Axial3D & Fast Radius Offer DICOM-to-Print Anatomical Model 3D Printing Service for Surgical Planning

We’re still in the midst of the COVID-19 pandemic, but it seems like there’s at least a small light at the end of the tunnel as businesses and services begin to open their doors once again. This is also a pretty important time for hospitals right now, since they are starting to perform surgical procedures again. Obviously, the crisis has created a pretty big surgery backlog, which is why Fast Radius and Axial3D are teaming up to create better 3D-printed anatomical models for surgical planning.

When it comes to surgery, using 3D printing in the pre-planning process has been proven time and again to be of tremendous value, as it can help save on costs, as well as decrease the amount of time a patient is on the operating table. It can help make the process more efficient, and the surgeon more confident, especially when dealing with complex cases.

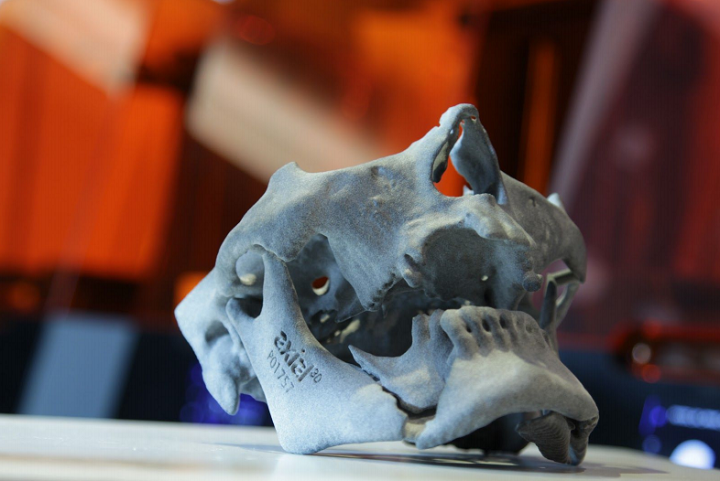
3D printed anatomical heart model. (Image credit: Materialise)

By using 3D technologies in surgical planning, clinicians can enjoy a higher standard of medical imaging, which enables them to have more insight into the unique anatomical details of different patients. Before they’re anywhere close to the operating room, the surgeons can hold 3D-printed anatomical models in their own two hands and take a much closer look at what they’ll be dealing with. Not only does this allow them to better define, and even practice, surgeries ahead of time, but patients can also handle the models in order to gain a better understanding of what’s going on in their bodies.

“The partnership between Fast Radius and Axial3D comes at a critical time for healthcare institutions. We are now able to support surgeons and hospitals in the US minimize the impact of COVID 19 as they endeavor to return elective surgery capacity,” explained Roger Johnston, the CEO at Axial3D.

Belfast-based healthcare technology firm Axial3D is focused on the global adoption of 3D printing in the healthcare industry, and its patient-specific 3D-printed medical models are award-winning. By partnering with Chicago-headquartered digital manufacturing solutions provider Fast Radius, clinicians all across North America will be able to make much more precise surgical plans than what 2D imaging can offer, according to the partners.

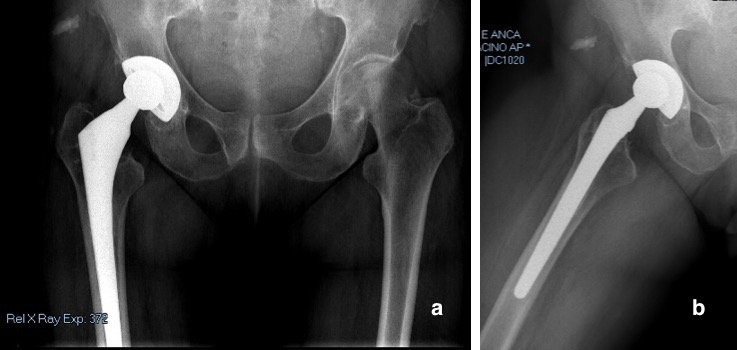
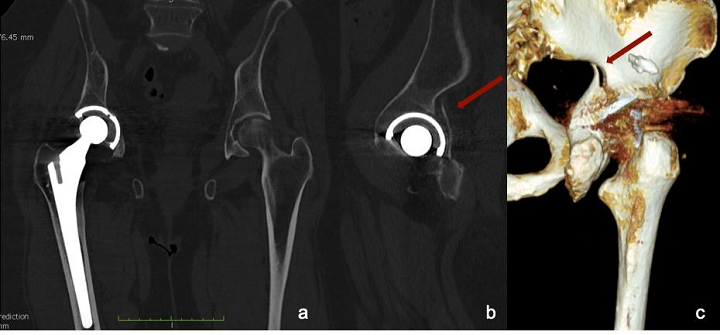
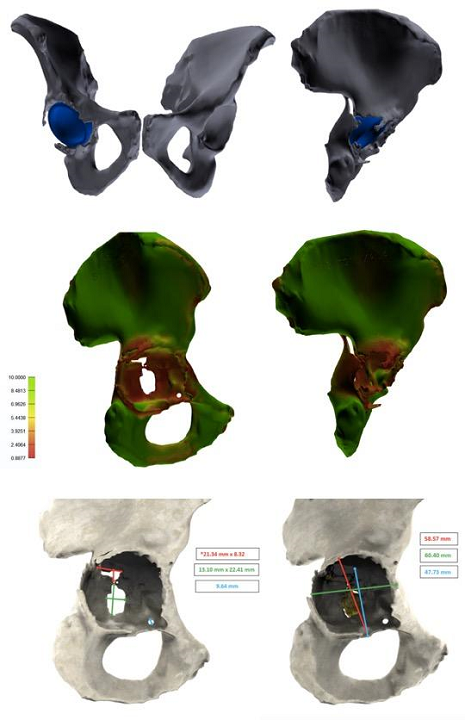
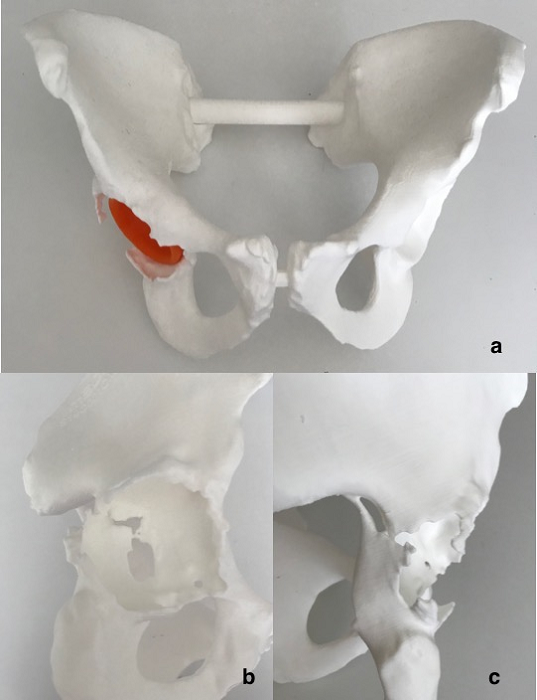
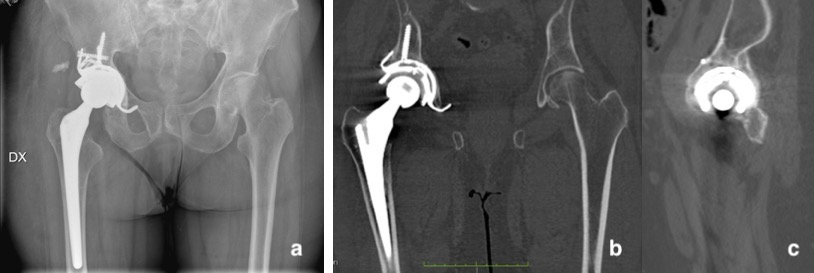
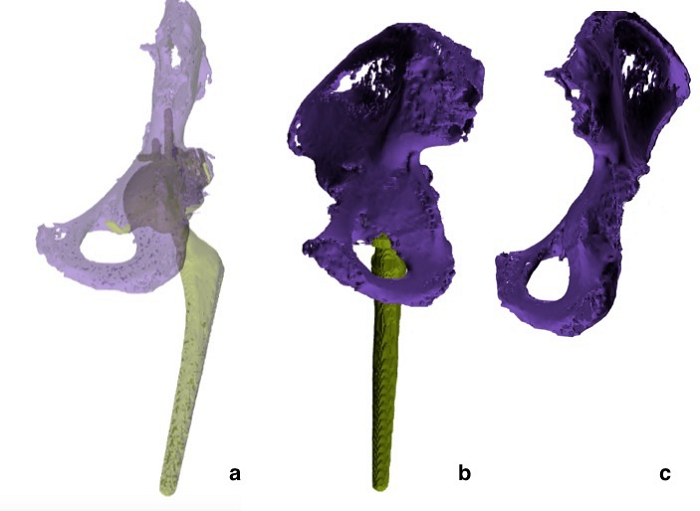
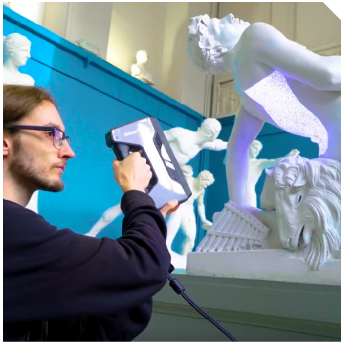
(Image credit: Axial3D)

Together, the two companies have developed what they consider a high-volume, high-quality DICOM-to-print service that will allow hospitals and surgeons in Canada, Mexico, and the United States to fabricate patient-specific 3D anatomical models, at high speeds, with an accuracy of micro-millimeters. They’ll use patient 2D scans to create the models, and once they’re 3D printed, they will be shipped to the hospitals within a minimum of 48 hours. How’s that for service?

“Our mission at Fast Radius is to help companies make new things possible that advance the human condition. Partnering with Axial3D to make these surgical models will have a great impact on patient care. It’s work we’re proud to do,” said Lou Rassey, the CEO at Fast Radius.

What do you think? Discuss this story and other 3D printing topics at 3DPrintBoard.com or share your thoughts in the Facebook comments below.

The post Axial3D & Fast Radius Offer DICOM-to-Print Anatomical Model 3D Printing Service for Surgical Planning appeared first on 3DPrint.com | The Voice of 3D Printing / Additive Manufacturing.

Mixed Dimensions & Mimaki Partnering to Bring 3D Printed Gaming Collectibles to the Market

Integrated reality and 3D printing technology startup Mixed Dimensions (Mxd3D) has announced a global strategic partnership with Mimaki Engineering Co., Ltd, a top company in the digital printing sector and developer of high-resolution, full-color 3D printing systems. The partnership will be focused on 3D printing and modeling services, as well as 3D software.

Mxd3D was founded seven years ago by Muhannad “Mo” Taslaq and Baha Abunojaim in Jordan, but is now headquartered in San Francisco, California. The company, which is backed by several top-tier venture firms such as Silicon Badia and Susman Ventures, started out as web-based software for 3D designers to upload their work and verify that their designs would come out correctly, and eventually established the leading GamePrint software platform and MakePrintable cloud-based 3D CAD file repair software as its core technologies.

3D printed Gods from Assassin’s Creed Origins (Image: Mixed Dimensions)

Both of its platforms make it easy for developers of digital intellectual property (IP), and specifically gaming companies, to create and provide 3D printed full-color versions of their important assets. Once someone places a request, the products are 3D printed in San Mateo, and can then be shipped to customers all over the world.

Mimaki is a leader in the industrial products, sign graphics, and textiles & apparel markets, and has already committed a significant amount of resources to its new partner, including an equity investment and some of its breakthrough, high-quality 3D printing hardware.

“Our experience working with Mimaki Engineering has been extraordinary,” stated John Vifian, Mixed Dimensions’ President and COO, in a press release. “Working closely together, we have unlocked manufacturing capabilities that were heretofore simply impossible, and what we have already achieved is only the beginning.”

Mixed Dimensions’ CEO Taslaq said, “Mixed Dimensions is building the merchandising factory of the future, to meet the growing global demand for personalized collectible objects.”

Mo Taslaq, Co-founder and CEO of Mixed Dimensions (Image: Mixed Dimensions)

Mr. Ikeda of Mimaki will be joining the board of directors at Mixed Dimensions, along with Taslaq, Pascal Levensohn of Dolby Family Ventures, Gilman Louie of Alsop-Louie Partners, two of the other venture firms which back Mixed Dimensions.

“We are very excited to welcome Ikeda-san as an independent director,” Tom Kalinske, Executive Chairman of the Mixed Dimensions board, said in the release. “Mimaki is the clear leader in full-color 3D printing, and we are proud to have them as a strategic partner and investor.”

The newly announced collaboration between these two companies will likely speed up the expansion and growth of the worldwide market in full-color 3D custom game collectibles, which have been increasing in popularity over the last few years.

What do you think about this? Discuss this story and other 3D printing topics at 3DPrintBoard.com or share your thoughts in the Facebook comments below.

The post Mixed Dimensions & Mimaki Partnering to Bring 3D Printed Gaming Collectibles to the Market appeared first on 3DPrint.com | The Voice of 3D Printing / Additive Manufacturing.

3D Modeling & 3D Printing Can Improve THA Diagnosis, Classification, & Surgical Planning

The Electronic Presentation Online System, or EPOS, is the European Society of Radiology‘s electronic database for scientific exhibits. A group of researchers published in EPOS about their work using 3D modeling and 3D printing tools to diagnose, classify, and carry out surgical planning for fixing periprosthetic acetabular fractures, which are a difficult, but common, complication of total hip arthroplasty (THA).

“Periprosthetic acetabular fractures are related to traumatic events and pathologic underlining conditions that reduce the structural integrity of supporting bone[1] and often are associated with aseptic loosening, periprosthetic osteolysis and severe bone loss[2],” the researchers wrote.

“Analysis based on standard radiographs alone are not suitable to reliably detect the residual stability of the implant and measure the extent of the fracture and pelvic bone loss [3].”

Fig. 1: (a) Anterior–posterior (AP) pelvis and (b) lateral view of right hip radiographs showed mild signs of periacetabular osteolysis without evidence of implant loosening and acetabular fracture.

They state that when it comes to defining a fracture pattern, CT scanning is “the gold standard,” which is definitely the case when a 3D virtual rendering is needed to help with surgical pre-planning.

3D modeling software based on CT scans allows clinicians to get precise images of “tridimensional reconstructions of the bony surface” by virtually removing metallic implants with segmentation. Other analytic tools include measuring remaining bone stock, evaluating implant stability, and characterizing the fracture, and 3D images can also be used to 3D print anatomical models for surgical planning and simulation purposes.

The researchers said their paper would show that bone quality and fracture morphology assessment can be improved with 3D modeling software, and reveal how useful 3D modeling and 3D printing are for the diagnostic process of periprosthetic acetabular fracture around THA, as well as making life-size models for pre-op implant templating, simulation, and sizing.

Fig. 2: CT scan of pelvis. (a) Coronal view shows slightly medially protruded acetabular cup; (b) sagittal view of the hip revealed posterior wall fracture of the acetabulum. The tridimensional reconstruction of the fracture is visible (c), but its extension is hidden by image artifacts.

They used the case of a 75-year-old woman who came to an ER after a domestic trauma incident. The patient had a history of severe coxarthrosis in her right hip, which had been treated a decade before using cementless THA. Doctors took AP radiographs of her pelvis, and a cross-leg view of her hip, and saw no signs of fracture or loosening around the acetabulum or the stem. However, a “CT scan of the pelvis with MAR protocol” showed that the posterior wall of the acetabulum did have a fracture, though the acetabular cup wasn’t displaced.

Materialise Mimics software was used to create a 3D digital model of the pelvis based on CT scan data. The bone was differentiated from surrounding soft tissue and the patient’s prosthetic implants through segmentation.

Fig. 3: Tridimensional images elaborated with 3D modeling software. (a,b) Entire pelvis with acetabular cup retained. Femurs and femoral stem were removed during segmentation. (c,d) Bone quality map shows regions with normal bone quality (green) and regions with low bone quality and thickness (red). (e,f) Measurements of the bone defect area and fracture extension.

“The first phase is thresholding, which includes all voxels whose density is within a specified range of Hounsfield Unit (HU) values. We used a mask with a HU range from 130 to 1750 in order to exclude metallic and ceramic implants and include both cancellous and cortical bone,” the researchers explained.

“The final segmentation, with the removal of soft tissues and artifacts, was manually performed using additional tools of the software (Fig. 3 a,b). Eventually, both femurs and metal implants were digitally removed from the corresponding pelvis and a 3D image of the isolated region of interest (ROI) was created.”

A bone quality map with a color gradient was used for the acetabulum, according to cortical and overall bone thickness of the various regions. Measures of the fracture’s area, shape, and spatial location were analyzed later, along with “the acetabular bone loss and the center of rotation, compared to the contralateral acetabulum.”

Finally, a life-size model of the patient’s entire pelvis was 3D printed on a Form 3L system.

Fig. 4: (a) 3D printed life-size plastic model of the entire pelvis. (b,c) Particular of the medial wall and posterior column fracture.

After analyzing the 3D images and the 3D printed model, they re-classified the posterior wall fracture as an incomplete posterior column and medial wall acetabular fracture. Additionally, the fracture was found to be “spontaneous,” with less than 50% loss of bone stock. Finally, the bone quality map determined global bone loss, showing poor quality in both the posterior and medial walls. The 3D printed model was also used to perform pre-op templating.

“The treatment strategy was chosen according to the algorithm proposed by Simon et al. [14, 15, 16], which suggest the acetabular revision surgery bridging or distracting the fracture, without fracture fixation,” the researchers explained.

Fig. 5: (a) Postoperative AP radiograph of the pelvis and (b,c) CT scan of the pelvis at 3 months post-op shows good implant positioning and complete fracture healing.

AP radiographs taken of the pelvis and right hip post-op showed that the implant was “well-positioned and fixed.” Three months later, a CT scan was taken of the patient’s pelvis, which showed “bone integration of the trabecular cup” and complete fracture healing “with callus formation.” A 3D digital model built using DICOM images confirmed this.

Fig. 6: 3D modeling digital reconstruction. The posterior column and medial wall of the acetabulum have been restored.

“The use of 3D modeling software showed that periprosthetic acetabular fractures can be better addressed, compared to plain radiograph and CT scans,” the researchers concluded.

“3D modeling software provide additional measurement tools which allow the volumetric analysis of bone defects and bone quality assessment.”

Discuss this and other 3D printing topics at 3DPrintBoard.com or share your thoughts below.

The post 3D Modeling & 3D Printing Can Improve THA Diagnosis, Classification, & Surgical Planning appeared first on 3DPrint.com | The Voice of 3D Printing / Additive Manufacturing.

3D Printing News Briefs: April 4, 2020

It’s the first 3D Printing News Briefs of the month! To start with, SelfCAD released a new update, and ACEO is hosting a webinar series about 3D printing with silicones, while Objectify Technologies and TAGMA India are hosting a webinar series about AM adoption. Finally, SHINING 3D and Scan the World are using 3D scanners to bring art and culture to people during a time when most can’t leave their homes.

SelfCAD 2.9.2 Release

SelfCAD has released its latest software update, SelfCAD 2.9.2, which improves upon existing features and adds new ones to make 3D modeling and printing more efficient. First, there’s a new Environment Map feature in the Settings dropdown menu that lets you add lighting and scenery to your model, and even an environment map. In advanced settings, the new Macro Preview feature lets you see the results of the macros you’ve added without having to finalize your choices.

You can set a Minimum Step Size for Drawing, Transformation, and Deformation tools, and apply several operations, such as Chamfer, Fillet, Round Object, and Simplify, to Profiles. In addition, SelfCAD has fixed some bugs, and added more settings and options to the Round Object tool. If you have any questions or bugs to report, you can join the SelfCAD Facebook group or email support@selfcad.com.

ACEO Presenting 3D Silicone Printing Webinar Series

Due to newly implemented health and safety measures during the COVID-19 pandemic, ACEO continues to be operational, but is unable to receive customers right now. So, in an effort to stay connected during these strange times, the company’s team of application specialists, design engineers, and material experts are presenting a series of webinars – in English – all about silicone 3D printing.

The first one, “ACEO Basics,” will be held Tuesday, April 7, from 9-9:30 CET, and Wednesday, April 8, from 4-4:30 CET. You can sign up for the webinars here; the event password is jVMGwgX$242. Future topics for the series, with dates not yet announced, are “Real Silicones,” “Design Freedom,” and “ACEO Use Cases.” Please email service@aceo3d.com with your name, company/organization, and country if you’d like to sign up. A modern browser (i.e. not Internet Explorer) is recommended to watch the webinars.

Objectify Technologies and TAGMA India Holding Webinars

As many people around the world are staying indoors and away from other people during the pandemic, it’s easy to get bored. But, you can spend your time in a productive way, which is why Objectify Technologies and TAGMA India are holding their own 3D printing webinar series together. The series, themed “3D Printing: Prototype to Production,” was created to promote adoption of and spread awareness about additive manufacturing. Webinars will begin on April 6th and go through April 14th, with topics such as Additive Manufacturing/3D Printing 101, Learnings and Misconceptions, and Current Challenges and Demand of the Industry.

“To help engineers around the world learn something new in this lockdown time, we have come up with a series of webinars on Additive Manufacturing (AM). The idea behind this webinar is to spread awareness regarding the AM technology and help companies in their journey towards industry 4.0,” said Ankit Sahu, Founder & Director, Objectify Technologies Pvt Ltd. “The objective is to encourage individuals ranging from students, researchers, and industrialist, on 3D Printing and the value it possesses for Industry 4.0.

“I thank Mr. DK Sharma, President TAGMA India and the entire team of TAGMA for their support. During this challenging time, it’s the collective effort that will help us all grow. Let us all do our bit to help the industry in skill development.”

3D Scanning to Build a Museum Without Walls

Continuing on in our list of things to do while stuck inside during the coronavirus crisis, SHINING 3D has been working with MyMiniFactoryto to digitize important artifacts for its Scan the World community-built initiative, which archives 3D printable sculptures and other culturally significant objects. Together, they are basically building a 3D museum without walls that anyone can access at any time and from anywhere. Many museums open their data with an open license  in 2D, but don’t have the necessary resources to do so in 3D. Scan the World founder and manager Jon Beck is offering museums a free end-to-end service of scanning the sculptures, with the EinScan Pro 2X Plus, before processing the data into 3D models and uploading them to the museum’s Scan the World profile.

“The quality is very nice for the price that you pay. Scanning is still quite a high-level-entry technology, but what SHINING 3D has been able to do is to create an accessible affordable product, which still produces very good results for a wide range of industries, for me working with sculptures I haven’t found any issues so far working with marble and plaster sculptures and even bronze sculptures. EinScan has been able to solve all of these problems for me,” Beck said.

“There is so much story behind every single artwork whether it’s an original or it’s a copy which is quite beautiful and so, working with each member of staff in the museum who want to tell a different story about their collection is great.”

Discuss these stories and other 3D printing topics at 3DPrintBoard.com or share your thoughts in the Facebook comments below.

The post 3D Printing News Briefs: April 4, 2020 appeared first on 3DPrint.com | The Voice of 3D Printing / Additive Manufacturing.

The Benefits of 3D Printing Architectural Concept Models

A concept model is crucial for being able to visualize an architectural structure as accurately as possible. Having a model makes it possible for every member of the team to be on the same page as well as allowing communication with clients in greater detail. Concept models have traditionally been made by hand by cutting out the shapes in paper, cardboard, foam-core or timber and it can take anywhere from days to weeks to complete a large context model. Many firms’ model shops have now been switching over to 3D printing to create their models instead for a number of different reasons.

Easing Communication Between Designers and Clients

When it comes to
communicating complex design ideas, the clients need to be able to fully
visualize what they are signing on for. If a design is overly theoretical or
technical that the client cannot fully understand it this could lead to
problems later on. 3D printing produces cleaner and more contemporary looking
tangible models with as much detail as possible and allows clients to make
informed decisions and give better feedback. It allows the client to more
directly visualize information like materials, colors and design elements.

Efficiently Testing, Editing and Refining Designs

Many times a model
needs to be reiterated a number of times to allow for alterations. Where the
typical process for producing a model takes time and can be quite expensive, 3D
printing the model makes it much easier to change the 3D design and then
rapidly create a new prototype within a couple of hours. This makes testing and
refining designs a much quicker process. Saving the designs also cuts time out
for future projects, if any of the information for previous designs becomes
useful again.

Improving Quality in Details and Materials

3D printing also
allows for an extremely high level of intricacy and details that are much more
difficult to produce by hand. Designers can use 3D printing to demonstrate
connections between structural elements (interlocking, overlapping, for
example) in multiple configurations to develop site plans in the most accurate
way possible. It is also easier to create more complex structural details like
domes and arches. 3D printers can use different materials for different aspects
of the models to further illustrate their concept. Some popular choices include
Nylon Plastic, transparent resin or metal. 3D printed models are much more
durable than paper or cardboard.

Extending 3D Printing to Prototypes and Specific Design
Elements

The usability of 3D
printing extends past full concept model making as well. Using a 3D printer, it
is possible to print concept models of specific parts of the buildings being
designed, like facades for different walls and other textures to further
illustrate design ideas. Parts can be 3D printed in full, but casts can also be
printed to create the prototype of a ceramic tile, for example, much easier and
quicker. Prototypes of the structure can then come to life long before the
build is complete.

When it comes to designing anything, especially such large scale entities like buildings or landscapes, 3D printing helps to streamline the process by visually communicating these ideas. Many architecture firms have begun acquiring their own desktop 3D printers to be able to produce models and prototypes quickly and at low cost. As 3D printing is still a relatively new technology there can be a learning curve in the transition to using it which makes outsourcing to specialized 3D printing companies like Shapeways a constructive alternative.

Shapeways offers consultations with 3D engineers to ensure efficiency and printability of the design in question at the highest quality, making the printing process as smooth as possible. Even as the use of desktop printers becomes easier it can be beneficial to outsource to printers like Shapeways who can deliver a specialized level of precision, print with a wider range of materials and guarantee efficiency in order to create top quality, high detail models for client showcases or trade shows. Creating models with as much detail and accuracy as possible is of the utmost importance not only for showing manufacturers but also for engaging clients.

The post The Benefits of 3D Printing Architectural Concept Models appeared first on Shapeways Blog.

8 Reasons Why 3D Modeling is in Demand in Architecture

3D modeling is increasingly used in various fields of human life and activity. For a long time, that technique has gone beyond the use of purely in the entertainment industry, although there it is still actively being introduced and improved. But not only games and animation are the main consumers of 3D models.

Today, more than ever, this technology is in demand in architecture and construction. And we will give you as many as 8 reasons for the popularity of 3D in these areas.

Reason 1: Realism

   Although the main drawings of any architectural structure are carried out in two-dimensional space, it is the 3D layout that allows us to evaluate their accuracy and compliance with the set goals, construction standards and utility. As a tradition, architectural design is the creation of textual and graphic documentation. Using three-dimensional modeling, the design process greatly simplifies and speeds up the creation of functional prototypes – as a result, the architect and the customer receive a functional prototype, the finalization of which takes a minimum of time and has maximum efficiency.

   For many years, architectural companies have been using CAD (Computer-Aided Design) to create projects. But if you need a model with maximum accuracy and detail, it is much easier to order it from a special company that is directly involved in the development of three-dimensional samples, including building a 3D model.

Reason 2: Speed

   When architects worked with paper, the time they needed to perform at least basic drawings and visualizations was very long. Building a 3D model using computer technology takes much less time, while it is almost impossible to make mistakes in the calculations.

   Now you do not need to delay the moment of presentation to the customer of your project – just use the finished model or order its production according to your references.

Reason 3: Detail Quality

    We already touched on this parameter in the first paragraph, but it is worth noting it separately: modern software in the hands of a skilled specialist allows you to achieve maximum compliance of details with customer requirements or the ideas of the designer. As a result, you get a ready-made layout that you can rotate in space to consider the quality of wall decoration, the interior, or even the decor pattern on the walls.

Reason 4: The Ability to Create a Full-Fledged Layout Based on the 3D Model

   Technologies are easily combined, and modern architectural 3D models can be embodied not only on a computer screen but also transferred to a completely tangible form. Get a three-dimensional image of your project and just print it using a 3D printer – the layout is ready! If your customers require you to visualize your idea, this is a great solution.

Reason 5: Possibility of a Good Study of Internal Zoning

   This reason is especially relevant for commercial construction. A full-scale model allows zoning the area with greater efficiency, “filling” the internal space of trading floors and galleries with goods and decor items, as well as “testing” the convenience of layout from the point of view of customers and employees.

Reason 6: Advertising

   If you initially set the task of promoting the projected project, whether it be an apartment building, a skyscraper or a future shopping center, it is the ready-made visualization in three-dimensional space that will help you with this. Use it in commercials, engage in promotional materials or present at architectural exhibitions and negotiations with investors – when a potential buyer sees exactly what he is going to pay his money for, his credit of trust in you will increase significantly.

Reason 7: Revision

    If you are trying to implement a building concept that exists only in the imagination of the customer, all ideas and concepts can easily be embodied in the primary model, the process of finalizing which in terms of functionality and aesthetics will take a minimum amount of time;

Reason 8: Money

   Ordering an architectural 3D model is always profitable because it allows you to save on several things at once:

• The painstaking manual work of a designer or architect, who will need to pay for difficult work.

• On making additions and reworking the order.

• On a separate development of layouts for the customer and advertising: a three-dimensional model can serve both here and there.

Three-dimensional technology rules the world. They show it realistically and in detail. This is especially noticeable in the example of the use of 3D models in architecture.

The post 8 Reasons Why 3D Modeling is in Demand in Architecture appeared first on 3DPrint.com | The Voice of 3D Printing / Additive Manufacturing.

The Top 10 SelfCAD Improvements of 2019

Let’s start 2020 with something positive – reflecting on the awesomeness of 2019. 2019 was a productive year for us at SelfCAD. We listened to your feedback, fixed bugs and other nasty things and improved most of our tools. We added a bunch of useful new features. Which one do you like the best?

Here are 10 SelfCAD improvements of 2019 graded by how much they added to your modeling experience. If you’d like to learn more, please visit our FAQ and the SelfCAD Manual.

#10 – Revolve tool can make objects with holes now

2018 Revolve tool closed all the holes. 2020 revolve tool doesn’t. You get the gist. We took a long, hard look at this tool, which creates a new shape out of revolving (for example) a plane. We realized it doesn’t make sense to automatically plug all the holes, and it sometimes makes creating the shape you want unnecessarily difficult. 

You can also revolve around any shape by selecting Revolve Around Edges/Profiles or even guides in the ‘Settings’ section. You no longer need to merge objects to revolve around them.

#9 – Snap Tool

Snap tool is another quality of life tool. You can use it to snap any shape to any location in the workspace. You can also use it to snap and collapse vertices. When used with ‘Remove Duplicate’ tool found in the Utilities section it will remove details in the vertices.

#8 – Drawing Tool Improvements

We’ve made a lot of changes to our drawing tool in 2019.

We’ve added smoothness to the text tool and real-time intersection. Real-time… what?

Before, when you drew something which has a hole in it, you were losing that hole after generating a 3D object from the drawing. Now, this tool creates a hole automatically if you indicate your object should have one!

Additionally, when you use the FreeHand Tool and set the height settings to zero, it will automatically create a profile.

#7 – Flatten, Inflate

SelfCAD added some crucial tools to your toolbox. Flatten and Inflate do exactly what it sounds like – Flatten makes the object gradually flatter, while Inflate will inflate the selected area like a balloon. Flatten is useful for quickly slicing a sphere, among other things.

#6 – Gear Generator

Our (relatively) new Gear Generator is located in the ‘3D Shapes’ category. No need to model your gears by hand, this flexible tool is here to save your time.

#5 – The Marquee Selection Tool

You can now select polygons by dragging your mouse.

If you drag towards the right, it will select only the included faces.  But if you drag towards the left you will select everything. We wanted selection to be as convenient as possible.

#4 – Part Selection Tool

This is a nifty tool that allows everyone to select specific parts of the model.

#3 – New Material Section ( including Shadows, Shininess, Light Sources and Targets )

In 2019 we added additional features to make SelfCAD models look even better while you model. You can now control shadows, shininess of the material, decide if the model is a light source etc. It will work even better with rendering!

#2 – Improved Slicer

The new and improved SelfCAD slicer, we’ve practically remade it. The new menu, more options than ever and you can now get you a preview of how your model will be 3D printed. Which is pretty neat, you have to agree.

#1 – Animation

In October, we added an animator to SelfCAD. It’s our first step to make SelfCAD a choice for every creator. 

When you click the record button, you can change the color, move or transform your 3D model to make a clip and then put these clips together to create something unique.

Up next: we are planning to add rendering in 2020 and a rigger in the future, making this feature feel more complete.

I hope you enjoyed reading this list – create your free SelfCAD account by clicking here.

The post The Top 10 SelfCAD Improvements of 2019 appeared first on 3DPrint.com | The Voice of 3D Printing / Additive Manufacturing.

Make a Textured 3D Model with Photos #celebratephotography

Click snake

From Eleccelerator:

Using Meshroom, an open source photogrammetry tool, I can process a bunch of photographs into a textured 3D model. I could use these models for 3D printing or as objects in a game engine.

Read more


Photofooter

We #celebratephotography here at Adafruit every Saturday. From photographers of all levels to projects you have made or those that inspire you to make, we’re on it! Got a tip? Well, send it in!

If you’re interested in making your own project and need some gear, we’ve got you covered. Be sure to check out our Raspberry Pi accessories and our DIY cameras.

LiDar and its Applications Part 4 – Agriculture

We have done a good background analysis on some of the building blocks of LiDar and how it can be applied to our environment so far. I am excited to talk about a field that is beyond my scope of understanding, but is essential to life. Let’s analyze how we use LiDar and 3D data for agricultural purposes.

Old school farming techniques are futile. When you have powerful machinery and technology such as drones and LiDar, a lot of the leg work is done for you. There are a number of major ways in which LiDar affects agriculture. Here are some of those affects:

  • Controlling or predicting Crop Yield
  • Crop Damage Analysis
  • Precision Agriculture
  • Land Mapping
  • Prevention of Soil Erosion
  • Land Segmentation
  • Crop and soil Analysis
  • Field Management

I will not drag you all as users with an in-depth overview of each sub category but I will focus on the following categories:

  • 3D Modeling
  • Precision Agriculture
  • Production Zones

Agriculture Mapping

3D modeling is a given when it comes to LiDar and the data it can capture. LiDar technology is vital for particularly modeling farmlands and it helps us to create accurate maps of natural resources around surrounding areas. This data allows a farmer to understand what type of terrain their farm is on. This allows for one to also understand the water catchment area of the land as well as the flow of erosion. A catchment area is a location in regions where water can collect from a higher area of land into a single body of water. These catchment areas are prone to drain water into other lower basins or into places such as a lake that have a closed body of water structure. This is all thanks to the data we collect from LiDar devices to map 3D terrain. Having these 3D models leads nicely into the next topic of interest.

Precision Agriculture

Precision agriculture is the preparation of a farm site with a goal towards improving the overall production capabilities of a site. This can lead to overall yields increasing tenfold within some land sites. Something to consider is the effect that precision agriculture may have on sustainability. If a farmer has knowledge about their land structure and how to best utilize it by building specific crops, one may have higher monetary returns as well as a better impact on the environment because the land is being used properly. Precision agriculture leads into our next topic of discussion, as this is a resultant from analyzing our land well.

LiDar is able to find specific areas of production that can lead to larger crop production and efficient usage of land. These production zones are specific to a piece of land and can be found by analyzing LiDar data. The data collected through this technology can help you select an area in a farm that is likely to flourish in terms of specific crops compared to other parts of the land. This is again a major factor in environmental sustainability and producing higher returns based on the land one has.

Discuss this article and more on the 3DPrintBoard or comment below to tell us what you think.

The post LiDar and its Applications Part 4 – Agriculture appeared first on 3DPrint.com | The Voice of 3D Printing / Additive Manufacturing.

Design Your Own 3D Model for Printing in CAD Software — All Online!

It’s the last week to sign up for 3DPrint.com’s online crash-course Design Essentials for 3D Printing starting October 23. Over one week, you’ll catch two live presentations from industry leaders followed by an interactive workshop. You’ll get step-by-step guidance to create your own 3D print model and learn design principles as well as the technical aspects that make a 3D design work. Whether you’re an artist or an engineer, this course will get you started on your 3D project.

Learn from these presenters:

Jordan Pelovitz, Senior 3D Artist, Wayfair

Session 1: Intro to 3D Printing Design

Date: Wednesday, October 23, 2019

11:00-11:45am ET

No experience required. Learn to think like a designer in this session, which includes an in-depth overview of ways to approach designing basic shapes for 3D printing, followed by a demonstration of Tinkercad, an easy-to-use 3D modeling program that allows you to turn your idea into a design for a 3D printer.

Aaron Breuer, founder and CTO of SelfCAD

Session 2: Developing Real Modeling Skills in 3D Print Design

Date: Wednesday, October 23, 2019

11:45am-12:30pm ET

Take the next step in 3D print design from basic shapes to real modeling. During this interactive, real-time demo, we’ll dive into the newest features of SelfCAD, a browser-based fully-featured 3D modeling and slicing software, that make designing shapes fast, easy, and fun. You’ll learn best practices on how to create an object from scratch with

  • 3D sketching
  • basic shapes
  • shape generator
  • and more!

We will guide you through a whole design-to-print flow within the lesson with SelfCAD.

Two Live Guest-Speaker Sessions + Online Workshop: What You Get

  • 90 minutes of key principles, case studies, and lessons, presented in two livestream sessions with Q&A. All live sessions  will be recorded and posted in the online classroom for on-demand access. 
  • A hands-on assignment to apply what you learn, shared in a small group workshop with one-on-one feedback from an industry expert. 
  • All live content will be recorded and posted in the online classroom for on-demand access.

Thank you to our Design Essentials for 3D Printing sponsor, SelfCAD, for the support.


The post Design Your Own 3D Model for Printing in CAD Software — All Online! appeared first on 3DPrint.com | The Voice of 3D Printing / Additive Manufacturing.