Digital Survey Technology & 3D Printing Used to Create Model of Ancient Mayan Acropolis

Located in the northern Petén Department of Guatemala near the Salsipuedes River, La Blanca is an ancient Mayan settlement, and one of its main archaeological focal points is the Acropolis, which was built as a residence for the city’s rulers during the Late Classical Period (AD 600-850). It consists of three buildings, two with thatched roofs and one with a soil layer, on a platform reached by a large staircase. Research into the settlement has been frequent over the years, which is why in 2010, a Visitor’s Center was built there as part of the La Blanca Project framework. Tourists receive support there, while locals have a good place to participate in cultural heritage workshops and view educational materials.

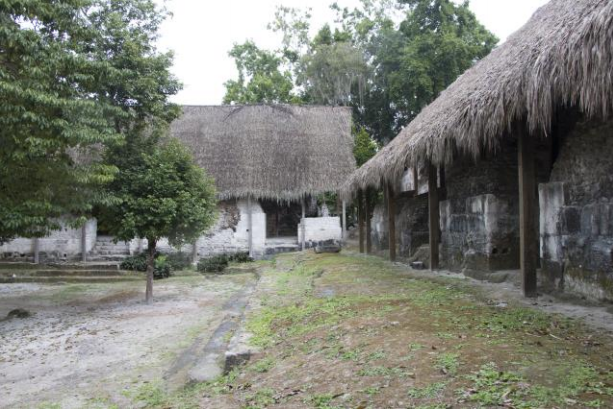
Southeast area of the Acropolis.

One thing it was lacking, however, was a scale replica of the Acropolis to use as a tool for the dissemination of Mayan architectural heritage. This would have been difficult to achieve before digital survey techniques, but 3D technology is changing how we document and preserve cultural heritage sites. A trio of researchers from the Universitat Politècnica de València (UPV) published a case study about using 3D printing for this purpose at La Blanca, and how the team was able to document the complex using digital survey technology “to obtain a high-fidelity model of the Acropolis’ buildings.”

The objectives were to improve the contents of the Visitor Center’s exhibition hall with a model of the Acropolis, perform an in-depth study of “all the procedures used to obtain the Acropolis reality-based model and propose a workflow that could be used in similar cases,” and test these resources for use in dissemination of Mayan history.

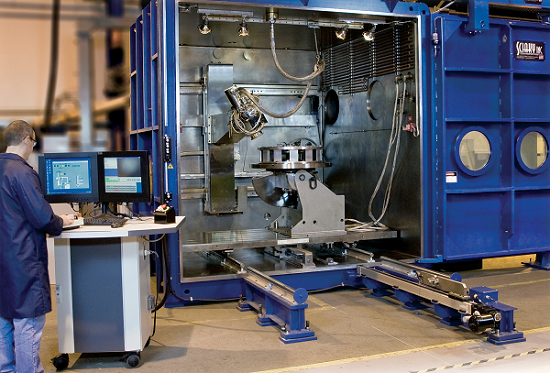
The project actually began in 2012 with a Faro Focus3D S120 scanner, which is a fast but compact Terrestrial Laser Scanner (TLS) that can provide efficient 3D measurements. Between 2012 and 2015, three digital survey campaigns were conducted at various parts of the Acropolis, for a total of 118 scans.

Acquisition Parameters and final Point Cloud Model

“Having acquired these scans, we carried out the point clouds registration in a laboratory and obtained the reality-based Point Cloud Model of the Acropolis,” the researchers stated. “This model showed a very high geometric accuracy and was useful for extracting 2D classic drawings and for obtaining 3D polygonal mesh models.”

It was important to create a methodology for reverse modeling of the Acropolis, which started with the laser scanning data.

“In general, it is possible to print 3D objects starting from a traditional 3D model that has been modeled directly (as in the case of the model of a building we are designing) or from a reality-based 3D model that has been obtained from real data acquired by laser scanning or by digital photogrammetry,” they explained.

Reverse modeling software can create a 3D polygonal mesh from a point cloud model, but the first mesh typically needs to be optimized to achieve a model with high enough quality that it can be 3D printed. Optimizing and building the 3D mesh model of the Acropolis was tough because there was a lot of redundant data from earlier scanning, and the highest parts of the wall lacked data, as “the thatched-roofs system caused occlusion areas,” but they managed.

“First, the 3D point model of the Acropolis was exported into .ptx format in 9 parts. Then, every section of the model was imported into the software 3D System Rapidform with a ¼ factor of reduction. In the same software, we built separately 9 different high-poly meshes,” they wrote. “The heterogeneous structure of the single 9 meshes was an additional problem caused by the higher or lower redundancy of data acquired in different field seasons.”

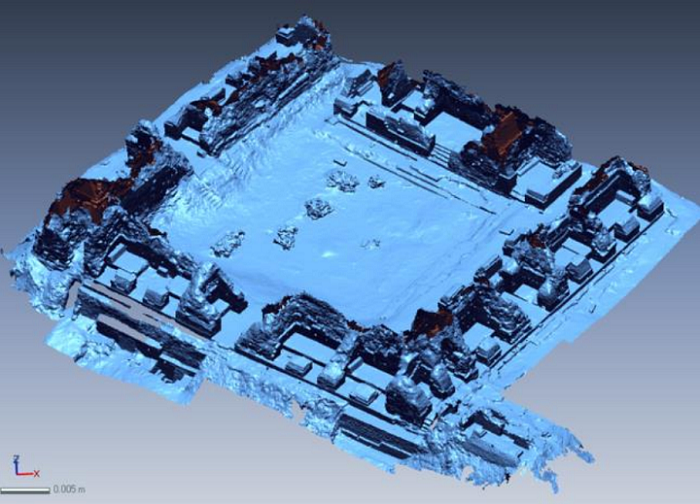
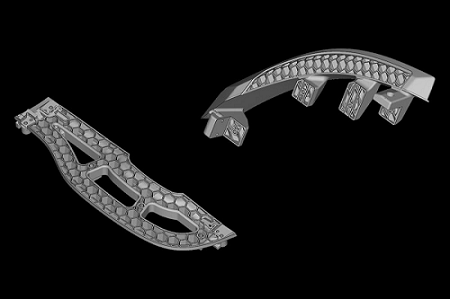
Reality-based mesh of the Acropolis.

They completed a “global re-meshing” of these nine to reduce the number of polygons in the final model and homogenize the average size of their edges, as well as their number and distribution. Then each mesh was processed separately to fill boundaries and negate topological errors, like overlaying or redundant polygons. Once all the meshes were combined, the team had a medium-poly model of the Acropolis.

They still needed to integrate the 3D model with these procedures, and turned to reverse modeling and other software tools to finish it. They completed a manual retopology of the model’s boundaries, which allowed them to obtain simplified contours; these were then used “as references for the direct modeling of the missing sections of the Acropolis.” They had to then homogenize the structures of both meshes using Luxology Modo and 3D System Rapidform, and then merged the meshes into one model.

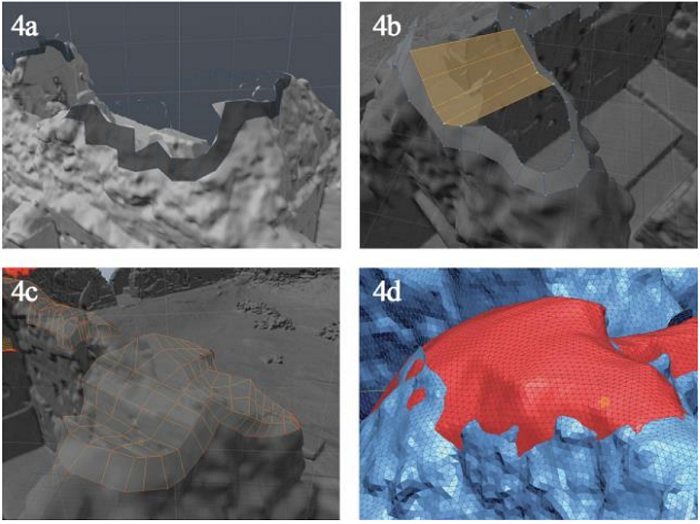
Integration of the model. 4a: Retopology of the boundaries; 4b: Direct modeling; 4c: Resultant mesh; 4d: Smoothing the mesh.

Maxon Cinema 4D’s sculpting tools were used to improve the model’s homogenization, which also “helped emphasize the difference between the reality-based parts of the model and the directly modeled surfaces that had been undetected by the laser scanner.” Finally, the terrain mesh was integrated with the help of a geometric modeling tool, and the 3D model of the Acropolis, “consisting of 6,043,072 polygons with a homogeneous structure over the entire mesh,” was ready to be 3D printed. The team did note a slight mesh deviation between one of the original high-poly meshes and the final model, but the FDM 3D printer they used could handle it.

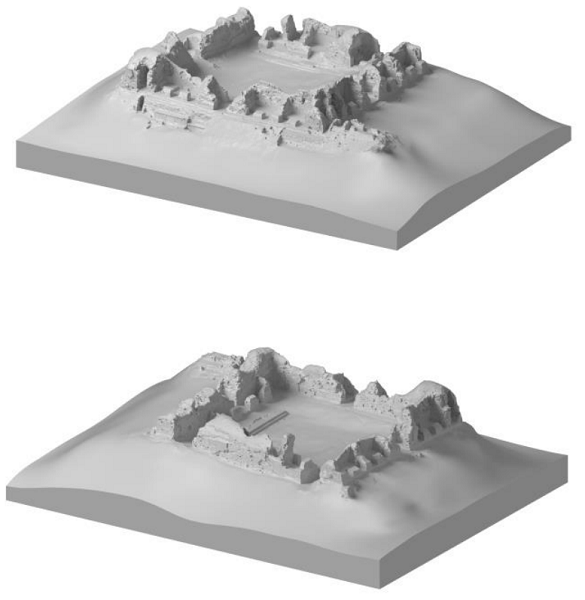
The final Acropolis model.

The team conducted a few print tests with different configurations and scales in order to select the proper settings before printing the entire model out of PLA, the results of which were very accurate when compared with the virtual 3D model.

“The missing parts of the Acropolis, undetected by laser scanner and then manually reconstructed, appeared to be perfectly integrated in the 3D printed version of the model and showed, at the same time, their diversity from the reality-based parts of the model,” the researchers wrote.

“From the analysis of these tests, we concluded that the representation of the Acropolis was satisfactory.”

The last test, with 1:100 scale and 0.3 mm accuracy, offered the best fidelity, so the team printed the Acropolis model with these parameters. It was printed in 17 different parts, as the final measurements of 90 x 70 cm were too large for the print bed; however, this ended up being helpful when it came time to transport the model to La Blanca. It was reassembled there, and sits in the middle of the La Blanca Visitor Center’s exhibition hall, protected by a transparent plastic dome, for all to enjoy.

Final 3D printed model of the Acropolis.

“Today, this physical replica of the Acropolis is an important resource that allows the visitors to have a complete view of the main complex of the site, which is not easy in the Guatemalan jungle,” the researchers concluded. “It also provides an exclusive view of some parts of the Acropolis, already studied by researchers and now protected with a soil layer to ensure their preservation. Moreover, it is a useful resource for supporting dissemination and also serves as a teaching resource for student visitors.”

The post Digital Survey Technology & 3D Printing Used to Create Model of Ancient Mayan Acropolis appeared first on 3DPrint.com | The Voice of 3D Printing / Additive Manufacturing.

HOOPS and Proplanner Combine 3D Model Data and PLM to Realize Industry 4.0

Oregon company Tech Soft 3D, with offices also in California, England, France, and Japan, is a provider of engineering software development kits (SDKS) through its HOOPS Platform, and offers other tools, like Polygonica and Siemens Parasolid, that help software teams deliver successful applications in additive manufacturing.

Now, the company has announced that Proplanner, a PLM-MDM (Manufacturing Data Management for the Product Lifecycle) solutions provider, will be using HOOPS to integrate 3D model data into its Assembly Planner for data management and desktop, mobile, and web product planning and visualization.

(Image courtesy of Proplanner)

Product data management (PDM) and product lifecycle management (PLM) are tools becoming increasingly adopted in the manufacturing world as means of more closely tying together various aspects of a production business. Rather than have disparate files, such as CAD and bill of materials, coming from disparate company departments, all of this data can be linked together, giving intended users access to all of the necessary information without having to manually contact each department to get specific data or files.

The Assembly Planner solution is used by manufacturing companies in a variety of industries, from automotive, aerospace, agriculture, and military to construction, medical device, electrical equipment, and academic. These manufacturers are often called on to fabricate complicated assemblies which are, according to a Tech Soft 3D press release, “often highly configured into customer orders.”

Users can work with Assembly Planner’s database to write and manage, in a secure location, their own manufacturing bill of materials (mBOM) and Bill of Process (BOP) routings. Then these companies can use the data to complete all sorts of helpful business tasks, such as auto-generating work instructions, balancing assembly lines, manage internal logistics, and complete time studies.

All of that is more complicated than it sounds. But by working with Tech Soft 3D and using its many SDKs, Proplanner can easily integrate 3D models into its Assembly Planner, and extract the underlying data. The company is using the HOOPS Platform to link process models and CAD models so that all of the data relates correctly.

“Linking the process model to the 3D model was the goal. We get a 3D model from one source, we get an eBOM from another source, which is the basis of our mBOM and we generate a BOP routing which consumes parts from that mBOM while visually manipulating the 3D model,” Proplanner’s President David Sly said. “Those three elements of the triangle (mBOM, BOP routing and 3D model) have to relate – and getting them to relate is really, really difficult when all three may be authored concurrently and independently for many variants, which is why most attempts in the past haven’t been successful.”

The HOOPS Platform has a lot to offer, like its HOOPS Communicator, a powerful but simple toolkit for creating advanced 3D web visualizations. HOOPS Exchange is meant to be a fast and accurate CAD data translation toolkit. It converts the source CAD file into an HSF or PRC format, and extracts detailed metadata, through a single interface, making it a simple workflow that negates the use of integration with PDM or PLM systems. HOOPS Publish enables applications to publish 3D data in multiple formats, including HTML, CAD, and native 3D PDF, and HOOPS Visualize is a graphics engine that can help teams create high performance applications.

Specifically, Proplanner is using HOOPS Communicator for the web version of its product, thanks to Tech Soft 3D’s HSF fast streaming format, while HOOPS Visualize is being applied for the Windows version. This collaboration has enabled the company to provide its customers with an easy-to-use workflow for bringing in 3D CAD models, without having to involve other systems. Working with the HOOPS Platform also means that Assembly Planner users can extract data from CAD models, easily visualize complex assemblies, and be the first to market with a way to solve a long-standing data management issue.

“3D is critical. 3D is what allows us to visually validate the process and generate shop floor instructions, but the knowledge that HOOPS Exchange is helping us extract from the CAD model is just as crucial. It helps us map the 3D model to the process, to convert the engineering change orders (ECOs) and engineering bill of materials (eBOMs) into manufacturing bill of materials (mBOMs), and associated process routings,” explained Sly.

“Some customers have tried to get this information to match up for decades and failed. The problem was that there was no way to easily reconcile the variances between a CAD model that might have thousands of parts with the other documents and data sources. Thanks to Tech Soft 3D, we’re at a point technologically now where customers can extract the data from many different CAD formats, and reconcile it against eBOMs and mBOMs and other data sources. The underlying technology from Tech Soft 3D is enabling all this information to finally come together.”

HOOPS Exchange allows development teams to easily build robust CAD data translation capabilities into their application, while HOOPS Visualize and HOOPS Communicator allow those 3D models to be visualized, on desktop and the web.

The use of PLM and PDM are increasingly considered necessary tools for the further digitization of manufacturing and realization of Industry 4.0. With 3D printing and other digital fabrication techniques thought of as the means for realizing 3D designs, PLM and PDM are now thought of as the software solutions for ensuring a continuous thread throughout the design-to-production process. For this reason, tools like Proplanner will gain greater importance in the world of 3D printing, just as 3D printing will gain greater importance in manufacturing overall.

(Images courtesy of Tech Soft 3D unless otherwise stated)

The post HOOPS and Proplanner Combine 3D Model Data and PLM to Realize Industry 4.0 appeared first on 3DPrint.com | The Voice of 3D Printing / Additive Manufacturing.

Logitech and Realize Medical Partner to Enhance Medical VR

Canadian medical virtual reality (VR) startup Realize Medical has announced a collaboration with Logitech, a renowned Swiss-based manufacturer of computer accessories and software. The partnership is designed to enhance Realize Medical’s Elucis, the world’s first platform for building patient-specific 3D medical models entirely in VR, by integrating Logitech’s enterprise-focused VR Stylus, enabling users to draw medical models precisely and directly in the program.

Through this new joint effort, Realize Medical will take the Elucis platform’s medical image viewing, modeling, and communication capabilities to the next level by combining novel 3D visualizations with the familiar and intuitive input of a hand-held stylus on a writing surface. Based entirely on VR, Elucis lets users turn medical images into 3D medical models with ease for 3D printing and other advanced visualization applications. While Logitech’s VR Ink Pilot Edition stylus, released last December, offers a more natural and precise input modality for a handful of art and design-focused VR tools. Together, the software and the pen will open new capabilities and improve usability.

“We are constantly on the lookout for innovative ways to improve our Elucis platform, and this partnership with Logitech does just that,” said Justin Sutherland, CEO and co-founder of Realize Medical. “Giving users the ability to draw seamlessly within our program will greatly improve the user experience, bringing us closer to meeting our mission of providing healthcare professionals with the 3D modeling tools they need to improve patient care and education.”

It takes a long time to make 3D anatomical models on 2D platforms, which is why Sutherland and Dan La Russa, Realize co-founders and medical physicists at the Ottawa Hospital, in Canada, began looking for a way to make the whole process easier. In 2017. they began working on creating a VR platform to help clinical physicians make 3D models faster, and in January of 2019, they took their work to the next level by creating a medical VR startup as a spin-out company out of the Ottawa Hospital.

Combining Logitech’s VR Ink Pilot Edition stylus with Realize Medical’s Elucis software to create 3D models (Image courtesy of Realize Medical)

Two-dimensional imaging, such as computerized tomography (CT) scans or magnetic resonance imaging (MRI), has been around since 1972. Although the resolution of the images has improved, it remains relatively the same technology with physicians still using the “slices” shown on 2D images for educational purposes and diagnosing patients. But even though medical imaging data represents 3D structures and can be turned into tangible physical 3D models, Realize Medical believes that many clinical settings and private companies are still relying on 2D tools to create 3D models, which is time-consuming and tedious. Instead, Elucis is expected to provide surgeons and healthcare professionals with a radically new way to create 3D medical content, much quicker and accurately.

The patent-pending input method lets users draw, measure, and annotate directly on any given view of an image, allowing for the creation to “materialize” in front of the user, offering the ability to work on it, hands-on. Thanks to intuitive hand motions and true 3D visual cues Realize Medical developed an image navigation tool that unlocks medical images and can even construct and edit 3D structures from 2D contours. 

Realize Medical’s Elucis software will help the healthcare field create 3D models (Image courtesy of Realize Medical)

This new collaboration is the latest in a breakthrough trend of VR and 3D medical modeling aiming to change the future of healthcare. According to the startup, virtual reality can play a variety of important roles in healthcare and medicine, and the Elucis platform, in particular, can act as a clinician’s education and training tool, help with patient-specific planning, have the potential to guide treatment decisions, and much more. The company founders consider that shortly conventional monitor displays will be replaced by modern mixed reality tools like VR, augmented reality (AR), and medical 3D printing. To that end, the partnership continues to upgrade the technological platform offering user-friendly tools to healthcare experts. 

Innovation in healthcare through 3D printing has led to the development of new applications. With hospitals and clinical settings looking to incorporate new ways to create medical models and devices in-house, the demand for technologies that can change the status quo continues to grow. In the last years, we have seen many healthcare institutions working together with researchers, startups, and companies to create bespoke clinical products, from surgical guides to patient-specific implants and 3D printed anatomical models, that can improve patient experience and surgical planning, as well as reduce operating time and costs. The role of mixed VR and 3D printing technologies is shaping up to be a staple for modern healthcare applications, as key development to advance the medical field.

The post Logitech and Realize Medical Partner to Enhance Medical VR appeared first on 3DPrint.com | The Voice of 3D Printing / Additive Manufacturing.

3D Printing News Briefs: December 26, 2019

For your holiday edition of 3D Printing News Briefs, we’ll get business out of the way first – Wipro 3D has launched Addwize, a new Additive Technology Adoption and Acceleration Program. Moving on, Prusa interviewed animatronic model senior designer Joshua Lee about their shared interest in 3D printing. Finally, Voodoo Manufacturing helped an artist bring her 2D artistic vision to full-sized 3D life.

Wipro 3D Introduces Addwize Program

Scale vendors: Foundation – blue; Advanced – green; Practitioner – orange

Additive manufacturing solutions provider Wipro 3D, a business of Wipro Infrastructure Engineering, has launched a new Additive Technology Adoption and Acceleration Program called Addwize, which will address all the phases in the AM adoption cycle within academia and industry. The multi-platform, OEM-agnostic adoption program will help interested organizations and institutions fully understand 3D printing, evaluate business cases for the technology, and then scientifically use it to create value. It’s designed to help stakeholders of all levels, and academia, adopt and scale their usage of AM for business benefits.

“Wipro 3D addwize™ is designed and developed to support any organization or institution who is either evaluating metal Additive technology, has AM in their near future technology roadmap or has already invsted in AM, create business value using metal AM,” said Ajay Parikh, Vice President and Business Head, Wipro 3D.

“There is no lower or upper limit to the size of the organization who wants to evaluate AM.”

Prusa Interviews Animatronic Model Designer Joshua Lee

Not too long ago, the Research Content Team at Prusa met award-winning animatronic model senior designer Joshua Lee in Prague, who has over 25 years of experience in the film industry working on such movies as Prometheus, The Fifth Element, and even the Star Wars and Harry Potter series. The team took advantage of the opportunity to speak with Lee about a topic near and dear to all their hearts – 3D printing, which he uses often in his work.

“We use a lot of different techniques of 3D printing in the filming industry,” Lee told Prusa. “We only really adopted it in the last 5 years. I am really using it a lot now.

“The thing I like the most is how 3D printers help when you have really tight deadlines. The film director has a new idea and you just wish there were more hours in a day. We used to do a lot of “all-nighters” to get things made. If you’ve got your own 3D printer, you can design something quickly, press print and you can go home to bed – that’s the best thing! In the morning, you are up and running again and this amazing print awaits you there. I still get a small thrill, every time I come in and see this thing that has magically appeared there overnight.”

To hear more of what Lee had to say about the materials he uses (PLA and PETG), his preferred desktop printer (Original Prusa MK3), and specific Star Wars-related projects he used 3D printing for, check out the rest of the interview in the video below:

Voodoo Manufacturing Assists with 3D Printed Art Installation

Back in 1976, artist Agnes Denes created a 2D art piece called Probability Pyramid – Study for Crystal Pyramid, and has long since dreamed of turning into a life-size installation. In early 2019, her dream seemed like it would become reality when NYC-based art space The Shed began working with her on the project. The team didn’t have much luck with acrylic, glass, or mold injection, and so turned to Brooklyn’s Voodoo Manufacturing for assistance. There were a lot of requirements for the project – the Pyramid required several groups of bricks in unique sizes and shapes, totaling 5,442 translucent bricks that could be stacked to easily transport and form the pyramid; Voodoo 3D printed bricks that were 99% hollow, so they were less breakable and very lightweight.

“A lot of traditional manufacturing happens abroad. Because Voodoo’s factory is in Brooklyn, the team at The Shed would have an easier time accessing the parts as the sculpture was built. By the same token, as part of her commitment to environmental responsibility, it was very important for Agnes Denes to keep the production local,” Voodoo explained.

“The use of 3D printing was much more in line with her vision than traditional sculpture construction methods. This also allowed us to test multiple versions of the Pyramid digitally instead of having to build many physical versions.”

Thanks to Voodoo’s digital factory, the exhibition Agnes Denes: Absolutes and Intermediates opened on time. The retrospective, which features the 3D printed installation, will be displayed at The Shed until March 22, 2020.

Discuss these stories and other 3D printing topics at 3DPrintBoard.com or share your thoughts in the Facebook comments below. 

The post 3D Printing News Briefs: December 26, 2019 appeared first on 3DPrint.com | The Voice of 3D Printing / Additive Manufacturing.

Let’s Kill Thingiverse?

If you are a 3D printer operator you probably have noticed that Thingiverse sucks at the moment. After being asked to write about it I decided to grab the bull by the horns and reached out to Makerbot. I asked them if I could buy Thingiverse. Sadly they weren’t interested in selling it to me.

For a long time, I thought that Thingiverse was the smartest thing in 3D printing. One central file repository for the entire 3D printing community, what a brilliant idea! Open source ideas and files could be exchanged for free by anyone. We could all work together to make all of the things better. In my idealism, Thingiverse could become the one tool that would let us all stand on the shoulders of giants. When the Makerbot team started to patent things its community had made and subsequently turned its back on open source, Thingiverse took a hit. A select few had ridden the open-source popularity wave and essentially used to the community for their own gain without giving back.

No longer loved, the platform still has an unassailable lead in files though. Dozens of other platforms imitated Thingiverse but none manage to come anywhere near its installed base. Even with an Autodesk Instructables plugging at the problem Thingiverse still remains the largest by far. Because it has the most users and the most files it has inertia and people keep publishing on it. Yes, you could try Pinshape, Youmagine or Minifactory but you’ll still get the most downloads, comments, and attention on Thingiverse. Yes, of course, you can search on other repositories but more things will still be on Thingiverse. Even users who by now don’t like the platform still use it very often. Thingiverse has become like a tax on 3D printing. Thingiverse has over two million registered users and has had more than 340 million downloads.

After Stratasys bought Makerbot the firm invested in Thingiverse, making an education version, an improved API, integrations with others, upload tools and adding functionality. For the past year however it been awfully quiet on Thingiverse. Thingiverse chugs along but kind of like the Flying Dutchman sailing the oceans without a crew doomed to continue a never-ending journey. Some social media accounts haven’t been updated for months. Spam and other undesirable content continue to at times not be moderated. Load times have gone to a few minutes per page and the site has had bugs that seem to not be solved for months. Log in issues took a long time to be resolved. There have been continuing issues with the renderings not displaying. A photo upload issue has not been resolved. The site has a lot of time outs and crashes. Lately, it seems to be getting worse. The site is at times painfully slow and you get a lot of errors when using it.

Meanwhile, it looks like some people are crawling and indexing Thingiverse, perhaps to use its data to start new competitors. This will negatively affect the performance of the site and will hasten its end. Rumors persist that the site has only one staff member assigned to it. It feels forlorn and unloved. So what do we do about Thingiverse? It seems that there would be a few options.

  1. Make Stratasys Love Thingiverse. Even though Stratasys interest is squarely focused on the enterprise Thingiverse’s installed base and way of sharing files could be a huge boon for open source and education. Thingiverse could become ad-supported to generate enough cash to survive in a cost-neutral way. With some ad revenue, a small team could keep up maintaining this huge and key 3D printing property.
  2. Get Makerbot to invest more in it so that the site becomes more reliable. Boring but probably the easiest option.
  3. A coup de grace. Kill it off. It continues to chug along and maybe we should put it out of its misery in order to let us focus our attention on other competing websites.
  4. Crowdfund Buying or Restarting Thingiverse. We get together, form a foundation and then try to crowdfund a new Thingiverse or buy the old one from Stratasys. The foundation affirms its open-source principles and tries to use ads to stay afloat and improve the site.
  5. Encourage someone to buy and invest in Thingiverse. I certainly see the long term value of this shared utility that is Thingiverse, maybe a start-up or established firm could also see this?
  6. Continue this stumbling around in the dark like a lazy zombie bore-apocalypse and do nothing.

What do you suggest?

We reached out to Makerbot and they got back to us saying,

“As the largest database for 3D print designs, Thingiverse sees a high volume of traffic on a daily basis, and continues to grow regularly with new users. We understand the frustrations and limitations to the current site, and are making much-needed updates and enhancements to ensure that users have a smoother and better site experience.
“We are redesigning the website, which should address the latency issues, and fixing the backend to address the underlying issues. Over time, we will also be updating other site features. We remain committed to Thingiverse and the 3D printing community, and will continue to make site improvements as needed.”
I’m encouraged that the Makerbot team acknowledges that there are issues with the site. What do you think, will the team fix all of the issues and give Thingiverse a place in your heart and hard drive again?

The post Let’s Kill Thingiverse? appeared first on 3DPrint.com | The Voice of 3D Printing / Additive Manufacturing.

3D Printing Strikes A Chord in Preschooler Music Education

In ‘Digital Fabrication: 3D Printing in Preschool Education,’ Federico Avanzini, Adriano Baratè, and Luca A. Ludovico explore the connection between 3D printing and the classroom through preschool music lessons. While music lessons act as the vehicle to show the level of educational value, the researchers use it to present a rich example, beginning by pointing out how important music education is to preschoolers—and featured in numerous research studies previously.

There are links found between better spatial-temporal reasoning, along with early reading skills. Other recent studies have shown that preschool children have ‘implicit harmonic knowledge’ with broad potential. The authors examine cognition, and especially as it is derived from the sensorimotor function—with preschoolers offering ‘paradigmatic examples.’ Smaller children learn through ‘perception-action in the environment,’ along with enjoying information arrived at from other senses too.

“It is often difficult to distinguish between exploration and play: during the sensory-motor development, very young children need to explore first to be able then to proceed to playful behavior, which is one of the most important activities for their development; by playing, children start to explore the world and to acquire and master new skills which can be vital for them,” explain the authors, along with reminding us of the importance of ‘open-ended’ nature in interactions, as kids are able to create new ways to play with an object—delighting in their discoveries.

While 3D printing has much to offer, preschoolers tend to lack the required modeling skills for creating parts and prototypes. Today, there are numerous different software programs developed precisely for preschoolers, allowing them to design and fabricate small items. In designing a 3D printing education, however, the authors realized some complications due to accessibility and affordability, along with space for hardware to be kept. They were also concerned that lack of suitable materials could be an obstacle too.

A raw 3D model of a mouthpiece

“Nevertheless, 3D printing offers relevant opportunities of young music learners, allowing them to build low-cost and customizable didactic objects,” state the researchers.

Providing a library of models is helpful to preschoolers—along with some designs they can begin customizing. Simple models can also be a great way for parents and new tutors or teachers to learn about 3D design and 3D printing. Examples might include everything from sounding objects to actual instruments. There may be percussion toy instruments, miniature xylophones, marimbas, and more.

3D models of musical instruments obtained by the extrusion of 2D shapes

“Even if a scaled model of a complex musical instrument can be hard to find, simplified 3D shapes can be easily obtained by extruding 2D contours without affecting the efficacy of the didactic experience,” stated the researchers. “Besides, 3D-printed objects can foster an early learning of organology, i.e. the science of musical instruments and their classification, including technical aspects of how instruments produce sound.”

The corresponding printed objects

Kids may also be drawn to more alternative educational fun like 3D printing action figures playing their instruments together. Such models could be challenging to find, but they encourage children to enjoy role models playing music, and especially in 3D printed or figurine form. Scale models and figures can be easily re-sized in 3D printing, and different materials can also change the way an item looks significantly.

They also included a case study regarding common western notation (CWN), a method for encoding notated music, as well as the concept of the piano-roll model where details like pitch and timbre are linked to 2D geometric shapes and more. 3D printed solid blocks can be created and placed on a baseplate. Ready-made blocks should help children link shapes to music parameters.

The role of the teacher/tutor is key as they assist in 3D design and 3D printing, guiding the young users, and challenging them to learn.

“Examples of didactic activities may include the recognition of musical instruments and their subparts, the exploration of sound generation techniques, the design and fabrication of sounding objects, and the investigation of alternative forms of music notation,” said the authors.

“For future work, we are planning to further investigate these proposals and implement them as learning practices to be experimented and assessed in preschool and out-of-classroom contexts.”

The momentum 3D printing has in education today is fascinating—not only due to the enthusiasm obviously experienced within the classroom, from innovations being created like prosthetics to online learning for 3D metal printing, to vocational schools engaged in SLS printing.

What do you think of this news? Let us know your thoughts! Join the discussion of this and other 3D printing topics at 3DPrintBoard.com.

[Source / Images: ‘Digital Fabrication: 3D Printing in Preschool Education’]

The post 3D Printing Strikes A Chord in Preschooler Music Education appeared first on 3DPrint.com | The Voice of 3D Printing / Additive Manufacturing.

French Researchers Develop Algorithm to Generate Interior Ribbed Support Vaults for 3D Printed Hollow Objects

Hollowed Bunny printed with our method, using only 2.2% of material inside (compared to a filled model). The supports use 316 mm of filament over a total of 1,622 mm for the print).

In 3D printing, every layer of material must be supported by the layer below it in order to form a solid object; when it comes to FFF 3D printing, material can only be deposited at points that are already receiving support from below. French researchers Thibault Tricard, Frédéric Claux, and Sylvain Lefebvre, from the Université de Limoges (UNILIM) and the Université de Lorraine, wanted to look at 3D printing hollow objects, and proposed a new method for hollowing in their paper “Ribbed support vaults for 3D printing of hollowed objects.”

The abstract reads, “To reduce print time and material usage, especially in the context of prototyping, it is often desirable to fabricate hollow objects. This exacerbates the requirement of support between consecutive layers: standard hollowing produces surfaces in overhang that cannot be directly fabricated anymore. Therefore, these surfaces require internal support structures. These are similar to external supports for overhangs, with the key difference that internal supports remain invisible within the object after fabrication. A fundamental challenge is to generate structures that provide a dense support while using little material. In this paper, we propose a novel type of support inspired by rib structures. Our approach guarantees that any point in a layer is supported by a point below, within a given threshold distance. Despite providing strong guarantees for printability, our supports remain lightweight and reliable to print. We propose a greedy support generation algorithm that creates compact hierarchies of rib-like walls. The walls are progressively eroded away and straightened, eventually merging with the interior object walls.”

Figure 2: A Stanford bunny model is hollowed using a standard offsetting approach. The resulting cavity (R) will not print properly due to local minima (red) and overhanging areas (orange).

While most people think of 3D printing supports as external ones that support overhanging parts of an object, the interior of an object may also need support structures.

“Hollowing a part is not trivial with technologies such as FFF,” the researchers explained. “In particular, the inner cavity resulting from a standard hollowing operator will not be printable: it will contain regions in overhang (with a low slope, see Figure 2) as well as local minima: pointed features facing downwards. There is therefore a need for support structures that can operate inside a part.”

Inner supports should occupy a small amount of space with the print cavity, and the impact on overall print time should be slight. Other researchers have contributed a variety of ideas in terms of support structures with 3D printed hollowed objects, including:

  • sparse infills
  • self-supported cavities
  • external supports as internal structures

“We propose an algorithm to generate internal support structures that guarantee that deposited material is supported everywhere from below, are reliable to print, and require little extra material,” the researchers wrote. “This is achieved by generating hierarchical rib-like wall structures, that quickly erode away into the internal walls of the object.

“Our algorithm produces structures offering a very high support density, while using little extra material. In addition, our supports print reliably as they are composed of continuous, wall-like structures that suffer less from stability issues.”

Hollow kitten model printed with our method and split
in half vertically.

The researchers explained how to support a 3D object by “sweeping through its slices from top to bottom” and searching for any unsupported parts, then adding necessary material below them in the next slice; this material doesn’t need to cover the entire unsupported area, and can take any shape.

“The amount of material added can also be larger than the area needing support. Depositing more material than necessary comes at the price of longer printing times, but can be interesting to significantly improve printability,” the researchers explained. “Large, simple support structures often are faster to print than complex, smaller structures. Indeed, when multiple disconnected locations need to be supported, it is in many cases more effective to print a single, large structure. It encompasses and conservatively supports many small locations. This is more effective than supporting isolated spots, which individual support size may be very small and therefore difficult to print, and which will inevitably increase the amount of travel and therefore print time (taking nozzle acceleration and deceleration into account).”

The team then explained their algorithm for ribbed support vault structures. The idea is to use three main operations to produce supports: propagating and reducing supports from the above slice, detecting areas that appear to be unsupported in the current slice, and adding the supports needed for it.

“Our inspiration comes from architecture, where supports are generally designed in an arch (and vault) like manner. In particular, vaults tend to join walls in any interior space, with only a few straight pillars directed towards the floor. Similarly, many vault structures present hierarchical aspects. Such hierarchies afford for dense supports while quickly reducing to only a few elements – much like trees,” they wrote.

“Within each slice we favor supports having a rectilinear aspect: they provide support all around them while eroding quickly from their ends. Thus, within a given slice, we seek to produce rectilinear features covering the areas to be supported.

“We propose to rely on 2D trees joining the object inner boundaries. Through the propagation-reduction operator, the trees are quickly eroded away (from their branches). Taken together across slices, the trees produce self-supported walls that soon join and merge with the object inner contours, much like the ribs of ribbed vaults.”

The team 3D printed a variety of PLA models with the same perimeters on different systems. Orange models were fabricated on an Ultimaker 3, while the yellow Moai was printed on an Ultimaker 2 and the octopus on a CR-10. A Prima P120 was used to make white models, the blue Buddha was printed on an eMotion Tech MicroDelta Rework, and a dual-color fawn was made on a Flashforge Creator Pro.

Demon dog printed using our method for external support.

The quality of these prints matches models with a dense infill, thanks to the full support property offered, and the algorithm generates multiple small segments that require individual printing, which led to many “retract/prime operations surrounding travels.”

“Depending on the printer model used, the quality of the extrusion mechanics, the user-adjustable pressure of the dented extrusion wheel on the filament, as well as the brand of the filament itself, a small amount of under-extrusion may happen,” the team explained.

“To compensate for this, we perform a 5% prime surplus at the beginning of each support segment: if the filament was retracted by 3 mm before travel, we push it back by 3.15 mm after travel. Because the extra prime may create a bulge, we avoid doing it when located too close to perimeters, so as to not impact surface quality.”

The team also evaluated how much material their method needed, and compared this with materials used for iterative carving and support-free hollowing methods. They also noted how layer thickness impacted support size, and recorded processing times.

Comparison with Support-Free Hollowing and Iterative Carving. The input volume represents the volume (in mm3) and height (in mm) of the model.

“While producing supports of small length, our algorithm is clearly not optimal. This is revealed for instance on low-angle overhangs,” the team wrote. “The inefficiency is due to the local choice of connecting support walls to the closest internal surface, ignoring the material quantity that will have to appear in slices below. While a more global scheme could be devised, it could quickly become prohibitively expensive to compute.”

The researchers concluded that their algorithm ensures complete support of deposited material, which can be helpful for extruding viscous or heavy materials like concrete and clay. They believe that their method for 3D printing hollowed objects through generating ribbed internal support structures could one day lead to novel external support structures as well.

Discuss this and other 3D printing topics at 3DPrintBoard.com or share your thoughts below.

Caterpillar Is a Powerful Rhino Grasshopper Plug-in for Greater Customization in 3D Printing

Bio-inspired 3D printings by (Zheng and Schleicher 2018)

Whether you are a serious 3D printing user or not, you have probably heard of Grasshopper, a popular add on of 3D modeling software Rhino. Grasshopper lets you use scripts and algorithms to create 3D models and generative designs. It is one of the quickest ways through which designers can get started with generative designs and lets you in a visual build things such as parametric designs or designs based on datasets. You may not yet be familiar with other features, however, recently outlined by University of Pennsylvania’s Hao Zheng in ‘Caterpillar – A GCode Translator in Grasshopper.’ Here, we learn more about a new plug-in Caterpillar and its ability to unleash full use of the three degrees of freedom of Computer Numerically Controlled (CNC) machines and non-traditional 3D printing. Caterpillar lets you generate Gcode from within Grasshopper. Your dataset or generative algorithm or existing model can now be quickly turned into Gcode that you can then optimize for 3D printing. This will enable people to quickly implement very creative and new 3D printing methods and techniques as well as enable the making of more non-traditional 3D printing processes.

Zheng points out what many of have noticed over time, as 3D printing users are simply not satisfied to stop and enjoy what has been supplied to them in terms of what is now traditional 3D printing in the layer-by-layer, bottom-to-top approach. For better control, Zheng postulates that users must be able to use ‘the three degrees of freedom’ – meaning X, Y, and Z and also go beyond them. More degrees of freedom and different ways of printing mean more applications are possible. The developers have added to conventional methods previously with accompaniments such as robotic arms, 3D printers that print on curved surfaces, as well as those that extrude alternative materials like wire.

For Caterpillar to do the necessary work, you must first give it the necessary data required. This means printers settings, to include many different parameters:

“Printer bed size (MM) contains three numbers (x, y, z), indicating the maximum printing size of the printer. Heated bed temperature (°C), extruder temperature (°C), and filament diameter (MM) are based on the printing material, which normally will not be changed once settled. Layer height (MM) and subdivision distance (MM) control the precision of the printing, while printing speed (%), moving speed (%), retraction speed (%), and retraction distance (MM) control how fast the printer will act when printing, moving without printing, and retracting materials. Extruder width (%) and extruder multiplier (%) together decide the width of the printed toolpaths.”

Work flow of Caterpillar in Grasshopper

Most users can just go with their default settings to be safe, but there may be some cases where you want to customize without default restriction. Infill settings must be considered too if you are slicing the model to provide infill.

For slicer and toolpath generation, there are numerous options:

  • Planar slicer
  • Curved slicer
  • Curved toolpaths for special use
  • User-defined toolpaths

Planar Slicer (left), Curved Slicer (middle), User-defined Toolpath (right)

The workflow of the GCode generator then creates toolpaths based on points based on inputted curves, and optimization occurs:

“So before inputting the given curves to the dividing component, the program will detect and separate curved toolpaths and linear toolpaths, then divide the curved toolpaths as usual and extract the start and end points to represent the linear toolpaths.”

The GCode decoder then translates text files, assisting users in further design and control through keywords extraction and model rebuilding.

Commonly-Used Gcode.

“In the future, non-conventional customized 3D printing will be highly developed for both educational and industrial purposes,” concludes Zheng. “Low-cost 3-axis 3D printers with extra toolkits can handle a variety of tasks, providing an alternative for expensive robotic fabrication.”

In 3D printing, the central theme is customization. Users can create on an infinite scale, whenever they want, rapidly and affordability. Hardware choices continue to expand with the needs of 3D printing enthusiasts around the world, as do materials. Changes and evolution in software tend to be even more sweeping—and desired—as computer programs allow us to design objects and then control printing processes. While add-ons, plug-ins, and updates are continually available, software programs drive innovations—whether in allowing more advanced bioprinting and tissue engineering, scanning, or simulation of other processes. Caterpillar makes is much easier to implement, design and develop completely new 3D printing techniques and we can not wait to see the impact that this will have.

What do you think of this news? Let us know your thoughts! Join the discussion of this and other 3D printing topics at 3DPrintBoard.com.

Printing Simulation

[Source / Images: ‘Caterpillar – A GCode Translator in Grasshopper]

Reducing the cost of 3D printed prototypes with 3ERP

3D printing has given businesses the ability to create prototypes quickly and at a low price. Using a 3D printer, it is now simpler than ever to turn a digital 3D design into a physical object: desktop 3D printers are affordable and relatively easy to operate, while online 3D printing services allow non-experts to have their prototypes printed by those with a more in-depth knowledge of the process.

But while 3D printing is often cheaper than traditional manufacturing processes, it can still represent a significant investment. For young businesses in particular — those looking to develop their first products — forking out on a 3D printed prototype can eat up a large chunk of budget.

Fortunately, help is at hand. By observing a few simple rules regarding materials, design features and different 3D printing processes, the cost of 3D printed prototypes can be reduced without sacrificing quality. Prototyping specialist 3ERP knows how to deliver professional-quality 3D printed prototypes on a budget, and is here to offer advice for prototyping on a budget.

Why 3D printing can be cheaper than the alternatives

While there are particular ways to reduce the cost of a 3D printed prototype, it is important to know why 3D printing or additive manufacturing is, in general, an affordable means of creating prototypes.

One of the fundamental advantages of 3D printing is its economy with material. Where other processes like CNC machining and injection molding require excess material — CNC machines turn part of the workpiece into waste metal chips; injection molding requires the creation of a mold — 3D printing uses only the amount of material needed for the object itself. A small amount of material may be sanded or cut away during post-processing, but 3D printing generally uses the bare minimum of raw material.

3D printing can also help to save money over the entire product development process. Since no tooling is required, businesses can modify their digital design to create radically new iterations of a prototype at no extra cost. By contrast, amending an injection molded prototype would require the creation of a new mold — at a much greater cost than a single 3D printed prototype.

Ways to reduce the cost of 3D printed prototypes

Material selection

The simplest way to reduce the cost of a 3D printed prototype is to select a low-cost material for the project. This needn’t have an adverse effect on the outcome: if the prototype will only be used for display purposes, affordable materials like PLA or ABS are perfectly capable of producing a quality-looking prototype that can later be developed into something more robust.

Of course, material selection is directly linked to the type of 3D printing process that will be used. The most common 3D printing process, Fused Deposition Modeling (FDM), allows for the cheapest materials, such as PLA. More expensive processes like Stereolithography (SLA) are not compatible with materials like PLA, but have their own range of low-end materials. Prototyping with a standard SLA resin, for example, will be cheaper than prototyping with a durable or rubber-like resin.

Remember that prototypes do not necessarily need to be made from the same material as the finished part. For example, a carbon-reinforced nylon automotive part could be prototyped using a standard nylon for display purposes; the carbon version would only need to be made at the testing or pre-production stage.

Design considerations

Hollowing out

A huge advantage of 3D printing is its ability to create objects with hollow or partially hollow interiors. Since a 3D printed part is built up layer by layer and not simply flooded with a liquid material, businesses can use the technology to create hollow or near-hollow 3D printed prototypes.

Creating a hollow 3D printed part can entail designing the prototype in such a way using CAD software. Alternatively, most FDM 3D printer software has an Infill setting, allowing the user to modify the density (and effective material usage) of a 3D printed part. Using less material by hollowing out the inside of a part naturally reduces material costs.

Supports

Complex 3D printed parts — those with features that jut out, for example — often require support structures: sections of material that are printed solely to act as scaffolding, used to prevent the main structure of the part from collapsing during the printing process. These support structures are often necessary, but careful consideration of the design makes it possible to reduce their number.

While compromising on a design is not ideal, it can be beneficial to think of the 3D design in terms of how it will be printed. If overhanging features are not entirely necessary, or if their angles can be adjusted to reduce the size or number of supports, the material usage and eventual cost of the print job can be reduced.

Scaling down

A seemingly obvious (but often forgotten) way to reduce the cost of a 3D printed prototype is to simply scale it down. Non-functional prototypes can often be created in scaled-down form if the smaller version is still able to demonstrate the appearance and function of the product.

By scaling down a 3D printed prototype, money can be saved by reducing the total material usage and cutting down the operation time of the printer.

Finishing

3D printed parts can be post-processed in various ways, from a rough sanding of the printed part to more complex processes such as coloring, epoxy coating and metal plating. In general, simpler finishing options will be cheaper to accomplish, resulting in a lower total cost.

Working with a budget-conscious prototyping service

For companies looking to create a 3D printed prototype via a third-party service, it is beneficial to select a partner with expertise in additive manufacturing and one that knows how to keep costs to a minimum.

Prototyping specialist 3ERP is one such company. Not only does the prototyping service provider offer a range of services including 3D printing, CNC machining, injection molding and vacuum casting, it also has experience working with a wide variety of clients, from internationally recognized companies like BMW, Lamborghini and Thyssenkrupp to young startups creating their very first prototype.

Because of this experience at both ends of the spectrum, 3ERP knows how to deal with companies working on a budget. Its staff are happy to work with a client to decide on material, design and process options, finding a solution that is both practical and cost-effective.

Contact 3ERP to discuss the possibilities of 3D printed prototypes.


3D Printing News Briefs: October 20, 2018

We’re starting with some information about a couple of upcoming shows in today’s 3D Printing News Briefs, followed by some business and aerospace news. Sinterit is bringing its newly launched material to formnext, while Materialise has announced what products it will be presenting. Registration is now open for AMUG’s 2019 Education and Training Conference. Moving on, Sciaky sold its EBAM and EB Welding System to an aerospace parts manufacturer, while final assembly has been planned for the Airbus Racer, which features a 3D printed conformal heat exchanger. The Idaho Virtualization Lab is a leader when it comes to 3D printing dinosaurs, and the recently released movie First Man used 3D printed models during filming.

Sinterit Launches New PA11 Powder

Military glass case 3D printed with PA11 Onyx

Desktop SLS 3D printing company Sinterit has launched a new material – PA11 Onyx – which it will be bringing to formnext next month, along with its Lisa and Lisa 2 Pro 3D printers. According to Sinterit, this is first powder that’s ready for use in desktop SLS 3D printers, and it delivers excellent thermal, chemical, and abrasive resistance, along with better flexibility and impact resistance. PA11 Onyx is a high performance, lightweight, polyamide-11 bioplastic produced from plant-based renewable resources. In addition, the material also has high elongation at break, which means that durable finished products, like a military glass case and custom casings, can be opened and closed thousands of times without getting damaged.

“Our clients use a lot of electronic devices, like Raspberry Pi, that need a proper, individually made housing that can endure in unfriendly conditions. They are looking for durable materials but also require some elasticity and high-temperature resistance,” said Sinterit Co-Founder Konrad Glowacki. “PA11 Onyx delivers that.”

Come visit Sinterit at booth G41 in Hall 3.1 at formnext, November 13-16, to see its 3D printers and newly launched powders, which also include Flexa Black and Flexa Grey TPU materials.

Materialise Announces formnext Product Introductions

Materialise Magics 23

Speaking of formnext, 3D printing leader Materialise will also be attending the event in Frankfurt, and has just revealed what new product introductions it will be displaying at its booth C48 in Hall 3. Some of the highlights include new plastic and metal materials, like Inconel, Polypropylene, and Taurus, automotive applications, and the Materialise Magics 3D Print Suite; this last includes a new Simulation Module, the E-Stage for Metal 1.1 automatic support structure generation upgrade, and Magics 23, the latest software release.

Additionally, there will also be presentations from Materialise partners and the company’s own experts, like Lieve Boeykens, the Market Innovation Manager for Materialise Software. Boeykens will be presenting on the TCT Stage about “Reducing Costs and Speeding Up the Validation of AM Parts” on November 15 at 4 pm. Visit the Materialise formnext site for updates.

AMUG Conference Registration Open

The Additive Manufacturing Users Group (AMUG) just announced that online registration is now open for its 2019 Education & Training Conference, which is now in its 31st year and will be held in Chicago from March 31-April 4. The conference is open to owners and operators of industrial 3D printing technologies for professional purposes, and welcomes designers, educators, engineers, plant managers, supervisors, technicians, and more to share application developments, best practices, and challenges in 3D printing. The program has been adjusted to include more hands-on experiences and training, and will include workshops, technical sessions, and even a new Training Lab. There will also be networking receptions, catered meals, the two-night AMUGexpo, a Technical Competition, and the fifth annual Innovators Showcase, featuring special guest Professor Gideon Levy, consultant for Technology Turn Around.

“As the AM community evolves, so will AMUG,” said Paul Bates, the President of AMUG. “We are excited to present the new program with the goal of continuing to act on our mission of educating and advancing the uses and applications of additive manufacturing technologies.”

Sciaky Sells EBAM and EB Welding System to Asian Aerospace Parts Manufacturer

VX-110 EBAM System

Metal 3D printing solutions provider Sciaky, Inc. has announced that an unnamed but prominent aerospace parts manufacturer in Southeast Asia has purchased its dual-purpose hybrid Electron Beam Additive Manufacturing (EBAM) and EB Welding System. The machine will be customized with special controls that allow it to quickly and easily switch from 3D printing to welding. The system will be used by the manufacturer, remaining anonymous for competitive purposes, to 3D print metal structures and weld dissimilar materials and refractory alloys for said structures, as well as for other aerospace parts. Delivery is scheduled for the second quarter of 2019.

“Sciaky is excited to work with this innovative company. This strategic vision will allow this manufacturer to reduce operating costs by combining two industry-leading technologies into a single turnkey solution,” said Scott Phillips, President and CEO of Sciaky, Inc. “No other metal 3D printing supplier can offer this kind of game-changing capability.”

Airbus Plans Final Assembly for Racer

Scale model of the Airbus Racer on display at Helitech International 2018. The manufacturer is aiming for a first flight of the demonstrator in 2020. [Image: Thierry Dubois]

Together with partners of its Racer demonstration program, Airbus Helicopters explained that it definitely expects to meet performance targets, and complete the first flight of the compound helicopter on time in 2020. The 7-8 metric ton aircraft, in addition to a targeted cruise speed of 220 knots and 25% lower costs per nautical mile compared to conventional helicopters, will also feature several advanced components, including a three-meter long lateral drive shaft. Avio Aero was called in to 3D print a round, conformal heat exchanger for each later gear box, which will help achieve reduced drag.

The preliminary design review was passed last July, with final assembly targeted to begin in the fourth quarter of 2019. The flight-test program will likely be 200 flight hours, with the second part focusing on demonstrating that the Racer will be able to handle missions like search-and-rescue and emergency medical services. The program itself is part of the EU’s Clean Sky 2 joint technology initiative to help advance aviation’s environmental performance.

Idaho Virtualization Lab is 3D Printed Dinosaur Leader

The Idaho Virtualization Laboratory (IVL), a research unit housed in the Idaho Museum of Natural History on the Idaho State University campus, has long been a leader in using 3D printing to digitize and replicate fossils and skeletons. Museum director Leif Tapanila said that IVL’s 3D printing program has been ongoing for the last 15 years, and while other labs in the country are more driven by research, the IVL is operated a little more uniquely – it’s possibly the only program in the US that goes to such great extent to 3D print fossils.

Jesse Pruitt, lab manager of the Idaho Virtualization Lab, said, “Everybody does a little bit of this and a little bit of that, but no one really does [everything we offer].

“We do our own internal research, we digitize our collections and we also do other people’s research as well.

“It’s not something you see at a smaller university. For this to exist at the level that it exists here is pretty remarkable in my mind.”

The IVL is also one of the only programs to have a large online database of the 3D models it creates, and works to spread knowledge about its 3D printing processes to students and researchers.

3D Printed Models for First Man Movie

Lunar module miniature [Image: Universal Pictures]

While many movies swear by CGI to create special effects, there are some directors and production crews who still prefer to use old school miniatures and models. But old school meets new when 3D printing is used to make these models for practical effects. Oscar-winning director Damien Chazelle used some 3D printed miniature model rockets for his new movie First Man, which was just released a week ago and is all about Neil Armstrong and his legendary first walk on the moon. The movie’s miniature effects supervisor Ian Hunter, who won an Oscar for Visual Effects for Interstellar, was in charge of creating and filming the models, which included a one-thirtieth scale miniature for the giant Saturn V rocket and one-sixth scale miniatures of the Command/Service Module and Lunar Excursion Module.

“We had banks of 3D printers running day and night, running off pieces. We also used a lot of laser-cut pieces,” Hunter said about the Saturn V rocket miniature. “The tube-like shape of the rocket came from PVC piping, with the gantry made of acrylic tubing, along with many 3D printed and laser cut parts.”

The 3D printed model of the Saturn V rocket even made it into one of the trailers for the film, and the film itself.

Discuss these stories and other 3D printing topics at 3DPrintBoard.com or share your thoughts in the Facebook comments below.