In today’s 3D Printing News Briefs, euspen plans to hold a Special Interest Group meeting in September centered around additive manufacturing, and an adjunct professor completed a comparison between a small SLS 3D printer and a large one. Moving on to interesting 3D printing projects, an artist teamed up with Mimaki to use full-color 3D printing to make a stage prop, a reddit user created an anti-cat button for an Xbox system, and an imgur user created a modular 3D printed fashion system.
euspen to Hold Special Interest Group Meeting on AM
![]() The European Society for Precision Engineering and Nanotechnology (euspen) will be addressing the factors which are influencing an uptake of the use of additive manufacturing as a production technology at a Special Interest Group (SIG) meeting in September. The meeting, which will be co-hosted by the American Society of Precision Engineering (ASPE), will analyze the barriers to, and the opportunities for, the adoption of AM in production. It will be held from September 16-18 at the École Centrale de Nantes in France.
The European Society for Precision Engineering and Nanotechnology (euspen) will be addressing the factors which are influencing an uptake of the use of additive manufacturing as a production technology at a Special Interest Group (SIG) meeting in September. The meeting, which will be co-hosted by the American Society of Precision Engineering (ASPE), will analyze the barriers to, and the opportunities for, the adoption of AM in production. It will be held from September 16-18 at the École Centrale de Nantes in France.
At the AM SIG meeting, issues that are, as euspen put it, “critical to the viability of AM as a production technology,” will be addressed. The co-chairs of the meeting are Professor Richard Leach from the University of Nottingham and Dr. John Taylor from the University of North Carolina at Charlotte. Local hosts and the organizing committee include Professor Alain Bernard from Centrale Nantes, Dr. David Bue Pedersen from the Technical University of Denmark, Professor Leach, and Dr. Taylor.
Comparison of Small and Large SLS 3D Printers
3D printers are often used in educational settings these days. Piotr Dudek, an adjunct professor at the AGH University of Science and Technology in Poland, runs a 3D printing lab at the school that both students and researchers frequent. While many technologies are used in the lab, SLS is the one that most interests Dudek, who decided to compare a big SLS system from EOS with the smaller Sinterit Lisa.
“We are using the big EOS SLS 3D printer for a long time and we wanted to compare it with Sinterit Lisa, check the possibilities of it. In SLS technology every detail matters. The temperature of the printing chamber, powder distribution system, heating or laser moving mechanism are very precise and important features. We wanted to test if Sinterit’s device is the valuable solution,” Dudek stated.
Larger 3D printers obviously have higher print volumes, but the down sides include difficult calibration, specialized training, and higher costs. In addition, it’s easy to mess up the calibration of a large 3D printer during transport. The Lisa 3D printer uses a gantry system, which comes pre-calibrated to save time, and it also uses less material, which means less money. The desktop printer is also much more student-friendly, making it the better choice for 3D printing labs like the one Professor Dudek runs.
Full-Color 3D Printed Stage Prop
 A few months ago, 3DPrint.com heard from 3D printing specialist and Post Digital Artist Taketo Kobayashi, from the Ultra Modelers community, about an art exhibit in Japan that he helped organize which featured colorful, 3D printed works created on the Mimaki 3DUJ-553 full-color 3D printer. Recently, he reached out to us again with news of his latest Mimaki Engineering collaboration – a stage prop for the Japanese artist Saori Kanda, who performed with techno/trance band Shpongle at the Red Rocks Amphitheater in Colorado.
“It is a artwork,” Kobayashi told 3DPrint.com, “but also a utilization of full color 3D printing to entertainment field.”
The “Shpongle Mask,” which took 28 hours to print and mixed in Asian details, was worn onstage by Kanda as she performed her painting live with the band.
3D Printed Anti-Cat Xbox Button
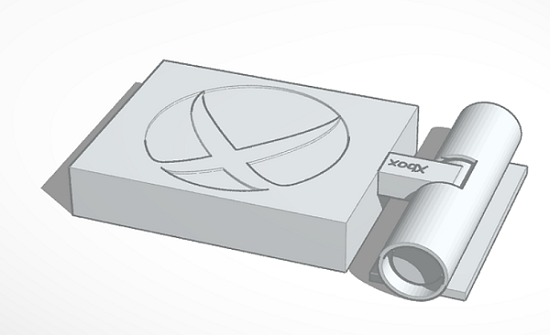 reddit user Mbiggz was getting sick of their cat turning off the touch-sensitive button on the Xbox console while it was in use, which I can understand, having two cats of my own. So Mbiggz came up with the perfect solution – a 3D printed cover for the button. The design can be found on the maker’s Tinkercad account, as Mbiggz originally made the design for a Digital 3D class.
“Adhesive goes on the back part (it is labeled in the print). I’m a newcomer in terms of this so it’s not perfect,” Mbiggz wrote on Tinkercad. “Also, the door doesn’t open all the way, so you can fix it so that it does if you want to (even though it doesn’t really matter, there’s not really a need for it to open it all the way).”
3D Printed Modular Fashion System
 hunter62610, a young imgur user, designed and 3D printed a Lego-like modular fabric system, which was featured in his school’s fashion show. He made two dresses that are made with a 3D printed prototype fabric pattern called Escher, which was designed to be “put together and taken apart” hundreds of times. It took him just two weeks to make the material, which the two young ladies who modeled the dresses said was fairly comfortable.
“The idea of the system is that theoretically, one could buy a fashion catalog filled with designs, and say 5000 links. Once could make every clothing item in the catalog, based on there needs. Perhaps that’s a pipe dream, but it’s a fun idea,” hunters62610 wrote.
“The Escher system is quite versatile. Each link acts like a free flowing Equilateral triangle, and has a male and female ball joint on each side. Every individual link is theoretically compatible with every other link. Special links are stored in the middle of this pouch that are really 3 merged links with a screw hole. If needed, these links can be used as elastic tie down points or buttons, if you screw in the buttons i made.”
A Makerbot Replicator Plus was used to print the fabric links in unique, small panels.
Discuss these stories and other 3D printing topics at 3DPrintBoard.com or share your thoughts in the Facebook comments below.