Gradient Temperature Heat Treatment of LPBF 3D-Printed Inconel 718

In order to tailor and improve the performance of microstructures, it helps with many 3D-printed alloys if the post-heat treatment process is carefully designed and executed for this purpose. Researchers Yunhao Zhao, Noah Sargent, Kun Li, and Wei Xiong with the University of Pittsburgh’s Physical Metallurgy and Materials Design Laboratory published a paper, “A new high-throughput method using additive manufacturing for materials design and processing optimization,” about their work on this subject, which was supported by a NASA contract.

They explained that post-heat treatment optimization and composite design are the central parts of materials development, and that “high-throughput (HT) modeling and experimentation are critical to design efficiency.” These aspects are even more important when it comes 3D printing, because the more processing parameters are used, the more the “microstructure-property relationships of the as-fabricated materials” will be effected.

“In this work, we couple the [laser powder bed fusion (LPBF) technique with the gradient temperature heat treatment (GTHT) process as an effective HT tool to accelerate the post-heat treatment design for AM components,” they explained.

They used the Ni-based Inconel 718 superalloy, which has excellent high-temperature mechanical properties, in order to evaluate their proof of concept, as the material is often fabricated with LPBF technology.

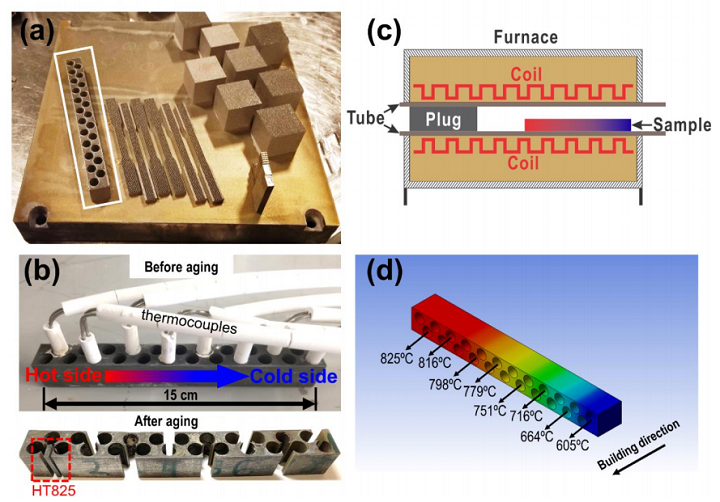
Figure 1. (a) Inconel 718 build printed by LPBF; (b) setup of temperature record and illustration of sample cutting for microstructure characterization; (c) setup of the furnace for the high-throughput experiment; (d) experimental temperature distribution inside the bar-sample.

The researchers created a high-throughput approach by using LPBF technology to print a cuboid long-bar sample out of Inconel 718 on an EOS M290. They designed the build with 23 evenly distributed holes, which not only increase the sample’s surface area and improve convection heat transfer, but also make it more flexible “when choosing monitoring locations.” The improved heat transfer also helped lower the variation in the sample’s temperature relative to the temperature of the air.

“As a result, the air temperature calibration became more representative of the real sample temperature, which allowed the preemptive selection of the monitoring locations in the sample according to the actual needs. Using this methodology, the current work significantly reduced the total time needed for heat treatment, and the flexibility of the setup of the high-throughput experiment was increased by adopting additive manufacturing methods for sample fabrication,” they explained.

Once the long bar sample’s microsegration and AM-related grain texture had been removed, it was submerged in ice water, and then conductive high-temperature cement was used to fix eight K-type thermocouples into equidistant holes. Finally, it was time for the 15-hour aging process of the heat treatment.

“The thermocouples were connected to a computer via a data acquisition system to record the aging temperatures at each location throughout the aging process,” the researchers wrote. “The aging heat treatment was then carried out in a tube furnace with one end open to introduce gradient temperatures at different locations in the sample, as illustrated in Fig. 1(c). The furnace temperature settings and the position of the sample inside of the furnace tube had been deliberately calibrated to acquire a temperature gradient of 600~800°C, within which the δ, γ′, and γ″ phases may precipitate during the aging processes [19]. The temperature gradient during the aging process is stable without fluctuation, and the distribution of temperatures achieved at each monitored location is illustrated in Fig. 1(d). From Fig. 1(d), the experimentally obtained temperature gradient was within 605~825°C, which agreed well with our expectation.”

Figure 2. Temperature diagram of heat treatment with corresponding sample notations.

The adjacent alloy to each thermocouple was individually sectioned to characterize the microstructure, and view the effect of the various aging temperatures. After the samples were polished, they were analyzed with SEM (scanning electron microscope), so the team could identify the phases, and EBSD (electron backscatter diffraction), for grain morphology observation.

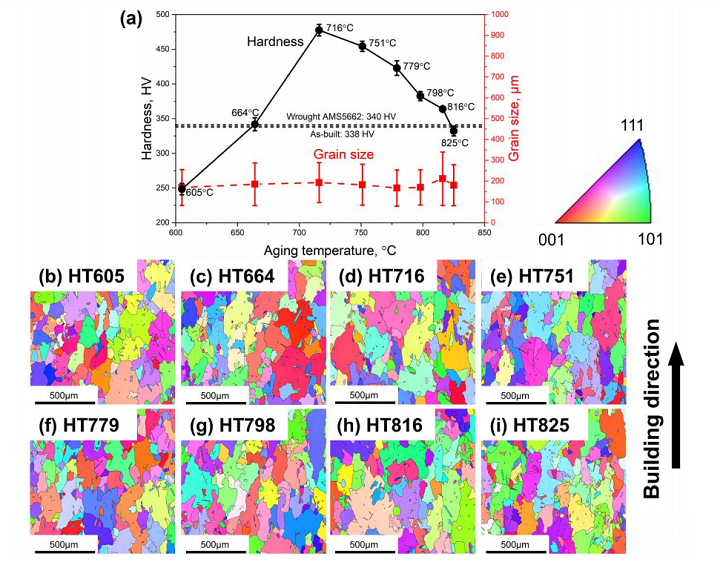
Figure 3. (a) Results of microhardness and average grain size measurements. IPFs of the aged samples with (b) HT605; (c) HT664; (d) HT716; (e) HT751; (f) HT779; (g) HT798; (h) HT816; (i) HT825.

“Within the temperature range of 716~816°C, the hardness of the aged samples are higher than that in the wrought Inconel 718 (340 HV, AMS5662) [14], indicating the AM alloys could achieve higher strengthening effects when applied suitable heat treatment,” they wrote. “The highest hardness is 477.5 HV0.1 and occurs after aging at a temperature of 716°C. It is found that the temperatures above and below 716°C result in the reduction of hardness. The lowest hardness of 248.4 HV0.1 is obtained at 605°C, which is lower than that in the as-built alloy (338 HV0.1).”

The EBSD found that coarse grains formed in all of the aged samples, and while their diameters were “plotted as a function of the corresponding aging temperatures in Fig. 3(a),” their size is independent of the temperature. This likely means that the aging temperatures did not significantly effect either the grain size or morphology, and that “the relatively large grain size achieved after heat treatment in this study has little contribution to the microhardness variation.”

To better understand structure-property relationships, the researchers chose three samples to undergo more microstructure investigation:

  • HT605 with the lowest microhardness of 248.4 HV0.1,
  • HT716 with the highest microhardness of 477.5 HV0.1, and
  • HT825 with the lowest microhardness of 332.2 HV0.1 in the high-temperature gradient

Other than a few NbC carbides, they did not see any other precipitates in the HT605 sample, but noted that 716°C-aging caused a little “of the δ phase to precipitate along grain boundaries” in the HT716 sample.

“However, a large number of plate-shaped γ″ particles are observed in the TEM micrographs,” the team wrote. “These γ″ particles are very fine with a mean particle length of 13.8±4.2 nm through image analysis. The typical γ′ phase with spherical shape is not found to precipitate in sample HT716. This indicates that the precipitation of γ″ preceded the formation of γ′ in the current study. Therefore, the strengthening effect is dominated by γ″ with fine particle size.”

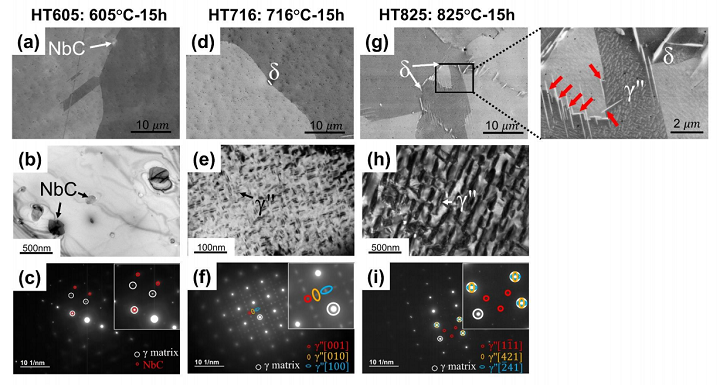
Figure 4. Microstructures of HT605 characterized by (a) SEM-BSE; (b) bright-field TEM; (c) selected-area-electron-diffraction (SAED). Microstructures of HT716 characterized by (d) SEM-BSE; (e) bright-field TEM; (f) SAED. Microstructures of HT825 characterized by (g) SEM-BSE; (h) bright-field TEM; (i) SAED. The different γ″ variants in (f) and (i) are differently colored, and the corresponding zone axes are indicated.

Just like with the second sample, the researchers also did not observe the γ′ phase in HT825.

The team deduced that the phase transformation behaviors caused the varying microhardnesses in the aged samples, concluding that aging the 3D-printed Inconel 718 samples at 605°C for 15 hours is not ideal for precipitation-hardening.

“We developed a high-throughput approach by fabricating a long-bar sample heat-treated under a monitored gradient temperature zone for phase transformation study to accelerate the post-heat treatment design of AM alloys. This approach has been proven efficient to determine the aging temperature with peak hardness. We observed that the precipitation strengthening is predominant for the studied superalloy by laser powder bed fusion, and the grain size variation is insensitive on temperature between 605 and 825ºC.”

Discuss this and other 3D printing topics at 3DPrintBoard.com or share your thoughts below.

The post Gradient Temperature Heat Treatment of LPBF 3D-Printed Inconel 718 appeared first on 3DPrint.com | The Voice of 3D Printing / Additive Manufacturing.

A New 3D Printing Method: Tethered Pyro-Electrospinning for 3D Printed Microstructures

Authors Sara Coppola, Giuseppe Nasti, Veronica Vespini, and Pietro Ferraro explore a new technique for 3D printing with biocompatible materials, outlined in ‘Layered 3D Printing by Tethered Pyro-Electrospinning.’ Motivated to overcome current challenges in the fabrication of fibers on both the micro- and nanoscale, the researchers offer a novel 3D printing method with the use of moderate temperatures resulting in both accuracy and flexibility.

Fibers today can be 3D printed for a variety of applications like wearables, custom biomedical devices, drug-delivery systems, bioprinted scaffolds, and more. While electrospinning is already a popular method for creating fibers, pyro-electrohydrodynamic (pyro-EHD) printing can be used for creating polymers fibers while overcoming typical EHD processes which are governed by nozzle size.

This study demonstrates the first use of pyro-EHD methods for creating biodegradable and biocompatible polymers with a variety of geometries and micro-architectures to include:

  • Wall
  • Square
  • Triangle
  • Hybrid structures

Materials used for samples consisted of Poly(lactic-co-glycolic acid) PLGA and dimethyl carbonate, with fluorochrome as an additive to the polymer for use as a model drug. In creating the polymeric fibers, the research team used tethered pyro-electrospinning, activated as a drop of the solution was used as a reservoir and then placed under the LN crystal plate.

“The reservoir drop was directly pipetted over a hydrophobic micropillar made in Polydimethylsiloxane (PDMS) and placed over a commercial microscope glass slide,” explained the researchers. “Under the activation of the TPES process, the droplet started to deform, creating an elongated tip from which fibers were drawn. The target used for the collection was placed in front of the drop and removed at the end of the over-printing procedure.”

Over-printing occurs as an ‘intense pyroelectric field’ emerges from the LN crystal, according to the right temperature. The researchers used the following equipment while engaged in pyro 3D printing:

  • Reservoir solution drop
  • Pyroelectric crystal
  • Thermal control system
  • Programmable stage motion
  • Glass target holder
  • Manual micro-stages with axis control

Once the pyroelectric material reaches a temperature of about 80°, a high electric field is created. High voltage is then charged between the crystal and the plate supporting the drop, with ions gathering within the printing solution—forming chargers.

“The charges would bring an electrostatic force to deform the drop’s meniscus to form a conical shape (Taylor cone),” explain the researchers. “When the electrostatic force will overcome the surface tension at the Taylor cone, a jet would be injected from the meniscus onto the receiving substrate.

“The reservoir droplet is sited in front of the active crystal at a distance h < 1 mm. The selected distance allows preventing the jetting from buckling as it hits the target. In this way, the bending instability and splitting of the charged jet are overcome.”

Outline of the set-up for layered 3D printing: the reservoir drop is sited under the LN crystal heated by a thermal control system. During the experiment, real-time visualization was ensured in order to control at the same time the jetting process and the target position. For the fabrication of layered architecture, the target was moved along the x,y direction. In the top-view the pink trails and the arrows indicate the direction of movement.

Jet diameter relies on:

  • Surface tension
  • Flow rate
  • Dielectric constant
  • Electric current

Plotting varied due to the impacts of ink properties, printing parameters, and temperature.

Fiber characteristics were adjusted during the TPES printing process, with fibers placed on the substrate and microstructures ‘obtained by superimposition.’ The research team noted that three parameters affected fiber diameters, with a temperature of 110°C activating the pyro-electric effect.

“The resulting printed fibers had a diameter (d) ranging between 10 μm <  < 30 μm. Controlling these parameters could be possible to produce fiber of about 1 μm diameter or even less, as demonstrated in case of TPES,” stated the researchers.

Schematic outline of three-dimensional architectures: (a) a single wall freestanding along the direction was constructed by overlay, the blue arrows indicate the direction of printing, (b) a single wall was constructed crossing a matrix of single fibers, creating a sort of square profile where only one side was obtained by superimposition, (c) a cubic architecture was constructed side by side, starting from the fabrication of the first wall (side ) all the adjacent sides were completed in a clockwise direction, and (d, e) cubic and triangular architecture were obtained by overlay of the complete profile, starting from the first track, the same profile was overwritten. The blue arrows indicated the direction of printing.

Pattern models, pre-designed for the study, manipulated motion during each stage, allowing for the layers to be fabricated. A high-resolution stage was necessary for the proper regulation of features and patterns.

The experimental portion of the study involved doping their PLGA/DMC solution with fluorochrome.  Both PLGA and DMC are highly dissolvable, but also biodegradable and attractive for use in this study. Microstructures were fabricated from the initial single wall, serving as a ‘building block’ for future layers of polymeric fibers.

After printing simple walls, the researchers moved on to more complex geometries such as a polymeric grid and a square, with all sides comprised of five layers.

(a) Schematic outline of the experiment. (b) Streomicroscope image of a single wall crossing a matrix of single fibers at the bottom. (c) Close up of the crossing and focus on a crossing point making evident the good control in superimposition (d).

“Following the same procedure for the realization of a regular three-dimensional microstructures we tested a triangular geometry where the angles between the adjacent side are acute ~30°. The construction of the architecture by superimposing the complete profile three times resulted in a good spatial resolution and vertical finishing,” stated the researchers.

(a) Hybrid microstructure made of hemispherical drops and multi-layered fibers. The drops were used as pillars for the construction of a free-standing wall. (b, c) Stereomicroscope image and close up of the sustaining pillars and of the overprinted fibers.

“ … starting from the fabrication of elementary geometry (wall, cubic, and triangular microstructures) this work represents the base for the design of more complex microarchitectures. The fabrication process is described in detail; the fabricated microstructures have been characterized, focusing on the use of composite material and, in particular, of biocompatible and biodegradable biomaterials,” concluded the researchers. “Taken into account that there is a growing demand for novel products and devices such as encapsulation systems, it is easy to imagine that the exploitation of different additive manufacturing approaches could find use in regenerative medicine with a strong interest in the development of in vivo bio-incubators that better replicate the tissue environment.”

3D printed microstructures and architectures continue to be a source of innovation via researchers around the world, involving research for new drug delivery systems, optics, tissue repair, and more.

What do you think of this news? Let us know your thoughts! Join the discussion of this and other 3D printing topics at 3DPrintBoard.com.

[Source / Images: ‘Layered 3D Printing by Tethered Pyro-Electrospinning’]

The post A New 3D Printing Method: Tethered Pyro-Electrospinning for 3D Printed Microstructures appeared first on 3DPrint.com | The Voice of 3D Printing / Additive Manufacturing.

Collaborative Research Team Develops Density-Graded Structure for Extrusion 3D Printing of Functionally Graded Materials

Microscopic photos of top and side views of printing results with a 0.38 mm wide extrusion path: (a) without versus (b) with overlapping by 0.36 mm respectively. Overlapping extrusion paths exhibit over-extrusion of material at the overlapping region, which results in unwanted blobs on the surface of the print.

Plenty of research has been completed in regards to FDM (extrusion) 3D printing, such as how to improve part quality and how to reliably fabricate functionally graded materials (FGM). The latter is what a collaborative team of researchers from Ultimaker, the Delft University of Technology (TU Delft), and the Chinese University of Hong Kong are focusing on in their new research project.

The team – made up of researchers Tim KuipersJun Wu Charlie, and C.L. Wang – recently published a paper, titled “CrossFill: Foam Structures with Graded Density for Continuous Material Extrusion,” which will be presented at this year’s Symposium for Solid and Physical Modeling.

“In our latest paper we present a type of microstructure which can be printed using continuous extrusion so that we can generate infill structures which follow a user specified density field to be printed reliably by standard desktop FDM printers,” Kuipers, a Software Engineer and Researcher for Ultimaker, wrote in an email.

“This is the first algorithm in the world which is able to generate spatially graded microstructures while adhering to continuous extrusion in order to ensure printing reliability.”

Because 3D printing offers such flexible fabrication, many people want to design structures with spatially graded material properties. But, it’s hard to achieve good print quality when using FDM technology to 3D print FGM, since these sorts of infill structures feature complex geometry. In terms of making foam structures with graded density using FDM, the researchers knew they needed to develop a method to generate “infill structures according to a user-specific density distribution.”

The abstract reads, “In this paper, we propose a new type of density graded structure that is particularly designed for 3D printing systems based on filament extrusion. In order to ensure high-quality fabrication results, extrusion-based 3D printing requires not only that the structures are self-supporting, but also that extrusion toolpaths are continuous and free of self-overlap. The structure proposed in this paper, called CrossFill, complies with these requirements. In particular, CrossFill is a self-supporting foam structure, for which each layer is fabricated by a single, continuous and overlap-free path of material extrusion. Our method for generating CrossFill is based on a space-filling surface that employs spatially varying subdivision levels. Dithering of the subdivision levels is performed to accurately reproduce a prescribed density distribution.”

Their method – a novel type of FDM printable foam structure – offers a way to refine the structure to match a prescribed density distribution, and provides a novel self-supporting, space-filling surface to support spatially graded density, as well as an algorithm that can merge an infill structure’s toolpath with the model’s boundary for continuity. This space-filling infill surface is called CrossFill, as the toolpath resembles crosses.

“Each layer of CrossFill is a space-filling curve that can be continuously extruded along a single overlap-free toolpath,” the researchers wrote. “The space-filling surface consists of surface patches which are embedded in prism-shaped cells, which can be adaptively subdivided to match the user-specified density distribution. The adaptive subdivision level results in graded mechanical properties throughout the foam structure. Our method consists of a step to determine a lower bound for the subdivision levels at each location and a dithering step to refine the local average densities, so that we can generate CrossFill that closely matches the required density distribution. A simple and effective algorithm is developed to merge a space-filling curve of CrossFill of a layer into the closed polygonal areas sliced from the input model. Physical printing tests have been conducted to verify the performance of the CrossFill structures.”

The researchers say that the user prescribes density distribution, and can use CrossFill and its space-filling surfaces, with continuous cross sections, to “reliably reproduce the distribution using extrusion-based printing.” CrossFill surfaces are built by using subdivision rules on prism-shaped cells, each of which contains a surface patch that’s “sliced into a line segment on each layer to be a segment” of the toolpath, which will be made with a constant width; cell size determines the density.

“By adaptively applying the subdivision rules to the prism cells, we create a subdivision structure of cells with a density distribution that closely matches a user-specified input,” the team wrote. “Continuity of the space-filling surface across adjacent cells with different subdivision levels – both horizontally and vertically – is ensured by the subdivision rules and by post-processing of the surface patches in neighboring cells.”

The subdivision system distinguishes an H-prism, which is built by cutting a cube in half vertically along a diagonal of the horizontal faces, and a Q-prism, generated by spitting a cube into quarters along the faces’ diagonals. To learn more about this system and the team’s algorithms, check out the paper in its entirety.

Schematic overview of our method. The top row shows a 2D analogue of our method for clear visualization. The prism-shaped cells in the bottom row are visualized as semi-opaque solids to keep the visualization uncluttered. Red lines in the bottom row highlight the local subdivisions performed in the dithering phase.

The researchers also explained the method’s toolpath generation in their paper, starting with how to slice the infill structure into a continuous 2D polygonal curve for each layer of the object, which is followed by fitting a layer’s curve “into the region of an input 3D model.”

Experiments measuring features like accuracy, computation time, and elastic behavior were completed on an Intel Core i7-7500U CPU @ 2.70 GHz, using test structures 3D printed out of white TPU 95A on Ultimaker 3 systems with the default Cura 4.0 profile of 0.1 mm layer thickness. The team also discussed various applications for CrossFill, such as imaging phantoms for the medical field or cushions and packaging.

“The study of experimental tests shows that CrossFill acts very much like a foam although future work needs to be conducted to further explore the mapping between density and other material properties,” the researchers concluded. “Another line of research is to further enhance the dithering technique, e.g. changing the weighing scheme of error diffusion.”

CrossFill applications. (a) Bicycle saddle with a density specification. A weight of 33 N is added on various locations to show the different response of different density infill. (b) Teddy bear with a density specification. (c) Shoe sole with densities based on a pressure map of a foot. (d) Stanford bunny painted with a density specification. (e) Medical phantom with an example density distribution for calibrating an MRI scanning procedure.

The team’s open source implementation is available here on GitHub. To learn more, check out their video below:

Discuss this story, and other 3D printing topics, at 3DPrintBoard.com or share your thoughts below.

TU Delft Researchers Discuss Microstructural Optimization for 3D Printing Trabecular Bone

Trabecular bone, also known as spongy or cancellous bone, is one of two types of bone found in the human body. It is found at the end of long bones, in the pelvic bones, ribs, skull and vertebrae. Trabecular bone is one of many microstructures with spatially varying properties found in nature. In a paper entitled “Compatibility in microstructural optimization for additive manufacturing,” a group of researchers points out that these microstructures can now be created by additive manufacturing. One challenge in the computational design of such materials is ensuring compatibility between adjacent microstructures. The researchers’ work aims to find the optimal connectivity between topology optimized microstructures.

“Given the fact that the optimality of connectivity can be evaluated by the resulting physical properties of the assemblies, we propose to consider the assembly of adjacent cells together with the optimization of individual cells,” the researchers explain. “In particular, our method simultaneously optimizes the physical properties of the individual cells as well as those of neighbouring pairs, to ensure material connectivity and smoothly varying physical properties. This idea is substantiated on the design of graded microstructures with maximized bulk moduli under varying volume fractions. The graded microstructures are employed in designing an implant, which is fabricated by additive manufacturing.”


When designing orthopedic implants, the researchers point out, it “may be desirable to have a continuous transition from denser microstructures in the central region to highly porous microstructures at the bone-implant interface.” This functional gradation promotes bony ingrowth at the bone-implant interface, they continue, while maintaining structural integrity and increasing mechanical properties in areas where bony ingrowth is not relevant.

The researchers presented a method of ensuring mechanical compatibility among topology optimized microstructures.

“Our results show that the bulk moduli of individual cells reach the theoretical bounds predicted by the Hashin–Shtrikman model, meaning that the optimization of compatibility does not compromise the performance of individual cells,” they state. “Furthermore, the bulk moduli of neighbouring pairs also agree well with the Hashin–Shtrikman bounds.”

The method was extended to allow maximum length scale and isotropy in microstructures. The researchers demonstrated the effectiveness of their proposed method in a number of designs, including functionally graded materials and multiscale structures. They also showed that the optimized microstructures can be fabricated by additive manufacturing technology. This has implications for a number of applications, including orthopedic implants, which 3D printing can optimize for better growth of new bone.

“As future work, we are particularly interested in the following aspects,” the researchers conclude. “Firstly, this method is directly applicable to 3D design problems. To alleviate the computational burden in 3D, the GPU-based topology optimization framework can be used. Secondly, while we have applied the compound formulation for maximizing bulk modulus, its applicability to other physical problems such as conductivity is left to be demonstrated.”

Authors of the paper include Eric Garner, Helena M.A. Kulken, Charlie C.L. Wang, Amir A. Zadpoor and Jun Wu.

Discuss this and other 3D printing topics at 3DPrintBoard.com or share your thoughts below. 


Microstructure of Powder Bed Fusion 316 L Stainless Steel: Colonies of Cells

(a) Bright-field transmission electron microscopy (TEM) image of the cells oriented perpendicular to the observation direction; (b) Bright-field TEM image of the cells oriented parallel to the observation direction, diffraction pattern illustrates the <100> fcc zone axis orientation of the cells; (c) nanoparticles observed in the microstructure of LPBF 316 L steel marked by arrows; and (d) TEM energy dispersive X-ray (EDX) spectra taken from one of the particle illustrated in (c).

A great deal of work is involved in optimizing materials for additive manufacturing. Porosity is a consistent problem in metal 3D printing, and scientists spend a lot of time studying each metal material to try to minimize or eliminate flaws. In a paper entitled “Microstructure, Solidification Texture, and Thermal Stability of 316 L Stainless Steel Manufactured by Laser Powder Bed Fusion,” a team of researchers examines 316 L stainless steel using techniques including scanning and transition electron microscopy, diffraction methods and atom probe tomography.

Porosity can be eliminated by controlling the laser power and laser scanning speed during the 3D printing process, the researchers point out.

“The final properties are governed by the microstructure of the material,” they continue. “The microstructure of the LPBF material is formed under the conditions of high temperature gradients and solidification rates, far from the ones of conventional materials. This results in the formation of a nonequilibrium microstructure with a unique set of properties. Epitaxial nucleation of cellular colonies has commonly been observed, which results in the solidification texture and anisotropic mechanical properties of LPBF materials.”

(a) Scanning strategy used to manufacture laser powder bed fusion (LPBF) 316 L; (b) microstructure of the LPBF 316 L steel, optical micrograph.

The study, which was conducted over several years, focuses on the metallurgical aspects of the material, as well as its microstructure. The formation of a cellular structure in a molten pool was discussed in relation to the thermal gradient and solidification rate. The correlation between the primary cell spacing and hardness was also discussed in relation to additive manufacturing process parameters and the presence of porosity.

(a) Scanning electron microscopy (SEM) micrograph of the etched cross section of the LPBF 316 L. Colony boundaries are marked by a dashed line; (b) channeling contrast SEM image of a cross section of the LPBF 316 L single track; (c) an electron back-scattering diffraction (EBSD) orientation map of the marked in the (b) region; grains 1, 2, and 3 illustrate the epitaxial nucleation of colonies from the substrate.

Several experiments were carried out with the stainless steel material. Specimens were additively manufactured using a Phenix Systems PM 100 machine. For the microstructural analysis, parameters of 50 W laser power and a 120 mm/s laser scanning speed were used because they provided the lowest porosity. Microstructural analysis was performed using optical and electron microscopy methods.

Several conclusions were reached. The as-built microstructure of the stainless steel consists of colonies of cells, and the boundaries between the cells are not regular high-angle grain boundaries, but rather dislocation structures of 100-300 nm in thickness. The size of the cells in the colonies depends on the manufacturing conditions, and may vary within a single track.

“The segregation of elements on the cell boundaries is presumably a function of the solidification conditions, and it may vary in AM 316 L manufactured at different laser powers and scanning speeds,” the researchers state. “Primary cell spacing is the key parameter that controls strength, following the Hall–Petch relationship. In many cases, deviations from the Hall–Petch relationship can be explained by variations of the primary cell spacing through the LPBF material and porosity.”

Solidification texture was formed by colonies of cells that grew through several layers. The texture was controlled by the manufacturing strategy. Cells within colonies were stable up to 800-900°C, after which point they disappeared. The disappearance of the cells resulted in a decrease in hardness. Colony growth was not significant until 1050 °C.

“Nanoscale oxide particles probably form from surface oxide, or due to oxygen pick up during manufacturing,” the researchers continue. “They are stable and do not coalesce or change shape after heat treatment up to 1050 °C. The contribution of these nanoscale particles to hardness of LPBF 316 L material seems to be insignificant, since after heat treatment the hardness of LPBF 316 L steel approached values typical for conventional coarse-grained material.”

Authors of the paper include Pavel Krakhmalev, Gunnel Fredriksson, Krister Svensson, Igor Yadroitsev, Ina Yadroitsava, Mattias Thuvander, and Ru Peng.

Discuss this and other 3D printing topics at 3DPrintBoard.com or share your thoughts below.