Gary Adams has always been a builder. So when his noisy camping stove disturbed his outdoor experience, he decided to fashion his own solution. Here, Gary talks about how BernieDawg Stoves got started and how he uses 3D printing to scale his production.
Tell us about your background. Were you always a creator?
From as early as I can remember, I was using tools to build things. When I was a kid, I would join other kids in the neighborhood and build treehouses, shacks, and fortresses out of scrap lumber and found materials. We loved to build toy boats out of construction scraps and float them in the bay. Hammers, saws, nails, and screws were in use by all the kids I knew. It was a different time. I had slot cars and built my own free-standing 4’x8’ layout from plywood and two-by-fours when I was ten. No adult help. I built all my own furniture when I went away to college – sling sofa, coffee table, bed frame, redwood dining table, etc.
I taught junior high school shop classes for quite a few years, everything from drafting and woodworking to metalworking and small engines. When I left teaching, I started my own custom cabinet- and furniture-making business; a one-man shop. Later, I closed the business to work for a custom cabinet shop competitor down the road. The idea was to let them deal with all the business details and so I could get back to the (real) “creating.”
What led you to your interest in creating stove caps?
In the midst of my work life, I was always hiking, backpacking, and whitewater kayaking and rafting avocationally. After many years of using the same outdoor cooking gear (a SIGG Tourist cook kit with a Svea 123R stove), I found myself somewhat embarrassed by my loud, conversation-stifling, out-of-date Svea while on a group Rogue River trip. I sought to sell it on eBay and instead discovered a whole world of other stoves that drew my interest. Many of the stoves that I had coveted in the early ’70s and ’80s were now much more affordable as used gear.
So, rather than get rid of my old kit, I ended up buying a whole lot of used kits and, over a period of several years, became fluent in their repair and operation. I even got into household and marine stoves and ranges. Sharing these skills through social forums, web pages, and YouTube videos created a sort of unplanned Internet notoriety for me.

When did you start 3D printing your product?
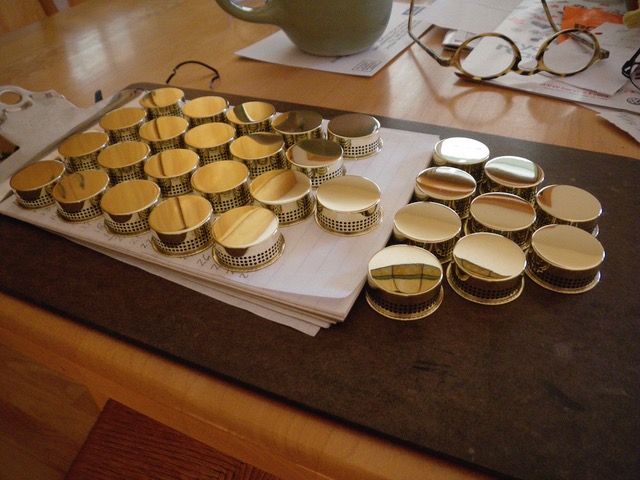
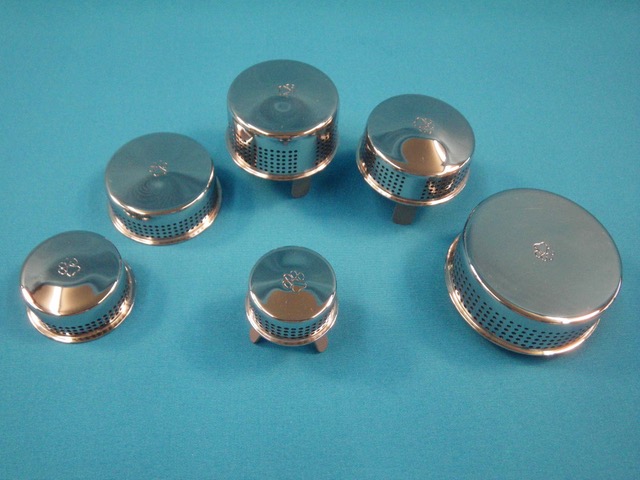
I started building silent caps for vintage stoves by hand using metal sheet and tubing and brazing the components together. The result was so successful that tons of orders and requests flowed in almost immediately. It didn’t take me long to figure out that the same designs could be modified to silence modern backpacking stoves. People went nuts for them, too. I soon had a waiting list of several months. I found myself tied to the shop with little time to kayak or hike. The labor involved was huge for such a small product – it typically took between four and eight hours to just make one.
I knew I needed a better approach. I put a freeze on the production list and once I cleared my wait list, I began offering the caps at auction on eBay, starting at a $1. This allowed me to make three or four a week and still have a life. But auction prices started reaching over $200, then $300, then $400 for a single cap. It was frenzied. The fact that people would pay those prices still amazes me. I wasn’t trying to get rich – I was just trying to set some limit to the production so I didn’t lose my mind and work myself sick.
Then 3D printing came to the rescue with unlimited production available simply by ordering it. Initially, I’d order rafts of 3D caps to sell on eBay; eventually I just turned over the entire business end to the welcoming arms of Shapeways. I set my shop up so Shapeways does the web work, money handling, and shipping stuff and I don’t have to. That stuff is yuck. Glad they do it and not me.
Where did the name “BernieDawg” come from?
My middle name is Bernard. Stoves burn. My kayaker buddies have called me “Big Dog” for the last 30+ years. (I’m quite tall.) “Big Dog” originated from me being an early adopter of “Big Dog” baggie shorts in 1983, being physically big, and looking kinda funny as a skinny tall guy in big baggie yellow Big Dog shorts. “BernieDawg” came out of the Big Dog nickname since Big Dog is usually already taken as a username across the internet. “BernieDawg” is also a play on “Burning Dog”. Take a look at the little dog in the picture and note that he has little “flames” I fashioned – “burnie-dog”. Get it?
3D design can be very daunting. Tell us about the design process for creating the stove caps and how you learned to 3D model.
I taught myself to use real engineering CAD software in order to do my models. It took me a couple of months, part-time, to work out how to successfully transfer my hand-built designs into CAD and, thence, to .stl files that could be printed. My specs are quite exact. I use TurboCAD Mac Pro. It’s a pretty bare-bones, low-tech CAD engineering software for the Mac OS.
What is your favorite material, and how did you pick it for your stove caps?
I use only one material – metal. Shapeways metal (stainless steel/bronze blend) is the only material that stands up to the heat of stove combustion. Though, it’s a less than ideal conductor of heat. I work around that in the designs. The polished finishes have better surface quality because Shapeways peens it with ceramic beads during finishing.
What makes BernieDawg stove caps special?
BernieDawg stove caps are the first modern recreation, and creation for the modern stoves since they were never historically made in those sizes, of the historic early 20th century production silent damper caps. They’re developed from hundreds of hours of hand-building and experimentation. They’re finely tuned to perform well.
What advice do you have for hobbyist designers, just getting started?
Working at a computer to do design work is all well and good, but understanding how to make stuff with your hands will help you better develop your designs and ideas. If you are younger than 40, I’d say go learn some actual tool skills. Do some woodworking or metalworking with your hands. Work up a sweat. It’s good for you, it’s honest work, and you’ll use those skills the rest of your life. You’ll always be able to pick up a tool you learned early and use it again later in life. It’s like riding a bike. And you can always use a hand tool when the power is out.
Take a class! Build a guitar, build some furniture or even build a kayak. Make some wood or metal chips. All that physical labor is way healthier than sitting in a chair in front of a screen, too.
CHECK OUT THE STOVECAPS
The post Designer Spotlight: Gary Adams (BernieDawg) appeared first on Shapeways Magazine.