Adafruit Weekly Editorial Round-Up: Secured Discount, Celebrating Vice President Elect Kamala Harris, Chinese Fashion Goes Cyberpunk, & more

INewImage 21 1 1


ADAFRUIT WEEKLY EDITORIAL ROUND-UP


We’ve got so much happening here at Adafruit that it’s not always easy to keep up! Don’t fret, we’ve got you covered. Each week we’ll be posting a handy round-up of what we’ve been up to, ranging from learn guides to blog articles, videos, and more.


BLOG

Adafruit 20off securing account blog 1

20% Off For Securing Your Adafruit Account — Limited Time Only!

Adafruit is currently offering a one-time use discount code of 20% off

The code is SECURED

Some restrictions apply, including product-level restrictions (a handful of products, including most Raspberry Pi boards, will not be eligible for discount). The discount does not apply to subscriptions or gift certificates either. The code is active from now until Thanksgiving (11/26/2020) — so get shopping!

More BLOG:


LEARN

Adafruit products MagTag top angle

Adafruit MagTag by Kattni Rembor

The Adafruit MagTag combines the new ESP32-S2 wireless module and a 2.9″ grayscale E-Ink display to make a low-power IoT display that can show data on its screen even when power is removed! The ESP32-S2 is great because it builds on the years of code and support for the ESP32 and also adds native USB support so you can use this board with Arduino or CircuitPython!

Learn more

More LEARN

Browse all that’s new in the Adafruit Learning System here!

Mason Jar Dice Roller

This would be a great upgrade for the Trouble board game.

via CJA3D on instructables

Here is a great weekend project to undertake, if you plan on playing any board/dice related games. To build the project you will need a continuous rotation servo, an arcade button and a arduino nano or ESP8266 board, in addition you will need a 3D printer.

You have a couple of options, you can either use the arcade button to drive the continuous servo to roll the dice, or you can use a web app hosted on the ESP8266 NodeMCU.The web app has 4 buttons, which spin the servos at various speeds..

Read more.

How to Make an Attiny85 Console

If you’re looking to make your own mini console, this project by ardutronic123 on instructables is really neat.

This is how arduPlay looks like – a mini-game console based on attiny85. Put the game board in the right place and close the casing, thus pressing the board to the connectors. Now you can enjoy retro-style gameplay on your hand-built mini console.

Read more.

Ben Heck Takes an Initial Stab at an Automated Face Mask @benheck #PPE

In this video, Ben Heck thinks his way through a design challenge: Can he make an effective face mask that opens at the touch of a button–so that he can take a breath, have a drink, etc.–and then closes up, again with the touch of a button.

What he ends up with is sort of a cross between Predator mandibles and Bane’s breather in The Dark Knight Rises.

Ben manages to make a pretty decent working prototype and is already at work on a more refined version. He says he’ll load the 3D printing files to Thingiverse when he gets something worth sharing.

Adafruit Weekly Editorial Round-Up: International Women in Engineering Day, Removing Racism from Thingiverse, No-Sew Cotton Face Mask with a Window, & more!

INewImage 21 1 1


ADAFRUIT WEEKLY EDITORIAL ROUND-UP


We’ve got so much happening here at Adafruit that it’s not always easy to keep up! Don’t fret, we’ve got you covered. Each week we’ll be posting a handy round-up of what we’ve been up to, ranging from learn guides to blog articles, videos, and more.


BLOG

Preview lightbox adafruit international women engineering day blog

Every June 23 we highlight women in engineering who have made an impact. In hopes to share some inspiration and help get #INWED19 trending we flooded the Adafruit blog with #ShapeTheWorld posts! Read more.

More BLOG:


LEARN

No-Sew Cotton Face Mask with a Window

More LEARN

Browse all that’s new in the Adafruit Learning System here!

An Arduino-Powered Watch Winder #Arduino #3dPrinting

What I Made Today presents an Arduino-powered, 3D printed watch winder.

Our solution is to 3D Print our own watch winder. We were inspired by the 3D mechanical design from Bruno Esgulian from his blog.

My co-blogger Mike and I recently constructed this 3D design and Arduino-controlled watch winder. Thank you Bruno Esgulian for a brilliant mechanic design. We started with his Arduino firmware, however I rewrote the firmware for Mike’s specific requirements.

See the video below and the post for details.

Adafruit Weekly Editorial Round-Up: Adafruit is open, safely, 20,000 THANK YOUs, Daily Cheer Automation, & more!

INewImage 21 1 1


ADAFRUIT WEEKLY EDITORIAL ROUND-UP


We’ve got so much happening here at Adafruit that it’s not always easy to keep up! Don’t fret, we’ve got you covered. Each week we’ll be posting a handy round-up of what we’ve been up to, ranging from learn guides to blog articles, videos, and more.


BLOG

Open

Adafruit is open, safely … and shipping all orders

How is Adafruit keeping the team safe and orders safe?

Government, educational institutions, and organizations have requested safety protocols from their suppliers, we’ve published them from the start, and frequently update as we add more safety protocols at Adafruit.

See more here

More BLOG:


LEARN

Wireless BLE MIDI Robot Xylophone

Nothing cures the blues like MIDI over Bluetooth

More LEARN

Browse all that’s new in the Adafruit Learning System here!

Build Your Own 3D Printed Open Source Motorized Microscope

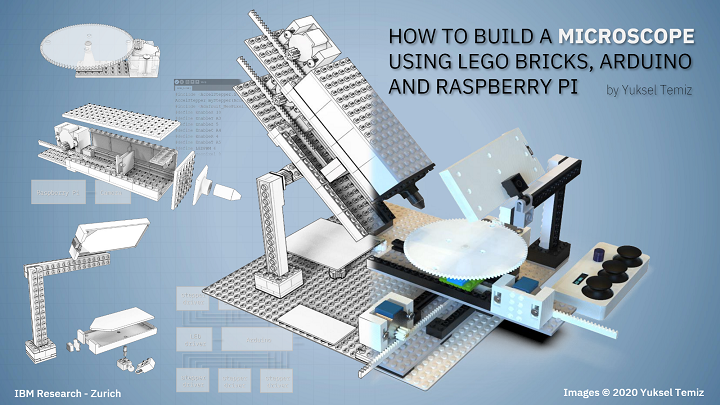
I always enjoy a good 3D printed DIY project, whether it’s truly helpful or just for fun. These projects are even cooler when you add Legos into the mix, like Reddit user DIY_Maxwell did. He posted about his work using 3D printing, Arduino, Raspberry Pi, and Lego bricks to make an open source, motorized microscope. But, the microscope itself is not fully 3D printed – instead, the body was built with Lego bricks and some 3D printed components. What makes this project more awesome is the stop motion-style video he made showing the various parts of the project and how they all fit together to make a working microscope.

BUILD YOUR OWN MOTORIZED MICROSCOPE using 3D-printing, Lego bricks, Arduino and Raspberry Pi… all design files, source codes and detailed instructions are provided open-source. from r/3Dprinting

“I wanted to have a modular microscope, something I can easily modify for transmitted-light, reflected-light, cross-section, etc. My early prototypes did not have Legos, as I started making my own interlocking pieces, I realized that I was in fact printing lego-like designs, I thought buying legos would be less of an effort,” he wrote on Reddit when asked why he didn’t 3D print all the parts. “Then I found out about these “sliding” lego pieces, which are very precise for linear actuators. The other advantage is that, if I want to change the height of the camera let’s say, I simply add more bricks, it’s convenient.”

DIY_maxwell used FreeCAD to design the 3D printed microscope parts, which were fabricated on an Ender 3 system. All of the source codes and design files have been provided open source on GitHub, along with detailed step-by-step instructions on how to make your own.

Before you jump right in, do you know what exactly a motorized microscope does when compared to a regular microscope? DIY_maxwell explained that, at least for him, it needed to be able to tilt in order to take photos, from an angle, of “highly reflective surfaces (semiconductor chips),” and that it should quickly adjust the focus and magnification, and position of the sample.

“The microscope has a simple operation principle based on changing the magnification and the focus by adjusting the relative distances between a camera, a single objective lens and a sample. Briefly, two linear stages with stepper motors are used to adjust these distances for a continuous and wide magnification range,” the GitHub instructions state. “Four additional stepper motors tilt the camera module and change the X-Y position and rotation of the sample. A uniform light source illuminates the sample either from an angle (reflected light) or from the bottom of the sample (transmitted light).”

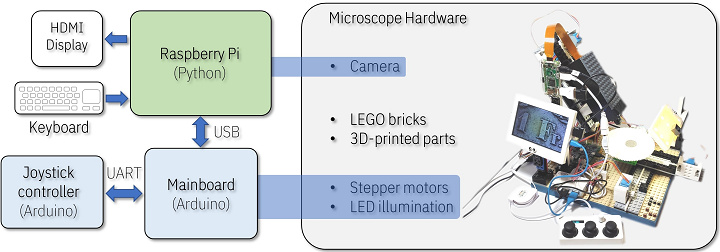
The main components of this modular, motorized microscope include a Raspberry Pi system, an 8 MegaPixel camera, six stepper motors, a keyboard or joystick for variable speed control, uniform illumination, and obviously plenty of Lego bricks. Depending on the specific features and electronics vendors used, the whole thing costs between $200-$400, and once you have all the parts in front of you, should only take a couple of hours to assemble.

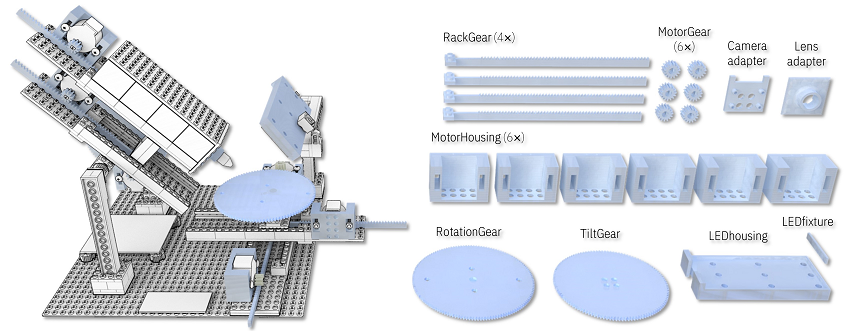
The main body was built with individually-purchased Lego bricks, and DIY_maxwell designed custom actuators and 3D printed them, rather than using available motors and gears from LEGO Technic.

“This approach not only lowered the cost of the microscope but also gave me some flexibility in the design and implementation of precise linear and rotary actuators. In principle, the whole structure could be 3D-printed without using any LEGO parts but that would be less modular and more time consuming,” he writes in GitHub.

In addition, 3D printing offers you the flexibility of quickly changing the design for maximum optimization if and when it’s needed.

“If the parts do not match well, some minor modification in the original design file (e.g. enlarging the holes matching to LEGO studs) or polishing/drilling may be required,” he explained.

The contents of the motorized microscope are as follows:

  • Linear Actuators
  • Camera Module
  • Rotary Stage
  • Illumination
  • Tilt Mechanism
  • Electronics
  • Final Assembly
  • Software

You can find detailed instructions, images, slicer settings, tips, and more on GitHub, and a longer version of the assembly video can be viewed here.

Several other Reddit users who routinely use microscopes related how impressed they were about the project; a geologist mentioned that “starting price can be anywhere between $500 to $1000 for something with that kind of quality” when DIY_maxwell said that his microscope could “easily resolve 10um features.” A pathologist expressed excitement about “a modular system to motorize common non motorized microscopes (Leica, Olympus, etc.).” While the compliment was appreciated by the maker, it was noted that “this microscope is not meant to replace a lab microscope used for medical assessment. No dark-field, no fluorescence, no aperture control, it suffers from chromatic aberration and other optical effects at high magnification, etc.”

“I hope this prototype persuades other DIY-enthusiasts to develop new designs of microscopes.”

If you’re interested in using 3D printing to make your own microscope, you can check out all of the relevant information on GitHub to build this one, or check out the OpenFlexture Microscope project on Wikifactory. This was created as “part of the Waterscope initiative, which by allowing for fast and affordable on-site bacterial testing of the water quality in developing regions of the world, is helping to cope with the diseases caused by bad quality water drinking.”

OpenFlexure Microscope

The OpenFlexure can be built in the classroom and used as an education tool for both students and teachers. Because the 3D printed microscope stage uses plastic flexures, the motion is free from friction and vibration, and the four-bar linkages in the stage can be 3D printed in a single job with no support material.

You can find other open source 3D printable microscopes on Thingiverse as well; happy making!

Discuss this and other 3D printing topics at 3DPrintBoard.com or share your thoughts below.

The post Build Your Own 3D Printed Open Source Motorized Microscope appeared first on 3DPrint.com | The Voice of 3D Printing / Additive Manufacturing.

Adafruit’s Top Youtube Videos of the Decade #AdafruitTopTen #DecadeofAdafruit

Adafruit top of the decade blog

It was so fun looking back through the Adafruit Youtube videos of the last decade to compile this list! Lets start with the best – check out our top 1-10 youtube videos of the last decade below!


1.

All About Electroluminescent Materials – EL Wire, EL Tape, EL Panel! #Adafruit

Browse Adafruit’s extensive catalog of EL materials and supplies! http://www.adafruit.com/category/50

Get inspiration for your next EL project with the guides on the Adafruit Learning System: http://learn.adafruit.com/category/el


2.

Guardian Robot – Zelda Breath of The Wild #3DPrinting #Adafruit

Since the last Guardian Robot project, we’ve gotten a number of requests to add a servo and LED to the head – In this project, we’ll show you how to do that!

Mounted to the eye is a 10mm blue LED. The head itself is attached to a servo horn and mounted to a micro servo. The head can freely rotate while the eye blink randomly. Surrounding the body are 5mm blue LEDs that illuminate the various surface details.

The random motion of the servo and eye blinks give the illusion of the robot “searching”. It’s appears quite organic and live like, adding much more dimension to this replica.


3.

Firewalker LED Sneakers

Light up your stride! Mod a pair of high-tops with NeoPixel strip and FLORA, Adafruit’s wearable electronics platform. Becky Stern and Phillip Burgess show you how to use a velostat step sensor in the heel to trigger firey animations as you walk! Build your own: https://learn.adafruit.com/firewalker-led-sneakers/


4.

We did a partial Furby teardown– check it out at the Adafruit Learning System! https://learn.adafruit.com/furby-2012-teardown


5.

Getting Started with the Fingerprint Sensor

Here’s a video guide to getting started with our fabulous fingerprint sensor! In addition to the detailed photo/software tutorial, we hope it’ll help you set up your sensor easily!

Buy one: http://www.adafruit.com/products/751
Full tutorial: https://learn.adafruit.com/adafruit-optical-fingerprint-sensor


6.

Raspberry Pi Laptop with Atrix 4G Dock

We found this post in the Raspberry Pi forums and wanted to make a tutorial for this easy way to make a Raspberry Pi laptop using the Atrix 4G dock: https://www.raspberrypi.org/forums/viewtopic.php?f=63&t=6747

Check out Adafruit’s many Raspberry Pi tutorials and accessories: http://adafruit.com/rasperrypi

More info on the cables and adapters used to make this project here:https://blog.adafruit.com/2012/09/10/cables-adapters-for-the-atrix-raspberry-pi-laptop/


7.

DIY Raspberry Pi Gameboy – 3D Printed #3DPrinting

https://learn.adafruit.com/pigrrl-raspberry-pi-gameboy
Celebrate the 25th anniversary of that classic gaming device by building your own with 3D printing and DIY electronics from adafruit.

The 3D printed enclosure will house all the components and you can print it in your favorite color.

Find out how to assemble and program this project by checking out the guide on the adafruit learning system.


8.

iPhone Light Mod

Add a light panel to illuminate the back of your iPhone!
Adafruit iPhone tools & accessories: http://www.adafruit.com/category/111


9. (personal fave)

Collin’s Lab: Soldering
Learn the basics of soldering from Collin Cunningham!


10.

Introducing NeoPixels by Adafruit!
http://www.adafruit.com/neopixel

Adding colorful LEDs to your project used to require a lot of pins on your microcontroller and complex code. With the Adafruit NeoPixels, those problems are a thing of the past. You only need one pin on any microcontroller to run a long string of pixels, and with our open source NeoPixel library, you can get your NeoPixels up and running in seconds.

Not only are NeoPixels easy to use, but they come in a wide variety of designs to fit your project. You can get NeoPixels in sewable form, long waterproof strips, in a ring, on an Arduino shield, on a stick, breadboard friendly and much more! Learn everything there is to know about Adafruit NeoPixels and how easy it is to use them on the Adafruit Learning System.