New Guide: Make Your Own Cosplay Fireball Props with Motion Sensing

Cosplay Fireball

Check out the latest tutorial from Erin St. Blaine: make a magical floating fireball prop for your Cosplay character. A snap of the wrist makes the LED flames flare up brightly! This is a fun beginner project, with no soldering required. The code is done in Microsoft MakeCode, with a drag-and-drop code block editor, so it’s easy to change colors or animation triggers.

From the guide:

Complete your cosplay with this Magical Item: a floating fireball that flares up at your command. Whether you’re portraying Kael’thas Sunstrider from WoW or trading flaming shots with Super Mario and Luigi, this fireball will push your outfit over the top. This is a very easy project, with no soldering required. The Circuit Playground board makes motion-sensing programmable lights a snap. Customize your colors and your animation speed with Microsoft MakeCode’s drag-and-drop code editor. You’ll be stopped for so many photos that you’ll never make it to that panel discussion at DragonCon.

Full tutorial: https://learn.adafruit.com/cosplay-fireball-prop-with-motion-sensing/

New Guide: Build a NeoPixel Crystal Chandelier with Speed & Brightness Control

DIY crystal chandelier

Take a look at the latest guide from Erin St. Blaine: build a three tiered chandelier with hanging DIY paper-craft crystals that light up with pixels inside. Easily add your own custom animations using CircuitPython and the LED Animations Library. This guide takes animated lights a step further, adding a rotary encoder knob that controls the brightness or the animation speed of the pixels, and also acts as an on/off switch. From the guide:

Floating crystals and glowing lights are a match made in heaven. This project combines a wide variety of skills and tools into one lovely project. Make a gorgeous hanging lamp with sparkly beads, glowing crystals, live edge wood and of course, lots of NeoPixels.

My chandelier is unique, and designed to show my personal style. Since you, dear reader, have your very own unique style, this tutorial will focus on giving you the tools to design and create your own one-of-a-kind bespoke hanging lamp. This tutorial will provide source files and ideas, and give guidance on how the electronics fit together.

This tutorial will also get you started with customizing your own software animations. The sample code uses CircuitPython and the delightfully easy to use LED Animations Library by Kattni Rembor. This code gives you a framework that allows speed and brightness control using a rotary encoder knob, so you can adjust the lighting to suit any environment or mood.

See the full build tutorial here: https://learn.adafruit.com/neopixel-crystal-chandelier-with-circuitpython-animations-and-speed-control/overview

crystal chandelier

We can’t wait to see the creative lamp you build with NeoPixels and Circuit Python!

New Guide: Minecraft Inspired Epoxy Resin Torch Lamp with Touch Control

Check out the newest project tutorial from Erin St. Blaine: make an epoxy resin Minecraft-inspired torch lamp. This lamp has a strand of warm white fairy lights embedded right into the resin, making a lovely starry glow effect. Adding a Circuit Playground Express underneath powers up the lamp with 10 programmable NeoPixel LEDs. The included MakeCode downloadable code makes the lamp flicker like a torch for a really beautiful ambient lighting effect.

From the guide:

Make your own custom Minecraft-inspired Torch lamp from epoxy resin. Embed a strand of fairy lights inside, and set it on top of a Circuit Playground Express. The onboard NeoPixel lights provide a lovely, flickery torch effect. This gorgeous lamp glows from the inside out.

Add a piece of shiny copper tape to the base, and you can change light modes with a touch of your finger. Capacitive touch control is just like magic!

We’ve provided a simple 3d printable base model, or you can get creative and design your own display mount. We made ours look like Viking Dragon Ships to go with our Dragon Wall Sconce, and now we sail into sleep at night with fiery dragonish gargoyles watching over us.

Learn to make your own Resin Torch Lamp here: https://learn.adafruit.com/epoxy-resin-torch-lamp-with-touch-control-3d-printed-base


New Guide: 3d Printed Glowing Scale Armor

3d printed mesh armor

Check out the latest tutorial from Erin St. Blaine: design and create 3d printed mesh “armor” and make it glow! From the guide:

Design and create glowing scales in your favorite shape and add NeoPixel strand lights inside for a stunning display of animated lights.

These are so easy to add to any costume or design. This guide shows you how to create your design in TinkerCad, a free online 3D design program. You can print your armor at home or use an online printing service. Hot-glue a strand of NeoPixels inside and control your project with a Gemma M0 or microcontroller of your choice.

The guide includes sample designs using a heart shape, as well as a mermaid scale shape, and instructions on how to create your own design in the shape of your choice. It also includes a 3d printable enclosure design for your Gemma M0 and battery.

See the full build tutorial here: https://learn.adafruit.com/glowing-scale-armor/overview

New Guide: Paper Craft Crystal Gems Tutorial #cosplay #stevenuniverse

New tutorial from Erin St. Blaine: create amazing cosplay glowing crystal gems!  From the guide:

Crystal Gems will always save the day!

Create a stunning paper craft crystal from laminated cellophane wrap. Add NeoPixels and watch it sparkle!

We’ve included two different build sizes in this tutorial — one crystal large enough to house a Circuit Playground Express, and one with a single NeoPixel illuminating the crystal. This project can be run from a battery for cosplay applications (the crystal on Gandalf’s staff perhaps?) or plugged in to the wall via USB for a more permanent installation.

We’ve also included a Steven Universe Warp-Pad 3D printable base, so your Crystal Gems can be displayed in style. The possibilities are endless!

We love these gems. They’re easy to make with a few easily found tools. The main ingredient is cellophane gift wrap that’s been run through a laminating machine, which creates a perfect material for paper crafting — stiff enough to hold up but easy to cut with scissors or a utility knife. You can also get fancy and use a vinyl cutting machine to create perfect gems in multiple sizes. 3d print a base, or use the gem in a hanging lamp, or place it on top of your staff for a Gandalf-style cosplay. Such a cool project!

Full tutorial: https://learn.adafruit.com/paper-craft-crystal-gem-lantern

Researchers Use 3D Printing and Basic Electronic Components to Make Neuroscience More Accessible

While I was worse in math, science was also not one of my strong suits in school. So anything that makes it easier for students to better understand these complex subjects is a good idea, in my humble opinion. Tom Baden, a professor of neuroscience at the University of Sussex, has been collaborating with his colleagues to further open up access to science education with a piece of hardware that can demonstrate how our brains function.

“By making access to scientific and teaching equipment free and open, researchers and educators can take the future into their own hands,” Professor Baden said. ” In time, we hope that this type of work will contribute to level the playing field across the globe, such that ideas, not funding can be the primary driver for success and new insights.”

Professor Baden is also one of the scientists behind the innovative 3D printable FlyPi microscope, and his latest work – an educational model of neurons in the brain made with basic electronic components – is just part of his expanding range of equipment that uses DIY and 3D printable models to make science more accessible and interactive.

One of the central parts of neuroscience is, of course, understanding how our neurons encode and compute information. But there’s not a good hands-on type of way to learn about this…until now. Professor Baden and other colleagues are building Spikeling: a piece of electronic kit which behaves similarly to the neurons in the brain and costs just £25.

“Spikeling is a useful piece of kit for anyone teaching neuroscience because it allows us to demonstrate how neurons work in a more interactive way,” Professor Baden explained.

Professor Baden, together with researchers Ben James, Maxime J.Y. Zimmermann, Philipp Bartel, Dorieke M Grijseels, Thomas Euler, Leon Lagnado and Miguel Maravall, published a paper about their work on Spikeling in the open access journal PLOS Biology, titled “Spikeling: a low-cost hardware implementation of a spiking neuron for neuroscience teaching and outreach.”

The team hopes that their invention will end up being a useful neuroscience teaching tool, and in fact, they are already seeing the benefits of their hard work. A class of third year neuroscience students at the university have used the kit, and at a Nigerian summer school last year, scientists were also taught how to build the hardware from scratch.

Spikeling has receptors, which react to external stimuli such as light to simulate how information is computed by nerve cells in the brain. Then, students can follow the activity of the receptors, or cells, live on a computer screen. Users can also link several Spikelings together to form a network, which demonstrates how brain neurons interconnect. This action makes it possible to demonstrate the neural behavior behind every day actions, such as walking.

The goal in Professor Baden’s lab is to, as the university put it, “level the playing field in global science” and make necessary equipment less expensive than it usually is. That’s why all of the information and design files for Spikeling have been made available, joining a growing trend around the world of designs collected on the PLOS Open Hardware toolkit, which Professor Baden just so happens to co-moderate.

A. Bag of parts disassembled Spikeling, as used in our summer school in Gombe, Nigeria. B. Students soldering Spikelings as part of an in-class exercise on DIY equipment building.

“With all parts being cheap, and design files being free and open, we hope that like any open Hardware design, Spikeling can be a starting point for others to change or extend it to their requirements, and reshare their improved design with the community,” Professor Baden said.

Andre Maia Chagas, one of the research technicians in the lab, recently published his own article in PLOS Biology that explains the importance of open scientific hardware, in response to a piece by Eve Marder, an American neuroscientist who wondered if researchers who worked in less wealthy institutions would fall behind as scientific research equipment continues to grow more expensive. More and more, we’re seeing that 3D printing can be used to make sure this doesn’t happen.

Discuss this story and other 3D printing topics at 3DPrintBoard.com or share your thoughts below.

[Images provided by University of Sussex]

Unique 3D Printed Connectors Help You Create Versatile Pieces of Furniture

[Image: Riley Young, Digital Trends]

While it is absolutely possible to 3D print custom furniture today, I think we can all agree that doing so is generally not as easy as just heading out to IKEA, Natuzzi or Ethan Allen or Value City Furniture or wherever it is you buy your home furnishings. In addition, some of the 3D printed furniture out there is just not that practical. Some pieces can even look like they belong on the set of another Willy Wonka movie remake…sorry if that’s harsh. But, that doesn’t mean we can’t use 3D printing to enhance or build furniture through the creative use of brackets, connectors, fasteners, and joints.

It’s entirely possible to improve upon furniture and make it your own without creating the entire piece in a wood or 3D printing workshop; most desktop 3D printers don’t have the build area to print a kitchen table anyway. But using connectors allows you to customize your furnishings without having to build something entirely new…unless you feel like it, of course.

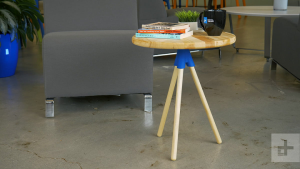
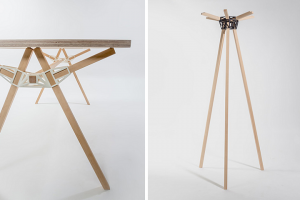
Asa Christiana and Drew Prindle with Digital Trends recently highlighted a quick DIY end table project that used a 3D printed tripod joint.

[Image: Riley Young, Digital Trends]

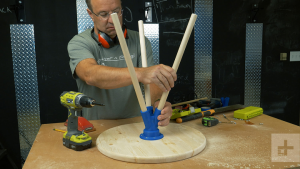
“Before you do anything else, you should fabricate the 3D printed tripod joint,” Christiana and Prindle wrote. “This part is the keystone of the entire table, so it’s crucial that you get it right. By printing it first, you’ll be able to take it with you when you head out to buy materials, and make sure that all the dowels and screws you get will fit properly.”

The simple design for the 3D printable joint model, by Cults3D user Alejandro Macias, will need to be tweaked so you’re sure the three 7/8″ dowel rods used as the table legs will fit. Once the file has been downloaded and loaded into a slicer program, you’ll want to scale the part’s flange up to about 106% of its original size, or even 107% just to be safe. Print the part on a 3D printer with a build envelope of at least 105 mm wide and 130 mm tall.

“After printing a few of these suckers, we determined that you need to bump up the number of shells (the outer layers of the print) and the amount of infill (the interior of the print) considerably in order to give the completed part more structural integrity,” Christiana and Prindle explained. “We printed ours with six shells and 40 percent infill, but you might want to kick it up even more (say, 8 shells and 50 percent infill) if you plan on putting heavier items on the table.”

They also noted that the interior will need to have supports, as there is a possible failure-causing “unsupported stalactite in the middle of the model.”

[Image: Riley Young, Digital Trends]

The dowel rods should slide right into the 3D printed joint, which includes small screw holes in the sides for fixing everything into place; these holes will probably need to drilled a little bit larger so the screws can freely pass through.

“To make sure you don’t create the Leaning Table of Pisa, draw a light pencil line about 1.5 inches from the end of each leg before inserting it, to help you insert them all the same amount,” said Christiana and Prindle. “Once you do, use the screw holes in the flange to locate and drill small pilot holes in the sides of the dowels before driving the screws. There isn’t much danger of the screws cracking the tabletop, but they could split the dowels if you don’t drill pilot holes.”

To learn all the important details of building the actual table, check out the rest of the project here.

[Image: MOCO Submit]

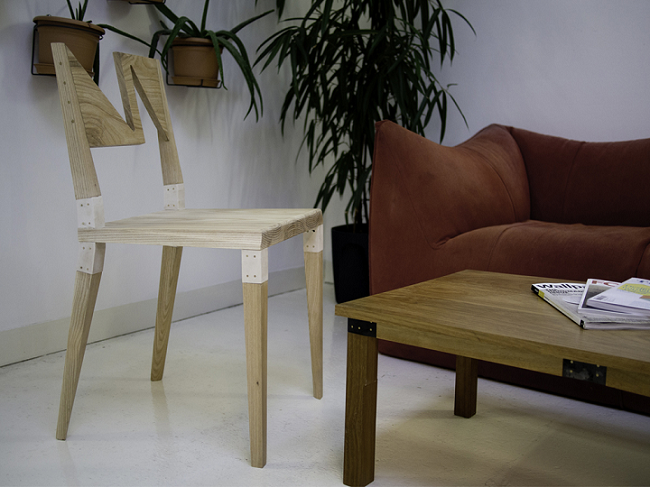
Over the last few years, we’ve seen all kinds of interesting 3D printed furniture connecting pieces. For example, the Control DIY Furniture collection by Jack Holloway offers open source, downloadable files of custom, 3D printable furniture joints that, once completed, can be fitted with standard dimension lumber to build benches, tables, and chairs. These joints are recommended to be printed in nylon (polyamide), acrylics, and even metal. These look so elegant, you’d think the entire piece was built to look that way.

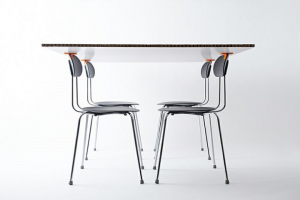
3D printed connectors offer versatility, letting you create unique pieces of furniture that sit at unusual angles, link together, or even create a table out of four chairs and a flat surface – perfect for smaller spaces. Italian-Japanese Studio Minale-Maeda created 3D printable sculptural Keystone connectors, which can be ordered from the Rotterdam studio or, to help cut down on emissions resulting from shipping and the need for big-box stores, be 3D printed as an open source design. These connectors can be tightened easily with a screwdriver, to help you repurpose old furniture parts or assorted pieces of wood into new furnishings.


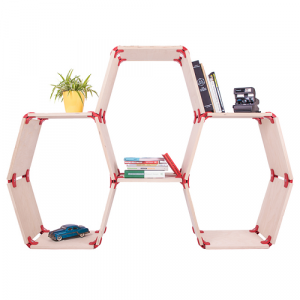
The Playwood collection of colorful 3D printed connectors by Italian designer Stefano Guerrieri gives you the flexibility to change up your environment on a whim, with only an Allen key needed to tighten the connections. Build your own furniture with whatever materials you want – so long as they are between 1.5 and 2 cm thick – and join the pieces together at 90°, 105°, or 150°, with three different kinds of recyclable polyamide connectors. According to the designer, Playwood was inspired as a modular and tactile response to the creativity-killing environment of a static office.

“We believe that people should be able to shape their own places according to what they do, we believe in modularity and creativity freedom,” said Guerrieri. “It doesn’t matter if it is a freelance studio or a billion dollar corporate office, the ability to organize your space is a powerful tool that brings office relationships to the next level and fosters innovation.”

Personally, I prefer my furniture to be a little less whimsical than the Playwood collection, but to each his own…which is the whole point of custom 3D printable furniture connectors, of course.

Discuss 3D printed furniture connectors and other 3D printing topics at 3DPrintBoard.com or share your thoughts in the Facebook comments below. 

Pentasynth: A homebuilt pentatonic keyboard and synth

Thanks for sending this in Mitch! Via Random Project Lab

This is part two (see part one) of a post on a custom-built Arduino-based synthesizer and keyboard called “Pentasynth”. Pentasynth uses a keyboard based on a five note pentatonic scale, so it’s easy to play for people with limited background in music (such as young kids) and encourages experimentation and improvisation. Pentasynth creates a user-selectable accompaniment including different drum patterns, bass lines and chord progressions and allows the user to play a pentatonic melody line over the top. Under the hood, Pentasynth runs on an Adafruit Metro Mini (using the same ATmega328 microcontroller as the Arduino Uno) and generates three channel audio (two square-wave tones and one pseudo-random noise drum beat), which is passed through and onboard amplifier and speaker, while simultaneously passing all outputs as MIDI messages via the USB for either a lo-fi or hi-fi audio experience. Pentasynth has controls for volume, tempo and selection of different accompaniment patterns. The keys and case components are 3D printed, with the main case panelling carved from clear acrylic using Carvey. Custom PCBs containing switches for detection of key presses were also carved on Carvey.

In the previous post, I discussed the hardware development of the keyboard including 3D printed keys and CNCed case and key switch PCBs, and the use of a wavetable synth for audio. I wasn’t that happy with the audio quality from the wavetable synth, so I re-wrote my own system using hardware PWM square-waves for audio, with a bit of re-jigging to add MIDI output. I’ll also discuss the electronics in a bit more details and the code running on the Arduino.

The ATmega328 has three hardware timers that can each be used to drive interrupt routines or run a hardware Pulse Width Modulation (PWM) signal. Since I wanted to keep the main program on the microcontroller free to managing key and control inputs and running an accompaniment system, the hardware timers were the only way to generate audio signals. By default, two of these timers (Timer 1 and 2) are unused, and the other (Timer 0) is set to run at 1kHz and controls functions such as millis() and delay(): any change in this frequency would mess with these. I’ve setup Timer 2 to run a square-wave output based on the note pressed on the keyboard and Timer 1 to run a square-wave from an accompaniment baseline. In order to get a pseudo random noise signal for a drum beat, I’ve piggy-backed an interrupt routine on the existing 1kHz to generate a pseudo random square-wave (i.e. randomly ordered series of LOW/HIGH) using a Galois linear feedback shift register (see this nifty little post). The random signal switched at 1kHz sounds a bit like a snare or open high-hat, so makes for a decent (lo-fi) beat.

See more!

Electronics