Researchers Develop Workflow for Repeatable Fabrication of PMMA Craniofacial Implants

While 3D printed patient-specific implants (PSIs) are helpful in craniofacial surgeries, it’s not always a practical option due to high costs and, as a research team from Switzerland’s University Hospital Basel puts it, “a lack of expertise.” They published a paper, “Accuracy Assessment of Molded, Patient-Specific Polymethylmethacrylate Craniofacial Implants Compared to Their 3D Printed Originals,” about their work to create a “simple and cost-efficient template-based fabrication workflow” that can help surgeons get past these issues and succeed.

“The aim of this study is to assess the accuracy of PSIs made from their original templates,” the researchers explained.

Cranial defects (CFD) and deformities can cause aesthetic, functional, and psychological problems for patients. A cranioplasty is performed to improve a patient’s neurological status, and to restore the function and structure of the missing cranial bone. PMMA is the most popular alloplastic material for cranial reconstructions, as it’s a cost-effective choice, resistant to functional stress, and is lightweight, yet not thermoconductive. But, intraoperative PMMA molding can be difficult in complicated cases that require a PSI.

“Other problems encountered with PMMA include the excessive heat generated by the exothermic reaction that occurs during the molding process, which might harm the surrounding tissues, or allergic reactions to monomers. In addition, the freehand PMMA molding technique is associated with an increased surgical time and often results in unacceptable cosmetic outcomes. Hence, to mitigate the problems associated with freehand implant fabrication, preoperatively or intraoperatively (extracorporeal) fabricated PMMA PSIs are used,” the team wrote.

3D printed templates for custom, pre-fabricated PMMA implants make the process easier, though there haven’t been many studies evaluating how accurate PSIs are, and if the silicone molds are reusable if the patient requires a revision operation. That’s why the team chose to compare molded PMMA PSIs to 3D printed, virtually designed templates.

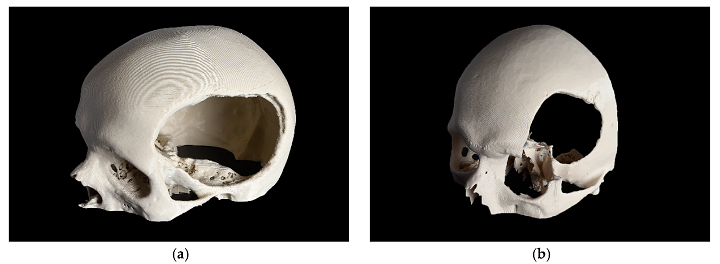
3D printed skull models with the defect are. (a) CRD; (b) TOD.

They chose two cases – a CRD and a temporo-orbital defect (TOD) – and imported DICOM data from the CT scans into Materialise Mimics software. After generating a 3D volumetric image of the skull anatomies, and the overall shape of the PSIs, the files were smoothed out and exported in STL format. The templates were printed out of PLA filament on a MakerBot Replicator+, and post-processing was completed to fix little irregularities that occurred. Finally, an EinScan-SP 3D scanner was used to digitize the 3D printed templates, and the resulting point cloud data was converted and exported in STL format.

Twenty PMMA PSIs were made out of a high viscosity bone cement using the silicone molds  – ten each for the CRD and TOD cases. They were digitized with cone-beam computed tomography (CBCT), and the CBCT DICOM data was segmented and extracted with Mimics; data from the digitized PMMA PSIs were then exported in STL format.

The team used the Materialise 3-matic analysis program to compare the accuracy of the 3D printed templates and PMMA PSIs.

“The accuracy of the PMMA PSIs was evaluated by superimposing the STL file data of the related template with the STL file data obtained from the CRD-PSIs (n = 10) or the TOD-PSIs (n = 10) test group. For accurate alignment, the datasets of the CRD- and TOD-PSIs were registered with the corresponding 3D printed templates. All registrations were achieved using the “align” feature. Therefore, five manually placed control points in the n-point registration and a global registration were performed,” they explained.

Comparison of 3D printed templates (a, b, beige) with the PSIs according to the n-point registration with five manually placed control points (c, d, purple), and superimposition (e, f). L: cranial template and PSI; R: temporo-orbital template and PSI.

They compared the differences with a maximally tolerated deviation of ± 2 mm, and the measurements were put in a color map.

“Using an identical coordinate system between the datasets, the quantitative values of the deviations were automatically calculated using a 3D analysis program with respect to the root mean square (RMS) values. The RMS values describe the absolute values of the deviations between two datasets. This comparison of the two datasets comprising n-dimensional vector sets provides a measurable value of the similarity after optimal superimposition. The higher the RMS value is, the greater the deviation error between the two datasets will be,” the researchers explained.

The RMS ranged from 1.128 to 0.469 mm, with a median RMS (Quartile 1 to Quartile 3) of 0.574 (0.528 to 0.701) mm for the CRD implants. For the TOD, the RMS was 1.079 to 0.630 mm with a median RMS (Q1 to Q3) of 0.843 (0.635 to 0.943) mm.

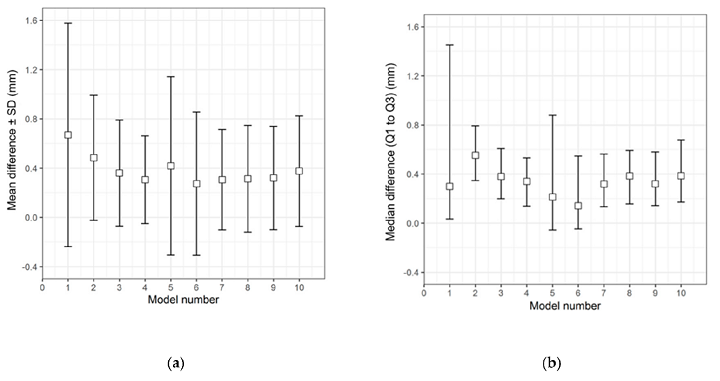
Descriptive data distribution illustrating the difference between the CRD-PSIs and the CRD 3D printed template. (a) Mean difference ± SD; (b) Median difference (Q1 to Q3).

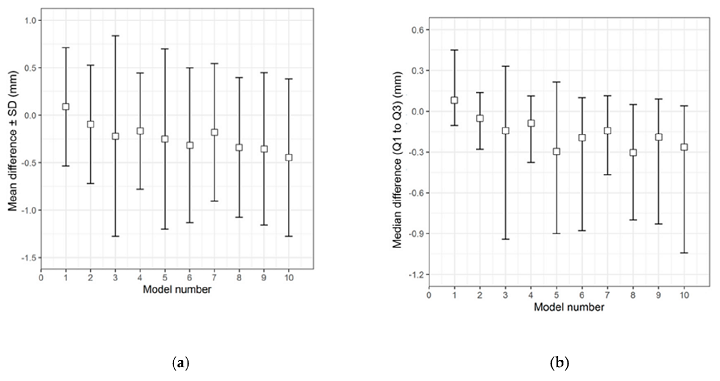
Descriptive data distribution illustrating the difference between the TOD-PSIs and the TOD 3D printed template. (a) Mean difference ± SD; (b) Median difference (Q1 to Q3).

You can see in the box plot graph below the quantitative data distribution results of the RMS values for the ten PSIs in the two test groups.

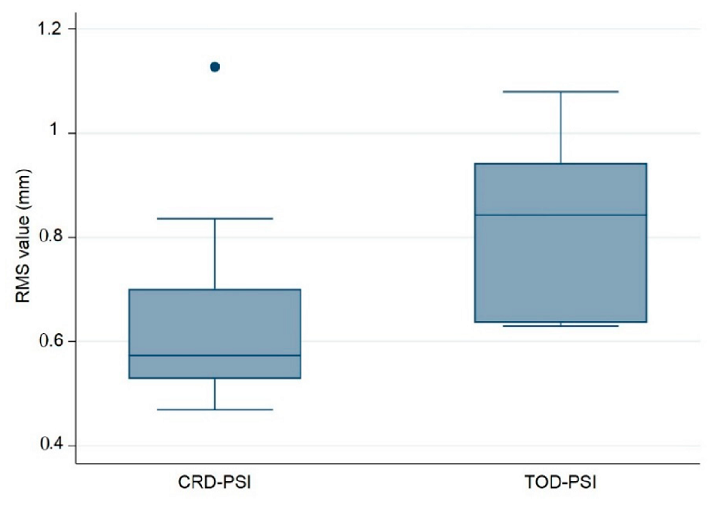
Box plot illustrating accuracy comparison with respect to RMS values between the PMMA CRD-PSI and TOD-PSI test groups (● describes the statistical outlier, CRD-PSI 01).

The deviation analysis for the CRD-PSIs and TOD-PSIs is shown in the heat map below. The blue areas represent negative deviations, and the red show positive. There was a slight positive deviation on the outer surface of the temporal region of the CRD-PSIs, and a slight negative on the inner surface “at the antero- and posterolateral margins.” For the TOD-PSIs, the outer surface of the infra-temporal region had a strong positive deviation, with a negative on the inner surface at the posterolateral margin.

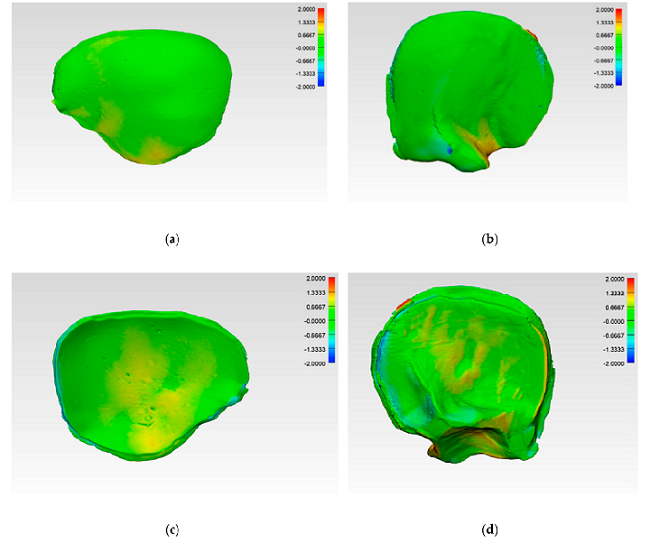
Color-coded deviation maps within each test group after applying best-fit method and generating a 3D comparison to evaluate accuracy. CRD-PSI: (a) squamous (outer) surface; (c) cerebral (inner) surface. TOD-PSI: (b) squamous surface; (d) cerebral surface.

“The present study demonstrates that the described manufacturing process of molded patient-specific PMMA implants based on 3D printed templates is highly precise, with a less than 1 mm deviation evaluated in two different defect patterns. This reflects the results commonly reported in the literature, where the overall inaccuracies of pure 3D printed anatomical models are also less than 1 mm,” the researchers wrote. “Thus, the PSIs are largely consistent with the 3D printed templates in terms of accuracy.”

As patient-specific treatments become more popular in diagnostic treatments and procedures, the demand continues to rise, especially when it comes to cranioplasty. You can easily see the difference between reconstructing a skull defect with a 3D printed PSI, and doing so with an implant manufactured manually. Even after “successive usage of silicone molds,” the study found that the dimensional accuracy of the PMMA PSIs was at a “clinically acceptable accuracy level.”

“The RMS values illustrate that, even after ten impressions (n = 10), the manufacturing method produces no clinically relevant deviations,” the researchers concluded. “Overall, the results suggest that the manufacturing process described in this study is an exact and reproducible technique. The median RMS values for each of the two test groups did not exceed 1 mm, which is an acceptable accuracy for clinical routine in craniofacial reconstruction.”

This workflow is an accurate, repeatable way to use PSIs in anatomical reconstructions, as it reduces time in the OR, makes common materials more available, and the silicone mold can be reused.

Discuss this and other 3D printing topics at 3DPrintBoard.com or share your thoughts below.

The post Researchers Develop Workflow for Repeatable Fabrication of PMMA Craniofacial Implants appeared first on 3DPrint.com | The Voice of 3D Printing / Additive Manufacturing.

3D Printing News Briefs: May 30, 2019

In today’s 3D Printing News Briefs, euspen plans to hold a Special Interest Group meeting in September centered around additive manufacturing, and an adjunct professor completed a comparison between a small SLS 3D printer and a large one. Moving on to interesting 3D printing projects, an artist teamed up with Mimaki to use full-color 3D printing to make a stage prop, a reddit user created an anti-cat button for an Xbox system, and an imgur user created a modular 3D printed fashion system.

euspen to Hold Special Interest Group Meeting on AM

The European Society for Precision Engineering and Nanotechnology (euspen) will be addressing the factors which are influencing an uptake of the use of additive manufacturing as a production technology at a Special Interest Group (SIG) meeting in September. The meeting, which will be co-hosted by the American Society of Precision Engineering (ASPE), will analyze the barriers to, and the opportunities for, the adoption of AM in production. It will be held from September 16-18 at the École Centrale de Nantes in France.

At the AM SIG meeting, issues that are, as euspen put it, “critical to the viability of AM as a production technology,” will be addressed. The co-chairs of the meeting are Professor Richard Leach from the University of Nottingham and Dr. John Taylor from the University of North Carolina at Charlotte. Local hosts and the organizing committee include Professor Alain Bernard from Centrale Nantes, Dr. David Bue Pedersen from the Technical University of Denmark, Professor Leach, and Dr. Taylor.

Comparison of Small and Large SLS 3D Printers

3D printers are often used in educational settings these days. Piotr Dudek, an adjunct professor at the AGH University of Science and Technology in Poland, runs a 3D printing lab at the school that both students and researchers frequent. While many technologies are used in the lab, SLS is the one that most interests Dudek, who decided to compare a big SLS system from EOS with the smaller Sinterit Lisa.

We are using the big EOS SLS 3D printer for a long time and we wanted to compare it with Sinterit Lisa, check the possibilities of it. In SLS technology every detail matters. The temperature of the printing chamber, powder distribution system, heating or laser moving mechanism are very precise and important features. We wanted to test if Sinterit’s device is the valuable solution,” Dudek stated.

Larger 3D printers obviously have higher print volumes, but the down sides include difficult calibration, specialized training, and higher costs. In addition, it’s easy to mess up the calibration of a large 3D printer during transport. The Lisa 3D printer uses a gantry system, which comes pre-calibrated to save time, and it also uses less material, which means less money. The desktop printer is also much more student-friendly, making it the better choice for 3D printing labs like the one Professor Dudek runs.

Full-Color 3D Printed Stage Prop

A few months ago, 3DPrint.com heard from 3D printing specialist and Post Digital Artist Taketo Kobayashi, from the Ultra Modelers community, about an art exhibit in Japan that he helped organize which featured colorful, 3D printed works created on the Mimaki 3DUJ-553 full-color 3D printer. Recently, he reached out to us again with news of his latest Mimaki Engineering collaboration – a stage prop for the Japanese artist Saori Kanda, who performed with techno/trance band Shpongle at the Red Rocks Amphitheater in Colorado.

“It is a artwork,” Kobayashi told 3DPrint.com, “but also a utilization of full color 3D printing to entertainment field.”

The “Shpongle Mask,” which took 28 hours to print and mixed in Asian details, was worn onstage by Kanda as she performed her painting live with the band.

3D Printed Anti-Cat Xbox Button

reddit user Mbiggz was getting sick of their cat turning off the touch-sensitive button on the Xbox console while it was in use, which I can understand, having two cats of my own. So Mbiggz came up with the perfect solution – a 3D printed cover for the button. The design can be found on the maker’s Tinkercad account, as Mbiggz originally made the design for a Digital 3D class.

“Adhesive goes on the back part (it is labeled in the print). I’m a newcomer in terms of this so it’s not perfect,” Mbiggz wrote on Tinkercad. “Also, the door doesn’t open all the way, so you can fix it so that it does if you want to (even though it doesn’t really matter, there’s not really a need for it to open it all the way).”

3D Printed Modular Fashion System

hunter62610, a young imgur user, designed and 3D printed a Lego-like modular fabric system, which was featured in his school’s fashion show. He made two dresses that are made with a 3D printed prototype fabric pattern called Escher, which was designed to be “put together and taken apart” hundreds of times. It took him just two weeks to make the material, which the two young ladies who modeled the dresses said was fairly comfortable.

“The idea of the system is that theoretically, one could buy a fashion catalog filled with designs, and say 5000 links. Once could make every clothing item in the catalog, based on there needs. Perhaps that’s a pipe dream, but it’s a fun idea,” hunters62610 wrote.

“The Escher system is quite versatile. Each link acts like a free flowing Equilateral triangle, and has a male and female ball joint on each side. Every individual link is theoretically compatible with every other link. Special links are stored in the middle of this pouch that are really 3 merged links with a screw hole. If needed, these links can be used as elastic tie down points or buttons, if you screw in the buttons i made.”

A Makerbot Replicator Plus was used to print the fabric links in unique, small panels.

Discuss these stories and other 3D printing topics at 3DPrintBoard.com or share your thoughts in the Facebook comments below.

3D Printed Prosthetics and Simulator Could Lead to Optimized Devices

In a thesis entitled “Optimizing 3D Printed Prosthetic Hand and Simulator,” author Stephen Estelle discusses an investigation of the use of an upper extremity prosthetic simulator for those who are not missing limbs – for example, for schools or research facilities. No standardized prosthetic simulator exists for these facilities, Estelle says. He discusses using 3D printing to modify the existing Hosmer 5X Prosthetic Hook by adding newly designed trusses.

“To continue to raise prosthesis satisfaction, the professionals who are assisting the users with the prosthetics need to be able test, redesign, and optimize prosthetics for their clients,” Estelle states. “If issues arise for amputees, such as profuse sweating, and the working professionals had the most efficient technology, then they could bring new changes to the prosthetic as swiftly as possible. This is imperative so that the necessary changes to the devices can be made promptly, accurately, and correctly.”

Priorities for prosthetic users, according to a survey, include:

  • increased functionality
  • natural interaction with the environment
  • reduced weight
  • higher grasping speed and forces
  • low noise
  • better cosmetic appearance

Estelle 3D scanned an existing Hosmer 5X Prosthetic Hook and then used the scans to create a 3D model from which he 3D printed several redesigned prototypes, aiming to create a prosthetic that would work well with a simulator.

“The trusses on the side of the newly designed model of the Hosmer 5X Hook were inspired by bridges and the truss system used for them,” he explains. “The purpose of the truss is to reduce any form of displacement of the prosthetic hook, as well to disperse the stress and strain that the prosthetic encounters throughout the device more evenly. The truss was designed to reduce any bending or twisting moment due to a force on the tip of the hook. By doing so, the prosthetic is able to withstand higher forces and reduce the buildup of maximum stress in certain locations.”

Estelle also designed a prosthetic simulator that could be attached to a user’s arm, and a small sample population of volunteers participated in a study using the simulator. The prosthetics and simulators were 3D printed on the Stratasys F270 and the MakerBot Replicator in PLA material.

Simulator iterations


“The two simulator positions were in front of the hand and below the hand, while the two different prosthetics were the original stainless-steel
Hosmer 5X Prosthetic Hook and a PLA 3D printed replica,” Estelle continues. “The two prosthetics weighed 5.5oz and 2.5oz respectively, and the only difference being the material and the additional M12-1.25 hex screw connected to the 3D printed replica.”

The four testing groups were:

  • in front of the hand with the original prosthetic
  • below the hand with the original prosthetic
  • in front of the hand with the replica
  • below the hand with the replica

The participants were required to perform a “Box and Blocks test” to measure manual dexterity using the prosthetics. A box with a partition in the middle was placed in front of each participant, with blocks on one side and an empty space on the other. The participants were required to move as many blocks as possible from one side to the other in one minute.

The participants wearing the 3D printed prosthetic did slightly better with the test than those wearing the original, possibly because the 3D printed prosthetic was more lightweight. The bottom prosthetic position also may have allowed the wearer to reach the blocks more quickly.

“These preliminary tests that were done in this study not only gave us insight on the prosthetic simulator position and the material choice for the prosthetic, it also gave us a better understanding on performing more accurate and reliable tests as we move forward and continue with this study,” says Estelle. “In the upcoming trials, the addition of a tracking system will be added to help us understand the body movements that go along with the simulator positions and the prosthetics being used.”

Discuss this and other 3D printing topics at 3DPrintBoard.com or share your thoughts below.