The Maker Movement Unmade? Part 5: The Community Responds

With this series, we’ve explored the changes that have occurred within the maker movement with the thesis that it seems to have fallen apart. Based on community feedback and some actual numbers, that thesis is likely incorrect. More accurately, the maker movement seems to have become integrated into mainstream society, particularly in educational spaces. And it has perhaps been the neglect from the media, in part, that has allowed the movement to fade from view.

Limor Fried, founder of open hardware supplier Adafruit, was quick to point out to 3DPrint.com that the “maker movement” is not defined by any one publication or company in the space and that “there are more publications for makers now (hackspace, etc.) and more electronics, more events, and even more things to do. [T]here are more open-source software and hardware projects than ever.”

The Open Source Hardware Association (OSHWA) keeps running tabs of the projects with OSHWA certification, currently numbering just under 400. The list continues to grow, with new additions as recently as January 13, 2020. At the beginning of the year, designer Mark Mellors uploaded a number of interesting 3D printable medical devices, such as an umbilical cord clamp and otoscope specula.

Since it was founded by Limor Fried in October 2005, Adafruit itself has been a demonstration of the overall growth of DIY/hacking culture. In the open source spirit, the company has regularly updated its community about the number of products it has shipped. As of December 2019, Adafruit had over 2,211,443 orders with revenue of over $40 million. Crucially, the company has had no loans, nor any venture capital.

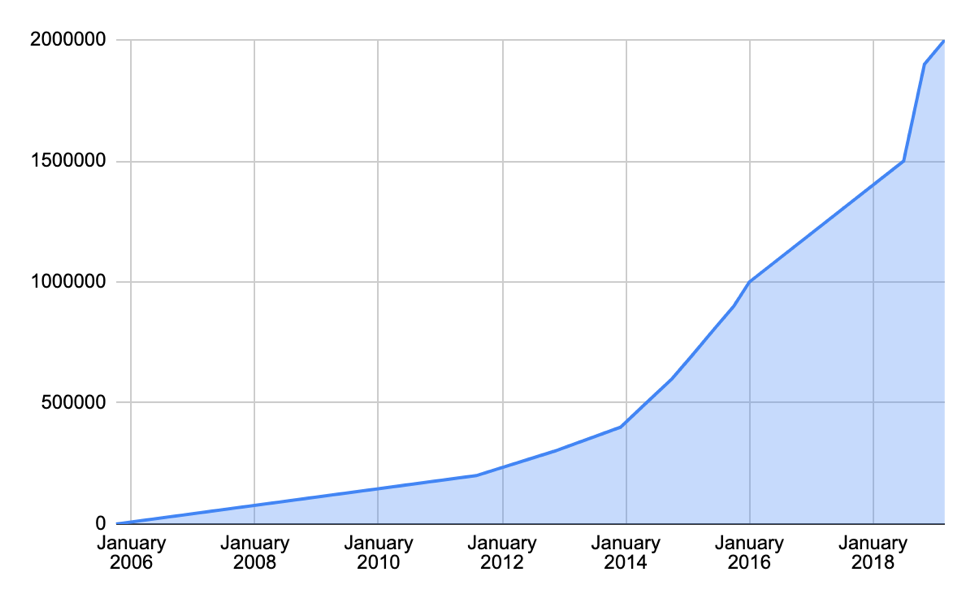
A chart made using Adafruit’s public information about year-on-year growth.

That doesn’t mean that the maker movement hasn’t changed. In addition to the metamorphoses of some companies, the preferences of the community itself have changed. For instance, the Adafruit team says that “in the past there was a lot of Arduino, but the market has moved to the most popular programming language for a lot of hardware (python) and for the physical format, feather, there are hundreds of boards and wings.”

The trick, according to the people closest to the open hardware community, is not to necessarily look at the original and bigger names in the maker movement. In addition to some of the companies we covered in a previous installment, there are names like TechShop that, at one point, became associated with the maker movement. While TechShop went out of business (using a for-profit model, it should be noted) and its CEO Mark Hatch failed to launch a maker-inspired bitcoin, other companies have been quite successful.

While the RepRap forums aren’t quite as active as they used to be, both the Adafruit team and Adrian Bowyer, founder of the RepRap Project, pointed out that Prusa Research now sells more 3D printers than any other company. The company was founded by RepRap legend Josef Prusa, whose Prusa RepRap design was replicated and, in some cases, commercialized numerous times by the open hardware 3D printing community.

Based on some always helpful research from Adafruit, Prusa Research had sold 150,000 3D printers. These aren’t just any desktop machines, but RepRaps—that is open source printers with many parts 3D printed on other open source 3D printers or self-replicating machines. The company earned roughly €33M in revenue in 2017 and, according to Deloitte, was the fastest growing tech company in Central Europe in 2018, growing at a rate of 17,118 percent over the previous four years.

Another legendary RepRapper, Richard “RichRap” Horne assured us that “[t]he maker culture is very much alive, always transforming and evolving.” Horne suggested that a community, whether in the form of a Makerfaire or a virtual space, is one that many DIY enthusiasts would likely want to pay for:

Whilst people happily pay for materials, tools and software the idea of paying to access an online community is not quite as compelling because so many highly focused knowledge sharing repositories already exist, they also need to be both niche and be able to accommodate and share ideas from anywhere (feeling independent), being behind a paywall or as a subscription service is unlikely to work in my view.

He also said that “[t]he RepRap movement is also going strong; it’s also slowly transitioning to another level of user and technology adoption. We are seeing constant developments of new ideas that are leading to ever more useful machines and commercial businesses.” Horne pointed out:

[T]he RepRap project launched thousands of companies to ‘feed’ the open-source 3D printing revolution, some of these like Prusa and E3D have taken that to the next level of both business (product sales) and circular developments of highly user focused products.

I’m quite interested to see what open-source hardware companies do to expand and also cultivate their communities of dedicated users and contributors. These companies may have the power (and funds) to help sustain and grow all sorts of niche developments and therefore build on that symbiotic relationship.

For his part, Horne is working on tool-changing technology and is still developing next generation paste extruders for food- and non-food-based 3D printing. Adrian Bowyer is working on a 3D printer that uses an electric current to cure a photopolymer resin that would rotate around the vat like a CT scan.

Adrian Bowyer’s schematic for an electric current 3D printer. This project definitely requires its own article. Image courtesy of Adrian Bowyer.

Another RepRapper, Nicholas Seward, currently works as a teacher, but still builds 3D printers in his spare time. He is involved in some exciting projects, including: a print bed that can actively heat and cool along with an automatic part ejection system, his RepRap WHEELIOS and HELIOS designs, and a prototype for backpack-sized printer that uses a SCARA arm to roll open a door so that it can print something as large as a human. He’s also starting to build RepRaps with six-degrees of freedom, either a Sextupteron or Stewie Simpson, but hasn’t decided which yet. If you look into any of these projects, you’ll see that they have some of the most interesting architectures imaginable.

Seward believes that the maker movement is mirroring the hype cycle generally associated with new technologies. He suggests that it may be fracturing back into sub-disciplines as the unified culture symbolized by some brands was too big to maintain. As for RepRap, Seward sees 3D printer development moving back into the private space, arguing that the concepts of patents and intellectual property are hindering what could be a much more rapid evolution of these technologies:

Open source is a big deal to me. I think patents are in some ways horrible for humanity… The only reason the RepRap project could do what it did was because the FFF patents expired right when it started…there is more and more pressure for patents and secrecy.  I have signed a…ton of NDAs (for consulting work) for companies that want to be open but are dealing with traditional funding models and expectations. I can’t fault them and I freely work for them (to a degree).  Even if I help them get to an idea that they patent, it might inspire others and eventually everyone can use the patent. You have to work within the system or you go out of business.

In the next installment in our series, we will continue to relay the feedback of prominent makers, including Joshua Pearce of Michigan Technological University and former Autodesk CEO Carl Bass.

The post The Maker Movement Unmade? Part 5: The Community Responds appeared first on 3DPrint.com | The Voice of 3D Printing / Additive Manufacturing.

The Nydus One Syringe Extruder (NOSE): Turns Your Prusa i3 Into a Bioprinter

Researchers from Germany are exploring democratizing bioprinting with their findings outlined in ‘Nydus One Syringe Extruder (NOSE): A Prusa i3 3D printer conversion for bioprinting applications.’ Recognizing the promise of this new technology and all that surrounds it, the authors focus on the potential for eliminating animal testing in the pharmaceutical industry, along with the ability to offer patient-specific treatment in nearly every area of medicine. But, applications could extend far beyond these.

In this study, the research team studies the performance of a Prusa i3 converted with a Nydus One Syringe Extruder (NOSE), allowing for hydrogel extrusion and ‘tunable deposition precision’ with a syringe holder. Projects like these are possible because of open-source technology, and here, the team was able to alter their low-cost 3D printing hardware to experiment in bioprinting. The combination of NOSE and the Prusa i3 platform in an open source bioprinting package is a potentially powerful one that could democratize bioprinting worldwide. Building on CMU’s FRESH research that has already lead to tissues being made on low-cost printers this is really a potentially groundbreaking moment in bioprinting.

So far bioprinters have been niche and cost 100,000’s or tens of thousands. With FRESH CMU already has demonstrated for three years that low-cost bioprinting for $500 to a $1000 is possible. But, this GPL licensed research combined wit the popular Prusa i3 open source 3D printer could be the thing that makes bioprinting accessible. What this paper does is give you a step by step guide on how to bioprint using a modified Prusa printer and some extra parts. In one fell swoop, hundreds of thousands of Prusa operators could potentially now experiment with bioprinting.

No matter what type of hardware, software, or materials are used though, challenges still abound in bioprinting as researchers must work hard to keep cells alive in the lab. Open sourcing allows for smaller labs to forge ahead in bioprinting also as they can bypass the cost of commercial hardware which could cost hundreds of thousands of dollars. Modifications to the Prusa i3 with the NOSE offer many benefits, to include:

  • A RepRap basis and GPL license allowing modifications and opening the door to support in a large 3D printing community.
  • Specialized P.I.N.D.A. calibration routine for user-friendliness, and ease in reproducing prints
  • Open-source software
  • Accessibility and affordability for users
  • Validated conversion for use with cell lines, stem cells, and FRESH printing for complex structures

Once parameters are set, the researchers promise an algorithm delivering a ‘collision-free path.’ They must be set carefully and correctly, however, and the team suggests that users practice first by fabricating and experimenting with basic samples. If desired, the printer mainframe can also be replaced with a RebelliX frame.

The research paper also includes information regarding:

  • Operation instructions
  • One-time setup
  • Software requirements and downloads
  • Slic3r setup
  • Bioprinting routine
  • Ink preparation
  • Support removal

A selection of the most commonly used bioprinting techniques: a) Inkjet bioprinting describes the deposition of biomaterials (and cells) in a low viscosity range by production and depositioning of drops in the 1-100 pL range. b) Extrusion Bioprinting: a continuous thread of biomaterial containing cells is extruded through a needle and deposited on a print surface. A broad range of viscosities is possible. c) Laser-induced forward transfer: the biomaterial is deposited on a gel ribbon. Laser impulses then initialize the release of small drops onto a receiver plate. The choice of the printing technique depends on the desired resolution, the type of biomaterials and the cell-type and -density.

Costs for converting the Prusa i3 into a comprehensive bioprinter are minimal, and the FRESH method means that users can print complex geometries, using concentrated hydrogels for bioprinting purposes. The researchers did note, however, that the NOSE system was lacking in some areas:

“A completely screw-based extruder assembly would enhance the modifiability for following iterations,” stated the researchers. “Rapid infill motions caused by the high center of mass might increase the material fatigue. One potential solution here could be the placement of the servo closer to the y-carriage. Extra mechanical-endstops would improve the user-friendliness, by automatizing the repositioning of the mechanical press. Additionally, thermal extrusion control or UV-emitting diodes could increase the cross-linking capabilities and thus the range of hydrogels in future.”

The NOSE bioprinting setup exhibited an 81 percent survival rate of HEK293 cells during experimentation and promising 85 percent rate for embryonic stem cells (mESC). Again, however, some major issues did arise as the FRESH microgel proved to be ‘non-ideal’ for cells exposed over 30 minutes.

The NOSE modification consists of four 3D-printed parts: (1) the mounting part of the y-carriage and adapter for the modular syringe holder (“main adapter”), (2) a syringe holder with a diameter suitable for common 10 mL disposable syringes (“syringe holder”), (3) part to mount a NEMA17 servo engine (“servo mounter”), (4) the press part to move the syringe-piston (“mechanical press”). All parts have been printed using 0,01 mm layer height using support structures. Any support structure leftovers or unfitting hinges were gently polished using fine sandpaper.

“Overall these findings open up further optimization of the embedded bioprinting method by creating a physiological environment,” concluded the researchers. “Our bioprinting approach is protected with the GPLv3 license, hence we invite you to reproduce our data and modify our approach.”

Bioprinting may be much more common in research labs around the world today, from microfluidic platforms to scaffolds for bone regeneration and more, but for most scientists, the ultimate goal is that of 3D printing human organs. Impressive strides have already been made, however, with cellularized hearts, human brain tissue, animal brains, and many other spectacular models.

Given that the Prusa i3 is an inexpensive 3D printer capable of high-quality 3D prints this development could potentially democratize bioprinting. If the NOSE nozzle works well then this could make the i3 an affordable bioprinting platform, for some bioprinting applications, for use in the lab and classroom. The Prusa i3 is the predominant FDM system architecture and hundreds of thousands of Prusa and Prusa clones are scattered across the earth. Hundreds of vendors sell and manufacture them. With the NOSE nozzle and the i3 bioprinting could now become affordable for many people worldwide. Sometimes a moment changes everything, sometimes that moment is this one.

A selection of the most commonly used bioprinting techniques: a) Inkjet bioprinting describes the deposition of biomaterials (and cells) in a low viscosity range by production and depositioning of drops in the 1-100 pL range. b) Extrusion Bioprinting: a continuous thread of biomaterial containing cells is extruded through a needle and deposited on a print surface. A broad range of viscosities is possible. c) Laser-induced forward transfer: the biomaterial is deposited on a gel ribbon. Laser impulses then initialize the release of small drops onto a receiver plate. The choice of the printing technique depends on the desired resolution, the type of biomaterials and the cell-type and -density.

[Source / Images: ‘Nydus One Syringe Extruder (NOSE): A Prusa i3 3D printer conversion for bioprinting applications’]

The Oasis 3DP Brings Open Source Binder Jetting to Makers

The 2018 Hackaday Prize will soon be wrapping up, and as always, the contest has yielded some wonderfully innovative and promising ideas. One entry, submitted by Yvo de Haas, aims to make binder jetting accessible to everyone. Binder jetting, in which a liquid binding agent is deposited to bind powder particles together, is an effective method of 3D printing whose benefits include not requiring supports. It’s not a technology, however, that is typically accessible to the average maker. De Haas decided to change that with the development of the Oasis 3DP, an open source binder jetting 3D printer that he built himself.

The Oasis 3DP consists of two hoppers and a spreader. One hopper is filled with powder, and the other serves as the build area. An inkjet head deposits binder onto the build area, which then lowers by the thickness of one layer. The powder hopper, in turn, raises, and the spreader spreads a new layer of powder across the build area, at which point the process repeats. This occurs as many times as necessary to build up a full part, which is then removed, allowed to dry, and cleaned.

The Oasis 3DP uses a typical inkjet cartridge to deposit the binding material, and can print in several different materials, including gypsum, sand, sugar, ceramics and metal. De Haas points out the many advantages of binder jetting, including the fact that it can print with so many materials, and that it does not require supports. It can also be easily altered to print in color, simply by adding ink or dye alongside the binder. There are also several drawbacks, however: it’s a messy process, and all prints require post processing. The parts tend to be very fragile, as well, which limits their maximum size. Only one material can be printed at a time, and hollow parts require holes for the excess powder to drain out. All 3D printing processes have their disadvantages, however, and despite them, binder jetting is an effective method of creating a part from any kind of powder.

De Haas designed the Oasis 3DP as an open source project. The setup is quite simple, and allows a lot of room for alteration and customization. While there are many, many open source 3D printers out there, they tend to be mostly FDM; binder jetting isn’t something you see very often in the open source community, which alone makes this an intriguing project. The Oasis 3DP is not a finished project, de Haas cautions, rather a working prototype, so it may have a few quirks and imperfections. It’s a promising project, however, and if you have the space for a full binder jetting setup in your home or workshop, this could definitely be a fun thing to play around with.

The finals of the Hackaday Prize 2018 begin on October 22nd, when the 100 top projects will be brought before the judges. The judges will then determine the top five projects, which will be announced at the Hackaday Superconference on November 3rd.

You can check out the Oasis 3DP in action below:

Discuss this and other 3D printing topics at 3DPrintBoard.com or share your thoughts below. 

[Images: Hackaday]


Desktop 3D Printing and Functional Replacement Parts

3D printing is seeing increasing use in the manufacture of components for bikes, and sometimes even the bikes themselves. Bikes with 3D printed parts don’t just look cool, either – they perform just as well as, and sometimes even better than, regular bikes.

Open source advocate and 3D printing educator at Michigan Tech Dr. Joshua Pearce recently published an Ultimaker blog post about how to use your desktop 3D printer to create functional, inexpensive replacement parts for complex machines that require mechanical integrity – like bicycles.

Dr. Pearce’s team partnered up with the research group of John Gershenson. Dr. Pearce, Gershenson, Nagendra Tanikella, and Ben Savonen completed a study on the use of open source 3D printers for making components for the popular Black Mamba bicycle.

Dr. Pearce wrote, “Specifically, we chose to start tests with pedals that fail often and have clear standards namely the CEN (European Committee for Standardization) standards for racing bicycles for 1) static strength, 2) impact, and 3) dynamic durability.”

First, the teams used parametric open source FreeCAD to design a custom CAD model of a replacement pedal; the model and STL files are available for download from Youmagine. The pedal was made using the most common 3D printing material – biodegradable, inexpensive PLA.

Static strength test

The pedal was first subjected to a 1,500 N vertical downward force under the CEN static strength test, which found no fractures. Then, the pedal was tested to a 3,000 N compression load applied pedal uniformly – this is actually twice the required amount, which meant that the pedal well exceeded the standard, and, as Dr. Pearce put it, was able to “clear the first hurdle!”

A mass of 15 kg was dropped onto the pedal from 400 mm up, 60 mm from the mounting face, for the CEN bicycle pedal impact resistance test. While the test resulted in a minor dent, there weren’t any fractures – another test passed.

In order to simulate a real-world bicycle, with a person on the pedals, the CEN developed its dynamic durability test for bike pedals. For this test, the research groups had to spin the spindle at 100 rev/min for 100,000 revolutions; at the same time, the pedal also had a mass of 65 kg suspended only by a string. Just like with the static strength test, the pedal’s dynamic durability was designed to exceed the CEN standard under normal conditions.

Impact resistance

Rather than using a rig, the team attached the 3D printed pedal to a bicycle for direct testing, and went 200,000 revolutions with a person’s 75 kg weight being carried solely by the pedals. Again, this was twice the CEN standard, and passed again – I’m sensing a theme here.

Dr. Pearce wrote, “Our humble 3D printed pedal is now good enough for European [racing] bikes…but wait it is actually better!”

The 3D printed pedals are nearly a third of the moss of the Black Mamba stock pedals, which is performance-enhancing as well as cost-effective…if raw PLA pellets or recycled materials, like ABS, nylon, or PET, are used, that is.

Dr. Pearce also provided some easy, DIY guidelines to achieve lab-worthy results for the 3D printed pedals, so you won’t have to redo any bike part experiments.

First, look into expertise already available through a study that researched the parts you were interested in, such as this one regarding the viability of distributed manufacturing of 3D printed PLA bike pedals. Then, determine the material’s mechanical requirements – check out this study for a handy open access list of most of the commonly available tensile strengths of the more common 3D printing materials.

Sub-optimal layers

Print the component in the right material, and with required infills, to achieve your application’s desired mechanical properties. Then, make sure to check out the print’s exterior for any sub-optimal layers from under-extrusion – if the part is under-extruded, fix your 3D printer and try it again.

Finally, weigh the part to make sure there isn’t any under-extrusion inside that you’re not able to see; Dr. Pearce explained that a digital food scale has “acceptable precision and accuracy” for most prints done on extrusion-based 3D printers.

“This mass is compared to the theoretical value using the densities from this table for the material and the volume of the object,” Dr. Pearce said.

The previously mentioned study with the list of tensile strengths was able to find a linear relationship between a 3D printed part’s ideal mass and the maximum stress able to be undertaken by samples. You can just check the study to see how far off from the ideal your part is, and then determine if it needs to be reprinted before figuring out the high probability of your needed properties.

According to mechanical studies completed on many extrusion 3D printers, open source machines produce stronger prints than proprietary systems, mostly thanks to the setting limitations of the latter.

“But be aware that there is a range and the properties of your parts will depend a lot on your machine and the settings you use,” Dr. Pearce warns. “In general printing at the high end of the extruder temperature range for your material will result in a higher strength.”

Just use that weighing technique, and compare your part’s mass to the ideal, to find out where it will most likely lie on the strength range.

You can read Dr. Pearce’s full rundown at Ultimaker.

Discuss this and other 3D printing topics at 3DPrintBoard.com or share your thoughts in the Facebook comments below.