Niche Made: Modding NERF Guns With 3D Printing

We didn’t have a lot of NERF guns in the house growing up, but I do remember one specific NERF incident when I was older. I was home from college for winter break, and my family and I were stuck inside due to a snow emergency. We were getting restless and sick of watching TV, when someone – my mom, maybe – randomly picked up a NERF dart gun from behind her chair, aimed it at the map of Michigan hanging over the couch across the room, and fired. The game quickly evolved into seeing who could get the dart to stick the closest to where we vacationed each summer, and we all forgot we’d been bored.

Just like using 3D printing to increase the fun of LEGOs, so too can the technology be put to work with NERF weapons. NERF modding is the practice of adding hands-on modifications to your NERF guns, so their capabilities are enhanced.

“NERF blasters aren’t just for pre-pubescent boys — the resurgence of NERF is real and it’s happening now,” a Manual post states.

“Grown men are dipping back into the hobby and making hands-on modifications that increase the range and speed of the toys.”

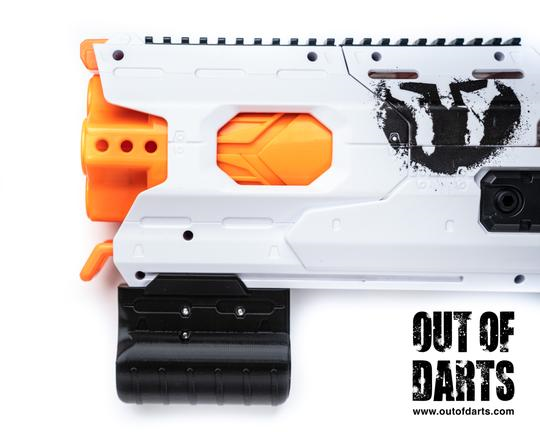
3D Printed Hades Pump Grip, $12 on Out of Darts

In the post, Luke Goodman, referred to there as “the surgeon general of NERF modifications,” describes the basics of modding a NERF Hammershot blaster gun. The former filmmaker wrote a popular book about Nerf modding, and also runs an online shop and NERF modification YouTube Channel called Out of Darts.

Goodman came up with some novel mods, like an air blaster that holds 1,200 rounds and shoots 15 rounds per second, and purchased a 3D printer so he could make his own modification parts. It’s now his full-time gig.

“There’s nothing better than taking something into your own hands and improving it — taking something old and making it new,” Goodman said. “For both kids and adults, getting them off video games, working with their hands, and interacting with the community can happen through NERF.”

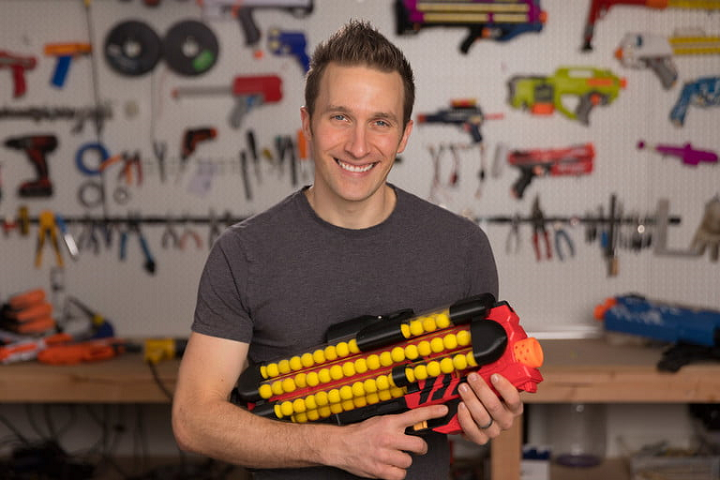
Luke Goodman with modified NERF gun (Credit: Luke Goodman)

Reddit user Pballwiz24 posted about his 3D printed hobby-grade NERF blasters, which look like they stepped right out of the 1990s. An appreciative person said they were “still amazed how much 3D printing has revolutionized homemade nerf guns and the nerf community as a whole,” and Pballwiz24 agreed, writing “It really helped launch the hobby to a whole new level.”

Another user wanted to know if the darts had to be cut down, and what was used for springs.
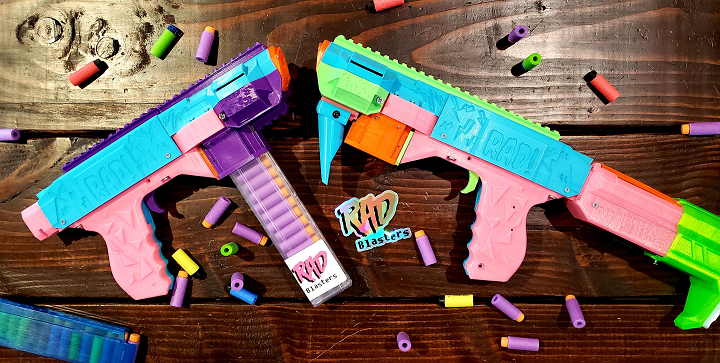
Pballwiz24

“Yeah they are cut to 39mm,” Pballwiz24 replied. “They use brushed motors with flywheels on them to compress and “throw” the dart out.”

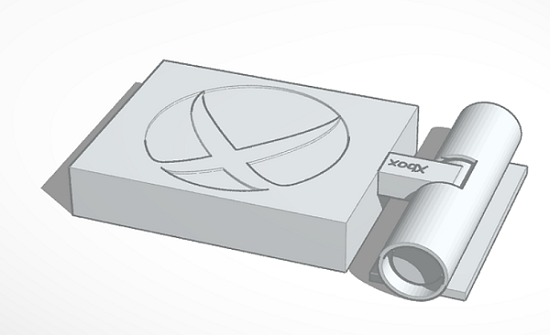
He was asked if the model was available on Thingiverse, and while the answer was no, he did state that several of his other models were there under the search term “cowabunga.” I checked it out, and the first one I found was the Cowabunga! Foam Dart Blaster by user radblasters, which contains detailed instructions on how to 3D print your own.

Cowabunga! Foam Dart Blaster

“The key feature of this design is the fact that it uses a smaller solenoid than most other solenoid builds. The Solenoid I designed this around is about half the size of the 35mm ones that are currently popular, but it functions exactly as needed (at only 15mm stroke),” it says in the description.

“Other than that feature, this is basically a primary blaster crammed into the smallest form factor I could create. Fully built, this can get 130-140 FPS on 4x Honeybadger motors…and it can be select fire too!”

There are plenty of other NERF mod designs on Thingiverse as well, such as sights, scopes, barrel extensions, magazines and dart holders, and even this cool NERF-compatible Grappling Hook.

“Printed without raft/supports. The first 5-6 layers look a little rough for lack of supports but it builds just fine,” Thingiverse user hewmart wrote. “I printed: 100% infill .2mm layer height 2 shells 60mm/s travel but these settings are probably changeable.”

If you think you’d like to try 3D printing a NERF mod, but are a little intimidated by the process and don’t know where to start, fear not – you can find Nerf Mods: a Beginner’s Guide on Instructables, which introduces readers “to the vast world of Nerf gun modifications” with instructions that are easy to understand.

“Beginners can be easily repelled from the world of Nerf gun modding by seeing a modification “write-up” that seems complicated. Many modification write-ups do seem confusing at first. However, modding a Nerf gun isn’t very hard–It simply takes knowledge of how a Nerf gun works and how a mod should be executed. With this knowledge, modifying Nerf guns is quite simple,” the post states.

While the instructable doesn’t actually mention 3D printing, it’s still a very helpful guide, with details on a variety of different mods and the differences between NERF spring guns and pump guns. You can check out one of the YouTube videos in this article for help with some cool 3D printed NERF mods.

Have you ever 3D printed a NERF mod? Tell us about it! Discuss this story and other 3D printing topics at 3DPrintBoard.com or share your thoughts in the Facebook comments below.

The post Niche Made: Modding NERF Guns With 3D Printing appeared first on 3DPrint.com | The Voice of 3D Printing / Additive Manufacturing.

Build Your Own 3D Printed Open Source Motorized Microscope

I always enjoy a good 3D printed DIY project, whether it’s truly helpful or just for fun. These projects are even cooler when you add Legos into the mix, like Reddit user DIY_Maxwell did. He posted about his work using 3D printing, Arduino, Raspberry Pi, and Lego bricks to make an open source, motorized microscope. But, the microscope itself is not fully 3D printed – instead, the body was built with Lego bricks and some 3D printed components. What makes this project more awesome is the stop motion-style video he made showing the various parts of the project and how they all fit together to make a working microscope.

BUILD YOUR OWN MOTORIZED MICROSCOPE using 3D-printing, Lego bricks, Arduino and Raspberry Pi… all design files, source codes and detailed instructions are provided open-source. from r/3Dprinting

“I wanted to have a modular microscope, something I can easily modify for transmitted-light, reflected-light, cross-section, etc. My early prototypes did not have Legos, as I started making my own interlocking pieces, I realized that I was in fact printing lego-like designs, I thought buying legos would be less of an effort,” he wrote on Reddit when asked why he didn’t 3D print all the parts. “Then I found out about these “sliding” lego pieces, which are very precise for linear actuators. The other advantage is that, if I want to change the height of the camera let’s say, I simply add more bricks, it’s convenient.”

DIY_maxwell used FreeCAD to design the 3D printed microscope parts, which were fabricated on an Ender 3 system. All of the source codes and design files have been provided open source on GitHub, along with detailed step-by-step instructions on how to make your own.

Before you jump right in, do you know what exactly a motorized microscope does when compared to a regular microscope? DIY_maxwell explained that, at least for him, it needed to be able to tilt in order to take photos, from an angle, of “highly reflective surfaces (semiconductor chips),” and that it should quickly adjust the focus and magnification, and position of the sample.

“The microscope has a simple operation principle based on changing the magnification and the focus by adjusting the relative distances between a camera, a single objective lens and a sample. Briefly, two linear stages with stepper motors are used to adjust these distances for a continuous and wide magnification range,” the GitHub instructions state. “Four additional stepper motors tilt the camera module and change the X-Y position and rotation of the sample. A uniform light source illuminates the sample either from an angle (reflected light) or from the bottom of the sample (transmitted light).”

The main components of this modular, motorized microscope include a Raspberry Pi system, an 8 MegaPixel camera, six stepper motors, a keyboard or joystick for variable speed control, uniform illumination, and obviously plenty of Lego bricks. Depending on the specific features and electronics vendors used, the whole thing costs between $200-$400, and once you have all the parts in front of you, should only take a couple of hours to assemble.

The main body was built with individually-purchased Lego bricks, and DIY_maxwell designed custom actuators and 3D printed them, rather than using available motors and gears from LEGO Technic.

“This approach not only lowered the cost of the microscope but also gave me some flexibility in the design and implementation of precise linear and rotary actuators. In principle, the whole structure could be 3D-printed without using any LEGO parts but that would be less modular and more time consuming,” he writes in GitHub.

In addition, 3D printing offers you the flexibility of quickly changing the design for maximum optimization if and when it’s needed.

“If the parts do not match well, some minor modification in the original design file (e.g. enlarging the holes matching to LEGO studs) or polishing/drilling may be required,” he explained.

The contents of the motorized microscope are as follows:

  • Linear Actuators
  • Camera Module
  • Rotary Stage
  • Illumination
  • Tilt Mechanism
  • Electronics
  • Final Assembly
  • Software

You can find detailed instructions, images, slicer settings, tips, and more on GitHub, and a longer version of the assembly video can be viewed here.

Several other Reddit users who routinely use microscopes related how impressed they were about the project; a geologist mentioned that “starting price can be anywhere between $500 to $1000 for something with that kind of quality” when DIY_maxwell said that his microscope could “easily resolve 10um features.” A pathologist expressed excitement about “a modular system to motorize common non motorized microscopes (Leica, Olympus, etc.).” While the compliment was appreciated by the maker, it was noted that “this microscope is not meant to replace a lab microscope used for medical assessment. No dark-field, no fluorescence, no aperture control, it suffers from chromatic aberration and other optical effects at high magnification, etc.”

“I hope this prototype persuades other DIY-enthusiasts to develop new designs of microscopes.”

If you’re interested in using 3D printing to make your own microscope, you can check out all of the relevant information on GitHub to build this one, or check out the OpenFlexture Microscope project on Wikifactory. This was created as “part of the Waterscope initiative, which by allowing for fast and affordable on-site bacterial testing of the water quality in developing regions of the world, is helping to cope with the diseases caused by bad quality water drinking.”

OpenFlexure Microscope

The OpenFlexure can be built in the classroom and used as an education tool for both students and teachers. Because the 3D printed microscope stage uses plastic flexures, the motion is free from friction and vibration, and the four-bar linkages in the stage can be 3D printed in a single job with no support material.

You can find other open source 3D printable microscopes on Thingiverse as well; happy making!

Discuss this and other 3D printing topics at 3DPrintBoard.com or share your thoughts below.

The post Build Your Own 3D Printed Open Source Motorized Microscope appeared first on 3DPrint.com | The Voice of 3D Printing / Additive Manufacturing.

3D Printing News Briefs: June 8, 2019

In this week’s 3D Printing News Briefs, we’re talking about partnerships, new software and buildings, and a neat 3D printed miniature. Together, Evolve Additive Solutions and Evonik are developing materials for the STEP process, while Awexim has partnered with Farsoon in an exclusive sales agreement, and SHINING 3D and 3D Systems released Geomagic Essentials. Oerlikon inaugurated its new R&D and production facility, and a Reddit user posted video of a miniature 3D printed steering wheel that fits on a video game controller.

Evonik and Evolve Partnering to Develop 3D Printing Materials

A little over a year ago, Stratasys spinoff company Evolve Additive Solutions emerged from stealth with its production-scale additive manufacturing STEP (selective thermoplastic electrophotographic process) solution. Now, the company is partnering up with the Evonik Corporation, a leading specialty chemicals company, in a joint development agreement to formulate the thermoplastic 3D printing materials for STEP solutions. Initial efforts will be focused on polyamide 12, PEBA, transparent polyamide, and polymer for the polyamide 6 series, and the two companies also plan to create a wider range of production materials for STEP users in the future.

“Evolve’s entirely new technology approach will allow us to expand the range of applications of our high-performance powder materials, which are produced through a unique production process,” said Thomas Grosse-Puppendahl, the Head of the Additive Manufacturing Innovation Growth Field at Evonik. “With more than 20 years of experience in 3D printing, we will also develop a wider range of customized powder formulations to unlock the full potential of the STEP technology.”

Farsoon and Awexim Sign Exclusive Sales Agreement

Another 3D printing partnership has Farsoon Europe GmbH, which is located in Stuttgart, signing an Exclusive Sales Agreement with Warsaw-based Awexim, which was founded in 1991 as a technical consulting and cutting tools supplier. Awexim’s 3D printing adoption as an official Farsoon Europe sales agent will support Poland’s industrialization of 3D printing with Farsoon’s Open Laser Sintering Systems.

“Farsoon’s strength in industrial Laser Sintering Systems, ideally supports our strategy to enter into the 3D Printing market. We support industrial customers in Poland for almost 30 years with top quality tools, machine tools and especially top quality technical and customer service. We are glad to start cooperation with such solid partner as Farsoon, whose approach and vision is similar to ours,” said Andrzej Wodziński, the Managing Director of Awexim. “This cooperation opens huge possibilities to bring even more solutions for our customers on solving their needs. 3D printing is a future of industry, and we are sure, that connection of Farsoon and our team will have big influence on this industry in Poland.”

SHINING 3D and 3D Systems to Deliver Geomagic Essentials

Chinese company SHINING 3D recently announced that it has partnered up with 3D Systems to launch a new cost-effective scan-to-CAD solution. The two released Geomagic Essentials on the market as a bundled offering along with SHINING 3D’s most recent handheld, multi-functional 3D scanner: the Einscan Pro 2X series.

The Einscan Pro 2X and 2X Plus are lightweight and compact, with faster scanning speeds and higher accuracy. The new Geomagic Essentials bundled offer only increases these capabilities, as the solution is perfect for downstream reverse engineering and scan-to-print applications. While many CAD software programs are limited in terms of what they can do in processing, Geomagic Essentials makes the scan data compatible with native CAD workflows, so designers wanting to integrate part design and 3D scan data can do so with ease.

Oerlikon Inaugurates New R&D and Production Facility

Technology company Oerlikon is based in Switzerland, but it has 170 locations in nearly 40 different countries, including the US. The company provides surface solutions, equipment, and materials processing, and as part of its continuing growth strategy here, recently celebrated the opening of its new $55 million, state-of-the-art Innovation Hub & Advanced Component Production facility in Huntersville, North Carolina. This is Oerlikon’s second location in the state, and the 125,000 sq ft, fully functional facility employs about 60 people and will continue to gradually add jobs as the business continues to expand.

“We are already working with customers in the aerospace, automotive, energy and medical industries in the US, and we anticipate continued growth in those sectors, as well as in others. We believe that additive manufacturing can transform production in many industries, and we are excited that our presence here in North Carolina allows us to better demonstrate those possibilities to our customers,” said Dr. Sven Hicken, Head of Oerlikon’s Additive Manufacturing business.

State and federal officials spoke at the inauguration event, which was attended by employees and their families, in addition to business leaders and customers. Oerlikon presented a local robotics club with a check at the event in order to begin growing collaborations with academic institutions and show support for STEM learning.

Oerlikon Huntersville Event

We had a lot of fun last week opening our new Innovation & Proctuction Hub in Huntersville, NC. Check out what happened on the big day! #OerlikonUSA #OerlikonAM

Gepostet von Oerlikon Group am Freitag, 7. Juni 2019

3D Printed Steering Wheel

Reddit user Malespams recently posted a video of a 3D printed steering wheel in action, but not one for a regular-sized car…or even a car at all, actually. No, this miniature green wheel is made to attach to the controller for a video game system, like XBox, to make it easier and more natural to play racing games. However, not everyone who commented on the video thought that the 3D printed mod would make these games easier. One person said that it would offer “zero control” during play, and another noted that it covered the controller’s right stick and would make it hard to press any buttons,

“I have one, but while it’s a fun concept it covers the dpad so if you’re playing horizon you can’t access Anna m. Sometimes it hits the clutch and messes me up,” user 3202 people wrote. “It’s sometimes fun and I could see people having fun if they got used to it.”

If you’re interested in making your own game controller racing mod, check out this Thingiverse link.

Discuss these stories and other 3D printing topics at 3DPrintBoard.com or share your thoughts in the Facebook comments below.

3D Printing News Briefs: May 30, 2019

In today’s 3D Printing News Briefs, euspen plans to hold a Special Interest Group meeting in September centered around additive manufacturing, and an adjunct professor completed a comparison between a small SLS 3D printer and a large one. Moving on to interesting 3D printing projects, an artist teamed up with Mimaki to use full-color 3D printing to make a stage prop, a reddit user created an anti-cat button for an Xbox system, and an imgur user created a modular 3D printed fashion system.

euspen to Hold Special Interest Group Meeting on AM

The European Society for Precision Engineering and Nanotechnology (euspen) will be addressing the factors which are influencing an uptake of the use of additive manufacturing as a production technology at a Special Interest Group (SIG) meeting in September. The meeting, which will be co-hosted by the American Society of Precision Engineering (ASPE), will analyze the barriers to, and the opportunities for, the adoption of AM in production. It will be held from September 16-18 at the École Centrale de Nantes in France.

At the AM SIG meeting, issues that are, as euspen put it, “critical to the viability of AM as a production technology,” will be addressed. The co-chairs of the meeting are Professor Richard Leach from the University of Nottingham and Dr. John Taylor from the University of North Carolina at Charlotte. Local hosts and the organizing committee include Professor Alain Bernard from Centrale Nantes, Dr. David Bue Pedersen from the Technical University of Denmark, Professor Leach, and Dr. Taylor.

Comparison of Small and Large SLS 3D Printers

3D printers are often used in educational settings these days. Piotr Dudek, an adjunct professor at the AGH University of Science and Technology in Poland, runs a 3D printing lab at the school that both students and researchers frequent. While many technologies are used in the lab, SLS is the one that most interests Dudek, who decided to compare a big SLS system from EOS with the smaller Sinterit Lisa.

We are using the big EOS SLS 3D printer for a long time and we wanted to compare it with Sinterit Lisa, check the possibilities of it. In SLS technology every detail matters. The temperature of the printing chamber, powder distribution system, heating or laser moving mechanism are very precise and important features. We wanted to test if Sinterit’s device is the valuable solution,” Dudek stated.

Larger 3D printers obviously have higher print volumes, but the down sides include difficult calibration, specialized training, and higher costs. In addition, it’s easy to mess up the calibration of a large 3D printer during transport. The Lisa 3D printer uses a gantry system, which comes pre-calibrated to save time, and it also uses less material, which means less money. The desktop printer is also much more student-friendly, making it the better choice for 3D printing labs like the one Professor Dudek runs.

Full-Color 3D Printed Stage Prop

A few months ago, 3DPrint.com heard from 3D printing specialist and Post Digital Artist Taketo Kobayashi, from the Ultra Modelers community, about an art exhibit in Japan that he helped organize which featured colorful, 3D printed works created on the Mimaki 3DUJ-553 full-color 3D printer. Recently, he reached out to us again with news of his latest Mimaki Engineering collaboration – a stage prop for the Japanese artist Saori Kanda, who performed with techno/trance band Shpongle at the Red Rocks Amphitheater in Colorado.

“It is a artwork,” Kobayashi told 3DPrint.com, “but also a utilization of full color 3D printing to entertainment field.”

The “Shpongle Mask,” which took 28 hours to print and mixed in Asian details, was worn onstage by Kanda as she performed her painting live with the band.

3D Printed Anti-Cat Xbox Button

reddit user Mbiggz was getting sick of their cat turning off the touch-sensitive button on the Xbox console while it was in use, which I can understand, having two cats of my own. So Mbiggz came up with the perfect solution – a 3D printed cover for the button. The design can be found on the maker’s Tinkercad account, as Mbiggz originally made the design for a Digital 3D class.

“Adhesive goes on the back part (it is labeled in the print). I’m a newcomer in terms of this so it’s not perfect,” Mbiggz wrote on Tinkercad. “Also, the door doesn’t open all the way, so you can fix it so that it does if you want to (even though it doesn’t really matter, there’s not really a need for it to open it all the way).”

3D Printed Modular Fashion System

hunter62610, a young imgur user, designed and 3D printed a Lego-like modular fabric system, which was featured in his school’s fashion show. He made two dresses that are made with a 3D printed prototype fabric pattern called Escher, which was designed to be “put together and taken apart” hundreds of times. It took him just two weeks to make the material, which the two young ladies who modeled the dresses said was fairly comfortable.

“The idea of the system is that theoretically, one could buy a fashion catalog filled with designs, and say 5000 links. Once could make every clothing item in the catalog, based on there needs. Perhaps that’s a pipe dream, but it’s a fun idea,” hunters62610 wrote.

“The Escher system is quite versatile. Each link acts like a free flowing Equilateral triangle, and has a male and female ball joint on each side. Every individual link is theoretically compatible with every other link. Special links are stored in the middle of this pouch that are really 3 merged links with a screw hole. If needed, these links can be used as elastic tie down points or buttons, if you screw in the buttons i made.”

A Makerbot Replicator Plus was used to print the fabric links in unique, small panels.

Discuss these stories and other 3D printing topics at 3DPrintBoard.com or share your thoughts in the Facebook comments below.

3D Printing News Briefs: May 26, 2019

This year’s RAPID + TCT ended late last week at the Cobo Center in Detroit, so we’re again starting off today’s 3D Printing News Briefs with more news from the busy show floor. DyeMansion launched a new extended color series at RAPID, while 3D Systems made the announcement that its Figure 4 Modular is now available. Moving on, SLM Solutions just celebrated the grand opening of its new Shanghai application center. Finally, a Reddit user made an adorable miniature 3D printer.

RAPID 2019: DyeMansion’s New Colors

DyeMansion at RAPID 2019 [Image: Sarah Saunders]

Munich startup DyeMansion, a leader in finishing and coloring solutions for 3D printing, launched its new ColorsX extended color series for end-use products at RAPID last week, in order to continue helping its customers achieve the perfect finish for all of their applications. Automotive ColorsX and Neon ColorsX are the first solutions under the startup’s X Colors for X Industries premise, with more to follow in the future. The automotive color line has improved light and heat resistance for better 3D printed polyamide components and interior car parts, and features Automotive BlackX, which has a less saturated black tone than DyeMansion’s basic DM Black 01 and was created according to ISO EN 105 B06 method 3’s hot irradiation standards. The luminous neon color line includes GreenX, YellowX, OrangeX and PinkX to help create striking end-use products. Both of these new color lines are compatible with DyeMansion’s PolyShot Surfacing (PSS) and VaporFuse Surfacing (VFS).

“Some of our earliest customers who made use of DyeMansion Print-to-Product technologies for serial production are from the Automotive and Lifestyle industries,” explained Kai Witter, DyeMansion’s Chief Customer Officer. “While working closely with our customers, joint strategies are always about creating even more value to their businesses. So, I feel very delighted to now offer additional value creating products. Automotive and Neon ColorsX are only the beginning of providing more specific industry offers.”

Once DyeMansion decided to launch its ColorsX series, it also named the coloring process it established back in 2015: DeepDye Coloring (DDC), which can be easily controlled and traced through integrated RFID technology and offers a limitless choice of custom colors.

RAPID 2019: 3D Systems Announces General Availability of Figure 4 Modular

Also at RAPID last week, 3D Systems announced the general availability of its scalable Figure 4 Modular production platform. The flexible digital light printing (DLP) system has multiple configurations that can print parts with high surface quality, and allows manufacturers to iterate designs more quickly, as well as produce end-use parts without having to worry about a minimum order quantity. Three models make up the Figure 4 – Standalone, Production, and Modular – and several customers, such as D&K Engineering and Midwest Prototyping, are reaping the benefits. Additionally, 3D Systems also announced five new DLP and SLS materials, the first of which is the immediately available Figure 4 FLEX-BLK 10. The other new Figure 4 materials, such as TOUGH-BLK 20, MED-AMB 10, MED-WHT 10, and HI-TEMP-AMB 250, are expected to be available in Q3 and Q4 of 2019.

“The newest additions to our plastic 3D printing portfolio demonstrate our commitment to driving the adoption of digital manufacturing. With the industry’s first, truly scalable plastic production platform and our robust selection of materials, 3D Systems enables customers to rethink manufacturing and realize improved agility, reduced complexity, and lower overall total cost of operation,” said Vyomesh Joshi, the President and CEO of 3D Systems.

3D Systems also announced that its customers Rodin Cars (based in New Zealand) and North Carolina-based Stewart-Haas Racing are using its plastic and metal 3D printing solutions to improve the speed and performance of their cars.

SLM Solutions Celebrates Opening of New Shanghai Application Center

The same year that SLM Solutions opened an applications and demonstration center in Germany, it also established Chinese operations in Shanghai. Earlier this week, the selective laser melting experts celebrated the grand opening of their expanded office facilities and application center in Shanghai, which will help the company continue to grow its presence on the Asian market. The new center has installed four SLM systems: one SLM 125, one SLM 500, and two SLM 280 printers. Additionally, the facility also has equipment to represent an SLM build’s supporting process chain, such as a metallurgical lab and post-processing capabilities. The grand opening included a tour through the new new customer service and application engineering center.

“As we continue to grow our Chinese team, the opening of our Shanghai Application Center is an important milestone in SLM Solutions’ development and indicates the confidence in the Chinese market,” stated Jerry Ma, General Manager of SLM Solutions (Shanghai) Co., Ltd. “As part of the global strategy for growth we have the capacity to more than double our number of employees and the equipment to support all Chinese users with the technological resources shared by our applications centers around the world. We can also provide high-quality, fast technical services to better promote the development of selective laser melting and create more value for customers.”

Mini 3D Printed 3D Printer

A reddit and imgur user by the name of “Mega Andy” used 3D printed parts and DVD drive motors to make his own miniature 3D printer. And by miniature, I mean that he used a banana for scale, which was taller than the 3D printed 3D printer itself! It’s a really interesting project – the device runs Marlin, and features a glass bed and an E3D V6 hotend. The black and gold parts of the mini 3D printer were made out of PLA material, while PETG was used to make teeth for the leadscrews. Speaking of this, Mega Andy said that the printer is “fairly unreliable” because it easily ruins the teeth that guide the device on the leadscrew. Additionally, he’s also working to improve and lengthen the Z axis due to binding problems. Mega Andy released the STLs onto Thingiverse so others could try to make their own versions of the miniature 3D printed 3D printer…say that five times fast.

“So this project is nothing new, people have made 3d printers, CNC, engravers before using this hardware. What I wanted to do differently with this is have a designed 3D printed frame to hopefully fit standard parts. Instead of mounting full metal dvd drive assembly’s together and look like a DIY project I wanted a something that could be more compact and neat,” Mega Andy wrote on Thingiverse.

“This project is not for everyone and would only recommend to someone with a decent knowledge of 3d printers, basic soldering and lots of patience. Also some fiddling was needed to get the right amount of tension on the leadscrew, this bit is a massive pain but hopefully no one else needs to go through quite as much issues as i did with this bit. They will wear out though and a 3d printer will be needed to print new parts for it when they inevitable wear out.”

Discuss these stories and other 3D printing topics at 3DPrintBoard.com or share your thoughts in the Facebook comments below.

Lulzbot hints at SLA 3D printer addition to open source FFF portfolio

Lulzbot, the open-source brand of the FDM 3D printers from Colorado-based manufacturer Aleph Objects, has hinted the development of an stereolithography (SLA) 3D printer in its latest newsletter. The newsletter heading states: “Wash Away Your 3D Printing Preconceptions: We’ve got the cure for the common printer—our newest solution will be released this September! We’re laser focused on the […]