MakerOS Webinar: Make the Most Profit from Your 3D Printing Business

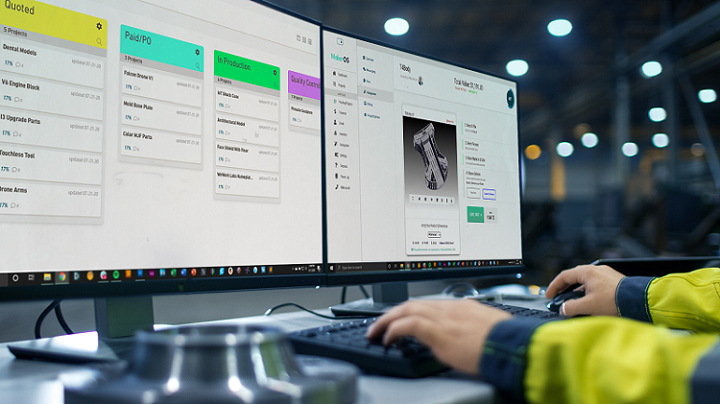
Web-based collaboration platform for 3D printing and digital fabrication companies MakerOS assists users in developing their products faster, no matter the stage or size of the company. It was founded by CEO Mike Moceri, who has copious amounts of experience in design, manufacturing, software, and business: he co-founded the very first 3D printing retail service bureau, located in Chicago, back in 2013, and followed this move by founding 3D printing and product design agency Manulith the next year.

MakerOS is sponsoring a free webinar, which 3DPrint.com is organizing, called “How to Make the Most Profit from 3D Printing,” which will be held on Wednesday, September 16th, 2020, from 2-3 pm EDT. Any digital fabrication business owner or 3D printing shop manager looking to run a more successful business should definitely sign up for this webinar.

“If you don’t understand your costs, you don’t understand your business,” Moceri told 3DPrint.com.

Let’s say that you have successfully completed a 3D printing job for a client, but instead of the substantial profit you were expecting, you only barely broke even. If you care about staying afloat, you’ll want to determine the underlying cause of something like this. That’s why this webinar is so important—you’ll learn how to keep this from happening and gain a deeper understanding of all the various expenses and costs that go into running your 3D printing business. This way, you will be able to set accurate, fair prices and maximize your profits.

“So what we’ll do in this webinar is we’ll figure out what are the core and most important points of cost analysis. We’ll go into detail on how to determine margins and profits for your operation, as well as the philosophy and rationale behind those calculations,” Moceri explained to us.

“We’ll provide a framework and how to think about your business starting with the costs and then we’ll talk about the philosophical aspects of determining margins and ultimately profits for your business.”

By attending this MakerOS webinar, you’ll come away with the knowledge of how to successfully run your digital fabrication or 3D printing shop. The insights attendees will gain can help steer thinking towards a cost-specific perspective, leading to higher profits, and you’ll learn how to recognize subtle things that could negatively affect your margins.

Every webinar attendee will receive access to a spreadsheet that they can use to make calculations and projections to, as Moceri explained, “see what the most optimal path to profitability is for their business.” In addition, the participants will have the chance to learn all of this from someone who has consulted with industry experts from all around the world and has successfully started multiple 3D printing services…Moceri himself.

Featured on MSN, NBC, Make Magazine, the Encyclopedia Britannica, and the D-Business Magazine, which once called him the “Face of 3D printing,” Moceri was once a mentor at TechTown Detroit, and currently serves as a mentor at WeWork Labs in NYC and the Stanley+Techstars Additive Manufacturing Accelerator. He is also an author, having recently published an e-book titled How to Survive the COVID-19 Pandemic as a 3D Printing or Fabrication Shop, along with 9 Lessons for Optimizing Your Product Development Service. You can find both of Moceri’s e-books on the recently launched MakerOS Zone of our website.

What else can you expect to see in the MakerOS Zone? Plenty! There are also free video tutorials, such as “How to Price for SLA 3D Printing” and “Why We Made a 3D Printing Pricing Calculator,” along with the aforementioned pricing calculator itself. The MakerOS Zone also includes articles about the company that have been published on our website, as well as MakerOS articles found elsewhere on the web. Finally, you can access the company’s webinars “How to Optimally Price For Your 3D Printing Service Bureau in 2020,” and “How to Make the Most Profit from 3D Printing,” as previously mentioned. You can register here for the latter, which will be held on Wednesday, September 16th, 2020, from 2-3 pm EDT.

The post MakerOS Webinar: Make the Most Profit from Your 3D Printing Business appeared first on 3DPrint.com | The Voice of 3D Printing / Additive Manufacturing.

New Guide: Frozen-Inspired Temperature-Sensing Pendant

Elsa with her Gizmo

The latest tutorial from Erin St. Blaine will teach you how to make a Frozen II inspired pendant for your young maker friend (or for you and your own sweet style) featuring elemental images that change based on the temperature of the air. The TFT Gizmo inside the pendant will display a snowflake when it’s cold, a spinning leaf image when it’s warm, and a lovely purple flame when it’s hot. From the guide:

Discover your inner Snow Queen with this temperature sensing pendant. Invoke the elements of snow, air, and fire using your breath or body heat (or your Ice Queen Superpowers). The pendant will display a snowflake, a spinning leaf, or a lovely purple flame animation depending on the warmth of the air.

Inspired by the elemental spirits in Disney’s Frozen II movie, this pendant will be sure to inspire and excite any Queen Elsa fans, and add an element of magic to your cosplay or halloween costume.

This project uses Adafruit’s TFT Gizmo, a Circuit Playground Bluefruit, and a 3d printed case. There’s no soldering or coding involved — just a few screws to tighten, and a couple files to upload — so it’s a wonderful beginner project if you’re just starting out in the world of electronic cosplay, or if you have a young helper who’s getting interested in making stuff.

Check out the full tutorial on the Adafruit Learning System here: Frozen-Inspired Animated Temperature Sensing Pendant Guide

Adafruit Weekly Editorial Round-Up: CAD Design Tips, Discord, Cleveland Museum of Art PyPortal Frame and More!

NewImage 51


ADAFRUIT WEEKLY EDITORIAL ROUND-UP


We’ve got so much happening here at Adafruit that it’s not always easy to keep up! Don’t fret, we’ve got you covered. Each week we’ll be posting a handy round-up of what we’ve been up to, ranging from learn guides to blog articles, videos, and more.


BLOG

3RtvDRx 1442x2048
A Poster of CAD Design Tips for #3DPrinting #CAD @BillieRubenMake

“Maker of many kinds, serial skill-collector, and STEM-student,” Billie Ruben, has created this very useful little poster of do’s, don’ts, and other design considerations for creating CAD files for 3D printing.

You can download a large version of the poster, along with two other 3DP tips posters she’s created here. While on the Imgur link, don’t forget to check out Billie’s other two posters with more tips on what modeling programs to use for different types of 3DP and the ins and outs of 3D printer bed leveling. Read more!

More BLOG:


LEARN

Adafruit io IMG 20200129 141515
Cleveland Museum of Art PyPortal Frame
Use your PyPortal to display works of art from the Cleveland Museum of Art

Museums today are expanding public access to their art collections, not just inside the walls of the museum but also outside. Digital initiatives are bringing artwork, once relegated within the confines of the museum, to a 21st century global audience. These modern museums have essentially become the new content providers. Much like the modern companies Netflix and Pandora that provide video and music content, museums are becoming their own content providers with their collection of paintings, photographs, jewelry and other media. Digitizing these collections and making it publicly available brings this material to a global audience.
One such museum that is at the forefront of this endeavor is the Cleveland Museum of Art.

This project accesses the CMA API using CircuitPython running on the PyPortal. It uses the API to pick a random item from the collection. It converts and resizes the JPEG image from the collection to a BMP image sized to the PyPortal using Adafruit IO image conversion service. Finally, the converted image is downloaded to the PyPortal for display. A new feature of the PyPortal allows the correct scaling of portrait images, which is a great feature for this project.
Learn more!

More LEARN

Browse all that’s new in the Adafruit Learning System here!

New Guide: 3d Printed Glowing Scale Armor

3d printed mesh armor

Check out the latest tutorial from Erin St. Blaine: design and create 3d printed mesh “armor” and make it glow! From the guide:

Design and create glowing scales in your favorite shape and add NeoPixel strand lights inside for a stunning display of animated lights.

These are so easy to add to any costume or design. This guide shows you how to create your design in TinkerCad, a free online 3D design program. You can print your armor at home or use an online printing service. Hot-glue a strand of NeoPixels inside and control your project with a Gemma M0 or microcontroller of your choice.

The guide includes sample designs using a heart shape, as well as a mermaid scale shape, and instructions on how to create your own design in the shape of your choice. It also includes a 3d printable enclosure design for your Gemma M0 and battery.

See the full build tutorial here: https://learn.adafruit.com/glowing-scale-armor/overview

New Guide: Paper Craft Crystal Gems Tutorial #cosplay #stevenuniverse

New tutorial from Erin St. Blaine: create amazing cosplay glowing crystal gems!  From the guide:

Crystal Gems will always save the day!

Create a stunning paper craft crystal from laminated cellophane wrap. Add NeoPixels and watch it sparkle!

We’ve included two different build sizes in this tutorial — one crystal large enough to house a Circuit Playground Express, and one with a single NeoPixel illuminating the crystal. This project can be run from a battery for cosplay applications (the crystal on Gandalf’s staff perhaps?) or plugged in to the wall via USB for a more permanent installation.

We’ve also included a Steven Universe Warp-Pad 3D printable base, so your Crystal Gems can be displayed in style. The possibilities are endless!

We love these gems. They’re easy to make with a few easily found tools. The main ingredient is cellophane gift wrap that’s been run through a laminating machine, which creates a perfect material for paper crafting — stiff enough to hold up but easy to cut with scissors or a utility knife. You can also get fancy and use a vinyl cutting machine to create perfect gems in multiple sizes. 3d print a base, or use the gem in a hanging lamp, or place it on top of your staff for a Gandalf-style cosplay. Such a cool project!

Full tutorial: https://learn.adafruit.com/paper-craft-crystal-gem-lantern

How to Paint 3D Printed Eyeglass Frames Your Favorite Color

If you want to learn how to add finishing touches to your products post-production before shipping to your customers or transform your own 3D printed designs to a more vivacious color you can do so by following a few simple steps. In this tutorial, Steven and Jeremy Gonzalez of The Super Maker Bros demonstrate how to paint eyeglass frames printed in Multi Jet Fusion Plastic PA12 in multiple colors, a process that can be applied to many other projects of the same 3D printed material.

3D printed eyeglass frames in MJF PA12, 220/400/600 grit sandpaper (Photo by The Super Maker Bros)

Primers and paints (Photo by The Super Maker Bros)

Here is what you will need:

  •       3D model printed in Multi Jet Fusion Plastic PA12 (also applicable for Versatile Plastic)
  •       220 grit, 400 grit and 600 grit sandpaper
  •       Spray paint primer
  •       Spray paint in your desired color(s)
  •       Clear coat matte or gloss spray paint
  •       Reusable drop cloths or newspaper to protect your work area from paint
  •       Highly Recommended: A respirator with replaceable filters will not only protect you from spray paint fumes but will last you through many more future paint projects.


Once you have these materials you are ready to get started. Follow the steps below and check out this video to see each step in action. 

Step 1:

Prepare your workspace by placing newspaper or a drop cloth over the area to cover any furniture or floor space in range of your spray painting pattern. Protect enough space to spray from different angles.

Step 2:

Put on your respirator. Spray paint fumes are toxic and sanding generates dust particles that are dangerous to inhale, so make sure you sand and spray in a well ventilated area and wear your respirator.

Step 3:

3D printed eyeglass frames, sanded (Photo by The Super Maker Bros)

Start by sanding the glasses pieces to smooth out their surfaces. This will also help the paint adhere to the plastic. Makerbro Tip: The best sandpaper to use is wet/dry or waterproof paper because getting the paper wet helps cool the plastic while sanding as well as keeps small dislodged plastic particles under control. Waterproof sandpaper is black instead of tan or beige.

Begin with a rougher, 220 grit sandpaper to remove any bulky texture and then move on to 400 grit and 600 grit to buff the surface smooth. The lower the number, the rougher the paper is. Be sure to rinse and dry the pieces to remove loose particles.

Makerbro Tip: To give your sandpaper more longevity, apply spray adhesive to the back of your quarter sandpaper sheet and fold it over to make an extra thick one-eighth sheet. This will give you the ability to use more pressure without tearing a hole in the paper.

Step 4:

Prime the frames using a spray primer like the Dupli color filler primer. Spray the glasses using a sweeping motion, keeping the spray can at a distance of about 6 to 12 inches. Spraying too closely will coat the object in too much paint and cause dripping or even cause the coat to crack when dry. Make sure all visible surface area is covered and let the pieces dry before spraying the other side.

Makerbro Tip: Spray paint takes about 30 minutes to dry to touch but wait between 1 to 2 hours to handle it. It will be fully dry after 24 hours.

Step 5:

Once the glasses are primed, sand the surfaces once more using the 600 grit paper to achieve maximum smoothness and wipe away any resulting dust.

Step 6:

3D printed eyeglass frames, painted (Photo by The Super Maker Bros)

3D printed eyeglass frames, painted (Photo by The Super Maker Bros)

Using the same spray painting method as with the primer, spray each piece in the color of your choice and let fully dry for 24 hours.

Makerbro Tip: Want to use more than one color on the same piece? Use masking tape to cover parts of your project you want in a different color. Once the first color dries, cover that portion and paint the rest.

Step 7:

Once the glasses have had 24 hours to fully dry, it’s time to seal up the paint with a topcoat. Using the same spray painting method, apply two layers of topcoat, leaving 1 to 2 hours of drying time in between. This helps protect the paint and enhances the shine or matte finish desired. It also gives a buffer between paint and skin contact.

Step 8:

3D printed eyeglass frames, painted in blue and brown (Photo by The Super Maker Bros)

3D printed eyeglass frames, painted in green and red (Photo by The Super Maker Bros)

Now assemble the pieces and you’ve got a brand new pair of glasses! You can have a pair in every color.

Check out The Super Maker Bros on Instagram (where they’ll be posting more photos and videos) and YouTube for more fun 3D printed projects.

More from the Material of the Month Series: PA12

Part One: Material Overview
Part Two: Material Comparison: Nylon Plastics
Part Three: Business Example: PA12 used in the virtual reality industry

The post How to Paint 3D Printed Eyeglass Frames Your Favorite Color appeared first on Shapeways Magazine.

NEW GUIDE: A Bluetooth Controlled NeoPixel Lightbox #3DPrinting #AdafruitLearningSystem #CircuitPython #Adafruit #Feather #3DThursday @Adafruit @DAstels

A new guide is on the Adafruit Learning System: Bluetooth Controlled NeoPixel Lightbox

This guide describes how to build what’s commonly called a light table or lightbox. It places a light behind the guide sheets, writing paper, and more, making it much easier to see through. Light tables are also handy for slide photography, tracing, and reading film x-rays!

You can buy a simple one fairly inexpensively, or a professional quality one for much more. But that’s not what Makers do; we build our own!

This guide uses the Feather nRF52840 Express as the controller for the project. It provides plenty of processing power to work in CircuitPython and, more importantly, it has a solid Bluetooth capability. The parts are 3D printed.

See this new tutorial here.

led_strips_final.jpg

led_strips_tracing.jpg

Are you interested in using light boxes in your work or hobbies? Let us know in the comments below.

3D Hubs Announces $18 Million in Funding and New Dedicated US Office

Less than a year after 3D Hubs turned five and outlined its new strategy to become “a full-blown manufacturing platform,” the company turned away from its community 3D printing roots and announced that it would only be working with professional service bureaus to fulfill orders. This meant that if community members didn’t qualify as a Manufacturing Partner based on their order history, they were out of luck, as the company was becoming completely focused on B2B.

“2018 was the year in which we turned 3D Hubs from a 3D printing peer-to-peer marketplace into a B2B platform for all digital production, taking pivotal steps towards our automated and distributed manufacturing mission,” 3D Hubs CEO and Co-Founder Bram de Zwart wrote in a biannual update to his LinkedIn contacts.

“Since 3D Hubs had become the world’s largest peer-to-peer marketplace for 3D printing, it was a dificult decision in early 2018 to transition to a turnkey B2B manufacturing platform and even harder to pull it off. But with last years’ revenue tripling and $18 Million in new funding we couldn’t be more excited about this new strategy and 3D Hubs its future!”

Bram de Zwart

While there were obviously a lot of hurt feelings in the wake of this announcement, the company seems to be doing pretty well for itself after this decision. Yesterday, 3D Hubs announced that it had received $18 million in Series C funding, which will be used to help “build the future of on-demand manufacturing” and increase development of its online platform, among other important things.

One item the funds will be used for is rapidly expanding its team in the US, which is the company’s largest market with over 10,000 clients. So 3D Hubs will be opening a dedicated US office to best serve these customers, and is now trying to determine where the office will be located.

“For the new office location we’re currently deciding between Chicago, Minneapolis and Boston, cities that are deeply rooted in manufacturing and have great connectivity to the rest of the country and to Amsterdam,” de Zwart wrote.

Speaking of Amsterdam, 3D Hubs will be expanding its team there, and in the US, over the next few months. In an effort to grow from 65 employees to over 100, the company is currently hiring for a number of positions, including Business Develop Representative and Director of Sales.

3D Hubs made a lot of investments last year in automating some of the most important manufacturing process features, such as design validation, quoting, and smart order routing. Now, leveraging the data from 2 million produced parts, the company’s platform can instantly provide accurate quotes for 98% of its customer requests for services such as CNC machining, injection molding, and 3D printing. In addition, 93% of its order are automatically sourced through the supplier network, so that customers receive their parts twice as fast.

3D Hubs also expanded its popular quarterly trend report by including industry specials. For instance, the Q1 2019 edition takes a look at how the automotive industry is adopting digital manufacturing.

The company is also helping to educate the rest of the world about digital manufacturing, and has been busy developing new content that can better explain the benefits of this technology, and how best to design for digital manufacturing.

In fact, one of the recent efforts is actually working to turn some of the chapters in the company’s 3D printing handbook, which was published in 2017, into helpful video tutorials on its YouTube channel.

Discuss this news, and other 3D printing topics, at 3DPrintBoard.com or share your thoughts in the Facebook comments below.

[Images: 3D Hubs]

3Doodler Introduces Mobile App, 3D Printing Pen Activity Kits, and Wider Distribution for EDU Learning Packs

Earlier this week, 3Doodler attended the 2019 Toy Fair New York, and brought along the latest additions to its EDU, Start and Create product lines to the event in Manhattan. Last year at the Toy Fair, the company debuted its new STEM Series of products designed around its Start 3D printing pen, and this year 3Doodler is not only debuting its newest lines, but also a special surprise – its first Mobile App, which is now available for download in both the App Store and on Google Play.

“Over the last few years, we’ve emphasized the ability to make a phone case using a 3Doodler pen. But with the app, the 3Doodler’s capability to work with your device makes it easier than ever to create. It’s also more environmentally friendly than printing out a stencil,” said 3Doodler Co-Founder Maxwell Bogue.

The new 3Doodler App, which will be launched in Q1 of this year, will initially have over ten tutorials and projects available, with more added each week. It also includes stencils, so you can actually use your device – be it a smartphone, iPad, or tablet – as a canvas for 3Doodling. Thanks to a seamless UX experience, the app is perfect for helping kids and adults alike make their own 3D projects in a mobile-friendly format.

3Doodler is also focusing even more on education this year, and its EDU Learning Packs, only available through its website at first, are now being distributed, at prices ranging from $349-$1,199, across several major e-commerce and retail sites, such as Best Buy, Barnes & Noble, and Amazon. The kits were designed with feedback from teachers, and come with either 6 or 12 pens, lesson plans, a year’s supply of filament, and exclusive teaching materials. They are available for both the Start and the Create+ pens.

“Our goal is to become as ubiquitous as a Crayola or LEGO in terms of being synonymous with creativity and development from an early age. Our mission is to inspire and enable everyone to create, and firmly believe that education is the proper vehicle for this mission,” said 3Doodler’s CEO Daniel Cowen. “We’ve already seen countless examples of how 3Doodler can positively impact a classroom, and have now started to structure our company to meet that demand.”

Since 3Doodler was founded six years ago, its products have been used in over 8,000 classrooms, by more than 400,00 students, all around the world. In that time, crowdfunded educational platform DonorsChoose.org has also sent 3Doodler kits to over 1,000 middle- and low-income US classrooms. But now that the 3D printing pens are available through more well-known sites, this access can increase even further, providing such benefits to schoolchildren as:

  • Help teachers diversify teaching methods
  • Improve student concentration levels
  • Stimulate different learning methods for both kinesthetic and visual learners
  • Increase opportunities for special needs students
  • Level the playing field between male and female students
3Doodler’s Head of EDU Leah Wyman said, “In the classroom, 3Doodler enables hands-on, fun, easy-to-use experiences that create a lasting impact on every student. We’ve seen the raw and transformative effect of 3Doodler in classrooms of every size, and in every subject, whether in private schools, low-income schools, after school programs, makerspaces, libraries and more.”

In addition to the new app and wider availability for its EDU Learning Packs, 3Doodler is introducing two new Create+ Pen Sets to go along with its popular 3Doodler Create+ Essential Pen Set. The $149.99 Master Creator Pen Set includes a Create+ pen, six packages of filament, a Nozzle Set, Canvas, Project Book, and DoodlePad, while the Deluxe Pen Set for $99.99 includes four packages of filament, a DoodlePad, and a Nozzle Set. Additionally, the company’s Make Your Own Canvas Bookend Kit, with an SRP of just $29.99, lets users decorate and personalize with the Create+.

At this week’s Toy Fair, 3Doodler also debuted two new family-friendly kits for its Start and Create product lines: the ALPHADOODS Character Kit and the ROBOSUMO Activity Kit.


The former, with an SRP of $19.99, is a fun way to make your own animated ALPHADOOD action figure to take on adventures, including ones of the social media and stop motion variety. Each kit comes with two plastic packs, two ALPHADOODS canvases, a tracing sheet, and an activity guide.

The $24.99 ROBOSUMO kit is an easy entry point into robotics for kids, where they can build their own mini sumo battle-bots and later fight them in the Sumo Battle Arena, which is included in the kit. The kit also includes two DoodleMolds, two packs of plastic, two motors, and an activity guide.

Finally, three more of the company’s fun and imaginative Activity Kits, which were originally brought to the market in Q4 2018, were officially debuted to retailers at the Toy Fair this week:

  • ANATIMO Activity Kit, $19.99
  • SCIENTIFICO Activity Kit, $29.99
  • ROBODINO Activity Kit, $29.99

Check out the funny video below for an introduction into the ALPHADOOD Character Kit:

Discuss this news and other 3D printing topics at 3DPrintBoard.com or share your thoughts in the Facebook comments below.

[Images provided by 3Doodler]

Just in Time: Last-Minute Holiday Gifts

Need a last-minute gift for a special person on your holiday list?  You can create a unique, custom 3D-printed clock with just a little bit of design knowledge and an inexpensive battery-powered clock kit like this $8 Youngtown Silent Clock Mechanism with Small Hands:

You’ve got from now to the second week of December to get a 3D design together, if you want to order a 3D print before the Shapeways Material Cut-Off Dates for the holidays. In this post we’ll show you how you can create a custom 3D-printable clock face with three different software programs. Don’t have time for that? Skip to the end to see how you can customize a retro clock very quickly with our Sunburst Clock Maker.

Beginner: Tinkercad

Even if you’ve never created a 3D design before, it’s easy to get started with Tinkercad, a free in-browser 3D design tool with a simple drag-and-drop interface. To get started, sign up for a free account and check out the All3DP video Getting Started in Tinkercad: A Tutorial for Complete Beginners. Once you know a few Tinkercad tricks, you can create complex designs from very simple combinations of shapes; throughout this post we’ll link to helpful YouTube videos to show you exactly what you need to know.

To make a simple clock in Tinkercad, we’ll start with a cylinder for the center face, and then create a couple of stretched-out rings with Rotated “Round Roof” shapes and Holes:

By using the “Control-D” duplication tool we can copy and rotate those rings in a pattern around the cylinder. After modifying the heights of each shape with the Ruler, we get a simple retro clock face design:

If you want to pick apart our Tinkercad design and see how it works, just open this Quick Clock link and tinker for yourself! Add some Text for numbers, if you like, or design something new from scratch. When you’re ready to download your design for 3D printing, click the “Export” button and then choose “Export as STL”.

Intermediate: Fusion 360

To make a fancier custom clock, try Autodesk’s Fusion 360 3D software, which is free for students, educators, and hobbyists. There’s a steeper learning curve to get started in Fusion 360 than there is with Tinkercad, but there are plenty of video tutorials online to help you learn. Some of the best are the Fusion 360 tutorials by Maker’s Muse. We’ll link to relevant video tutorials throughout this section so that you can learn just what you need. Fusion 360 is a very powerful program with a lot of features and tools, but you only need to know how to use a few of those tools to make a simple clock!

For example, if you know how to create a Sketch, add Constraints, and use a Circular Pattern, then you have all the tools you need to create a 2D shape for a clock face design in Fusion 360. To create the example below we started a Sketch, added a Circle at the origin, then formed spoke shapes with Lines. We kept the shapes symmetric by using Constraints, and rotated them in a Pattern around the origin. In the screenshot below we are in the process of duplicating and rotating the thinnest spoke to create twelve copies of it around the center circle:

Most models in Fusion 360 start from a two-dimensional Sketch like the one above. Once you’re done with your Sketch you can Extrude to give it some three-dimensional depth, and then Fillet the edges to make them rounded and professional-looking:

To download your model for 3D printing, right-click on the gray name of your model in the Browser menu (if you haven’t saved your Fusion 360 design yet, then the name of the model will be “(Untitled)”, as it is in the screenshot above). Select “Save as STL”, click “OK” in the new window that pops up, and save the STL file to your computer.

Advanced: Make ALL THE CLOCKS

Feeling more ambitious? With some parametric design you can write OpenSCAD code to generate billions of clocks, each from a random seed. For example, consider the many types of retro-styled “Sunburst” or “Starburst” clocks shown in this Google Image search:

Clocks like these were inspired by the modernist-style work of industrial designer George Nelson, who made many variations of such clocks in the 1950s. There are some common design features that are shared by most of these clocks: geometrically-shaped spokes, a star/sunburst pattern, a circular inside for the hands… Here’s what our first notes looked like when we started thinking about the typical parts and designs for Sunburst Clocks, and some of our early test prints:

OpenSCAD is a free code-based design software that works on any platform. With just a little bit of coding knowledge you can write simple code to describe a library of geometric spoke shapes, and then options for rotating those shapes around a central circle. There are literally billions of configurations; here are just a few:

If you want to learn more about OpenSCAD, check out our beginner’s video tutorial PolyBowls – A simple OpenSCAD code walkthrough and intro document Hello OpenSCAD. The “Hello” document has a link to sample code you can inspect and modify; if you want to play around with the code that made the clocks in the rotating image above, you can download it from our Thingiverse page.

The Easy Way Out: Customize a Sunburst Clock

But… you may be thinking… there is NO TIME FOR THIS!! The holidays are coming fast, and you don’t have time to learn how to write parametric OpenSCAD code right now? No problem, just use our Customzier to design your own retro clock! We’ve made our design free on Thingiverse so you can create unique and interesting Sunburst Clocks in just a few seconds. Just go to the design on Thingiverse and click the “Open in Customizer” button to get started (you’ll have to sign up for a free Thingiverse/MakerBot account to open the design in Customizer):

The Customizer version of the Sunburst Clock design lets you create new clocks just by clicking in the Random Seed slider and selecting design options from drop-down menus. You can also set the overall shape and size of your clock, and control the center hole and backing to match your clock kit:

Once you have the clock you want, click the “Create Thing” button and download the STL file from your list of Things within Thingiverse. Here is a design we made with the Customizer and had printed at Shapeways in White Versatile Plastic for less than $30 (it’s the “Cordelia” design), together with the clock mechanism we’ll use to assemble the final clock:

After assembly, the clock looks like this:

And here’s an “action” shot on the wall:

Light Speed: Order an Existing Design

If you’re really down to the wire and don’t have time to create or customize your own design, then quickly head over to the Shapeways Marketplace for a huge selection of unique 3D printed gifts that you can order right away. If it’s before the December 13 cutoff date for medium-sized White Versatile Plastic at Shapeways, then you still have time to order, with next-day shipping and priority manufacturing, one of our best twelve pre-made retro clock designs from the geekhaus shop, like the Velma:

Happy making, and happy holidays!

The post Just in Time: Last-Minute Holiday Gifts appeared first on Shapeways Magazine.