
Researchers Jinjin Liu, Hai Gu, Bin Li, Lu Zhu, Jie Jiang, and Jie Zhang from the Nantong Institute of Technology and Jiangsu Key Laboratory of 3D Printing Equipment and Application published a paper, titled “Research on Artificial Post-Treatment Technology of FDM Forming Parts,’ about using manual post-processing on 3D printed parts made with FDM technology, which has a low molding accuracy that can cause stair-stepping.
“Due to the “step effect”, the printed parts have rough surface, obvious stripes, poor surface quality, and cannot meet the customer’s or specified requirements, so post-processing is very important. This paper mainly studies and summarizes the manual post-processing technology of FDM printed parts, and provides the specific implementation method of post-processing, providing reference for the post-processing of FDM formed parts and other forming processes,” the researchers wrote.

Figure 2. The vase model.
In order to “further improve the surface quality and strength” of 3D printed models, post-processing is often necessary. Some of the more common methods of post-processing FDM formed parts include:
- Chemical treatment with organic solvent
- Heat treatment
- Mechanical treatment with a sander or grinder
- Surface coating treatment
In this paper, the researchers focused on a manual post-treatment process, which requires several items to work properly, such as a spray pen air pump with air storage tank, a coloring pen and tool set, gloves, a mask, water-diluted solvent in a solvent bottle, quick dry small fill soil, 80 to 3000 mesh sandpaper, a cleaning agent, a file, and others.
The team fabricated a post-treatment vase model as an example, using PLA material and an Einstart 3D printer. Once the vase was printed, they removed the plate with the model on it from the printer.
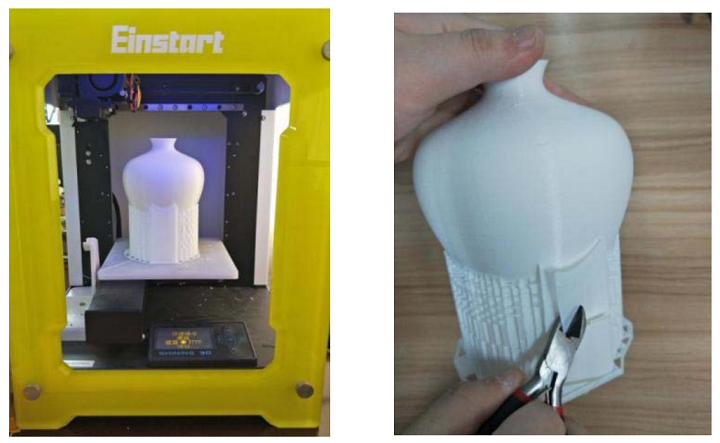
Figure 4. Model finished printing. Figure 5. Demolition of support.
“…the model is smoothly removed from the bottom plate with a shovel, and then to check whether there is strain concentration model, relatively weak parts with small first stripping knife to spin out the model and the support, and then has a long nose pliers clamping a direction support, applying a constant force, the location of the tiny support can use the file to remove,” they wrote.
To clean up a rough surface, the researchers noted that you can use low mesh sandpaper to sand and polish it. The model and the low mesh sandpaper should be immersed in water and sanded along the model’s texture, as this can both extend the sandpaper’s life and smooth out the model’s surface.
Then, they moved on to a technique called quick dry small fill, which involves the addition of a small amount of filling material to gaps in the model; then, the fill is evenly daubed with a hard scraper.
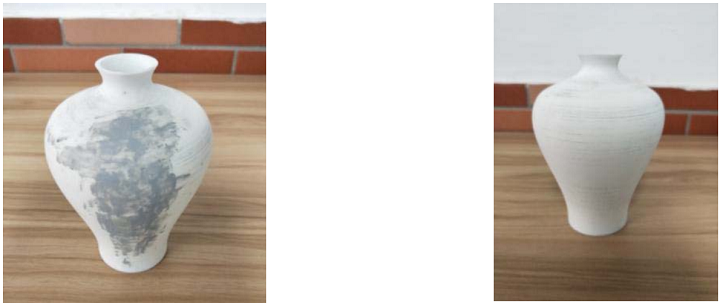
Figure 7. Apply small patch of soil evenly. Figure 8. Polished to make it smooth.
“Then wait for 30 seconds, after filling soil has hardened, using 1200 mesh to 1500 mesh sandpaper in, as shown in figure 8, If there are still tiny grooves and repeat the above steps,” the researchers wrote. “To be in addition to the groove after no large-area fill soil, feel smooth, can proceed to the next step.”
The next step is spray can water fill soil spraying. First, the model’s surface should be washed with water, and then the spray pot is used to fill the soil, before the model is wiped with a non-woven cloth and sprayed at “the ventilated position,” keeping the nozzle at about 20 cm and uniformly spraying the model one to three times, quickly.
“Generally, choose gray spray pot water to fill the soil, because gray is a neutral color,” the team explained.

Figure 10. High mesh sandpaper grinding.
Once the water is sprayed and the soil is filled, air drying takes place. Then, 2000-3000 high-mesh sandpaper is applied for “slight grinding” along one direction, before moving on to the coloring phase.
The 3D printed, polished and processed model should first be washed and dried before pigments are applied. A spray gun can be used to add either a base color or one that covers a large area of the model; you’ll need a 1:2 ratio of diluent to pigment for spraying, and you should be able to adjust the amount of air injection while you’re spraying.
“Brushes of different thicknesses and sizes can be used to paint the details,” the team wrote. “It is accessible to use 00000 pens to paint the detailed parts of the figures, or use different widths of the cover tape to cover and then spray the spray gun to paint.”
Once the paint and spray paint have dried completely, you can uniformly spray protective paint on the model; the research team used B603 water-based extinction for their 3D printed vase.
The team shared a few more notes on making the post-treatment process run smoothly, such as the importance of using software to reduce the amount of unnecessary support structures, coating the print plate with a thin layer of glue to prevent deformation, and observing the model while it’s being printed.
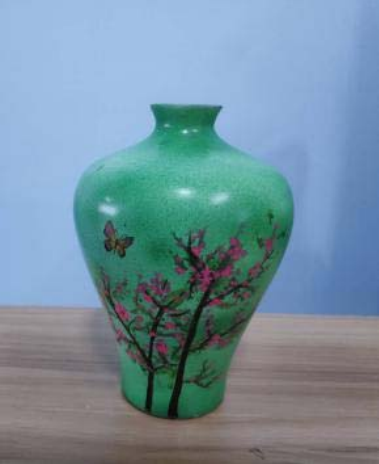
Figure 13. The vase is finished after processing.
“Secondly, in the manual post-processing should look to the protection work, grinding water mill is the best way to model processing, be patient, 80-2500 mesh, use each mesh sandpaper required time from long to short, low mesh sandpaper grinding along the texture of the model, high mesh sandpaper grinding should be turned around,” the researchers concluded. “When mixing colors, you should understand in advance the relationship between light and shade, brightness and purity of various colors, warm and cold color selection, etc.”
They noted that “the degree of difficulty” for post-processing methods, and the methods themselves, can vary with different 3D printing technologies – what works for FDM may not necessarily work for SLA, and so on.
Discuss this and other 3D printing topics at 3DPrintBoard.com or share your thoughts in the comments below.
The post Is This the Best Way to Manually Post-Process an FDM 3D Printed Part? appeared first on 3DPrint.com | The Voice of 3D Printing / Additive Manufacturing.
286 Replies to “Is This the Best Way to Manually Post-Process an FDM 3D Printed Part?”
Comments are closed.