3D Printing Models & Stents for Treatment of Abdominal Aortic Aneurysms

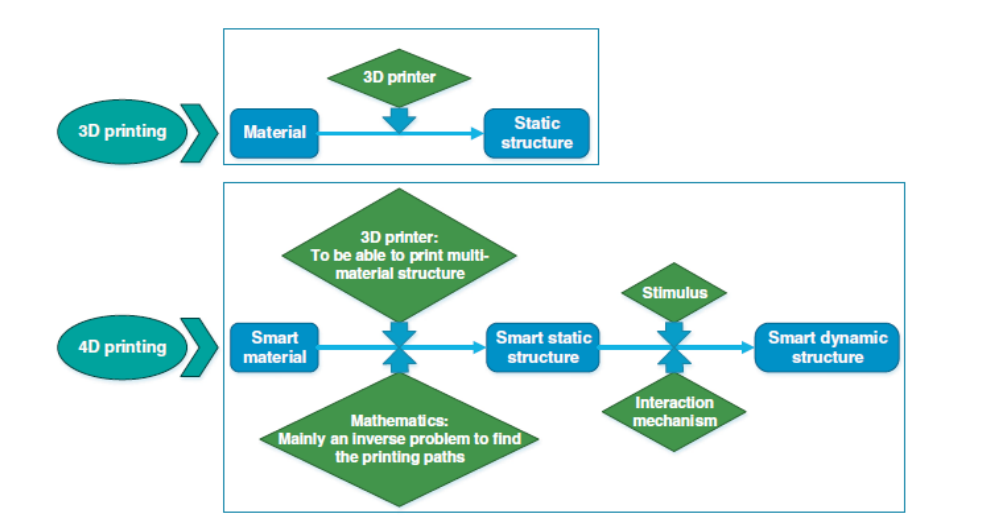
Joyce van Loon recently presented a Master’s thesis, ‘Personalized Endovascular Stent Grafts: Developing a Phantom Aneurysm Model to Test Personalized Stent Grafts,’ to the University of Twente. This work is centered around the use of 3D printed medical models and the potential for viable devices.

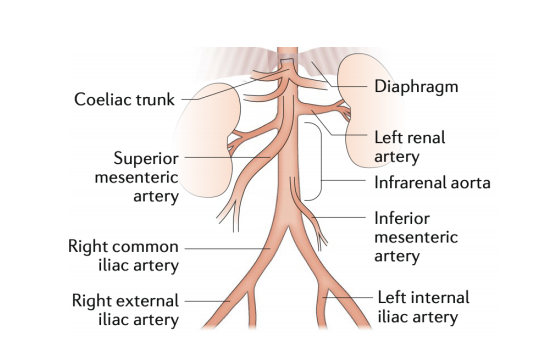
Schematic of a normal abdominal aorta and the major branches

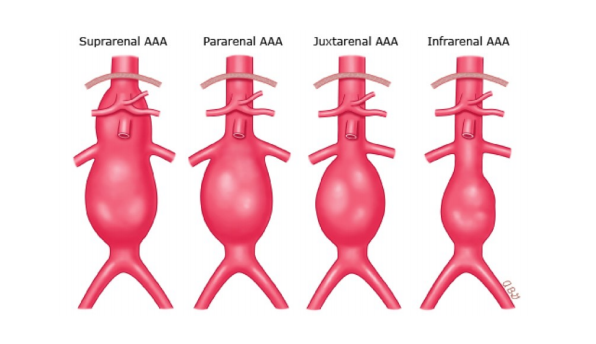
Classification of AAA concerning the renal arteries. Suprarenal AAA includes the origin of renal arteries without the involvement of the superior mesenteric artery. A pararenal or juxtarenal AAA is when an aneurysm originates at the level of the renal arteries. A pararenal aneurysm is when the renal arteries originate from an aneurysmal aorta, and a juxtarenal aneurysm is when the aorta at the level of the renal arteries is normal. An infrarenal AAA originates below the renal arteries with a segment of non-dilated aorta between the renal arteries and the aneurysmal sac.

Caused by vascular weakness, abdominal aortic aneurysms (AAA) are irreversible conditions involving the intima, media, and adventitia. They tend to enlarge as time passes, and diagnosis is critical before a rupture. Afterward, close monitoring is required up until surgery.

“Rupture of an AAA usually leads to sudden onset abdominal or back pain and hypotension or shock. A ruptured AAA is a life-threatening situation with an overall mortality of 90% and even with prompt surgical intervention around 25% of the patients die,” stated van Loon.

“Before surgery, preprocedural imaging and planning is critical. CTA (computed tomography angiography) is superior as imaging modality and more accurate than US in estimating the diameters and lengths. During planning the anatomy, the involvement of the visceral arteries, the morphology of the aortic neck (proximal part of the aorta), the aortic angulation, existence of thrombosis, calcifications and stenosis are important factors that should be considered. This indicates the importance of a useful measurement tool in combination with the obtained images to evaluate the condition of the aneurysm and to decide which surgery should be performed and which stent graft is suitable.”

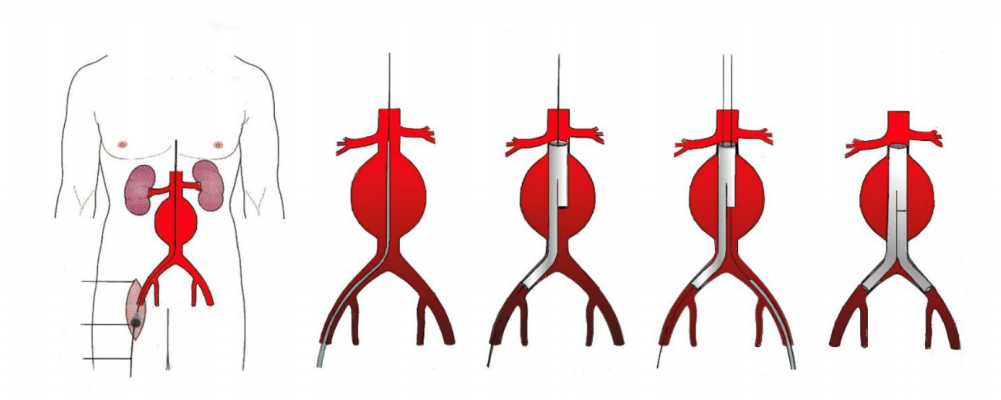
EVAR procedure. The introduction and positioning of the modular stent graft. The stent graft consists of a main device and extensions. The two femoral arteries are the access sites and incisions are made as shown.

More serious complications can arise for the 30 percent of patients not eligible for endovascular aneurysm repair (EVAR); however, customized endovascular stent grafts can be inserted. Challenges arise in using traditional methods though as there could be as much as a two-month wait.

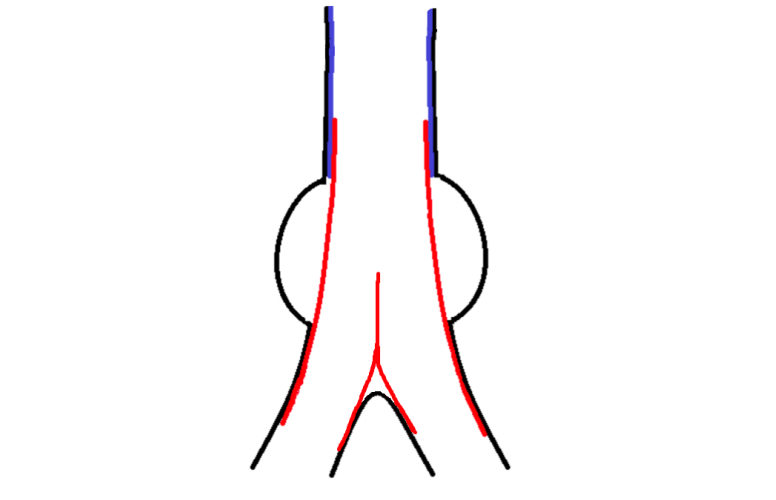
Sketch of the combined custom-made stent graft. The arterial wall shown in black, the personalized stent graft in blue and off-the-shelf stent graft in red

During this study, data from CT scans of 65 patients functioned to create 3D models to be evaluated—and then further used to 3D print personalized stent grafts. The materials of choice for creating the aorta required flexibility and elasticity, high compliance, and material strong and durable enough to endure pressure from the stent graft. Materials must be able to fabricate complex geometries and being resistant to fluids.

“The stent graft material should have a high compliance and needs to mimic the native artery. Nitinol stents have proven to have high compliance due to its super-elasticity, it is biocompatible, hemodynamically stable, fatigue resistant, and non-corrosive,” stated van Loon. “However, we were not able yet to 3D print nitinol and we needed a comparable material to study the behavior of the stent grafts.”

CT-scan of one of the included subjects. The aneurysm is visible within the red circle. Left: Coronal slice. Right: Sagittal slice.

For the stent, van Loon stated that it required not only strength and flexibility, but it was necessary for the materials to border on the 4D level as well, able to deform with ‘self-expanding properties’ in the aorta. The material had to be soft enough to avoid any damage to the body and allow for printing of more complicated structures. The personalized stent required customization, as well as proper sealing between the aortic wall and the stent graft.

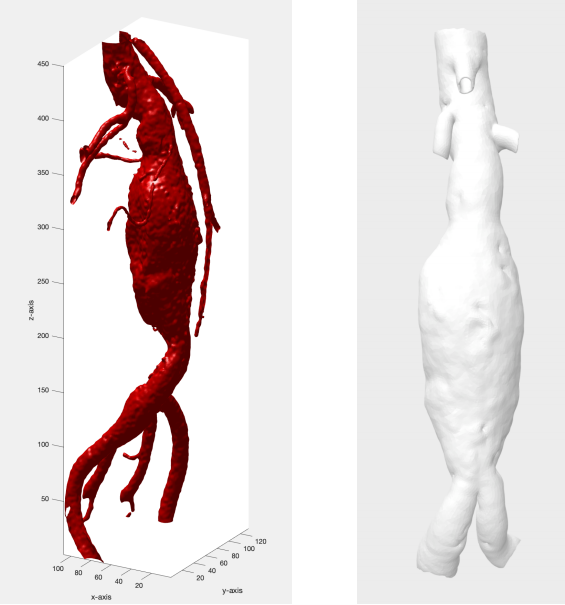
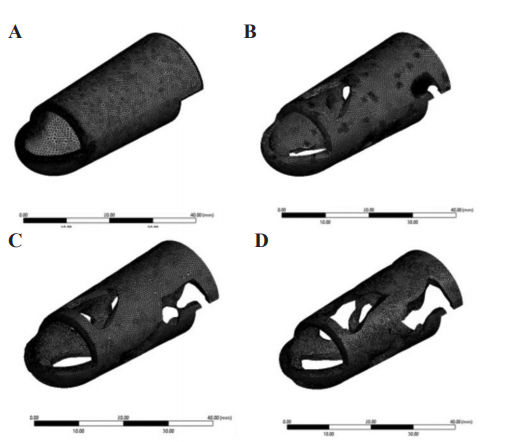
Segmentation abdominal aorta aneurysm of one of the included subjects. Left: the MATLAB segmentation results. Right: the Meshmixer results, where a large part of the renal arteries, the mesenteric artery and the iliac arteries are removed.

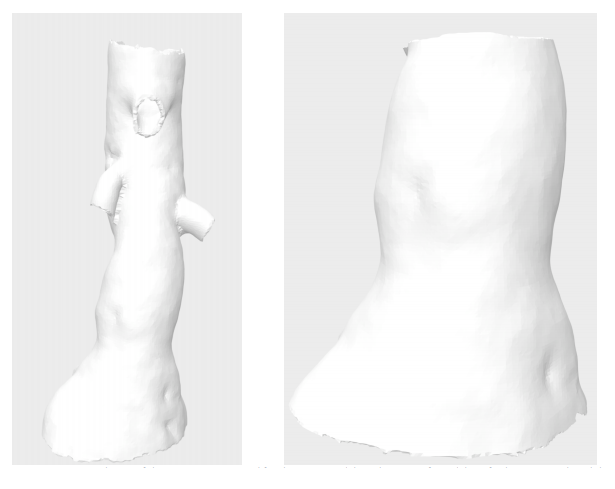
Aortic neck part of the segmentation, used for the aorta models and stent graft models. Left: the aortic neck and the branches of the renal arteries and superior mesenteric artery. Right: the aortic neck (infra-renal part). This part is important for measurements and sealing.

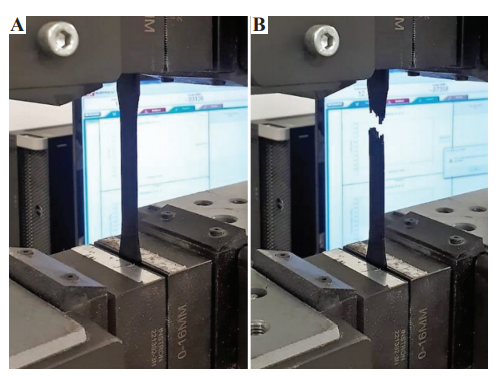
Aorta models were printed using elastic resin with a Form 2 3D printer. In testing two 3D printed models, however, van Loon stated that they both ‘showed problems,’ mainly with tearing. They were not able to finish printing of the models, in fact.

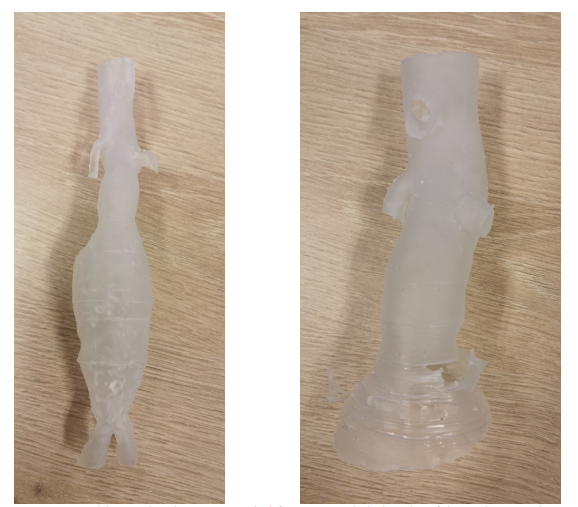
Aorta models printed in elastic resin. On the left, an aorta with the branches of the renal arteries, the complete aneurysm and bifurcation to the iliac arteries are shown. On the right, an upper part of the aorta and aneurysm can be seen, including the branches of the renal arteries and superior mesenteric artery. In the aortic neck and upper part of the aneurysm, tears are visible.

“Secondly, we printed the aortas with Agilus30 and the Stratasys ObJet260 Connex3 printer. Agilus30 is a flexible material and has a tensile strength of 2.4 – 3.1 MPa and a Young’s Modulus of 0.6 MPa,” explained van Loon. “Printing the aorta models in Agilus30 is a time-consuming (1-2 days) process but results in usable aorta models.”

“After stenting the aorta models with a 1 mm and 1.5 mm wall thickness, they rupture and are considered not suitable for further measurements. We only used the 2 mm wall thickness for further research.”

Aortic neck model, one of the first prints.

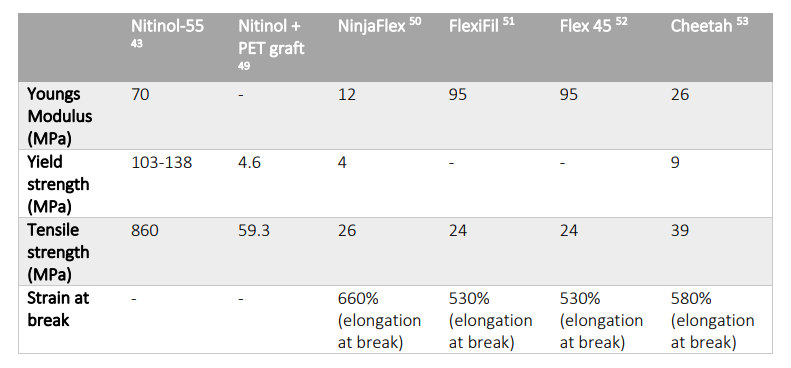
Material properties of nitinol and available and tested 3D print materials

They 3D printed stents on an Ultimaker 3, using NinjaFlex. The material was not as flexible as required for the project, and van Loon noted that the stents were ‘difficult to position’ in the sample printed aorta.

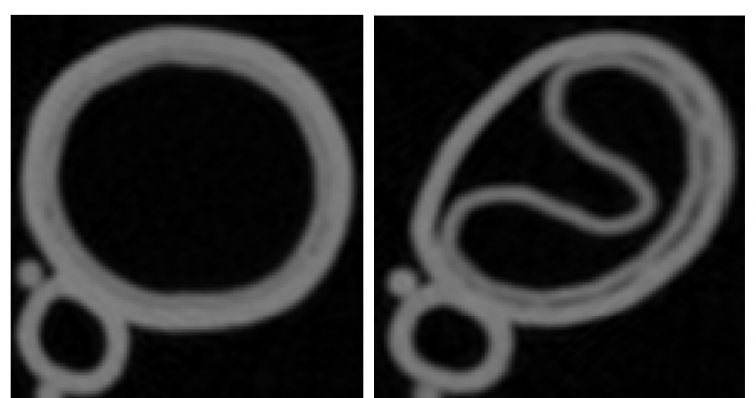
CT-scan of the printed stent grafts in NinjaFlex placed in the aorta model. Left: transversal slice of the aorta model with the personalized stent graft and a good sealing. Right: transversal slice of the aorta model with the straight stent graft, which could not unfold and bad sealing is seen at the unfolded side of the stent graft.

“The second tested material described, Cheetah, was not as flexible as thought and the solid stent grafts were not easily foldable which make it difficult to place the stent graft in the aorta model. When printed in a different geometry (meshed), the stent is more flexible and showed similar behavior as the nitinol stent graft. The stent grafts printed in NinjaFlex or Cheetah are in solid form too stiff and in mesh structure too flexible. We were not able to measure any distention differences of the aortic wall between the personalized stent grafts and the straight stent grafts,” concluded van Loon.

“The results showed that a better sealing could be obtained by using personalized stent grafts in our aorta models, however the used materials for the 3D printing of the stent grafts are not comparable with the nitinol stent graft and therefore more research is required.”

While van Loon documented obvious challenges in this study, 3D printed models are becoming indispensable in many medical applications, for assisting in surgery, diagnosing, treating and educating patients, while a variety of implants and devices are improving the quality of life for individuals around the world.

What do you think of this news? Let us know your thoughts! Join the discussion of this and other 3D printing topics at 3DPrintBoard.com.

[Source / Images: ‘Personalized Endovascular Stent Grafts: Developing a Phantom Aneurysm Model to Test Personalized Stent Grafts’]

The post 3D Printing Models & Stents for Treatment of Abdominal Aortic Aneurysms appeared first on 3DPrint.com | The Voice of 3D Printing / Additive Manufacturing.

4D Printed Structures to Impact Many Industries in the Future

Researchers from Libya are doing more than just delving past the limits of 3D printing and into 4D printing—they are investigating a full revolution in digital fabrication where structures can change over time as their environment transforms.

With their findings recently released in ‘4D Printing Technology: A Revolution Across Manufacturing,’ the authors define 4D printing as ‘the use of the 3D printing in the creation of objects which alter/change their shape when they are removed from the 3D printing. The aim is that objects made self-assemble when being exposed to heat, air or water, this is caused by chemical reactions due to the materials utilized in the manufacturing processes.’

4D printing offers benefits due to the versatility available as shapes adjust to heat or moisture, for example, offering properties and functionality suitable for many applications today. Commonly referred to as smart materials, 4D structures are created through mathematical modeling.

The differences between 3D printing technology and 4D printing technology

The bases of the 4D printing

A variety of different materials can be used in 4D printing, to include:

  • Thermo-responsive
  • Moisture-responsive
  • Photo-responsive
  • Electro-responsive
  • Magneto-responsive

Classes of materials that can respond to various types of stimulus including heat, electricity, moisture, light, and magnetic field.[12]

Smart materials show ongoing potential for use in applications like medicine, with the use of 4D printed implants able to deform in size as patients grow; for example, such a device was responsible for saving the life of a child in 2015, solving respiratory problems and adapting as the child grew—eventually dissolving.

“At present, the use of 4D printing technology in ultrasound scans allows, for example, to know more precisely the structural and functional development of the nervous system of the fetus. In the future, vascular endoprosthesis (stents) or other 4D parts that react to body heat and expand to adapt to the patient, may be able to be printed,” explained the researchers.

a: 4D-printed heart and b: 4D-printed skull

Clothing and footwear may continue to feel the positive impacts of 4D printing too, offering incredible customization for the wearer, who is able to experience a new level of comfort as items completely adapt to their form.

“The USA military is testing, for example, uniforms that change color depending on the environment, or that regulate perspiration depending on the environment temperature or the soldier’s pulse. 4D printed shoes will also be able to adapt to movement, impact, atmospheric pressure, and temperature.”

a: 4D-printed t-shirts and b: 4D-printed shoe

As organizations like NASA continue using 3D printing for items like rocket engines, robots, and a wide range of sophisticated projects, they are also reaching to 4D printing for features like metallic fabrics that could be used to offer greater insulation for astronauts. Smart materials able to deform quickly are also being tested for use in automobile airbags.

a: 4D-printed plane and b: 4D-printed car.

“Smart printing can be applied to many fields from simple changes of shape to bio printing for organisms,” concluded the researchers. “Using multi-material 3D printing technology and smart materials, 4D printing has been improved. 4D printing provides a feasible method to fabricate compact deployable products structures. Smart materials used are the cornerstone for 4D printing technology. This new technology will reduce the energy expenditure resource and consumption in the industry.”

What do you think of this news? Let us know your thoughts! Join the discussion of this and other 3D printing topics at 3DPrintBoard.com.

[Source / Images: ‘4D Printing Technology: A Revolution Across Manufacturing’]


The post 4D Printed Structures to Impact Many Industries in the Future appeared first on 3DPrint.com | The Voice of 3D Printing / Additive Manufacturing.

3D printing a low polygon Easter egg #3Dprinting

MSRaynsford blogs about 3D printing an Easter egg with a low polygon count:

Because it’s Easter and we’re all at home I thought I’d print some more interesting egg designs this year. Thingiverse provides as usual with this set of lovely designs, that I shall slowly work my way across while attempting to improve my timelapse set up. I thought I had changed the white balance for this one but clearly not.

See the video above and the post here.


Safety Suggestions for 3D Printing Medical Parts at Home: FDM Polymers

This does not constitute medical advice or indeed is meant to convey any particular indication that it would be safe to print medical parts at home. In a moment bereft of optimal choices however people are printing medical and ancillary medical things at home using desktop FDM systems. In order to make this safer, we’ve penned a number of articles encouraging you to do no harm, some safety suggestions on your print room setup and how to keep it clean and the relevant safety guidelines available including if you’ll print what category of items you’ll print. GMP plus the right materials and certifications is the only way to safely make a medical product or a quasi-medical product. If you print irresponsibly or cough on a face shield that you give to a hospital you may, in fact, kill someone who would have lived without you face shield. Please be careful.

Cleaning

1, Parts should be cleaned with soap and water. This is a guide on cleaning for COVID.

Disinfectant 

2. Subsequently, you can disinfect them. This is a list of EPA approved disinfectants. You should make sure that you yourself are clean and wearing gloves before doing this step. A newly washed apron, gloves, mask, and a face shield should be worn before disinfecting. All surfaces should be cleaned and disinfected before doing this step. Do not eat, drink, let people or pets in the room before this step.

Sterilization

3. Sterilization is a required step. There are a number of different processes that can all kill the living things that will inhabit your parts. Here is a quick guide, here are the CDC guidelines on sterilization and this is a practical guide.

Autoclaving

Autoclaving is the most common form of sterilization for a lot of polymer 3D printed parts. This gives you a good overview. Essentially your parts are sterilized under pressurized steam at around 121C. Immediately you’ll know that PLA won’t fare well under these conditions. These parts will often delaminate and fail.

In fact, most FDM materials do not fare well when autoclaved as their heat deflection temperatures are too low. Materials such as PPSU/PSU/PPSF are good candidates for autoclaving and can be exposed to repeated cycles. Their print temperatures range in the 380C range and 100C bed temperature however and this is beyond the reach of many desktop machines. The material is also around $380 per 500g or $216 per 500g, depending on approvals and the vendor. You could also consider materials such as PEEK or PEKK which also are expensive and high performance. PEI also withstands repeated cycles. PEEK is very difficult to print, PEKK and PEI are generally easier. To process these materials well you will have to have a highly modded printer or a high-temperature printer with a nozzle print temp of 400C, bed temp 100C and chamber temperature of 100C.

ABS is generally not a good candidate for autoclaving and ABS parts often fail in the autoclave. All other materials not mentioned here are also not good. This is a guide specifying which polymers are good candidates for the autoclave.

Should you wish to go the low-cost route then Polypropelene is also an alternative. Some polycarbonates could work but parts may warp and strength is reduced. Stratasys’ PC-ISO material is a good candidate for autoclaving. Polyamide filaments (but only really PA6) can, in a limited way, be autoclaved and are more accessible. POM (Acetal) is a risk in terms of fumes but with sufficient industrial ventilation could be managed. I personally wouldn’t print POM at home even with an enclosed system, filters and good ventilation.

WARNING: Please never 3D print PVC filament, it is too high risk to use, even in an industrial setting with HVAC and high safety standards. Fumes are highly toxic and dioxins may remain on your printer or on parts. There is no safe way to 3D print PVC. 3D printed PVC parts may have highly toxic dioxin residue on or in them. Here are articles on dioxins and PVC and thermal decomposition and in fires. During the 3D printing of PVC: hydrogen chloride may be released, cancer causing PAH’s may be released, as may toxic and carcinogenic dioxins.

Never use CF or GF or carbon nanotube or carbon black filaments for this application and try for the natural color if possible. Please note that even natural color filaments do often contain undisclosed not MSDS listed processing additives but generally no colorants. Please purchase filaments with the relevant approvals.

Other Options 

Typically the users will have their very own processes and adhere to them. There are some other options as well. Prusa has done a great job on identifying them for their face shield designs. They’ve found that for their shields autoclaving specifically will deform them. With some different materials this may not be the case. I’d always go with a part that can work in an autoclave. This is a readily available sterilization technology.

Also, the nice thing about an autoclave is that it is a very well understood, widely practiced, reliable technology. For the other methods above the processes could be less controllable. So design parts that work in materials that work in an autoclave, If this is impossible then I’d move to other sterilization methods.

What is encouraging for parts made in the home for the home or for you sterilizing a mask before you give it to your brother for example, is that a 5 minute bath in IPA seems to do the trick. Bleach could also be a solution. This means that with care, there are methods by which you could do a rudimentary sterilization at home. Now rudimentary sterilization is a bit like saying you’re half pregnant. Especially with cleaning, disinfecting and sterilizing we want to be incredibly careful.

The post Safety Suggestions for 3D Printing Medical Parts at Home: FDM Polymers appeared first on 3DPrint.com | The Voice of 3D Printing / Additive Manufacturing.

MELD Manufacturing Reaches Major Milestone with Metal 3D Printed Components

Virginia-based company MELD Manufacturing Corporation was launched in the spring of 2018 as a subsidiary of Aeroprobe Corporation, which produces instruments that provide and measure real-time air and flow data. Aeroprobe had been working with the Edison Welding Institute to develop Friction Stir Additive Manufacturing for printing functionally gradient metal components, and founded MELD to continue working on this novel technology.

That’s exactly what the company did. Even though its technology had already been in development for more than a decade, MELD continued making strides to its patented process of creating, and repairing, metal components out of off-the-shelf materials. Not long after its launch, MELD was in the news for winning the RAPID Innovation Award at RAPID + TCT 2018.

“The MELD technology is a revolution. To be recognized at RAPID by these industry leaders demonstrates just how much potential MELD has to change the way we think about manufacturing,” MELD Manufacturing Corporation’s CEO Nanci Hardwick said at the time. ” We want to see MELD adopted across industries, so it’s exciting to see genuine interest from such a diverse crowd.”

MELD Manufacturing Corporation CEO Nanci Hardwick and Production Manager David Smith with measuring tape extended to 1.85 meters (6 feet).

A few months later, the company was selected as a finalist for the global R&D 100 Awards, and is now celebrating a major milestone regarding the size of its metal 3D printed parts. Using off-the-shelf Aluminum 6061, MELD has 3D printed components that are larger than 1.4 meters (55 inches) in diameter; some of these components even have solid walls that are over 102 mm (4 inches) thick!

So, what makes this technology so unique? It can actually print fully dense parts without having to melt any metal. The innovative, solid-state process can be used to 3D print, coat, repair, and join metals and metal matrix composites. By avoiding melting, MELD also avoids issues like hot-cracking and porosity, and uses less energy to produce high-quality parts with full density and low residual stresses.

Large scale components made from off-the-shelf Aluminum 6061 material using the MELD process.

“MELD is uniquely open atmosphere, meaning no special chambers or vacuums are needed. This flexibility not only means less equipment and cost, but also that MELD is scalable and can make parts bigger, better, and faster than other processes,” the MELD website states.

“The combination of material freedom and scalability make MELD a revolution for a wide range of industries, including aerospace, defense, turbomachinery, and many others.”

Due to a decrease in domestic forges and mills, there’s an increased demand for large-scale metal parts, like the ones MELD is now creating, than foreign companies can readily supply. The current COVID-19 pandemic has not made these delays any better, either.

“Prior to the pandemic our customer told us that these parts, printed in a few days at MELD, would have taken them up to two years to get from their supply chain,” Dr. Chase Cox, MELD’s Director of Technology, said in a press release. “This global economic shutdown likely added 6 months or more to that 2-year lead time estimate. MELD represents an opportunity to re-establish domestic manufacturing capability at a critical time.”

MELD Manufacturing Corporation CEO Nanci Hardwick with a large-scale aluminum component built with the MELD process.

MELD’s material is widely used in industry applications, though it’s not compatible with other forms of metal additive manufacturing, and the large size of its 3D printed components is a good example of the advantages in scalability that this type of open-air 3D printer can provide. Large metal structures that are commonly fabricating with forging can now be 3D printed, on-demand, with MELD’s technology.

What do you think about this? Discuss this story, and other 3D printing topics, at 3DPrintBoard.com or share your thoughts in the Facebook comments below. 

(Images provided by MELD Corporation)

The post MELD Manufacturing Reaches Major Milestone with Metal 3D Printed Components appeared first on 3DPrint.com | The Voice of 3D Printing / Additive Manufacturing.

Timelapse Polar Bear Automata @BlitzCityDIY #3DPrinting #Timelapse

Liz Clark, BlitzCityDIY, shared on YouTube:

Timelapse: Polar Bear with Seal Automata by amaochan // 3D Printing and Assembly

This model had been on my print list for a while and I finally had time to print and assemble it. It’s such a beautiful model, both from an aestethic and mechanical perspective, that I wanted to do a video showcasing it.

Also I encourage you to look into amaochan’s work beyond this model, he is a very talented designer: https://amaochan.work/

Polar Bear with Seal Automata model on Thingiverse: https://www.thingiverse.com/thing:4052802

Subscribe to BlitzCityDIY on YouTube

Safety Suggestions for 3D Printing Medical Parts at Home: Standards and Terms

With a lot of you essentially having started a medical device factory in your den, we’ve begun by detailing useful information for you to learn and consider. We urge you the utmost care and would like to remind you that GMP is the only really good basis for manufacturing this kind of thing. Likewise your materials processes and methods should all be checked and validated. A lot of very precise terminology is being used very loosely. We thought it best that we give you some good links to explanations and automotive sources on a lot of terms that we’re only used by some of our tribe and now increasingly are used widely. With regard to making medical devices and medical parts, there are a number of standards and terms that are very relevant.

Terminology 

Biocompatible is a term that means that a material can work as intended in a human body without harming the body too much, this is a good guide on that. There are lots of different biocompatibility tests. There isn’t one magical “its biocompatible test” but many tests are conducted as a part of ISO 10993 and other standards and approval processes. Just because a material is called biocompatible does not mean that your handling of it will result in something safe nor that it will work for a new application or at a different site.

Cytotoxicity is when something is toxic to cells. In Vitro cytotoxicity tests are conducted “in glass” while in vivo tests are held in an animal. ISO 10993-5 deals with these kinds of tests and how they are to be conducted. Some things are referred to as in Vivo cytotoxic or in vitro cytotoxic. One can be used to derive safe limits for the other as well.

The NIH has a carcinogenic potency database. There is a distinction between known and probable human carcinogens. The IARC has a searchable database of its publications on over 400 carcinogenic materials. You can find a list of the IARC and NTP carcinogens here.

MSDS, SDS are Material Safety Data Sheets or Safety Data Sheets. Any and all vendors of a 3D Printing material should have this on file and readily available. Do not order from people who do not. This is clearly a sign of cavalier idiocy that should send your money elsewhere. There are search engines for SDS’s and you should be able to widely find them for all products. MSDS should tell you how to handle burns, how to dispose of the material, some of the materials it contains etc. Be aware that there is a huge variance in what and how much people disclose in MSDS. Specifically for 3D printing materials, MSDS are often vague and leave out a lot of additives.

A CAS Number is one unique number that is used to identify a particular chemical. Knowing and Googling the CAS number will tell you a lot about that molecule. Also, it saves you time and confusion. There are a number of CAS Databases such as CAS Registry and NIST Chemistry Webbook.

Tools for identifying chemicals and materials as well as learning about their safety.

PubChem is a great resource for learning about chemicals, the National Toxicology Program has a database called the Chemical Effects in Biological systems which is great as well.

With a design straight out of 1992, ITER is a comprehensive resource on risk assessment.

ECHA has a great search tool as well.

The ECHA’s C&L Inventory is a joy and gives you a simple info card on common chemicals.

SigmaAldrich is an online retailer for labware and chemicals. Their SDS search for Safety Data Sheets is a great tool, and often you can quickly identify a substance through using it. Fisher has a similar tool.

The NIOSH Pocket Guide to Chemical Hazards is a great downloadable and searchable book that gives you guidance on common chemical hazards.

Tests and Standards 

USP Class VI Plastic Tests is a series of tests to help determine if a plastic is safe for use in medical devices. Of all the relevant material related standards this is the defining one for the moment.

Class testing is often required for manufacturing drugs for its low toxicity compliance and strict bio-compatibility standards. It is important to know that no fluid-contact surfaces will result in harmful chemicals being extracted in to a conveyed fluid. Class VI testing extensively investigates the reaction in the body, skin, and living tissue to ensure safety. USP Class VI is a common standard for pharmaceutical tubingfittingssingle-use systems, and fabricated parts.”

ISO 10993-5:2009 is a standard for testing medical devices on their in vitro toxicity. So its an experiment in a petri dish meant to see if the device changes human cells in some negative way.

ISO 10993-10:2010 is a standard for medical devices on skin irritation and skin sensitization. Skin sensitization occurs when your body’s immune system responds to exposure through an allergic reaction. It is defined under OSHA and other rules, more detail can be found here. Partially or uncured SLA and DLP resins, 3D printing inkjet materials and some additives have been found to cause allergic responses such as this.

ISO 10993-12:2012 is a standard for biocompatibility tests with a focus on blood and fluid.

ISO 9001:2015 is a standard for manufacturing. It is a quality management system that once implemented and adhered to should mean that this firm can consistently manufacture things.

AS9100/EN 9100 is a certification for adopting a quality management system.

ISO 13485:2016 is a quality standard for manufacturing medical devices.

Directive 93/42/EEC is the main European Union directive for manufacturing medical devices. Other relevant directives are: AIMDD 90/385/EEC and IVDMDD 98/79/EC

GMP is a set of guidelines and standards for Good Manufacturing Practice that are needed to comply with regulatory agencies around the world when you manufacture food, drinks and pharmaceutical products.

CGMP is the Current Good Manufacturing Practice as regulated by the FDA. You can find these regulations here.

Class I,II etc. 

In Europe medical devices are classed: Class I, IIa, IIb and III. I has the lowest risk and III the highest. In class I it can be strict if it is sterile or a measurement device such as a stethoscope. If it is neither, you can self certify by registering the technical documentation yourself and marking it with a CE mark.

Class IIa devices include surgical gloves and include the now popular respirators and other similar equipment. Here your self registry information goes to a government body for review.

Class IIb devices can be used for longer than a month and include ventilators and ER monitoring equipment.

Class III devices are the most risky and include medical implants. Here an audit and inspection may be needed.

The CE Mark itself can be done by you in ten minutes.

The CE Mark Medical Devices is only allowed when the correct conditions are met. But, in the case of a Class I device it could be done by you in ten minutes.

The US FDA also has a class rating system but this is of I, II and III. Most class I devices do not get any premarket review. These devices need a 510(k).

A 510(k) is a premarket notification whereby a device similar to an existing one is cleared.

This is in contrast to a more exacting Premarket Approval (PMA).

Some devices are 510(K) exempt which means that you have to register it and manufacture under GMP but don’t have to go through the approval process.

Face shields are FDA Class I devices and face masks Class II devices. As was explained in this article, there is a relaxation on face shields while there is none on masks. Michael’s recommendations on what you can make when are here.

NIH’s “clinical review” is based on uploading and having your device reviewed by NIH staff.

Hospital approved, is currently being used to mean that “St. Mary’s Hospital uses these shields.” In some hospitals an extensive review may be conducted by committees and have be based on testing and evaluation. Given the time span under which some of these so called approvals are occurring, we would caution when trusting this term however.

So generally we can say that a material would have to be made according to GMP at a relevant ISO certified site according to the relevant ISO norm with a quality system. It will have to be tested and pass USP Class VI. Then a device would also have to be made at least according to GMP. Ideally, a certified quality management system and the relevant ISO or other norms would have to be in place and the facility and all procedures will have to adhere to them. So if you’re buying parts or materials you’d like them to originate from these sources.

It is important to note that while skin sensitization testing and biocompatibility are important they do not guarantee safety. Even if the material conforms to all of these things and you as the manufacturer do not have the relevant procedures in place it will be unsafe.

The post Safety Suggestions for 3D Printing Medical Parts at Home: Standards and Terms appeared first on 3DPrint.com | The Voice of 3D Printing / Additive Manufacturing.

FDM 3D Printing & PLA: Fabrication of a Splint for Mallet Finger

Researchers from Australia and the UK are finding ways to improve treatments for injuries to the hand, detailing their results in the recently published ‘Patient-specific 3D-printed Splint for Mallet Finger Injury.’ The goal is to offer better outcomes for patients who may have experienced damage to the tendon responsible for straightening the joint found at the end of the finger (or thumb).

Mallet finger injuries most commonly occur due to trauma after being struck by an object that bends the finger or thumb tip painfully.

(A) Mallet finger fracture (Image courtesy from Sachin J Shah, MD, online), (B) anatomy of finger

While there are many injuries and illnesses far more seriously affecting lives today, losing the use of a finger or hand can be debilitating as we must use them for so many tasks—primarily at work. Many types of splints may be uncomfortable for the patient to wear, but are also labor-intensive and expensive to make, resulting in the use of excess material during production too.

3D printing and additive manufacturing processes are beginning to make an impact in manufacturing of orthotics, offering benefits like greater affordability, speed in production, and best of all—total customization. Innovation around the globe has resulted in new software and improved workflow for creating medical devices like orthotics, the production of more comfortable foot/ankle orthotics, myoletric orthotics, and more.

“Mallet finger is often left untreated by patients unless severe restriction in extensor ability is present, or there is lingering pain. This injury, in the case, that there are functional shortfalls, can impede the whole hand in everyday fine motor skill tasks,” explained the authors. “Furthermore, this deformity can develop additional medical conditions in the finger and hand as overcompensation can create hyperextension of proximal interphalangeal joint, a swan neck deformity.”

“Effective use of AM may lead to a reduction in size and weight of the splint making it more comfortable for the user.”

Today, the most common splints are the prefabricated stack splint, the dorsal aluminum splint, and the customized thermoplastic splint. Generally they are worn for six to eight weeks, but with the first two choices there may be ongoing comfort issues as the splints may not fit well causing the skin to become irritated, the patient may experience added pain, and the splint itself may break due to inferior materials or manufacturing. Many patients are also unhappy with the size and style of their splints.

(A) Stack, (B) dorsal aluminum, and (C) personalized thermoplastic splints

“… customized splints, fitted to the exact dimensions of a patient’s finger, have the ability to provide successful treatment in more cases than the other two splint types,” stated the authors.

FDM 3D printing was chosen for the course of this study as the researchers made samples, noting that they would be taking advantage of the ability to fabricate complex geometries not previously possible through conventional techniques in manufacturing. More importantly is the ability to offer patient-specific treatment like never before—especially with medical devices like prosthetics and orthotics. In this study, the issue of comfort could be addressed with comprehensive customization, splints made quickly, and revised simply by changing the 3D design and printing a new one in the case of growth (these issues are common with children who may outgrow an orthotic made with conventional methods before it even arrives to them!), damage, or other requirements.

The seven measurements required to create a personalized finger splint computer-aided drawing model.

The research team used Autodesk Inventor for entering the measurements for their sample, including a built-in constraint:

“When the user clenches their fist, without this material removed, the skin of their middle phalanx finger can push into the back of the splint dislodging its correct position. The stack splint is designed with an open ventilation section above the fingernail to allow some airflow to reduce sweat when being worn and to allow limited access for washing.”

Geometry of a sample 100% mass design according to a patient’s finger.

Addressing the issue of wasted material and recycling of products later, the researchers point out that patient-specific devices like the splints they designed cannot be re-used by another individual later due to the level of customization, so they must be disposed of; however, with the use of PLA as their 3D printing material, a discarded splint can be ‘composted’ within six to eight weeks.

Schematic view of boundary conditions on a sample splint design.

One of the main objectives in the study was to develop a highly functional orthotic with topology optimization, eliminating as much material as possible while still maintaining the splint’s required volume fraction and stiffness.

Domains discretization with tetrahedral elements for (A) 100%, (B) 79.49%, (C) 71.13%, and (D) 62.51% mass

A three-dimensional-printed dog-bone poly-lactic-acid sample (A) before, and (B) after tensile test.

An Ultimaker2 Extended+ 3D printer was used for fabrication, while tensile testing was performed on an Instron 300LX.

“In FDM topology optimized and original design, finger splints were fabricated, original (100% mass), 62.51% mass, 71.13% mass, and 79.49% mass, by the same 3D printer and processing parameters used for the dog-bone specimens,” stated the researchers.

Noting that deflection results did not correlate exactly with heat dissipation, a trade-off analysis was required in choosing the best splint since the initial splint operating at 100 percent mass offered the best mechanical performance, but the 71.13 percent mass splint performed optimally in heat dissipation.

From left to right 62.51%, 71.13%, 79.49%, and 100% mass splints

“This splint is simpler to print than lower percentage mass splints that can require more printing support structures. It was found that inevitably reducing the amount of material in a load-bearing finger splint would increase the deflection of it. However, when the distribution of that material is chosen to optimize the stiffness in that situation, the deflection value was low enough to justify its use,” concluded the researchers.

“The results of this project would pave the way for the medical industry to utilize superior advanced manufacturing and minimum materials that have been shape optimized to better serve their purpose while improving patient comfort.”

What do you think of this news? Let us know your thoughts! Join the discussion of this and other 3D printing topics at 3DPrintBoard.com.

[Source / Images: ‘Patient-specific 3D-printed Splint for Mallet Finger Injury’]

The post FDM 3D Printing & PLA: Fabrication of a Splint for Mallet Finger appeared first on 3DPrint.com | The Voice of 3D Printing / Additive Manufacturing.