step-by-step button cap #3DThursday #3DPrinting

scratchhax shares:

One of the schools I work with makes heavy use of these step-by-step jelly bean buttons. They run into a fairly consistent problem though of the button being accidentally pressed when it’s in a bag or when a remote switch is being used, so I came up with these magnetic caps. You’ll need 3 5mm disc magnets if you want the cap to hold itself on, but it should friction fit pretty well without them.

download the files on: https://www.thingiverse.com/thing:3222413


649-1
Every Thursday is #3dthursday here at Adafruit! The DIY 3D printing community has passion and dedication for making solid objects from digital models. Recently, we have noticed electronics projects integrated with 3D printed enclosures, brackets, and sculptures, so each Thursday we celebrate and highlight these bold pioneers!

Have you considered building a 3D project around an Arduino or other microcontroller? How about printing a bracket to mount your Raspberry Pi to the back of your HD monitor? And don’t forget the countless LED projects that are possible when you are modeling your projects in 3D!

Case for Adafruit Animated Eyes Bonnet for Raspberry Pi W/ US-100 #3DThursday #3DPrinting

NotLikeALeafOnTheWind shares:

Just in time for Christmas the final update to our Halloween project.

A case for Adafruit’s Animated Eyes Bonnet for Raspberry Pi using the US-100. (No more level shifters.) The case will mount either a Pi Zero or a full sized Raspberry Pi on the front inside face or inside bottom of the case. The US-100 mounts through the front of the case. The idea is to place the box in a dark place and uses the sensor to wake the effect up a programmable distance.

download the files on: https://www.thingiverse.com/thing:3287084


649-1
Every Thursday is #3dthursday here at Adafruit! The DIY 3D printing community has passion and dedication for making solid objects from digital models. Recently, we have noticed electronics projects integrated with 3D printed enclosures, brackets, and sculptures, so each Thursday we celebrate and highlight these bold pioneers!

Have you considered building a 3D project around an Arduino or other microcontroller? How about printing a bracket to mount your Raspberry Pi to the back of your HD monitor? And don’t forget the countless LED projects that are possible when you are modeling your projects in 3D!

Why the Maritime Industry Should Embrace 3D Printing for Spare Parts

In an article entitled “Is it Time for the Maritime Industry to Embrace 3D Printed Spare Parts?” a pair of authors argues that the shipping industry could benefit from 3D printing spare parts. The shipping industry, the authors point out, is typically conservative when it comes to change, but they offer several reasons why this industry, in particular, could be well-served by embracing 3D printing. Ships are frequently operating far from repair facilities and spare parts storage, so the ability to produce spare parts directly aboard the ships could be immensely helpful.

The authors also examine several other industries in which 3D printing has been successfully utilized in the production of spare parts, including the aerospace industry. The advantages that the aerospace industry has seen include better energy efficiency, cutbacks in emissions, better design handling and lower manufacturing lead time. Reduction in inventory cost is another benefit, as manufacturers can produce spare parts when and where they are needed rather than keeping a warehouse full of parts that may or may not be used.

The maritime industry isn’t a complete stranger to 3D printing, and the authors highlight a few cases in which the technology has already been successfully used. They mention a 2016 project called “3D Printing Marine Spares,” which was initiated by the Innovation Quarter, the Port of Rotterdam Authority and RDM Makerspace with the participation of 28 businesses and agencies.

“Making use of three different production processes, the advantages of the various methods for additive manufacturing and the maturity of the technology was experienced,” the authors state. “Thus the project brought a wealth of information on the current and near future state of 3D printing as an alternative method for producing maritime parts.”

The WAAMpeller

The project concluded that 3D printing holds promise for a variety of spare parts. However, extra work needs to be done to adjust regulations in order to qualify 3D printed parts. The authors also mention the WAAMpeller project, in which several organizations worked together to fabricate the world’s first class-approved 3D printed ship’s propeller. Then there is the Green Ship of the Future consortium, which involves more than 20 industry partners exploring opportunities for 3D printing in the maritime industry.

The United States Navy has also used 3D printing to great success in a number of maintenance cases.

“The maintenance has given the Navy the time needed to permanently install, and test out a 3D printer on board,” the researchers state. In the meantime, the crewmembers on board the ship have been busy printing out anything from plastic syringes, to oil tank caps, to model planes used for the mock‐up of the flight deck. The US Navy argues that they are still several years away from being able to print out actual spare parts for aircraft or the ship itself, but it is certainly a good starting point.”

The authors conducted several interviews with people working in the maritime industry. Most of the respondents had some idea of what 3D printing is, and almost all of them had a positive view of the technology; a few were skeptical, but not negative.

“Their main concern was if the spare part made by the AM is comparable with the part made by the traditional method,” the researchers explain. “Another concern was the cost of the AM machine, and the cost to build the part.”

A submarine hull 3D printed by the US Navy

There are several issues to be addressed, they continue, including finding the best process for use aboard a ship, protecting intellectual property, and training personnel in the technology. Overall, however, they conclude that 3D printing is a “promising” technology and one that should be seriously considered by the maritime industry.

Authors of the paper include E. Kostidi and N. Nikitakos.

Discuss this and other 3D printing topics at 3DPrintBoard.com or share your thoughts below. 


3D Printing Industry Review of the Year April 2018

In April 2018, automotive and architecture dominated on the 3D printing applications front. This month, 3D Printing Industry also became an official media partner of AMUG, one of the most exclusive groups in the industry – and we featured big releases from the likes of Stratasys, BMW, Oak Ridge National Laboratory, and Markforged. 3D Printing […]

Regulated Plant Water #3DThursday #3DPrinting

hitchhiker4200 shares:

You ever seen those bubblers for watering chickens? This is like those, only it doesn’t water chickens. You should water your chickens – else they don’t grow – just not with one of these.

download the files on: https://www.thingiverse.com/thing:3222386


649-1
Every Thursday is #3dthursday here at Adafruit! The DIY 3D printing community has passion and dedication for making solid objects from digital models. Recently, we have noticed electronics projects integrated with 3D printed enclosures, brackets, and sculptures, so each Thursday we celebrate and highlight these bold pioneers!

Have you considered building a 3D project around an Arduino or other microcontroller? How about printing a bracket to mount your Raspberry Pi to the back of your HD monitor? And don’t forget the countless LED projects that are possible when you are modeling your projects in 3D!

Neopixel insert for idig3d Christmas Tree #3DThursday #3DPrinting

MiggyMan shares:

An led insert for idig3d’s christmas tree, it’s designed to take ws2812b led strips, there are cable cutouts at the bottom, one in the base for a usb cable and space enough to fit a wemos d1/digispark/other microcontroller in the middle.

download the files on: https://www.thingiverse.com/thing:3304505


649-1
Every Thursday is #3dthursday here at Adafruit! The DIY 3D printing community has passion and dedication for making solid objects from digital models. Recently, we have noticed electronics projects integrated with 3D printed enclosures, brackets, and sculptures, so each Thursday we celebrate and highlight these bold pioneers!

Have you considered building a 3D project around an Arduino or other microcontroller? How about printing a bracket to mount your Raspberry Pi to the back of your HD monitor? And don’t forget the countless LED projects that are possible when you are modeling your projects in 3D!

3D Printing Industry Review of the Year March 2018

In the month we opened voting for the 3D Printing Industry Awards research prevailed, especially in the medical and biomedical sphere. A few companies donned some new 3D printed shoes and, of course, there was a flurry of 3D printer releases to top it all off. Medical innovation straight from the lab At the University of Texas […]

Long Term Home Review of Ultimaker’s New S5 Professional 3D Printer

At Hannover Messe this past April, desktop 3D printing leader Ultimaker introduced its first new 3D printer in two years – the S5, an expansion to its professional 3D printer portfolio. Ultimaker reseller Dynamism showcased the new S5 at RAPID + TCT that same month, as did Ultimaker itself. The desktop system, with a 330 x 240 x 300 mm build volume, has all kinds of great features, including dual extrusion, an intuitive touchscreen integrated into the front panel, and an enclosed front with tinted glass doors…so imagine my excitement when I learned that Dynamism would be shipping me a review unit!

Full disclosure – while I’ve completed 3D prints before at Dayton’s 3D printing bar, this would be my first time setting up and operating a 3D printer all on my own. So when the gigantic box, and a smaller one of extra filament, arrived on my porch, I was a little…okay, a lot…intimidated. In fact, I was so concerned about not having anything pull focus from the unboxing and set-up process that the gigantic carton just sat in my dining room for a few days until the opportune moment. At 3DPrint.com we do not charge money for reviews. This is my own experience and my own opinion.

I’ll say this – the S5 was extremely well packaged. I was amazed at the sheer amount of used packing material I had at the end of the process, but also not surprised; I was dealing with precious cargo, after all. Another thing I will say, with complete honesty, is that while I write about technology all day every day, handling it is not my personal forte. So the fact that I was able to get this machine out of the box and set up with relatively few hiccups means that anyone can. The provided instructions were easy to follow, and if I needed more information, I just checked out the Ultimaker Resources.


The S5 came with a test print and a box of hardware accessories and tools, including two print cores, several nozzle covers, the glass build plate, a 2 mm Hex screwdriver, a glue stick, spool holder with a material guide, XY calibration sheets, a power cable, and a USB drive. The 3D printer also came with Tough PLA and PVA support material, the latter of which I am in love with…but more on that later.

Keeping my cats and dogs away!

I found it fairly straightforward to set up most of the hardware, but I had a bit of trouble using the clips to secure the Bowden tubes; however, I think that was more user error than anything else. I had no issues installing the Cura software, or updating the firmware once the 3D printer was fully up and running, though it took me a couple of tries to get the 3D printer to connect to my WiFi. While there were no problems loading the materials, I had a harder time installing the BB 0.4 print core. I think this was mainly due to the fact that I was so insanely aware of just how expensive this machine was and was treating it with kid gloves, and a firmer hand is sometimes required when installing hardware. Luckily, the more I used the 3D printer, the more comfortable I became.

Speaking of actually using the 3D printer, when the time finally came to test it out, I got a little too excited and forgot about a very important step: calibration. I very quickly realized that there was a problem, as the print was stringing and not adhering to the build plate, even though I’d applied a thin layer of glue, and stopped the job about three minutes in. While I was sad that my first print was far from a resounding success, I resolved to make it right.

I again waited a bit to try calibrating the S5, partly because I was busy but mainly because I was intimidated by it all over again. But once I took the time to sit down and figure it out, the calibration sheet that came with the 3D printer was a breeze to use, and I was on my way once again, ready to try 3D printing something that wasn’t just the calibration grid of straight lines.

My first successful attempt was one of the two sample prints that came on the included USB drive, which printed very quickly. I love the intuitive touchscreen on the front of the S5 – it’s very user-friendly, and I quickly figured out how to pull up a rough image of what the print would look like once it was complete, so I’d know that it was printing correctly. Once I pried the tiny print off of the plate (a very easy task thanks to a layer of glue underneath), I put it in a small container of water and let it sit overnight, so I could see how long it took to dissolve the PVA support structures.

I loved the Ultimaker water soluble PVA. It was just so easy – pop the print in water and let the material work its magic. It’s possible to simply crunch and pull the supports off by hand as well, but the immediate effect wasn’t as clean. Obviously, the larger and more complicated the prints were, the longer I had to let them sit in water, and I learned that unless I felt like getting gummy residue stuck to my fingers, it was best to just wait until the supports had 100% completely dissolved. It was also a little tough cleaning the build plate, as the PVA sort of bonded with the glue and became hard to scrub off. But I followed the advice of the Dynamism team and got a soft, non-abrasive sponge to help with this task.


My next two prints were included Cura files: a star trophy and a rocket ship. Both of these were fairly straightforward prints, and gave me a chance to try out an extra form of bed adhesion with the addition of a brim; I can tell you now I much prefer a skirt, but I figured I would just give it a shot.

The first print I completed that wasn’t already included in Cura or the USB drive was a Harry Potter Logo by Cults3D user 3DNaow, which turned out great. It’s definitely my favorite 3D print from this review, mostly because I love Harry Potter. Because I majorly scaled it down, the print took a lot less time to complete as well.

I’m going to take a moment here to rave about the remote monitoring. I didn’t download the app, but I did not have the S5 set up in my office. I live in an older Cape Cod house, and my office is in the half story upstairs, which doesn’t have great ventilation. So I decided it would be better to put the 3D printer on a table in my dining room, which is in a much more open part of the house. But this meant that I couldn’t keep my eye on it during the day. Having the option to monitor my print jobs from upstairs, thanks to Cura and the camera located above the auto-leveling bed, provided me with peace of mind.

I would have called this adorable Low Poly T-rex by Thingiverse user slavikk my favorite, had I not screwed it up so badly. I had been messing around in the custom settings in Cura, just to try and put the system through its paces by changing up things like the infill and layer height, and I somehow managed to change the support material from Extruder 2 – the Natural PVA – to Extruder 1 – the Tough PLA. It took me about a quarter of the way into the print to realize my mistake, and by then it was too late. So this dino is still pretty cute, but I think he will be much better-looking when I take the time to get an X-Acto knife and cut away the black supports from the front.

In completing my small collection of low poly animals from Thingiverse, I chose to 3D print a Low Poly Cat – another print by slavikk – and a Low Poly Stanford Bunny by johnny6. I put both the cat and the bunny on the build plate at the same time for a 7.5 hour print. This is where things started to get a little rocky.


About four hours in, an error message popped up on the touchscreen: “One material appears to be empty. Please change it to a new material to continue printing.” I wasn’t home (this became the only time I left the house during a print job) and my husband texted me about it, but said that it didn’t appear that the filament was empty. Once I got home and took a look, it was definitely very obvious that neither filament was empty, so I just took a shot in the dark and pressed ‘Ok’ below the error message to confirm that I had changed to a new material, even though I hadn’t, just to see if it would start up again.

I got lucky and the prints resumed…for about 20 minutes. Then, the same thing happened again, I tried the same fix, and things continued on, though the support material was looking pretty stringy. About an hour later, the connection went out and I lost the monitor view upstairs, but the S5 just kept rolling along.


My next print was an STL file that the Dynamism team had sent me of a generic sample spare part, which took about 15 hours to print, with no supports, when scaled to 100%. It was a good illustration of just how important professional 3D printers, like the S5, can be for businesses in need of prototypes or models. The level of quality and accuracy of the prints produced on the S5 is just stellar, in my opinion. Maybe you should take my opinion with a grain of salt, because as I noted earlier, I’m not an expert on using 3D printers, but that’s up to you.

Realizing that not a single one of the items I’d 3D printed so far were at all useful, I  went back to Thingiverse and found this batman earphones holder by itlaor, which quickly printed without any supports and is now being used by my husband, with great appreciation, to keep his earbuds from getting tangled up all the time.

I also decided to 3D print this very detailed Eagle Sculpture by Thingiverse user 3DWP for my husband, who is an Eagle Scout and has a small collection of eagle figurines and sculptures. With this one, I couldn’t get my computer upstairs to connect to the 3D printer downstairs. I turned the WiFi off on both the computer and the printer and then immediately back on, and still nothing. So in the interest of saving time, I simply saved the STL file to the USB drive and printed it that way. About 10 hours in to the 16.5 hour print, I got the same error message I’d received with the low poly animals, and “fixed” it the same way. It seemed to only occur on prints with PVA supports for some reason.

I enjoyed trying out the Ultimaker S5 3D printer from Dynamism. I had it for far longer than I planned, but thoroughly enjoyed using it. What I knew already from writing about this technology daily, and have now had the chance to truly experience for myself, is that 3D printing takes time, which is something I don’t always have in the evenings – I do a decent amount of church and theatre volunteer work. So I kept searching for quick print jobs to try with the S5 because I just do not often have 15-24 hours where I am at my house the entire time. But as for the quality and ease of use – that was top notch.

The Ultimaker S5 is available for purchase on the Dynamism website starting at $5,995.

Discuss this and other 3D printing topics at 3DPrintBoard.com or share your thoughts below.

[Images taken by Sarah Saunders for 3DPrint.com]

3D Printed Microfluidic Device Designed to Customize Cancer Treatment

Testing cancer treatments is a lot of trial and error currently, and patients are often subject to multiple uncomfortable and time-consuming therapies before finding one that works. Developments have been made, including growing artificial tumors to test drugs on specific cancer types, but these tumors can take weeks to grow and they don’t account for patients’ individual biological makeup. Now, however, researchers from MIT and Draper University have come up with a new option: a 3D printed microfluidic device that simulates cancer treatments on biopsied cancerous tissue.

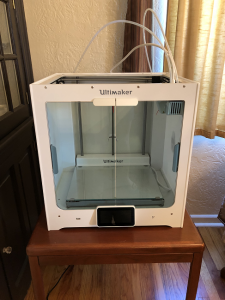
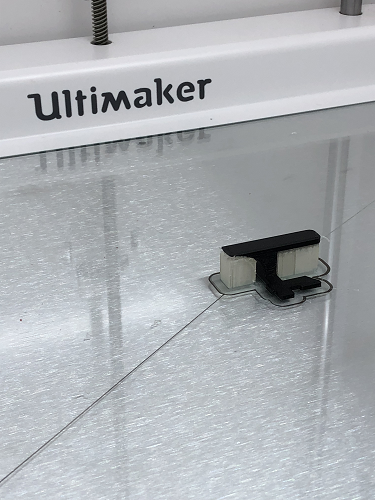
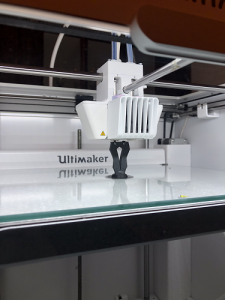
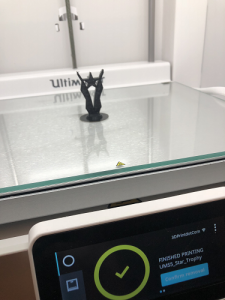
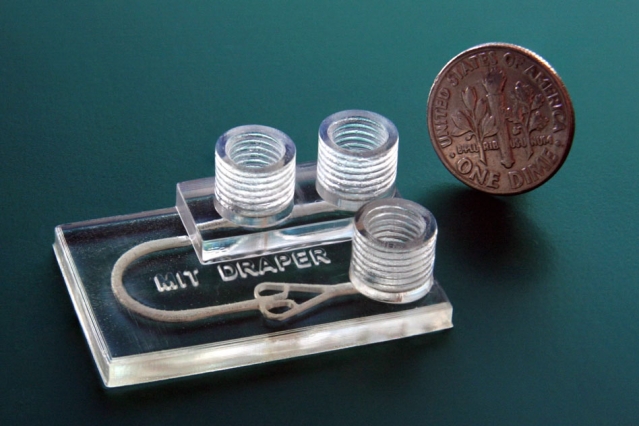
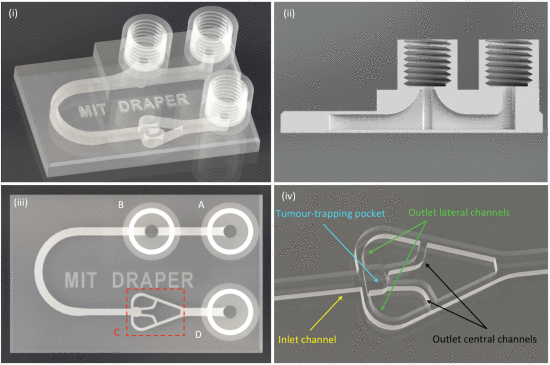
The device is a chip slightly larger than a quarter that can be 3D printed in about an hour. It has three cylindrical chimneys protruding from the surface, which are ports that input and drain fluids as well as remove unwanted air bubbles. The biopsied tumor fragments are placed in a chamber connected to a network of deliver fluids to the tissue. These fluids could contain things like immunotherapy agents or immune cells. Clinicians can then use imaging techniques to see how the tissue responds to the treatments.

The researchers used a new type of biocompatible resin, traditionally used for dental applications, that can support the long-term survival of biopsied tissue. This contrasts with other 3D printed microfluidic drug testing devices, which have chemicals in the resin that quickly kills the cells. Fluorescence microscopy images showed that the new device, called a tumor analysis platform or TAP, kept more than 90 percent of the tissue alive for at least 72 hours and potentially much longer.

The TAP is cheap and easy to fabricate, so it could quickly be implemented into clinical settings, according to the researchers. The devices is adaptable as well – doctors could 3D print a multiplexed device that could support multiple tumor samples in parallel, so that the interactions between tumor fragments and several different drugs could be modeled simultaneously for a single patient.

“People anywhere in the world could print our design. You can envision a future where your doctor will have a 3-D printer and can print out the devices as needed,” said Luis Fernando Velásquez-García, a researcher in the Microsystems Technology Laboratories. “If someone has cancer, you can take a bit of tissue in our device, and keep the tumor alive, to run multiple tests in parallel and figure out what would work best with the patient’s biological makeup. And then implement that treatment in the patient.”

One potential application is testing immunotherapy, a new treatment method that uses drugs to “rev up” a patient’s immune system to help it fight cancer.

“Immunotherapy treatments have been specifically developed to target molecular markers found on the surface of cancer cells,” said graduate researcher Ashley Beckwith. “This helps to ensure that the treatment elicits an attack on the cancer directly while limiting negative impacts on healthy tissue. However, every individual’s cancer expresses a unique array of surface molecules — as such, it can be difficult to predict who will respond to which treatment. Our device uses the actual tissue of the person, so is a perfect fit for immunotherapy.”

The research was published in a paper entitled “Monolithic, 3D-Printed Microfluidic Platform for Recapitulation of Dynamic Tumor Microenvironments.

“A key challenge in cancer research has been the development of tumor microenvironments that simulate mechanisms of cancer progression and the tumor-killing effects of novel therapeutics,” said Jeffrey T. Borenstein, who leads the immuno-oncology program at Draper. “Through this collaboration with Luis and the MTL, we are able to benefit from their great expertise in additive manufacturing technologies and materials science for extremely rapid design cycles in building and testing these systems.”

Microfluidic devices are typically produced via micromolding with PDMS. The technique was not suitable, however, for producing a device with fine 3D features such as the fluid channels, so the researchers turned to 3D printing, which allowed them to create the device in one piece. They experimented with several resins, but finally settled on Pro3dure GR-10, which is often used to make mouth guards. The resin is nearly as transparent as glass, can be printed in very high resolution, and has hardly any surface defects – and it doesn’t harm the cells.

“When you print some of these other resin materials, they emit chemicals that mess with cells and kill them. But this doesn’t do that,” Velasquez-Garcia said. “To the best of my knowledge, there’s no other printable material that comes close to this degree of inertness. It’s as if the material isn’t there.”

The device also features a “bubble trap” and a “tumor trap.” Fluids flowing into a device like this one creates bubbles that can disrupt the experiment or burst and release air that destroys tumor tissue. So the researchers created a bubble trap, a chimney that rises from the fluid channel into a threaded port through which air escapes. Fluid gets injected into an inlet port adjacent to the trap, then flows past the trap, where any bubbles in the fluid rise up through the threaded port and out of the device. Fluid is then routed around a small U-turn into the tumor’s chamber, where it flows through and around the tumor fragment.

The tumor trap sits at the intersection of the larger inlet channel and four smaller inlet channels. Tumor fragments, less than one millimeter across, are injected into the inlet channel via the bubble trap. As the fluid flows through the device, the tumor is guided downstream to the tumor trap, where it gets caught. The fluid continues traveling along the outlet channels, which are too small for the tumor to fit into, and drains out of the device. A continuous flow of fluids keeps the tumor fragment in place and constantly replenishes nutrients for the cells.

“Because our device is 3-D printed, we were able to make the geometries we wanted, in the materials we wanted, to achieve the performance we wanted, instead of compromising between what was designed and what could be implemented — which typically happens when using standard microfabrication,” Velásquez-García said.

The next step is to test how the tumor fragments respond to therapeutics.

“The traditional PDMS can’t make the structures you need for this in vitro environment that can keep tumor fragments alive for a considerable period of time,” said Roger Howe, a professor of electrical engineering at Stanford University, who was not involved in the research. “That you can now make very complex fluidic chambers that will allow more realistic environments for testing out various drugs on tumors quickly, and potentially in clinical settings, is a major contribution.”

Discuss this and other 3D printing topics at 3DPrintBoard.com or share your thoughts below.

[Source/Images: MIT]


Researchers 3D Print a New Variety of Zinc Ion Battery Shapes for Wearable Devices

With the development of flexible wearable devices comes the need for new battery shapes, as most batteries are currently limited to spherical or rectangular shapes. These shapes do not use space as efficiently as other shapes could, so a team of researchers led by Professor Il-Doo Kim from the Department of Materials Science at KAIST and Professor Jennifer Lewis from the School of Engineering and Applied Sciences at Harvard University have used 3D printing to manufacture batteries with a variety of novel shapes.

These shapes include ring-type, H and U-shaped batteries. Through a research collaboration with Dr. Youngmin Choi at the Korea Research Institute of Chemical Technology (KRICT), these 3D printed batteries were applied to small wearable electronic devices, namely wearable light sensor rings.

The team adapted environmentally friendly aqueous Zn-ion batteries to make customized battery packs. The system, which uses Zn2+ instead of Li+ as charge carriers, is much safer than rechargeable lithium batteries, which use highly flammable organic electrolytes. The processing conditions of these lithium-ion batteries is also highly complicated, as organic solvents can ignite upon exposure to moisture and oxygen. The aqueous Zn-ion batteries are stable upon contact with atmospheric moisture and oxygen, so they can be fabricated in ambient air conditions. They also have advantages in packaging, since packaged plastic does not dissolve in water even when 3D printed.

The researchers used an electrospinning process to fabricate a carbon fiber current collector and uniformly coated electrochemically active polyaniline conductive polymer on the surface of the carbon fiber for a current collector-active layer integrated cathode. The cathode, which is based on conductive polyaniline consisting of a 3D structure, exhibits extremely fast charging speeds, with 50 percent of the charge being completed in two minutes. It can be fabricated without the detachment of active cathode materials, so various battery forms with high mechanical stability can be manufactured.

“Zn-ion batteries employing aqueous electrolytes have the advantage of fabrication under ambient conditions, so it is easy to fabricate the customized battery packs using 3D printing,” said Professor Kim.

The research was published in a paper entitled “High-Power Aqueous Zinc-Ion Batteries for Customized Electric Devices.

“3D-printed batteries can be easily applied for niche applications such as wearable, personalized, miniaturized micro-robots, and implantable medical devices or microelectronic storage devices with unique designs,” said Professor Lewis.

Most current battery shapes are optimized for coin cell or pouch cells. Since batteries occupy most of the space within microelectronic devices, different shapes are required to fit the new wider variety of devices. The researchers’ success could lead to more of a variety of wearable devices, including very small ones.

In related news, Professor Kim was appointed as an Associate Editor of ACS Nano, in which the article was recently published.

“It is my great honor to be an Associate Editor of the highly renowned journal ACS Nano, which has an impact factor reaching 13.709 with 134,596 citations as of 2017,” he said. “Through the editorial activities in the fields of energy, I will dedicate myself to improving the prominence of KAIST and expanding the scope of Korea’s science and technology. I will also contribute to carrying out more international collaborations with world-leading research groups.”

(L to R) Dr. Bok Yeop Ahn, Dr. Chanhoon Kim, Professor Il-Doo Kim and Professor Jennifer A. Lewis

Authors of the paper include Chanhoon Kim, Bok Yeop Ahn, Teng-Sing Wei, Yejin Jo, Sunho Jeong, Youngmin Choi, Ill-Do Kim and Jennifer A. Lewis.

Discuss this and other 3D printing topics at 3DPrintBoard.com or share your thoughts below.

[Source/Images: KAIST]