What is Metrology Part 20 – Processing

Processing

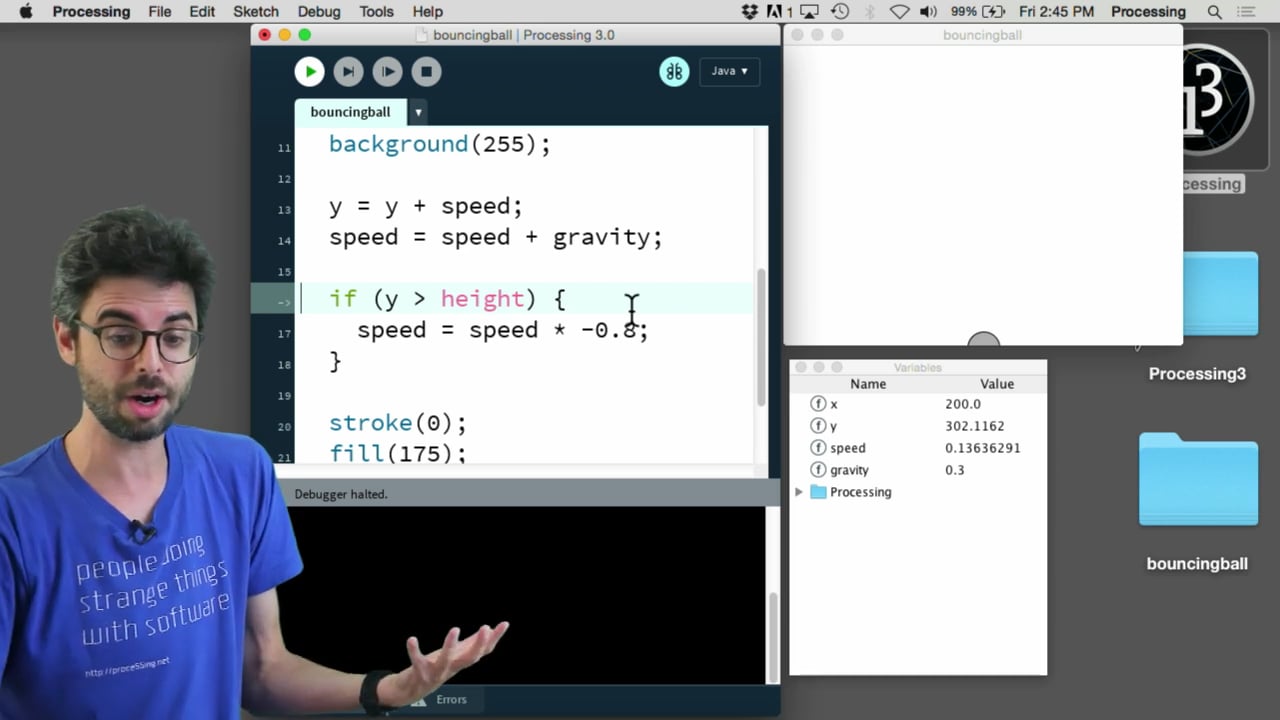
Hey everyone! So this series thus far has been a bunch of fun, and it gets more exciting with what we are doing today. Today I’ll be taking us through a basic tutorial in coding through the framework of the Processing API. I have had experience with this programming language and I believe it is an interesting medium for visualizations of various sorts. It can do awesome generative computerized art, and it can be the source of interesting projects when data and 3D environments are fused. I’ll give an informational overview of the platform as it pertains to 3D manipulation. 

Processing is an interesting platform as it is a software sketchbook in a sense. It is a language used for coding and applying it specifically to the visual arts. Processing has done a lot of promotion for software literacy within the visual arts field. It has also done similar promotion for visual literacy within the technology sector. They have built a large global community of students, artists, researchers, and hobbyists who use the platform for educational and prototyping purposes. 

Processing Tutorials

I personally started messing with Processing when I was in college. I had some skills in Python mostly through my physics courses, but I was working at my Center of Digital Media within my university. Being around digital media and artistic individuals got me curious as to see the combination of technical fields as well as the arts. When I was learning to code a bit more, I found the Processing platform and a large amount of YouTube tutorials. 

Generative Processing Art

Something of interest to me with the platform is that it is a simple interface. It also is not as intimidating of an environment compared to other development spaces. For someone who is interested in things such as image processing, it is the ideal platform to learn quickly. Combining the arts and technology seems disparate for a lot of people. These two fields however are extremely similar and they should not live in vacuums away from each other. 

Another great thing about Processing is the large portfolio of onsite tutorials that explain the basics to someone who has no experience with the platform. They did a great job of explaining what every command does within their environment. When learning to code, it is more of a learn as you go approach. When one needs a function, they will have to research online for the meaning of this function and how to execute it. Processing did a good job of centralizing their information through their website and online forum communities. 

P3D Mode in Processing

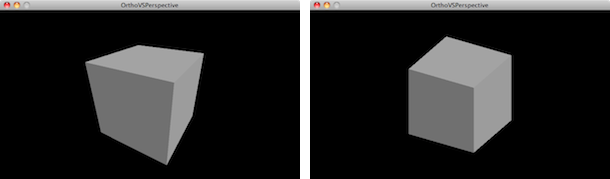
Processing’s power lies within its five render modes. These render modes are the default renderer, P2D, P3D, PDF, and SVG. The default renderer is the backbone of a lot of the programs done by Processing users. It is used for 2D drawing. The usage rates vary based on whether the other renders lack the definition of the size() parameter. The P2D renderer is an alternative to the default renderer for 2D images. The difference between these renderers is that P2D has a quicker runtime, but it sacrifices some visual quality for speed. The P3D renderer is used for drawing in three dimensional space. The PDF renderer is used for writing PDF files from Processing. The files can be scaled to various sizes and output with high resolutions. This renderer can also flatten 3D data into a 2D vector file as well. The SVG renderer does similar tasks as the PDF renderer, but the file format is an SVG. A lot of the renderer power for 3D imaging comes from utilizing the software of OpenGL that is supported on multiple GPUs to help speed up the drawing process. 

With this overview, I hope I have intrigued people for a couple of coding projects I will try to show off within the series.

The post What is Metrology Part 20 – Processing appeared first on 3DPrint.com | The Voice of 3D Printing / Additive Manufacturing.

3Dflow Computer Vision Software

3Dflow

3Dflow

3Dflow is a private software company operating in the field of Computer Vision and Image Processing. It was established in 2011 as a spin-off of the University of Verona, and in  2012 it became a spin-off of the University of Udine. 3Dflow is a company that provides solutions in Photogrammetry, 3D modeling of reality, 3D processing, and 3D visual effects. Their customers range from small industries competitors to large scale entertainment companies. In this article we will be analyzing this company as well as showcasing their workshop for 3D imaging and photogrammetry, as well as their world cup competition.

3Dflow is a company that is based in Italy. It is a small organization with fewer than 15 employees. The main value proposition this organization gives is its ability to use computer vision and software in combination to create 3D image data. For the stitching of the point cloud data of multiple photos, the organization provides software that does this for the user. The software is called 3DF Zephyr. 3DF Zephyr comes in the following forms:

  • 3DF Zephyr Free
  • 3DF Zephyr Lite
  • 3DF Zephyr Pro
  • 3DF Zephyr Aerial

Image result for 3d flow photogrammetry

3DF Zephyr Free

The free version of 3DF Zephyr includes full 3D construction, a 50 photo limit, single NVIDIA GPU support, basic exporting capabilities, and basic editing tools, and full forum support. 3DF Zephyr Lite differences include Dual NVIDIA GPU Support, 1 year upgrades included, basic email, and full forum support. The 3DF Zephyr Pro version has full exporting capabilities, advanced editing tools, control points & measurements, laser scan support, 1 year upgrades included, full email, and forum support. 3D Zephyr Aerial has all the previous abilities and GIS, CAD, and Survey Tools. 

3Dflow still comes from an educational background in terms of its founding story. It explains how they have transitioned to a consulting company as well as an organization that is focused on research and development. It also explains why they offer a free version of their software as an educational version for students. They care about building software for the future of photogrammetry as well as 3D imaging. They have developed specific algorithms and frameworks that are proprietary to their organization. This includes:

  • 3DF Samantha
  • 3DF Statsia
  • 3DF Sasha
  • 3DF Masquerade

3DF Stasia is the proprietary algorithm to extract very accurate dense point clouds from a set of 2D images. In Computer Vision this process is best known as a multiview stereo. The first step is to extract the corresponding points in two images and the second step is the 3D reconstruction with algorithms like Discrete Linear Transform. The Discrete Linear Transform, or Discrete Fourier Transform used in a linear model, converts a finite sequence of equally-spaced samples of a function into a same-length sequence of equally-spaced samples of the discrete-time Fourier transform (DTFT), which is a complex-valued function of frequency. The function we are dealing with in this case is the stitching together or images into 3D object data. Using DLT, the reconstruction is done only where there are SCPs. By increasing the number of points, the results improve but it is time consuming. This method has low accuracy because of low reproducibility and time consumption. This method is dependent on the skill of the operator. This method is not suitable for bony structures with continuous shape. This method is generally used as an initial solution for other methods. Hence the other technology developed by 3DF is vital. 

Mathematics of Discrete Fourier Transform

3DF Sasha is their proprietary algorithm for mesh extraction: given a dense point cloud full of details, it is important to preserve as much detail as possible when extracting the surface. Sasha allows one to get sharp edges on a 3D model and that is why it is more suitable for applications such as architecture, industrial surveying, and urban monitoring. Without the precision of point cloud data, the resulting stitch of 2D images would come out to be noisy. 

To clean up residual noise from the data, 3Dflow employs their 3DF Masquerade tool. This tool has been developed as an external executable that is included in the 3DF Zephyr installation package. Masquerade can mask images so it can save time during masking operations. 3DF Masquerade is helpful when there is a lot of background noise or when the subject has been moved incoherently with the background: the most common scenario is a subject that is being acquired on a turntable.

Image result for noisy 3D data

Example of a Noisy 3D mesh


The first photogrammetry & 3D scanning training course in the English language by 3Dflow in Verona (Italy), next September 30th, October 1st and October 2nd! One will learn photogrammetry with 3DF Zephyr: this course will tackle everything from photography for photogrammetry (basic and advanced shooting techniques) to data processing with 3DF Zephyr, on both photogrammetry-only workflows and a external-data oriented workflows (e.g. laser scanners). Theory and practice on the software will be paired with an actual test-acquisition Verona, a world-famous history-rich cities in Italy and home of 3Dflow. 

I will be attending this workshop to learn and report on this next month, but I encourage others to look into the 3Dflow organization and see what they are doing. Also be sure to signup for their workshop here.


The post 3Dflow Computer Vision Software appeared first on 3DPrint.com | The Voice of 3D Printing / Additive Manufacturing.

How to Turn a 2D design into a 3D print in three simple steps

Here at Shapeways, we believe everyone has the potential to create something amazing; all you need are the right tools and support to bring your ideas to life. That’s why we’re so passionate about making 3D printing more accessible with easy-to-use 3D modeling tools and apps. One of our favorites is our 2D-to-3D app, which converts images and drawings into fully fledged, printer-ready 3D models. So if you’re new to 3D modeling or simply want to mock up a new design quickly, keep reading for our expert guide on how to go from 2D to 3D with ease!

Upload buttonStep one: Upload Your Image
After opening the 2D-to-3D creator, the first step is to upload your design. You can upload anything from found illustrations to patterns and shapes. Tip #1: If you are making a drawing, black and white works best where the black is the outline of your design and the white represents the empty space. We also recommend using thick lines so your product can be printed in a greater variety of materials (minimum wall thickness for materials vary from 0.3 mm to 3.0 mm). Tip #2: If you are printing a word or a phrase, make sure the edges of the letters and characters are touching, so you can print in one piece instead of multiple ones. 

Customize button
Step two: Customize Your Design
Now that your design is in the creator, it’s time to adjust its size to your taste and needs. On the app, there are sliding scales and backing options that allow you to play with the design’s customizations. You can set your object to be as small as 5 millimeters or go all the way up to 100 millimeters. We suggest working with a ruler on hand in order to help you tangibly visualize sizes. You can also add one of two loop designs to make this a keychain, or choose “none” if you prefer to keep the design as is.

Print button
Step three: Print Your Original Design
Once you’re happy with your creation, it’s time to send it to our printers. Simply hit “Create My Keychain” to convert this into a 3D modeling file, then click on “View Model” to proceed to the next page where your model will be automatically checked to ensure printability in a range of materials suitable for your model size. If this is one of your first 3D printed products, we suggest using our Versatile Plastic, which is great for prototyping. Once you’ve selected your desired material and finish, follow the checkout page to complete the process. It’s really that easy!

Now it’s time for you to take what you’ve learned and actually create something. Test out your new skills by uploading a 2D design into our custom creator. Happy making!


The post How to Turn a 2D design into a 3D print in three simple steps appeared first on Shapeways Magazine.