3D Modeling & 3D Printing Can Improve THA Diagnosis, Classification, & Surgical Planning

The Electronic Presentation Online System, or EPOS, is the European Society of Radiology‘s electronic database for scientific exhibits. A group of researchers published in EPOS about their work using 3D modeling and 3D printing tools to diagnose, classify, and carry out surgical planning for fixing periprosthetic acetabular fractures, which are a difficult, but common, complication of total hip arthroplasty (THA).

“Periprosthetic acetabular fractures are related to traumatic events and pathologic underlining conditions that reduce the structural integrity of supporting bone[1] and often are associated with aseptic loosening, periprosthetic osteolysis and severe bone loss[2],” the researchers wrote.

“Analysis based on standard radiographs alone are not suitable to reliably detect the residual stability of the implant and measure the extent of the fracture and pelvic bone loss [3].”

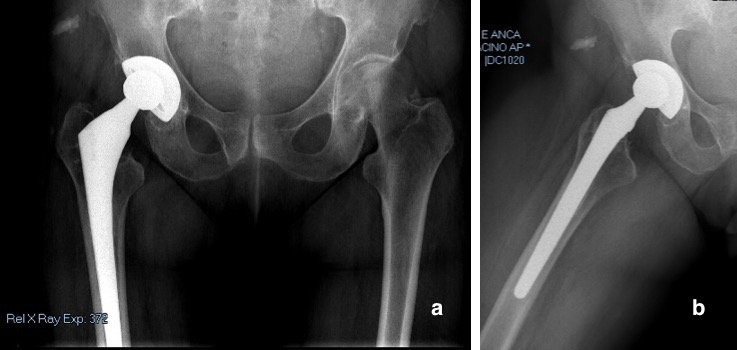
Fig. 1: (a) Anterior–posterior (AP) pelvis and (b) lateral view of right hip radiographs showed mild signs of periacetabular osteolysis without evidence of implant loosening and acetabular fracture.

They state that when it comes to defining a fracture pattern, CT scanning is “the gold standard,” which is definitely the case when a 3D virtual rendering is needed to help with surgical pre-planning.

3D modeling software based on CT scans allows clinicians to get precise images of “tridimensional reconstructions of the bony surface” by virtually removing metallic implants with segmentation. Other analytic tools include measuring remaining bone stock, evaluating implant stability, and characterizing the fracture, and 3D images can also be used to 3D print anatomical models for surgical planning and simulation purposes.

The researchers said their paper would show that bone quality and fracture morphology assessment can be improved with 3D modeling software, and reveal how useful 3D modeling and 3D printing are for the diagnostic process of periprosthetic acetabular fracture around THA, as well as making life-size models for pre-op implant templating, simulation, and sizing.

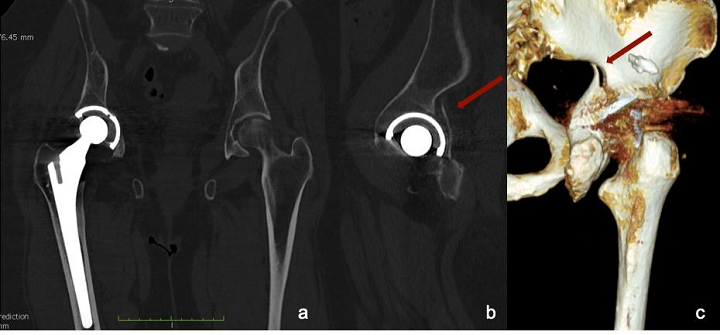
Fig. 2: CT scan of pelvis. (a) Coronal view shows slightly medially protruded acetabular cup; (b) sagittal view of the hip revealed posterior wall fracture of the acetabulum. The tridimensional reconstruction of the fracture is visible (c), but its extension is hidden by image artifacts.

They used the case of a 75-year-old woman who came to an ER after a domestic trauma incident. The patient had a history of severe coxarthrosis in her right hip, which had been treated a decade before using cementless THA. Doctors took AP radiographs of her pelvis, and a cross-leg view of her hip, and saw no signs of fracture or loosening around the acetabulum or the stem. However, a “CT scan of the pelvis with MAR protocol” showed that the posterior wall of the acetabulum did have a fracture, though the acetabular cup wasn’t displaced.

Materialise Mimics software was used to create a 3D digital model of the pelvis based on CT scan data. The bone was differentiated from surrounding soft tissue and the patient’s prosthetic implants through segmentation.

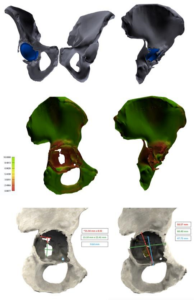
Fig. 3: Tridimensional images elaborated with 3D modeling software. (a,b) Entire pelvis with acetabular cup retained. Femurs and femoral stem were removed during segmentation. (c,d) Bone quality map shows regions with normal bone quality (green) and regions with low bone quality and thickness (red). (e,f) Measurements of the bone defect area and fracture extension.

“The first phase is thresholding, which includes all voxels whose density is within a specified range of Hounsfield Unit (HU) values. We used a mask with a HU range from 130 to 1750 in order to exclude metallic and ceramic implants and include both cancellous and cortical bone,” the researchers explained.

“The final segmentation, with the removal of soft tissues and artifacts, was manually performed using additional tools of the software (Fig. 3 a,b). Eventually, both femurs and metal implants were digitally removed from the corresponding pelvis and a 3D image of the isolated region of interest (ROI) was created.”

A bone quality map with a color gradient was used for the acetabulum, according to cortical and overall bone thickness of the various regions. Measures of the fracture’s area, shape, and spatial location were analyzed later, along with “the acetabular bone loss and the center of rotation, compared to the contralateral acetabulum.”

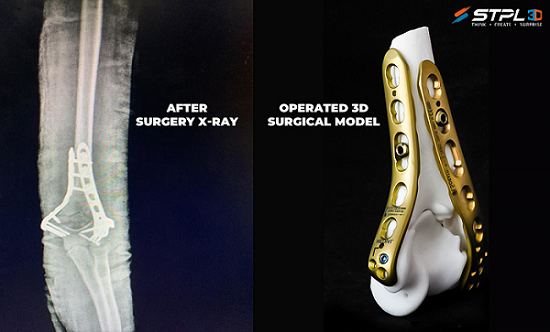
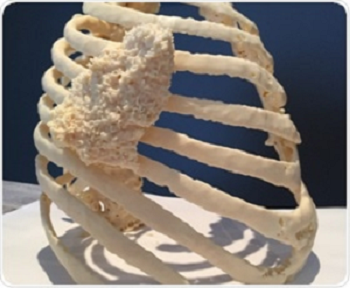
Finally, a life-size model of the patient’s entire pelvis was 3D printed on a Form 3L system.

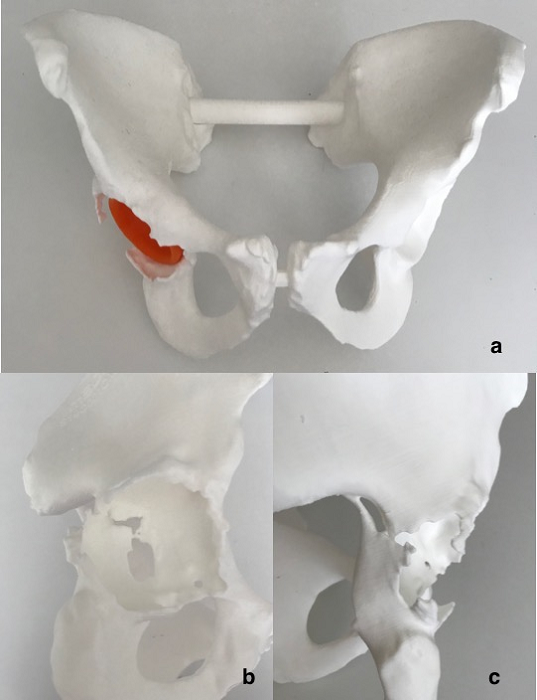
Fig. 4: (a) 3D printed life-size plastic model of the entire pelvis. (b,c) Particular of the medial wall and posterior column fracture.

After analyzing the 3D images and the 3D printed model, they re-classified the posterior wall fracture as an incomplete posterior column and medial wall acetabular fracture. Additionally, the fracture was found to be “spontaneous,” with less than 50% loss of bone stock. Finally, the bone quality map determined global bone loss, showing poor quality in both the posterior and medial walls. The 3D printed model was also used to perform pre-op templating.

“The treatment strategy was chosen according to the algorithm proposed by Simon et al. [14, 15, 16], which suggest the acetabular revision surgery bridging or distracting the fracture, without fracture fixation,” the researchers explained.

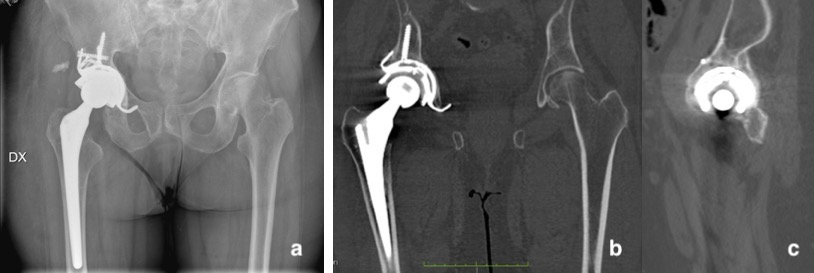
Fig. 5: (a) Postoperative AP radiograph of the pelvis and (b,c) CT scan of the pelvis at 3 months post-op shows good implant positioning and complete fracture healing.

AP radiographs taken of the pelvis and right hip post-op showed that the implant was “well-positioned and fixed.” Three months later, a CT scan was taken of the patient’s pelvis, which showed “bone integration of the trabecular cup” and complete fracture healing “with callus formation.” A 3D digital model built using DICOM images confirmed this.

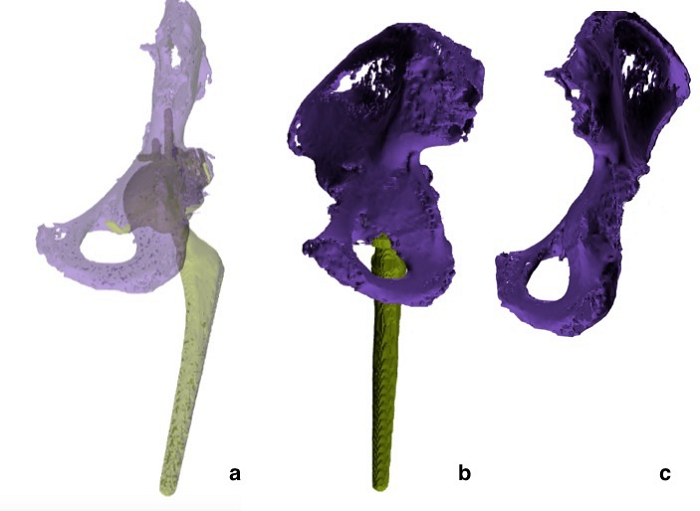
Fig. 6: 3D modeling digital reconstruction. The posterior column and medial wall of the acetabulum have been restored.

“The use of 3D modeling software showed that periprosthetic acetabular fractures can be better addressed, compared to plain radiograph and CT scans,” the researchers concluded.

“3D modeling software provide additional measurement tools which allow the volumetric analysis of bone defects and bone quality assessment.”

Discuss this and other 3D printing topics at 3DPrintBoard.com or share your thoughts below.

The post 3D Modeling & 3D Printing Can Improve THA Diagnosis, Classification, & Surgical Planning appeared first on 3DPrint.com | The Voice of 3D Printing / Additive Manufacturing.

3D Printing Models & Stents for Treatment of Abdominal Aortic Aneurysms

Joyce van Loon recently presented a Master’s thesis, ‘Personalized Endovascular Stent Grafts: Developing a Phantom Aneurysm Model to Test Personalized Stent Grafts,’ to the University of Twente. This work is centered around the use of 3D printed medical models and the potential for viable devices.

Schematic of a normal abdominal aorta and the major branches

Classification of AAA concerning the renal arteries. Suprarenal AAA includes the origin of renal arteries without the involvement of the superior mesenteric artery. A pararenal or juxtarenal AAA is when an aneurysm originates at the level of the renal arteries. A pararenal aneurysm is when the renal arteries originate from an aneurysmal aorta, and a juxtarenal aneurysm is when the aorta at the level of the renal arteries is normal. An infrarenal AAA originates below the renal arteries with a segment of non-dilated aorta between the renal arteries and the aneurysmal sac.

Caused by vascular weakness, abdominal aortic aneurysms (AAA) are irreversible conditions involving the intima, media, and adventitia. They tend to enlarge as time passes, and diagnosis is critical before a rupture. Afterward, close monitoring is required up until surgery.

“Rupture of an AAA usually leads to sudden onset abdominal or back pain and hypotension or shock. A ruptured AAA is a life-threatening situation with an overall mortality of 90% and even with prompt surgical intervention around 25% of the patients die,” stated van Loon.

“Before surgery, preprocedural imaging and planning is critical. CTA (computed tomography angiography) is superior as imaging modality and more accurate than US in estimating the diameters and lengths. During planning the anatomy, the involvement of the visceral arteries, the morphology of the aortic neck (proximal part of the aorta), the aortic angulation, existence of thrombosis, calcifications and stenosis are important factors that should be considered. This indicates the importance of a useful measurement tool in combination with the obtained images to evaluate the condition of the aneurysm and to decide which surgery should be performed and which stent graft is suitable.”

EVAR procedure. The introduction and positioning of the modular stent graft. The stent graft consists of a main device and extensions. The two femoral arteries are the access sites and incisions are made as shown.

More serious complications can arise for the 30 percent of patients not eligible for endovascular aneurysm repair (EVAR); however, customized endovascular stent grafts can be inserted. Challenges arise in using traditional methods though as there could be as much as a two-month wait.

Sketch of the combined custom-made stent graft. The arterial wall shown in black, the personalized stent graft in blue and off-the-shelf stent graft in red

During this study, data from CT scans of 65 patients functioned to create 3D models to be evaluated—and then further used to 3D print personalized stent grafts. The materials of choice for creating the aorta required flexibility and elasticity, high compliance, and material strong and durable enough to endure pressure from the stent graft. Materials must be able to fabricate complex geometries and being resistant to fluids.

“The stent graft material should have a high compliance and needs to mimic the native artery. Nitinol stents have proven to have high compliance due to its super-elasticity, it is biocompatible, hemodynamically stable, fatigue resistant, and non-corrosive,” stated van Loon. “However, we were not able yet to 3D print nitinol and we needed a comparable material to study the behavior of the stent grafts.”

CT-scan of one of the included subjects. The aneurysm is visible within the red circle. Left: Coronal slice. Right: Sagittal slice.

For the stent, van Loon stated that it required not only strength and flexibility, but it was necessary for the materials to border on the 4D level as well, able to deform with ‘self-expanding properties’ in the aorta. The material had to be soft enough to avoid any damage to the body and allow for printing of more complicated structures. The personalized stent required customization, as well as proper sealing between the aortic wall and the stent graft.

Segmentation abdominal aorta aneurysm of one of the included subjects. Left: the MATLAB segmentation results. Right: the Meshmixer results, where a large part of the renal arteries, the mesenteric artery and the iliac arteries are removed.

Aortic neck part of the segmentation, used for the aorta models and stent graft models. Left: the aortic neck and the branches of the renal arteries and superior mesenteric artery. Right: the aortic neck (infra-renal part). This part is important for measurements and sealing.

Aorta models were printed using elastic resin with a Form 2 3D printer. In testing two 3D printed models, however, van Loon stated that they both ‘showed problems,’ mainly with tearing. They were not able to finish printing of the models, in fact.

Aorta models printed in elastic resin. On the left, an aorta with the branches of the renal arteries, the complete aneurysm and bifurcation to the iliac arteries are shown. On the right, an upper part of the aorta and aneurysm can be seen, including the branches of the renal arteries and superior mesenteric artery. In the aortic neck and upper part of the aneurysm, tears are visible.

“Secondly, we printed the aortas with Agilus30 and the Stratasys ObJet260 Connex3 printer. Agilus30 is a flexible material and has a tensile strength of 2.4 – 3.1 MPa and a Young’s Modulus of 0.6 MPa,” explained van Loon. “Printing the aorta models in Agilus30 is a time-consuming (1-2 days) process but results in usable aorta models.”

“After stenting the aorta models with a 1 mm and 1.5 mm wall thickness, they rupture and are considered not suitable for further measurements. We only used the 2 mm wall thickness for further research.”

Aortic neck model, one of the first prints.

Material properties of nitinol and available and tested 3D print materials

They 3D printed stents on an Ultimaker 3, using NinjaFlex. The material was not as flexible as required for the project, and van Loon noted that the stents were ‘difficult to position’ in the sample printed aorta.

CT-scan of the printed stent grafts in NinjaFlex placed in the aorta model. Left: transversal slice of the aorta model with the personalized stent graft and a good sealing. Right: transversal slice of the aorta model with the straight stent graft, which could not unfold and bad sealing is seen at the unfolded side of the stent graft.

“The second tested material described, Cheetah, was not as flexible as thought and the solid stent grafts were not easily foldable which make it difficult to place the stent graft in the aorta model. When printed in a different geometry (meshed), the stent is more flexible and showed similar behavior as the nitinol stent graft. The stent grafts printed in NinjaFlex or Cheetah are in solid form too stiff and in mesh structure too flexible. We were not able to measure any distention differences of the aortic wall between the personalized stent grafts and the straight stent grafts,” concluded van Loon.

“The results showed that a better sealing could be obtained by using personalized stent grafts in our aorta models, however the used materials for the 3D printing of the stent grafts are not comparable with the nitinol stent graft and therefore more research is required.”

While van Loon documented obvious challenges in this study, 3D printed models are becoming indispensable in many medical applications, for assisting in surgery, diagnosing, treating and educating patients, while a variety of implants and devices are improving the quality of life for individuals around the world.

What do you think of this news? Let us know your thoughts! Join the discussion of this and other 3D printing topics at 3DPrintBoard.com.

[Source / Images: ‘Personalized Endovascular Stent Grafts: Developing a Phantom Aneurysm Model to Test Personalized Stent Grafts’]

The post 3D Printing Models & Stents for Treatment of Abdominal Aortic Aneurysms appeared first on 3DPrint.com | The Voice of 3D Printing / Additive Manufacturing.

3D Printing News Briefs: February 4, 2020

In today’s 3D Printing News Briefs, we’re covering a range of topics. First, Digital Alloys is sharing a guide on the cold spray metal 3D printing process. UPM just launched its new GrowInk Bioinks product range. STPL3D offered its 3D printing expertise to help with a complex orthopaedic surgery, and the Smithsonian Institution is using Mimaki’s full-color 3D printer to make virus models for an exhibit. Finally, 3D printing was used to give an ancient mummy a voice…sort of.

Digital Alloys’ Cold Spray Guide

Massachusetts-based Digital Alloys has been publishing a Guide to Metal Additive Manufacturing, and the 16th part is all about Cold Spray technology, which was used as a coating process for many years before it was adapted into a metal 3D printing technology for rapid fabrication of near-net-shape parts. The technology uses pressurized gas to rapidly fire metal powders through a nozzle, aimed at the deposition point, with high enough velocity to create a metallurgical bond on impact but without melting the material. High-pressure Cold Spray systems allow for the processing of heavier materials, like steel and titanium alloys, while low-pressure systems use ambient air as a propellant, making them better for more ductile metals, like copper and aluminum.

“Cold Spray’s advantages include compatibility with heat-sensitive materials, low thermal stresses, and the ability to operate in an open (non-inert) environment. Disadvantages include restrictive part geometry, low density and accuracy, and material embrittlement,” the blog post states. “This post provides an overview of Cold Spray metal AM technology: how it works, geometry capability, material compatibility, economics, applications, and current state of commercialization.”

UPM Launched GrowInk Product Range 

Biomaterials company UPM, which introduced the biocomposite 3D printing material Formi 3D two years ago, is now launching a new line of hydrogels. The GrowInk 3D printing product range, which consists of non-animal derived, ready-to-use hydrogels, was introduced at the recent SLAS2020 conference. These bioinks, made up of water and nanofibrillar cellulose, support cell growth and differentiation by mimicking the in vivo environment, and are compatible with a wide range of 3D printers.

GrowInk Bioinks provide excellent imaging quality, and are perfect for many different 3D bioprinting applications, such as scaffold preparation and cell encapsulation for drug discovery, regenerative medicine, and tissue engineering. Additionally, UPM is also expanding its GrowDex product range with the sterile hydrogel GrowDex-A, which was created to debind biotinylated molecules, like antibiotics and peptides.

STPL3D Provides 3D Printing Help in Orthopedic Surgery

In December, 14-year-old Aaska Shah from India sustained multiple fractures to her left elbow while playing, and at her young age, a prosthetic implant would only compromise her natural movements. So doctors were left with no choice but to operate, using clamps to keep the bone pieces in place. Aaska’s surgery was denied because of how complex it would be, but Dr. Jignesh Pandya took on the task, and partnered up with Agam Shah from 3D printing service STPL3D to create a 3D printed resin model of the patient’s fractured elbow bone for surgical planning.

“Dr Pandya and his team first reviewed x-rays and 2D scans of the patient and reviewed their surgical plan. The doctors were a little concerned because there are a frightening amount of things that can go wrong during the operation but refused to give up hope,” an STPL3D blog post states. “The doctors have faced many challenges during the operation like deciding the clamp length and attaching points in the bone but the surgeries were successful largely thanks to the skilled surgeons.”

The doctors said the 3D model gave them “greater confidence,” and the patient was also on the operation table for roughly 25% less time.

Smithsonian Institution 3D Printing Full-Color Virus Models

This image shows the Influenza virus model, created using the Mimaki 3DUJ-553 3D printer, in an opened position. The clear disk that contains the eight purple capsids and the eight yellow RNA strands has been removed from the green envelope. Image credit: Carolyn Thome/SIE

The world’s largest museum, education, and research complex, the Smithsonian Institution, is working with Mimaki USA to help with art, cultural, educational, and science exhibits and experiences. The Maryland-based Smithsonian Exhibits’ (SIE) studios works with the Institution’s offices and museums, and the federal government, to help plan engaging exhibits, as well as create models for research and public programs. The SIE team is using the full-color Mimaki 3DUJ-553 3D printer to create detailed, 3D printed models of enlarged viruses for the Smithsonian National Museum of Natural History’s Outbreak: Epidemics in a Connected World exhibition.

“We are pleased to be a part of the Smithsonian Institution’s efforts to engage and inspire audiences through the increase and diffusion of knowledge. This printer will enable the Smithsonian to use new technologies to produce exhibits in new ways, particularly for creating models and tactile elements that help bring exhibits to life for all visitors,” stated Josh Hope, Sr. Manager, 3D Printing & Engineering Projects at Mimaki USA.

3D Printed Vocal Tract for Mummy

The 3D printed trachea and mouth of Nesyamun. (Credit: David Howard/Royal Holloway, University of London)

We’ve seen 3D printing used multiple times to help bring the mysteries of mummies into the modern world, but here’s a new one: a team of researchers from the UK used 3D printing to help an ancient mummy speak. Together, they published a paper, titled “Synthesis of a Vocal Sound from the 3,000 year old Mummy, Nesyamun ‘True of Voice,’ about their work creating a 3D printed vocal box for the mummy. Nesyamun was an Egyptian priest who lived and died over 3,000 years ago, during the reign of Ramses XI. A scribe and incense-bearer who likely sang and chanted prayers at the temple in Thebes, his sarcophagus features an epithet that translates to “true of voice,” because as a priest, he would have said that he lived a virtuous life; this is the reason the researchers gave for their work being ethical. In 2016, the mummy was sent to a facility for CT scanning, which discovered that, while his soft palate was gone and his tongue was shapeless, his larynx and throat were still in good condition – perfect for an experiment to replicate his vocal tract and help him “speak.”

Egyptologist Joann Fletcher said, “The actual mummification process was key here. The superb quality of preservation achieved by the ancient embalmers meant that Nesyamun’s vocal tract is still in excellent shape.”

The team 3D printed a copy of Nesyamun’s vocal tract between the larynx and lips on a Stratysys Connex 260 system. The horn portion of a loudspeaker was removed and replaced with the artificial vocal box, and then connected to a computer to create an electronic waveform similar to what is used in common speech synthesizers. This setup was able to help produce a single vowel sound, which you can hear for yourself here.

Discuss these stories and other 3D printing topics at 3DPrintBoard.com or share your thoughts below.

The post 3D Printing News Briefs: February 4, 2020 appeared first on 3DPrint.com | The Voice of 3D Printing / Additive Manufacturing.

3D Printing in Korea: Researchers Refining Spinal Surgery Instruments & Models

Researchers from Seoul, Korea have tried to refine spine surgery instruments via 3D printing, outlining their work in the recently published ‘3D Printer Application for Endoscope-Assisted Spine Surgery Instrument Development: From Prototype Instruments to Patient-Specific 3D Models.’

Exploring the realm of developing surgical instruments with innovative technology, the researchers used their study to reach beyond previous ‘limited’ attempts, producing both a prototype for an instrument as well as a functional 3D printed model. Realizing the benefits of 3D printing in terms of flexibility in production, affordability, and the ability to create models and devices that are patient-specific, the scientists designed a new system that can be used with one surgical instrument for endoscopic surgeries.

Four steps were required to create a new instrument:

  1. Developing a concept
  2. Designing a prototype based on the new concept and accompanying ideas
  3. 3D printing a patient-specific spine model
  4. Assessing the accuracy and efficacy of new surgical instruments

Workflow diagram of the development and evaluation of new surgical instruments. The solid arrow indicates the conventional application, and the dotted arrow indicates the application of endoscope-assisted spine surgery.

“3D printing technique was primarily applied in two parts: making the prototype instrument and the patient-specific model to test the new instrument,” stated the scientists in their research paper.

The researchers created a system with combined cannula, featuring one cannula for the endoscope and the other for surgical instruments, with major and minor axis diameters of 10.34 mm and 9.16 mm, respectively.

New endoscope-assisted spine surgery system. (A) Two tubes were joined together: one for an endoscope and the other for an instrument working cannula. The instrument working cannula could be blocked with a rubber cap to maintain proper saline pressure. (B) 3D-printed prototypes of the new endoscope-assisted spine surgery system. A 10-mm incision was needed for patient model application. (C) Photograph of a surgical test using the new endoscope-assisted spine surgery system. An endoscopic drill was inserted at the working cannula. (D) Operation field with the new system. Similar operational views with conventional endoscopic spine surgery. The arrow head is the ligamentum flavum at the inter-laminar space, and the arrows indicate the lamina of the superior and inferior vertebral body.

Patient-based model created with the 3D printing technique. (A) 3D modeling of spine components using patient MRI data. (B) Printing spine components using a 3D printer. (C) Making silicone molds for patient-based 3D-printed spine components. (D) Making spinal components considering physical properties (vertebra, discs, nerves, ligaments) using patient-based spine component molds. (E) Making a patient model after assembling the body frame, spine components, and skin with soft tissue.

To create the spine model, the researchers:

  1. Used 2D data from MRI and CT scans to create a 3D design
  2. 3D printed spine components
  3. Fabricated silicone molds with the 3D printed spine components
  4. Made spine components with required properties
  5. Assembled the patient-specific model

Imaging data was imported to slicing software, with models then 3D printed on a Creatable D3. The first group of samples consisted of parts that required exact replication:

  • Bone
  • Tissue
  • Discs
  • Nerves
  • Ligaments

The team used a variety of silicones and polymers, and foam, for the fabrication of the spinal parts, including two sets of patient-specific spine models for lumbar 4–5 paramedian disc herniation and lumbar 4–5 foraminal disc herniation on the left.

The results were assessed as the researchers compared instruments and methods. The new system created in this study was compared with a 16mm tubular retractor. Two different approaches were used, both paramedian and foraminal discectomy, with results compared after the procedure.

Discectomy with a tubular retractor. A paramedian approach is shown above, and a foraminal approach is shown below. The arrows indicate the nerve root, and arrowheads show the discs.

Discectomy with the new endoscope-assisted spine surgery system. A paramedian approach is shown above, and a foraminal approach is shown below. The arrows indicate the nerve root, and arrowheads show the discs. Less bone destruction was observed with the new system, compared to the conventional tubular retractor in the foraminal approach.

“Our new endoscope-assisted spine surgery system and trial with a 3D-printed patient-specific model involved many limitations. Postoperative outcome analysis using a 3D-printed model could be different from using actual patients. Also, the surgical trial was conducted only once, and it was not compared to conventional endoscopic spine surgery. Since we could not confirm whether the magnetic connector would be adequately bonded when it is inside a real human, a cadaver trial is needed to confirm this matter. However, the purpose of this study was to show the usefulness of 3D printers for the development of complex surgical instruments,” concluded the researchers.

“The authors are well-aware that the new endoscope-assisted spine surgery system needs further improvements, and future studies with more complicated degenerative spinal diseases and deformed patient-specific models are required. Nevertheless, we were able to make and test a new idea on surgical instruments quickly, in addition to introducing the possibility of a new endoscope-assisted spine surgery system using 3D printing technology.”

3D printing continues to be helpful to researchers, medical scientists, and both patients and surgeons as the realm of 3D printing models, devices, and surgical guides is refined further for diagnosing, treating, training, and operating. What do you think of this news? Let us know your thoughts; join the discussion of this and other 3D printing topics at 3DPrintBoard.com.

[Source / Images: ‘3D Printer Application for Endoscope-Assisted Spine Surgery Instrument Development: From Prototype Instruments to Patient-Specific 3D Models’]

The post 3D Printing in Korea: Researchers Refining Spinal Surgery Instruments & Models appeared first on 3DPrint.com | The Voice of 3D Printing / Additive Manufacturing.

Germany: Research Shows Good Response from Students Using 3D Printed Dental Traumatology Training

Authors M. Reymus , C. Fotiadou, R. Hickel, and C. Diegritz explore the uses of 3D printed models in dental traumatology training, with their findings outlined in the recently published ‘3D printed model for hands-on training in dental traumatology.’ For their study, they used an SLA printer to create a 3D printed model of a dental patient’s maxilla, mimicking several different traumatic dental injuries.

Being able to create accurate models exhibiting significant trauma offers a host of benefits to dental students who can take their time in a deliberate learning mode rather than waiting to rush in to see what could be a relatively small number of injured patients on-site. This also accentuates the enormous amount of learning gained from lectures. The hope is that more knowledge can be gained about dental traumatology, as the researchers point out that dental accidents are often treated by general dentists who may not have an adequate education or experience to deal with such cases overall.

The researchers wanted to make a model that was not only realistic but would allow for students to practice both diagnosis and treatment too. They also wanted to design a product that would translate from educational settings to dental clinics. With these hands-on tools available, the authors also created another level to their study regarding the use of dentaltraumaguide.org, offering the resource to only half of the students participating in the study—and comparing their knowledge.

The model was designed and 3D printed as follows to show dental trauma for a 16-year-old boy:

“The data generated were exported as single DICOM files and imported to Invesalius for Mac (Centre for Information Technology Renato Archer, Amarais, Brazil) to convert it into one .stl file. This file was subsequently imported to Meshmixer for Mac 11.0 (Autodesk, San Rafael, CA, USA) and trimmed to a region extending from the right first premolar to the left premolar. The right lateral incisor, the left first incisor as well as the left second incisor were cut out of the STL-mesh and exported as single STL-files.

Using the function ‘Boolean difference’, these teeth were cut out, leaving imitation tooth sockets in their original position. Additionally, the right lateral incisor was positioned at a 30° angle towards the palatal from its original position, and again, the function ‘Boolean difference’ was used to imitate a lateral luxation of the tooth perforating the buccal bone. The left lateral incisor was separated into two parts at its apical third imitating a horizontal root fracture. The extracted left incisor was not changed, imitating an avulsion. The mesial edge of the right incisor was removed, exposing the pulp chamber to imitate a complex crown fracture.”

Computer-aided designed model with empty tooth sockets, buccal perforation and complicated crown fracture.

The 32 undergraduate students were tasked to work on the case, even simulating a conversation with the mother of the injured boy as they practiced asking the correct questions about the accident, as well as advising on post-traumatic behavior. Upon examining the 3D printed model, they were given information about every tooth, and asked to offer the following:

  • Diagnosis
  • Treatment plan
  • Recall regime
  • Prognosis of each injured tooth

The assessment was considered in these areas:

  • Pre-treatment
  • Therapy
  • Post-treatment
  • Recall
  • Complications

“The presented workflow allowed the manufacturing of a radiopaque model that imitated a luxation injury, a complicated crown fracture, an avulsion, and a horizontal root fracture in a realistic way,” stated the authors.

Radiograph of the right lateral incisor with a luxation injury (left) and Radiograph of the empty tooth socket of the left incisor and the left lateral incisor with a horizontal root fracture (right).

And while their goal was for such a workflow to be easily transferred to another dental school, they would need to own a CBCT and a stereolithographic printer, along with software that could be offered free. The 32 students were asked to evaluate the model, with 57 percent reporting it to be ‘very realistic,’ and 43 percent choosing ‘rather realistic.’

“The diagnosis of the lateral luxation was evaluated to be the most difficult of all injuries, whereas the avulsion was the easiest injury to diagnose. Concerning treatment planning, the horizontal root fracture was rated as being the most difficult injury. When listing possible complications, the students had serious problems with the horizontal root fracture.

Students’ evaluations of difficulty in diagnosis, treatment planning, therapy and knowledge about complications for each injury.

“All participants reported to have gained new knowledge on dental traumatology, and 97 percent felt better prepared for treating traumatic dental injuries in the future.

“Students seem to focus especially on the diagnosis and treatment of traumatic injuries to teeth when dealing with dental traumatology. This is logical because these steps are of outmost importance for immediate care when confronted with a trauma case. Fortunately, both groups of students in the present study achieved their best results in these fields. The group without access to dentaltaumaguide.org, however, had only poor results when faced with developing a recall regime and knowing about possible complications,” concluded the researchers.

Many dentists and orthodontists rely on 3D printing today for digital dentistry, dentures, and even grafts for issues like alveolar augmentation. What do you think of this news? Let us know your thoughts! Join the discussion of this and other 3D printing topics at 3DPrintBoard.com.

Printed model with gingival mask.

[Source / Images: ‘3D-printed model for hands-on training in dental traumatology

The post Germany: Research Shows Good Response from Students Using 3D Printed Dental Traumatology Training appeared first on 3DPrint.com | The Voice of 3D Printing / Additive Manufacturing.

3D Printing News Briefs: February 6, 2018

We’re talking about business, training, and events on today’s 3D Printing News Briefs. The first European 3D printing incubator will soon be inaugurated in Barcelona, and 3devo is launching training workshops about desktop filament extrusion. nScrypt’s Director of 3D Printing and a surgeon from Belfast will be presenting at upcoming events, and Arburg will display a complete turnkey system at an Italian trade fair. Finally, because we celebrate all accomplishments in our industry, we’re sharing some good news about a Xometry employee.

3D Factory Incubator Inauguration

This coming Monday, February 11th, the inauguration of the first European incubator of 3D printing – 3D Factory Incubator – will take place in Barcelona. The Minister of Science, Innovation and Universities, Pedro Duque, will chair the inauguration’s opening act. This High-Tech Business Incubator, a project led by Fundación LEITAT and El Consorci de Zona Franca de Barcelona (CZFB), is working to promote the adoption of 3D printing by creating a space to incubate related SMEs and micro-SMEs.

The 600 sqm incubator space is located at CZFB’s headquarters, and will include training areas, offices, meeting rooms, laboratories, and co-working zones, in addition to a variety of services. The inauguration will begin promptly at 11 am.

3devo Launching Training Workshops

Dutch technology company 3devo, which creates desktop-based material development and recycling solutions such as SHR3D IT, is launching a series of hands-on training workshops all about desktop filament extrusion for professionals, which will be branded as DevoTraining. The workshops will be held at 3devo’s Utrecht headquarters, and participants can choose one of three programs: a basic, 4-hour module for €499, a 1-day intermediate workshop for €899, and a 2-day advanced level course for €1549.

“The demand for unique 3d printing materials is ever-growing, which requires new knowledge on how to process it,” said Tim Wesselink, the CEO of 3devo. “With DevoTraining, we offer the answers to those innovators who seek to take matters into their own hands. Giving them complete guidance to create and customize their own filament – on demand.”

DevoTraining will be officially released next Tuesday, February 12th.

nScrypt Discussing 3D Printed Munitions and Other DoD Applications

Orlando, Florida-based nScrypt, which manufactures micro-dispensing and 3D printing systems, announced the release of its hybrid Factory in a Tool (FiT) integrated system for Direct Digital Manufacturing in October. nScrypt’s Director of 3D Printing, Larry (LJ) R. Holmes, Jr., is in charge of directing the company’s market participation for industrial-level 3D printing hardware, including its work with the US Department of Defense (DoD). This week, Holmes will speak about nScrypt’s 3D printed munitions, as well as its other DoD applications, on the “AM Innovation Panel: Developing the Next Generation of 3D Printing and Processes in Support of the Warfighter” in Tampa at the Military Additive Manufacturing Summit & Technology Showcase.

“Our FiT platform is ideal for DoD’s 3D printing applications because it does next generation Direct Digital Manufacturing, which means no retooling to build a product or to change from printing one product to another. Just change the CAD file. Our FiT’s pick and place tool head adds actives to the prints, making them electrically functional if needed. We just delivered a Factory in a Tool to the Army’s Redstone Arsenal. It has one full meter of travel in the XY plane,” Holmes said.

“nScrypt’s goal is to disrupt how manufacturing happens. Munitions printed on-demand, where and when they are needed; a ruggedized 3D printer for use in forward deployed locations; and printed electronics, like conformal Active Phased Array Antennas for improved performance at lower cost, are a few of the examples of capabilities currently being transitioned from nScrypt to the DoD and the global manufacturing industrial base.”

SXSW 3D Printing Presentation About 3D Printed Kidney Model

SXSW 2019 begins next month in Texas, and in addition to the many other innovations on display at the event, Dr. Tim Brown, Consultant Transplant Surgeon at Belfast City Hospital, will share his experience of using 3D printing to successfully perform a first of its kind, life-saving operation during a presentation titled “Tumours, Transplants and Technology: AI for Life.” His patient needed a life-saving kidney donation, and while her father was willing to donate, his kidney had a tumor on it. Together with UK medical 3D printing company axial3D and Digital Catapult, Dr. Brown used a 3D printed kidney model to safely complete the transplant surgery and save his patient’s life.

“As the cyst was buried deep within the renal cortex and therefore invisible on the back bench, a replica 3D model was used for preoperative planning and intra-operative localization of the lesion,” explained Dr. Brown. “It’s difficult to underestimate how valuable this strategy was in terms of preoperative planning and achieving successful clearance of the lesion.”

axial3D won the Healthcare Application Award at the 2018 TCT Awards for creating the 3D printed model, and the company’s CEO Daniel Crawford and Operations Manager Cathy Coomber will join Dr. Brown for a panel discussion at SXSW, along with Nigel McAlpine, Immersive Technology Lead at Digital Catapult. The session will take place at SXSW on March 12th, at the JW Marriott Salon FG.

Arburg Exhibiting at MECSPE 2019

Arburg Allrounder Freeformer

At next month’s MECSPE 2019 trade fair in Italy, German machine construction company Arburg will be focusing on 3D printing, automation, and digitalization. The company will be displaying a complex turnkey system, built around a Freeformer 200-3X industrial AM system and a hydraulic Allrounder 370 S; both the Freeformer and Allrounder are networked live with the company’s ALS host computer system. In addition to displaying the system at the trade fair, Arburg will also have experts presenting their outlook on the digital future of plastics processing at Stand F49 in Hall 6.

“MECSPE 2019 is the most important trade fair for the manufacturing industry in Italy and, with its focus on Industry 4.0 and automation, it is an ideal match for Arburg. We are not only a machine manufacturer and expert in injection moulding, but we also have our own MES, our own controllers, automation technology and the Freeformer for industrial additive manufacturing as part of our product portfolio,” said Raffaele Abbruzzetti, the new Managing Director of Arburg Srl. “With more than 30 years of experience in networked and flexibly automated production, we offer our customers everything they need in the era of digitalisation to increase their added value, production efficiency and process reliability – from the smart machine to the smart factory and smart services. We will present examples of all of this at MECSPE.”

Xometry Employee Wins Game Show

This last News Brief has nothing to do with 3D printing itself, but rather an unrelated, but still incredible, accomplishment from one of the industry’s own. On Thursday, January 24th, employees from on-demand manufacturing and 3D printing service provider Xometry gathered to watch one of their colleagues – marketer Aaron Lichtig – compete, and eventually win big, on the popular Jeopardy! game show that night.

Lichtig started off at a steady pace, competing against returning champion and astrophysicist Rachel Paterno-Mahler and sales manager Nancy Rohlen, and was leading the pack with a final score of $12,400 by the end of the Double Jeopardy round. He squared off against Rohlen during Final Jeopardy with the clue, “He was the first U.K. prime minister born after Elizabeth II became queen.” While both correctly guessed the answer as Tony Blair, Lichtig’s steep lead made him the winner that night. Congratulations from your friends at 3DPrint.com!

Discuss this news and other 3D printing topics at 3DPrintBoard.com or share your thoughts below.

Partners of Spanish Hospital Use Stratasys FDM Technology to 3D Print Medical Models

Founded in 2008, Biodonostia Health Research Institute was the very first medical research institute in Spain’s Basque region, and now focuses on research in seven subject areas, from oncology and neuroscience to bioengineering and infectious diseases. Recently, the institute partnered with Tecnun, a specialist division of the Universidad de Navarra, and Tknika, a regional Research and Applied Innovation Center for Vocational Education and training, in order to help its surgeons harness Stratasys‘ FDM 3D printing technology to help in surgical preparation and planning.

“3D printing is an essential surgical tool for us,” explained Dr. Jon Zabaleta, a Thoracic Surgeon at Biodonostia. “Previously, no 3D printed model we created in-house could meet the level of detail and accuracy we needed. However, thanks to our partnership with these local institutions, we now have access to advanced 3D printing technology from Stratasys that enables us to meet the demands required to create highly-accurate, patient-specific 3D models.”

In order to perform complex procedures successfully, surgeons need every possible tool at their disposal…such as 3D printing. The goal of Biodonostia’s partnership with both Tecnun and Tknika is to put together a multidisciplinary team that works to make accurate, high-quality 3D printed surgical models on demand for the hospital. Tecnun will work on the segmentation and reconstruction of the patient-specific models, while Tknika will complete the final 3D printed versions.

“We’re thankful to have such knowledgeable partners in Tknika and Tecnun,” said Dr. Zabaleta. “Coupled with the dedicated local support of Stratasys distributor, Pixel Sistemas, we’re confident that the hospital can continue to help patients with access to the most advanced 3D printing solutions.”

Thanks to its new partnerships, Biodonostia surgical teams can receive highly accurate 3D printed medical models, made with Stratasys’ FDM technology, within 24 hours. These models are helping the hospital’s teams improve patient care by reducing the amount of time patients spend in surgery, especially when it comes to treating complex thoracic wall tumors.

Patient-specific 3D printed model of a tumor on the thoracic wall.

These tumors, located on the chest wall, cause painful swelling, and can even lead to trouble breathing. Dr. Zabaleta and his team recently had a case where a 64-year-old man had a very complicated, and painful, tumor on his thoracic wall – the tumor had grown up his chest cavity and spread across multiple ribs over two years. The team was concerned about the patient’s respiratory function and knew they needed to act fast.

“Ordinarily, in a case like this, we would remove the affected ribs and correct the defect by covering the area with a titanium plate,” Dr. Zabaleta explained. “These plates are a standard size, designed for men of 100 KG or women of 50 KG, and need to be altered and rotated during surgery to suit each patient specification. In a complicated surgery, this can add hours to the operating time.”

Removing multiple ribs would increase the risk of the surgery, so the team needed to find a way to maintain movement and flexibility in the patient’s chest, while also fixing the defect with enough strength to protect his lungs. They turned to new partners Tecnun and Tknika for help planning the surgery through the use of an advanced, patient-specific 3D printed model.

“By creating a precise, anatomically-accurate 3D printed model of the thoracic wall, we were able to plan and perform the resection on the 3D model ahead of the surgery. This allowed us to measure the screws and pre-bend the titanium plates in advance and helped reduce the overall operating time by 2 hours,” said Dr. Zabaleta. “For the patient, this meant a significant reduction in time under anesthesia, and for our hospital, freeing up time in operating rooms saves costs.”

Tecnun and Tknika converted a CT scan of the patient’s thoracic wall and tumor into a 3D printable model. Because the model needed to be strong enough to replicate human bone, it was 3D printed out of an engineering-grade thermoplastic on the Stratasys Fortus 450mc 3D printer.

“Our partnership afforded us access to the necessary technology to produce a large and complex model that was incredibly strong, close to the real bones we would face during surgery,” said Dr. Zabaleta. “Without the strength of this model, we could not have prepared for the surgery in the same way.”

The 3D printed model was also helpful in reliving the patient’s anxiety ahead of the surgery, which also made the surgical consult more efficient.

Due to its new partnerships, Biodonostia is working to provide 3D printed medical models to 23 other Spanish hospitals. Dr. Zabaleta believes that the next step for all of the hospital’s surgical disciplines should be to use Stratasys FDM 3D printing for surgical planning, so patient care can be improved through innovation.

Dr. Zabaleta said, “The use of the 3D printed model was so essential to this case, and we are working to apply this to many other surgical disciplines across the hospital, from pancreatic tumors to airway stenosis, and these 3D printed models are already being used to help train our future surgeons.”

Discuss this news and other 3D printing topics at 3DPrintBoard.com or share your thoughts below.

[Source: News Medical]

3D Printing in Architecture, Engineering, Product Design: 3D Hubs Announces 2018 Student Grant Winners

Last year, 3D Hubs, the world’s largest online network of 3D printing services, reported that nearly 500 applicants from 300 universities around the world applied for its extremely popular Student Grant program, which encourages students to make a positive influence on the world by using 3D printing in a creative way.

Just a few months ago, 3D Hubs announced that it would be kicking off its Student Grant program for the second year in a row, and offering grants to students who were able to illustrate the best use of 3D printing in the architecture, engineering, and product design fields. The grant amount was increased this year from $500 to $1,000, to be used for project expenses and continued funding. Unsurprisingly, the reception for the grant program was great once again.

“We’ve had some amazingly innovative applicants from around the world using 3D printing for some unique applications,” George Fisher-Wilson, the Communications Manager for 3D Hubs, told 3DPrint.com.

There were applicants from more than 50 countries this time around, entering a wide array of innovative 3D printed projects that, as Fisher-Wilson told us, were diverse, including “underwater jetpacks, prosthetics for mountain biking and a 3D printed head with sensors used as a training device for robotic surgery.”

Today, 3D Hubs has announced the three awardees for this year’s 3D Hubs Student Grant program, who were chosen based on the core concept, impact, and functionality of their projects, along with how creatively 3D printing was used to make their ideas a reality. 44.6% of all entries this year were for the Product Design category, followed up by 27.5% for Architecture and 25.9% for Engineering. For the second year in a row, Loughborough University in the UK had the most entries, while New York’s Pratt Institute came in second and the Politecnico di Milano in Italy was third.

“After the success of last year it was great to see more refreshing and new ideas being submitted,” said Filemon Schoffer, the CMO of 3D Hubs. “Our goal is to give students affordable access to all manufacturing technologies so [their] ideas don’t have to be restrictive. The 3D Hubs Student Grant is always a great way to showcase the talented people we having using the platform who will be pushing the industry forward.”

The winners of this year’s Architecture category were Benedikt Boschert and Miriam Boldt from Hochschule Koblenz in Rhineland-Palatinate, with their 3D printed model of a public swimming pool. Their particular project turned the old culture of bathing on its head and into a new, more modern concept.

“With the background of a real task for our city, this concept is weaving the conditions to [an] optimal design of contemporary public swimming pools,” explained Boschert and Boldt in their project description.”

The students 3D printed over 25 pieces for the swimming pool model with an FDM 3D printer, then bonded them together, which helped them turn their original design into a physical model.

Rory Geoghegan and Dr. Mendelsohn from UCLA, who are in the bioengineering and biomedical engineering field, were awarded the 3D Hubs grant in the Engineering category for their Training Platform for Transoral Robotic Surgery.

Using an FDM 3D printer and PLA materials, the two created a 3D printed model of a human head, which also includes a synthetic oral tumor and an anatomically accurate aerodigestive tract, to be used as a training platform.

“Robotic surgery can be used to remove tumors from deep inside the mouth,” Dr. Mendelsohn and Geoghegan explained. “Currently there is no training platform to facilitate the necessary skills acquisition for surgical residents.”

The model is cost-effective, which is good if replacement parts are needed quickly during training, and also includes force sensors underneath the structures that are most often damaged by new surgeons, such as the lips and teeth.

Archie O’Brien from Loughborough University was awarded the final 3D Hubs grant, in Product Design, for his 3D printed, underwater jet pack. He calls his project, named Cuda, the “fastest underwater jetpack” in the world, and says it can be used for multiple purposes, such as underwater exploration, lifeguard duties, “and of course fun.”

The functional 3D printed prototype, designed in SOLIDWORKS, shows what O’Brien calls a “complex use of 3D printing,” as the prototype and most of its internal components were 3D printed using mostly PLA.

During this year’s program, 3D Hubs also took a close look at the most commonly used 3D modeling software – SOLIDWORKS was at the top, with Rhino following closely behind – and the most popular materials (PLA was the clear winner) used by students for their projects.

To take a look at the rest of these findings, and all of the top ten finalists in each of the three award categories, check out the 3D Hubs blog post. While dates and categories won’t be confirmed until later this year, the 3D Hubs Student Grant, open to all registered students, will definitely be returning for a third iteration in 2019.

Discuss this story, and other 3D printing topics, at 3DPrintBoard.com, or share your thoughts in the Facebook comments below.

[Images provided by 3D Hubs]