Giant Pinball Machine Made by Hacking Nintendo Switch Controllers with 3D Printing

“Ever since I was a young boy I’ve played the silver ball…From Soho down to Brighton I must have played them all.” – Pete Townshend, The Who

Now that I’ve got “Pinball Wizard” stuck in your head, let’s talk about this classic arcade game. The concept is pretty simple: you use game paddles, or flippers, to manipulate the little metallic balls on the game field inside the glass-covered cabinet, or pinball machine, to score as many points as you can. It’s so popular that many gaming consoles like the hybrid Nintendo Switch, have their own versions, in case players can’t get themselves to an actual arcade—do those even exist anymore?

The Switch can be plugged into a docking system and played on a TV, or used as a mobile gaming device with a touchscreen interface. Naturally, many people have used 3D printing to hack the system, and customize the multi-use JoyCon controllers however they want, which brings us back to pinball. Maker Tommy Williamson is the founder of the Nerds&Makers community, which is exactly what it sounds like — the members visit the site to “showcase cool projects, to promote makers, to find inspiration, to teach, to learn and most importantly to connect with other makers and like-minded individuals.”

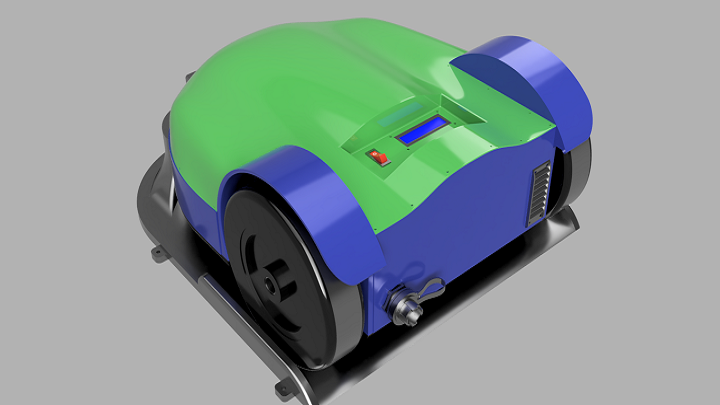
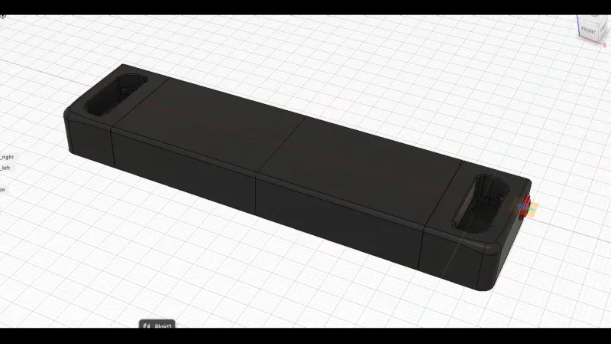
Williamson found that playing pinball on the Switch was difficult with the standard JoyCon shoulder buttons, which are decidedly not the typical flipper controls used to play the original game. He did what many a maker has done before, and used 3D printing to create a custom solution. The JoyCon dock he created, which he dubbed the SwitchPin, makes it much easier to play the game. Basically, the controller turns two buttons on the JoyCon into two different buttons for optimal pinballing.

“Sometimes two buttons really need to be two other buttons, and in those times we should not let anything get in the way of a creative solution,” Kotaku writer Mike Fahey wrote about Williamson’s creation.

The SwitchPin is an ingenious solution. Basically, Williamson modeled two blocks, and fitted them with pinball arcade flipper buttons. Then, he 3D printed the blocks out of black Hatchbox PLA on his Prusa i3 Mk3 3D printer; the buttons were printed in red, and he recommends using the printer’s quality settings due to the tight tolerances of the design. Once the print job was finished, he had to spend some time removing supports from the blocks, and then did a little sanding to, as he wrote on Thingiverse, “tweak things to be just right.”

He used 3/8″ x 5/8″ springs from a Harbor Freight box set to make the flippers work, and assembled the SwitchPin with M3 screws – no soldering required.

“I recommend drilling and tapping the frames, the center parts use nuts. I used M3 20mm and 25mm,” Williamson wrote. “To keep it from sliding around there’s small wells on the bottom for rubber pads. I used hemispherical ones from this pack.”

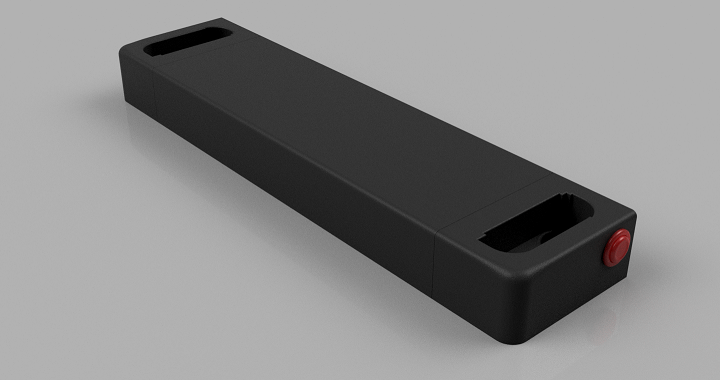
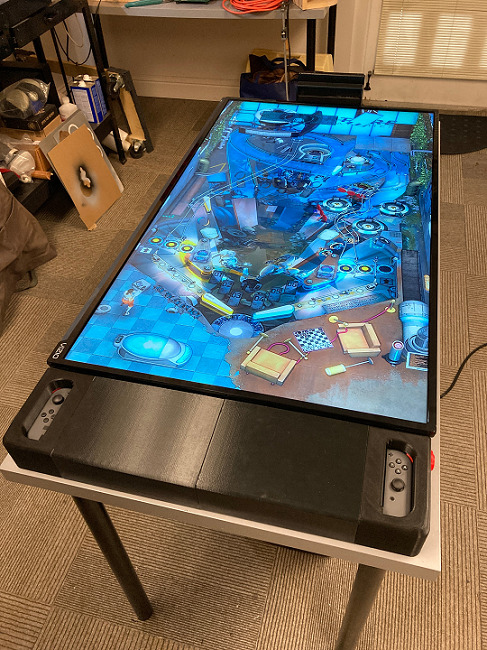
As you can see in the image above, there’s a slot for a JoyCon controller inside each block, and the controller’s shoulder buttons line up perfectly with the arcade button actuators. Then, Williamson added enough black plastic in between the two blocks to make the whole thing the length of his TV when on portrait mode. He removed the TV from the wall, set it on a table, placed the 3D printed SwitchPin at the bottom, set the Nintendo Switch to the correct view, and started playing the game the way pinball is meant to be played. It’s a pretty impressive setup.

You can get the 3D printing files to make your own SwitchPin pinball controller for free on Thingiverse. Take a look at the video below to see Williamson’s whole building process:

I was curious about what other interesting 3D printable Switch adaptations people have been making, so I searched a few 3D model repositories and found some interesting designs. Mechatronics engineer Julio Vazquez, also known as Vexelius, created these JoyCon adapters that allow disabled gamers to play with just one hand, and also came up with this Accessibility stand “to provide an easy to print and non invasive mod that will help disabled players enjoy a better experience.”

“The SL and SR buttons, which are small and difficult to press are now easier to reach, thanks to a couple of extensions; and an optional cross-shaped cover for the buttons will help users that might not have the accuracy to press the small buttons in the Joy-Con,” Vazquez wrote.

On Cults 3D, I saw this JoyCon Wristband for playing the “Just Dance” game on the Switch, which has two slot sizes, and I also found two different versions of a Nintendo Switch Joy Con Controller Drink Holder.

(Images courtesy of Nerds&Makers)

The post Giant Pinball Machine Made by Hacking Nintendo Switch Controllers with 3D Printing appeared first on 3DPrint.com | The Voice of 3D Printing / Additive Manufacturing.

Build Your Own 3D Printed Open Source Motorized Microscope

I always enjoy a good 3D printed DIY project, whether it’s truly helpful or just for fun. These projects are even cooler when you add Legos into the mix, like Reddit user DIY_Maxwell did. He posted about his work using 3D printing, Arduino, Raspberry Pi, and Lego bricks to make an open source, motorized microscope. But, the microscope itself is not fully 3D printed – instead, the body was built with Lego bricks and some 3D printed components. What makes this project more awesome is the stop motion-style video he made showing the various parts of the project and how they all fit together to make a working microscope.

BUILD YOUR OWN MOTORIZED MICROSCOPE using 3D-printing, Lego bricks, Arduino and Raspberry Pi… all design files, source codes and detailed instructions are provided open-source. from r/3Dprinting

“I wanted to have a modular microscope, something I can easily modify for transmitted-light, reflected-light, cross-section, etc. My early prototypes did not have Legos, as I started making my own interlocking pieces, I realized that I was in fact printing lego-like designs, I thought buying legos would be less of an effort,” he wrote on Reddit when asked why he didn’t 3D print all the parts. “Then I found out about these “sliding” lego pieces, which are very precise for linear actuators. The other advantage is that, if I want to change the height of the camera let’s say, I simply add more bricks, it’s convenient.”

DIY_maxwell used FreeCAD to design the 3D printed microscope parts, which were fabricated on an Ender 3 system. All of the source codes and design files have been provided open source on GitHub, along with detailed step-by-step instructions on how to make your own.

Before you jump right in, do you know what exactly a motorized microscope does when compared to a regular microscope? DIY_maxwell explained that, at least for him, it needed to be able to tilt in order to take photos, from an angle, of “highly reflective surfaces (semiconductor chips),” and that it should quickly adjust the focus and magnification, and position of the sample.

“The microscope has a simple operation principle based on changing the magnification and the focus by adjusting the relative distances between a camera, a single objective lens and a sample. Briefly, two linear stages with stepper motors are used to adjust these distances for a continuous and wide magnification range,” the GitHub instructions state. “Four additional stepper motors tilt the camera module and change the X-Y position and rotation of the sample. A uniform light source illuminates the sample either from an angle (reflected light) or from the bottom of the sample (transmitted light).”

The main components of this modular, motorized microscope include a Raspberry Pi system, an 8 MegaPixel camera, six stepper motors, a keyboard or joystick for variable speed control, uniform illumination, and obviously plenty of Lego bricks. Depending on the specific features and electronics vendors used, the whole thing costs between $200-$400, and once you have all the parts in front of you, should only take a couple of hours to assemble.

The main body was built with individually-purchased Lego bricks, and DIY_maxwell designed custom actuators and 3D printed them, rather than using available motors and gears from LEGO Technic.

“This approach not only lowered the cost of the microscope but also gave me some flexibility in the design and implementation of precise linear and rotary actuators. In principle, the whole structure could be 3D-printed without using any LEGO parts but that would be less modular and more time consuming,” he writes in GitHub.

In addition, 3D printing offers you the flexibility of quickly changing the design for maximum optimization if and when it’s needed.

“If the parts do not match well, some minor modification in the original design file (e.g. enlarging the holes matching to LEGO studs) or polishing/drilling may be required,” he explained.

The contents of the motorized microscope are as follows:

  • Linear Actuators
  • Camera Module
  • Rotary Stage
  • Illumination
  • Tilt Mechanism
  • Electronics
  • Final Assembly
  • Software

You can find detailed instructions, images, slicer settings, tips, and more on GitHub, and a longer version of the assembly video can be viewed here.

Several other Reddit users who routinely use microscopes related how impressed they were about the project; a geologist mentioned that “starting price can be anywhere between $500 to $1000 for something with that kind of quality” when DIY_maxwell said that his microscope could “easily resolve 10um features.” A pathologist expressed excitement about “a modular system to motorize common non motorized microscopes (Leica, Olympus, etc.).” While the compliment was appreciated by the maker, it was noted that “this microscope is not meant to replace a lab microscope used for medical assessment. No dark-field, no fluorescence, no aperture control, it suffers from chromatic aberration and other optical effects at high magnification, etc.”

“I hope this prototype persuades other DIY-enthusiasts to develop new designs of microscopes.”

If you’re interested in using 3D printing to make your own microscope, you can check out all of the relevant information on GitHub to build this one, or check out the OpenFlexture Microscope project on Wikifactory. This was created as “part of the Waterscope initiative, which by allowing for fast and affordable on-site bacterial testing of the water quality in developing regions of the world, is helping to cope with the diseases caused by bad quality water drinking.”

OpenFlexure Microscope

The OpenFlexure can be built in the classroom and used as an education tool for both students and teachers. Because the 3D printed microscope stage uses plastic flexures, the motion is free from friction and vibration, and the four-bar linkages in the stage can be 3D printed in a single job with no support material.

You can find other open source 3D printable microscopes on Thingiverse as well; happy making!

Discuss this and other 3D printing topics at 3DPrintBoard.com or share your thoughts below.

The post Build Your Own 3D Printed Open Source Motorized Microscope appeared first on 3DPrint.com | The Voice of 3D Printing / Additive Manufacturing.

Mechanical Engineer Makes 95% 3D Printed Autonomous Robotic Lawn Mower

While I do know how to mow my lawn, that’s a job my husband normally takes care of. We like to divide and conquer when it comes to household chores – I do the laundry, he mows the lawn, I vacuum and he mops, et cetera, et cetera. Maybe I would enjoy mowing the lawn if ours was bigger and I could use a mower of the ride-on variety…I don’t know for sure, but I always imagined this would be something like a way slower go-kart (if this is untrue, don’t tell me). But German mechanical engineer and maker Philip Read recently completed a project, using Arduino and 3D printing, that makes me want to get out there and get mowing, no matter the size of my yard.

“It’s a fully autonomous Robot Lawn Mower which can be 95% 3D printed,” Read told 3DPrint.com, noting that a few small connectors will have to be made for the wheels and mower disc.

“I see you have covered this type of project in the past, but I believe this is a real upgrade in terms of design and “makeability” due to the ability to 3D print almost everything.”

Read, a self-professed RC fanatic and scratch builder who goes by ReP_AL online, is not wrong – over the years, we have definitely written stories about 3D printed parts for lawn mowers, fully 3D printed lawn mowers, and even another 3D printed robotic lawn mower.

“Its been a long project and took a lot of my time to complete,” Read wrote on Thingiverse.

“I have had many requests for parts and code etc.. and decided to relocated the build instructions and code management to my new website.”

You can find all of the build instructions and details for the little robotic lawn mower, including code, videos, and a webshop, on his website, where he explains why he is passionate about building his own robots and other machines, such as his own 3D printer.


“I like to understand the mechanics, the programming and what the electrical components do. I would like to share this passion with you, so you can build the projects too and learn about robotics,” Read wrote.

“This site will guide you through the build process of these projects so you can enjoy making them yourself..  With detailed instructions and links to the components I used, my goal is to make it possible for anyone to complete a complex robotics project and enjoy the results.”

On his website, Read rates the difficulty of his 3D printed autonomous lawn mower robot as a 7 out of 10, noting that the required skills to make the machine include soldering and 3D printing.

“The mower navigates within the boundary wire which is positioned (pinned) around the perimeter of the garden,” Read explained. “Once the mower senses the perimeter wire, it stops reverses and moves off in a new direction. The mower also has 3 sonar sensors to detect objects in the mowers path. Once the mowers battery is exhausted, the mower uses the boundary wire to navigate itself back to the charging station. All this can be customised in the Arduino software or completely re-written to your personal preferences.”

Rear control panel

According to Read, a commercial lawn mower with these kinds of specifications would cost at least €600, if not more.

The equipment required to make Read’s robotic lawn mower includes PLA material, a 3D printer with a 330 x 330 x 400 mm bed, wire strippers, and various screwdrivers and Allen wrenches. He 3D printed the lawn mower parts at 50% infill, with a 0.4 mm resolution, and notes on Thingiverse that most parts can be printed without any supports.

He also added the STL files for his lawn mower, and its optional charging station, to Thingiverse.

Will you try and make your own 3D printed robotic lawnmower? Discuss this project and other 3D printing topics at 3DPrintBoard.com or share your thoughts in the Facebook comments below.