Design and Customize the Perfect Presents with Our Creator Apps

The holidays are fast approaching and with them, the annual extended panic attack over finding exclamation-worthy gifts for all of your family and friends. But this year, instead of rushing through packed stores and standing on seemingly endless lines just to end up with something that doesn’t fully capture the uniqueness of your loved one, why not design the perfect present yourself? Shapeways makes it easy to create and customize a whole array of products so each one feels singular and made specifically for its recipient. Below we’ve assembled some of our favorite creator apps that can help you nail the holidays this year from the comfort of your own home.


Spring & Wonder

The new destination for customizable jewelry, Spring & Wonder lets you select the shape, size, message, and material of a whole range of high-quality pieces, from necklaces to rings and earrings.  


Ciphering

This app creates a ring with a sentimental surprise – built into the physical form of each ring is an encoded number of your choosing, which is only revealed when you shine light or look through it at the right angle.


Twine

Twine interlocks two names of your choosing into a chic necklace pendant, connecting loved ones forever.


Cookie Caster

Buying a present for the baker in your life? Make standard cookies a thing of the past with Cookie Caster, the app that allows you to draw and 3D print your own unique cookie cutter.


Our creators apps are for everyone, helping new as well as experienced 3D designers create their own perfect piece in a breeze. So skip the holiday rush this year and use Shapeways to create timeless gifts that show your loved ones exactly how well you know them.

The post Design and Customize the Perfect Presents with Our Creator Apps appeared first on Shapeways Magazine.

Cooper Hewitt’s National Design Award Winner Joe Doucet Always Places Sustainability at the Forefront

Artist: Joe Doucet / Cooper Hewitt, Smithsonian Design Museum
Photo: Donatello Arm

For world-renowned designer Joe Doucet, using 3D printing to create products that have a minimal environmental impact was never an afterthought. To Doucet, sustainability is key to the future of design.

“I’ve always been interested in new technologies, particularly ones that have the ability to be transformative in terms of manufacturing,” Doucet told Shapeways. “If you look at it from the fact that 3D printing allows each and every object to be unique and customized completely without creating the waste — both in terms of excess material and freights and shipping — it’s just a fundamental shift in the way that we create and consume products.”

Launching his 3D design career

Doucet is no stranger to the world of 3D design. He began using 3D printing for his first project back in 2000 and hasn’t stopped since. Shortly after that, Doucet discovered Shapeways and saw how cost and time efficient the company was when it came to prototyping (“I used Shapeways…to visualize what the final product would be like,” he said). So when it came time to launch his company OTHR, it only made sense to partner with Shapeways.

“We’ve had a long history with Shapeways. During the launch of OTHR, we formalized a partnership and a relationship with Shapeways to be really one of our main suppliers and partners.”

And now, National Design Award winning designer Doucet is using Shapeways to help curate a current exhibition in New York City that is open through April 14, 2019.

Tableware through the centuries on display

Artist: Joe Doucet / Cooper Hewitt, Smithsonian Design Museum
Video: Donatello Arm

The exhibition — which is titled Tablescapes: Designs for Dining, and is currently open to the public — confronted Doucet with a challenge: How do you use design to create solutions for the decrease in resources we see in the world? As resources get more limited, how do you make that less dystopian? How do you take these resources and make them into a beautiful experience of eating?

The exhibition is broken up into three sections: One depicting dining ware in the 19th century, another in the 20th century and a final section focused on dining and tableware in the 21st century. The 19th-century room is an artistic masterpiece bringing viewers back to the time of Napoleon III. The 20th-century room, on the other hand, shows the shift that occurred towards mass production of products. And finally, the 21st-century room paints a picture of the sustainable future we see a glimpse of today.

“When we were tasked to design the tableware and dinnerware for the 21st century…obviously to me, the decentralization of manufacturing and the addition of technology, being able to reduce the carbon footprints and allow infinite customization, was key to representing what the 21st century will be,” Doucet told Shapeways.

Partnering with Shapeways to find the perfect materials

Once Doucet was aware of the way he wished to construct each section of the exhibit, he went back to Shapeways to find the best materials and printing processes to use.

“We partnered with Shapeways quite early on in the process to explore different manufacturing techniques in terms of 3D printing to be able to create all the final pieces you’ll see at the exhibit. Shapeways is the sole producer of the tableware and cutlery.”

He adds, “It was a very hands-on process and Shapeways was closely involved. There were five or six different materials and processes that were considered in the beginning, and we essentially prototyped everything with all of these different available materials and printing techniques. We met at the Shapeways headquarters in New York and went through all the benefits and different quality levels that we were able to achieve.”

After much time spent on reviewing each material and printing option, calculating the benefits of each, Doucet and the Shapeways team were able to agree on the best way to create the products for the exhibit.

“I think we were all incredibly pleased with the results and quite surprised with the level of execution that we were able to achieve with the products that are on display now. They’re really stunning.”

Producing completely functional products

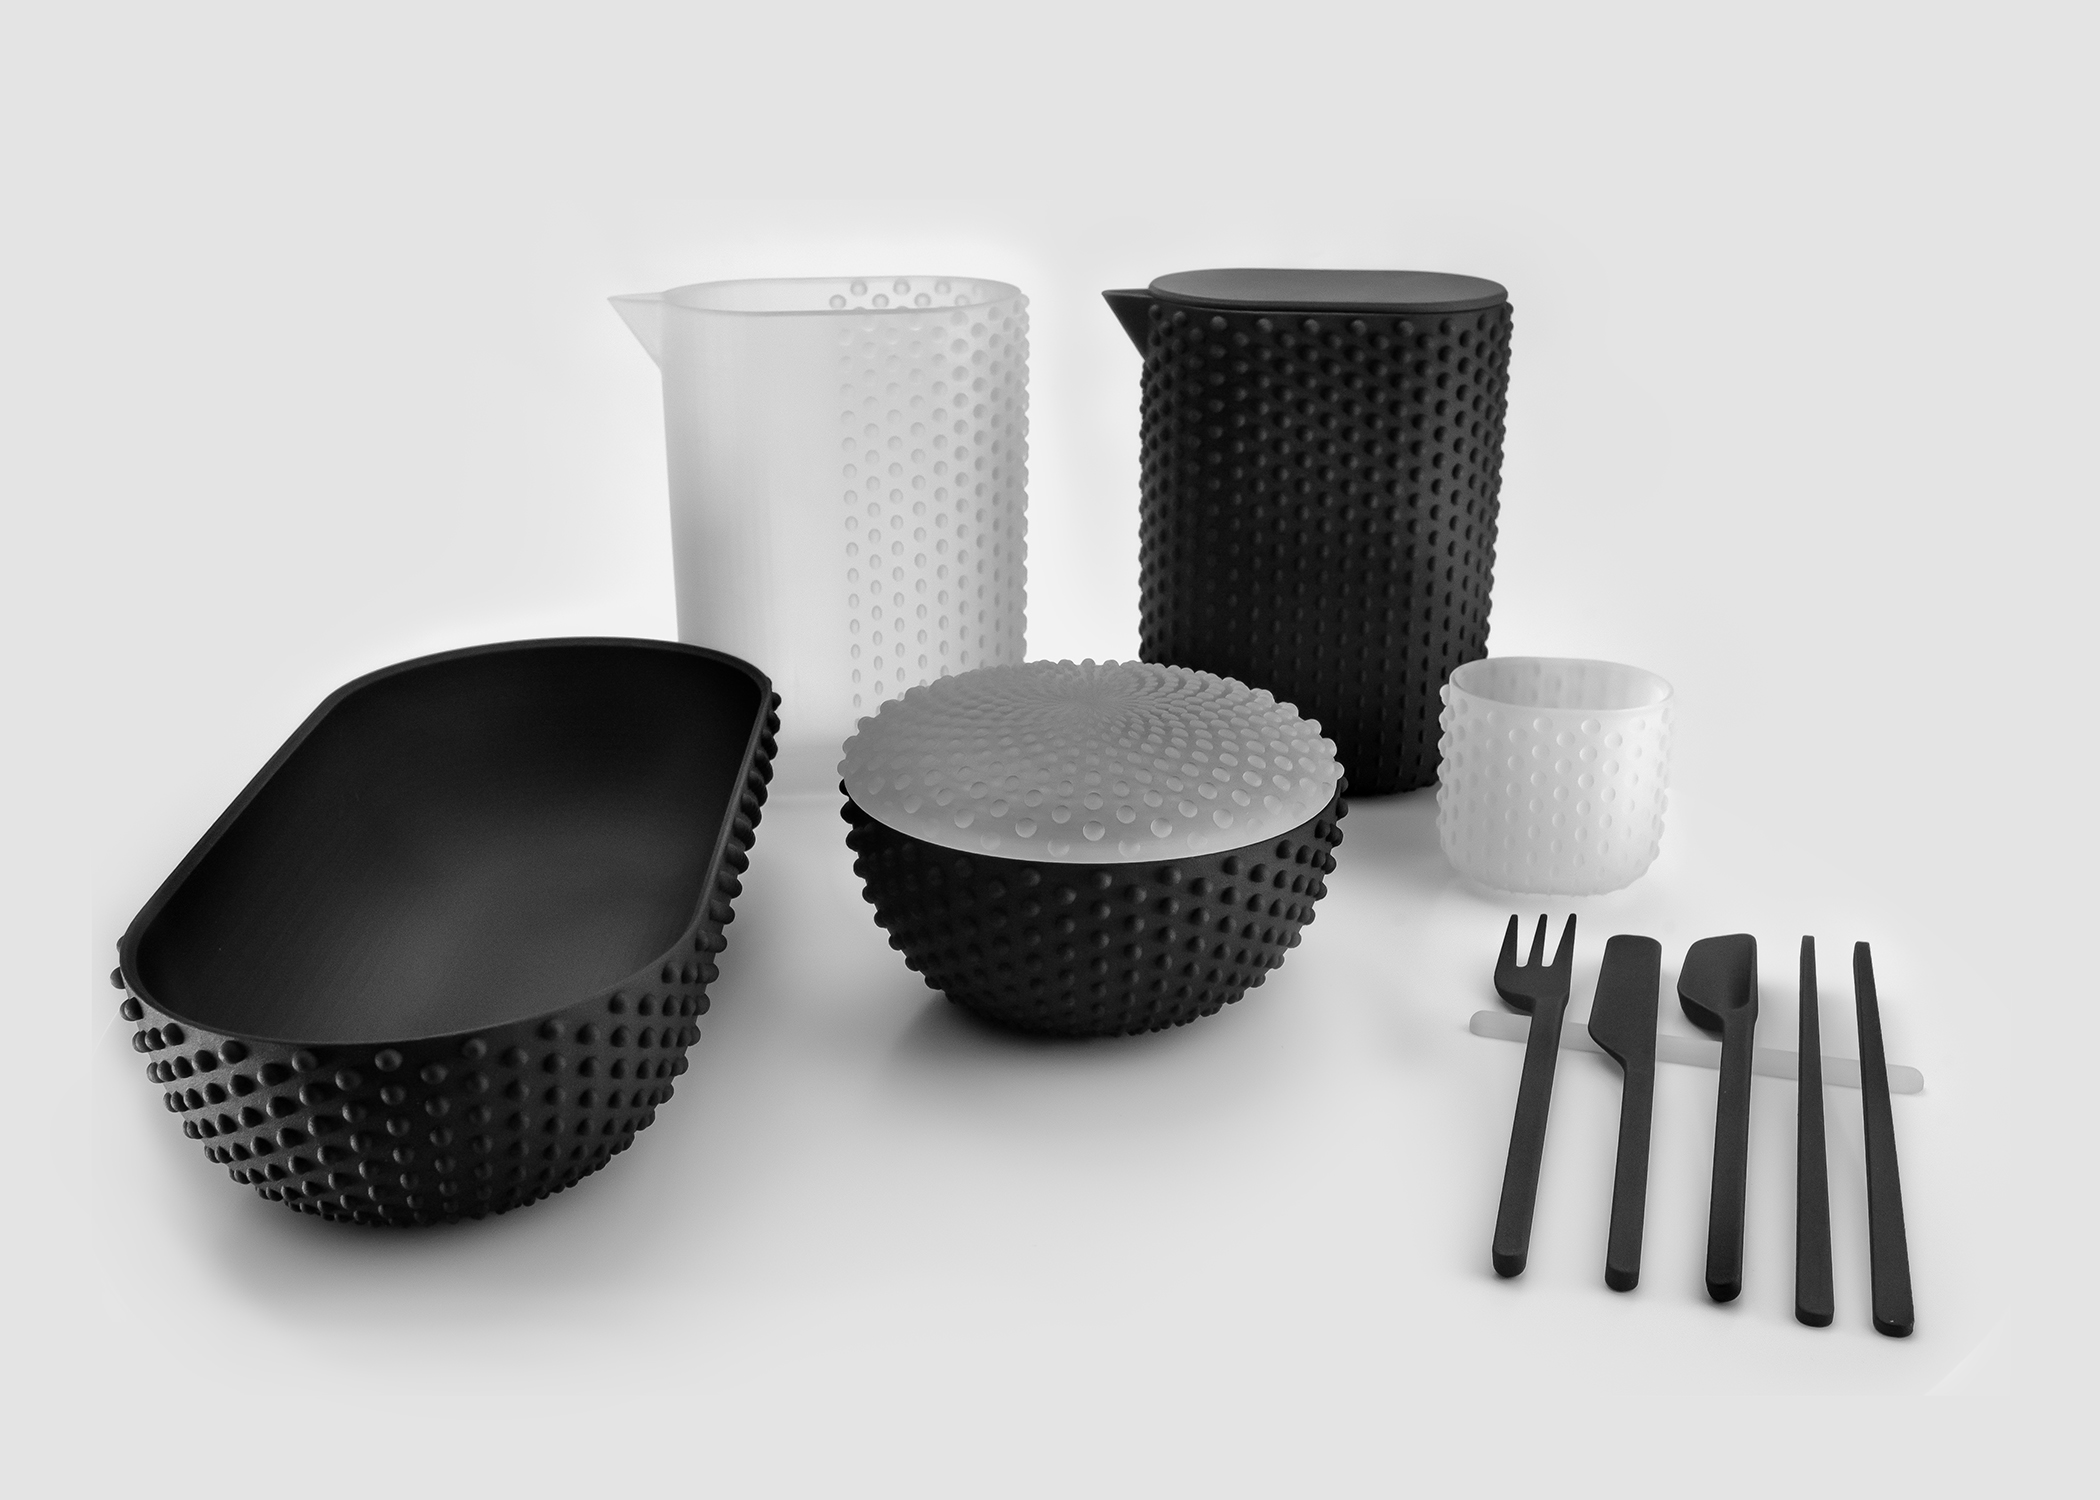
A highlight of the exhibit lies in Doucet’s vision to create products that can be used for cooking, serving and storing food. In the 21st-century room, the place settings can be used for all three functions, “as opposed to having three separate sets of containers for each step in that process. We decided it was best to eliminate as much as we could.”

Artist: Joe Doucet / Cooper Hewitt, Smithsonian Design Museum
Photo: Donatello Arm

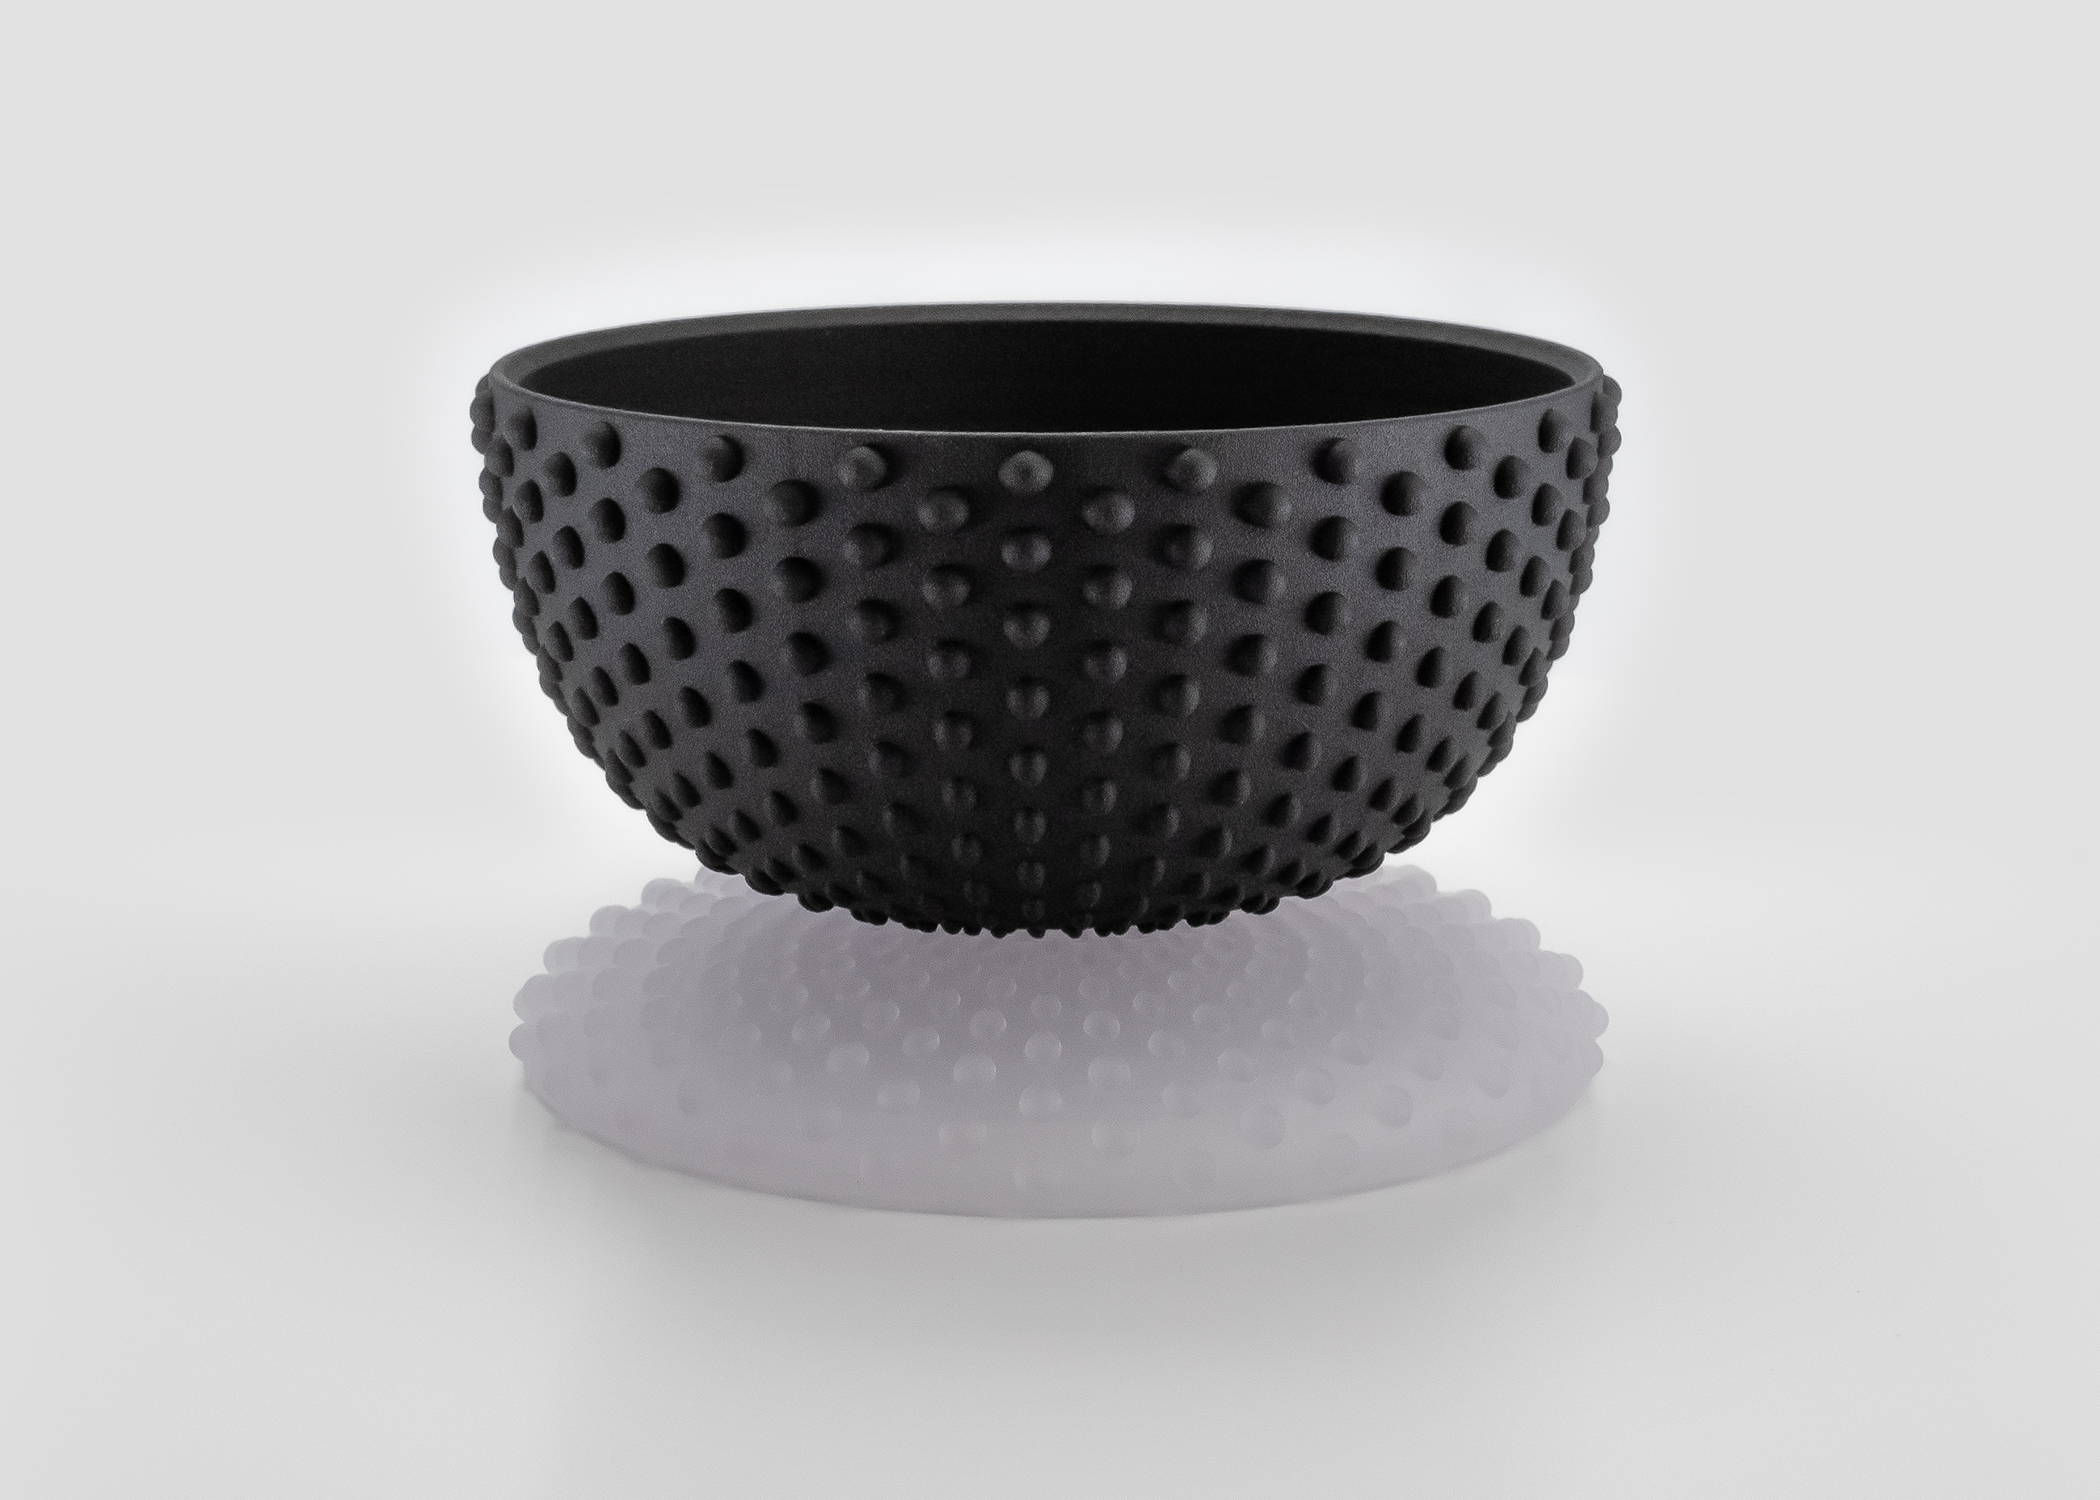
“You’ll notice that on the objects, there’s this raised pattern, and it’s there not just to be a decorative element but they, in fact, would act as heat sinks to be able to distribute heat quickly in terms of the cooking process and then to quickly dissipate in the serving process,” Doucet said. “So you could take something from a microwave and put it on the table and the vessel would become cool to the touch very quickly.”

If anything, Doucet’s experience partnering with Shapeways and curating the Tablescapes: Designs for Dining exhibition was yet another clear indication of where the future of 3D printing lies.

Doucet explains, “It should be, at this point, fairly easy to see how 3D printing is going to fundamentally revolutionize how things are made. And I think companies like Shapeways, and Shapeways in particular, are really [game changers] in making this industrial revolution accessible to [anyone] at the touch of a button.”

Joe Doucet’s “Tablescapes: Designs for Dining” exhibition is on view now at the Cooper Hewitt, Smithsonian Design Museum through April 14, 2019.

Want more exclusive interviews with leading 3D designers? Sign up to our email list

The post Cooper Hewitt’s National Design Award Winner Joe Doucet Always Places Sustainability at the Forefront appeared first on Shapeways Magazine.

Cooper Hewitt’s Designer of the Year Joe Doucet Always Places Sustainability at the Forefront

Artist: Joe Doucet / Cooper Hewitt, Smithsonian Design Museum
Photo: Donatello Arm

For world-renowned designer Joe Doucet, using 3D printing to create products that have a minimal environmental impact was never an afterthought. To Doucet, sustainability is key to the future of design.

“I’ve always been interested in new technologies, particularly ones that have the ability to be transformative in terms of manufacturing,” Doucet told Shapeways. “If you look at it from the fact that 3D printing allows each and every object to be unique and customized completely without creating the waste — both in terms of excess material and freights and shipping — it’s just a fundamental shift in the way that we create and consume products.”

Launching his 3D design career

Doucet is no stranger to the world of 3D design. He began using 3D printing for his first project back in 2000 and hasn’t stopped since. Shortly after that, Doucet discovered Shapeways and saw how cost and time efficient the company was when it came to prototyping (“I used Shapeways…to visualize what the final product would be like,” he said). So when it came time to launch his company OTHR, it only made sense to partner with Shapeways.

“We’ve had a long history with Shapeways. During the launch of OTHR, we formalized a partnership and a relationship with Shapeways to be really one of our main suppliers and partners.”

And now, after being named Cooper Hewitt Museum’s Designer of the Year, Doucet is using Shapeways to help curate a current exhibition in New York City that is open through April 14, 2019.

Tableware through the centuries on display

Artist: Joe Doucet / Cooper Hewitt, Smithsonian Design Museum
Video: Donatello Arm

The exhibition — which is titled Tablescapes: Designs for Dining, and is currently open to the public — confronted Doucet with a challenge: How do you use design to create solutions for the decrease in resources we see in the world? As resources get more limited, how do you make that less dystopian? How do you take these resources and make them into a beautiful experience of eating?

The exhibition is broken up into three sections: One depicting dining ware in the 19th century, another in the 20th century and a final section focused on dining and tableware in the 21st century. The 19th-century room is an artistic masterpiece bringing viewers back to the time of Napoleon III. The 20th-century room, on the other hand, shows the shift that occurred towards mass production of products. And finally, the 21st-century room paints a picture of the sustainable future we see a glimpse of today.

“When we were tasked to design the tableware and dinnerware for the 21st century…obviously to me, the decentralization of manufacturing and the addition of technology, being able to reduce the carbon footprints and allow infinite customization, was key to representing what the 21st century will be,” Doucet told Shapeways.

Partnering with Shapeways to find the perfect materials

Once Doucet was aware of the way he wished to construct each section of the exhibit, he went back to Shapeways to find the best materials and printing processes to use.

“We partnered with Shapeways quite early on in the process to explore different manufacturing techniques in terms of 3D printing to be able to create all the final pieces you’ll see at the exhibit. Shapeways is the sole producer of the tableware and cutlery.”

He adds, “It was a very hands-on process and Shapeways was closely involved. There were five or six different materials and processes that were considered in the beginning, and we essentially prototyped everything with all of these different available materials and printing techniques. We met at the Shapeways headquarters in New York and went through all the benefits and different quality levels that we were able to achieve.”

After much time spent on reviewing each material and printing option, calculating the benefits of each, Doucet and the Shapeways team were able to agree on the best way to create the products for the exhibit.

“I think we were all incredibly pleased with the results and quite surprised with the level of execution that we were able to achieve with the products that are on display now. They’re really stunning.”

Producing completely functional products

A highlight of the exhibit lies in Doucet’s vision to create products that can be used for cooking, serving and storing food. In the 21st-century room, the place settings can be used for all three functions, “as opposed to having three separate sets of containers for each step in that process. We decided it was best to eliminate as much as we could.”

Artist: Joe Doucet / Cooper Hewitt, Smithsonian Design Museum
Photo: Donatello Arm

“You’ll notice that on the objects, there’s this raised pattern, and it’s there not just to be a decorative element but they, in fact, would act as heat sinks to be able to distribute heat quickly in terms of the cooking process and then to quickly dissipate in the serving process,” Doucet said. “So you could take something from a microwave and put it on the table and the vessel would become cool to the touch very quickly.”

If anything, Doucet’s experience partnering with Shapeways and curating the Tablescapes: Designs for Dining exhibition was yet another clear indication of where the future of 3D printing lies.

Doucet explains, “It should be, at this point, fairly easy to see how 3D printing is going to fundamentally revolutionize how things are made. And I think companies like Shapeways, and Shapeways in particular, are really [game changers] in making this industrial revolution accessible to [anyone] at the touch of a button.”

Joe Doucet’s “Tablescapes: Dining Through the Centuries” exhibition is on view now at the Cooper Hewitt, Smithsonian Design Museum through April 14, 2019.

Want more exclusive interviews with leading 3D designers? Sign up to our email list

The post Cooper Hewitt’s Designer of the Year Joe Doucet Always Places Sustainability at the Forefront appeared first on Shapeways Magazine.

How to Set Up the Shapeways Fulfillment App for Shopify

Shapeways supports sellers wherever they want to do business. If you would like to sell beyond the Shapeways marketplace and either have a Shopify store or would like to create one, our recent integration with Shopify is a great solution to automating your order processing, production, and shipping by connecting your store with the Shapeways Fulfillment app. No more manual order entry after this integration!

Ready to get started? Follow the steps below to connect your Shopify store to Shapeways.


1. Setting Up Payment

To use the Shapeways Fulfillment app, you must have a credit card on file with Shapeways.

If you have previously placed a Shapeways order with a credit card, your payment method will default to the last credit card you used. If you already have a card on file, skip to Step 2.

If you do not have a credit card on file, you can add one on Shapeways.com.

  • Click the avatar in the top-right corner and select Settings.

  • Then select Shipping & Billing.

  • On the Shipping & Billing page, scroll down to Payment MethodInput your credit card information and billing address then click Save Card.

2. Installing the app

  • Go to the “Shapeways Fulfillment” page on the Shopify App Store here.
  • Click on the Add App button.
  • If you are not already logged in to your Shopify account, you will be prompted to login.
  • You will then be prompted to install the app on your Shopify site.

  • Next, you will be prompted to sign in to your Shapeways account. Use the same credentials that you use on Shapeways.com.

  • Review and accept the terms and conditions and click Authorize.


3. Creating Products in Shopify

To start, you’ll need to create your products in Shopify. There are two methods for doing this.

  • Method 1:

    Manually create your products in Shopify. For more information on creating products in Shopify, click here to see their guide.

  • Method 2:

    If you have a Shapeways Store and you’d like to import all of your Shapeways products, the Shapeways team can provide you with a Shopify Product Import CSV file that can be used to import your public products into Shopify. Email storefronts@shapeways.com for details.

4. Mapping Shapeways Products

You can now manually map your Shapeways models to your Shopify products in the Shapeways Fulfillment App. To do this, you’ll need to enter the Shapeways model ID and select a material for each Shopify product variant. There are two ways to locate the information needed.

  • Method 1:

    If you have a Shapeways shop, sign to Shapeways.com and go to your Shop Settings. 

  • Select Pricing CSV Wizard.

  • Click Download CSV. Your model IDs will be displayed in this file.

  • Method 2:

    If you don’t have a Shapeways Shop: click on the 3D Models tab. Here, you’ll find a list of your uploaded models. Click on a model and copy the number at the end of the browser’s page URL. This is the model ID for your product. (Example: for https://www.shapeways.com/model/upload-and-buy/1234567, copy “1234567”)

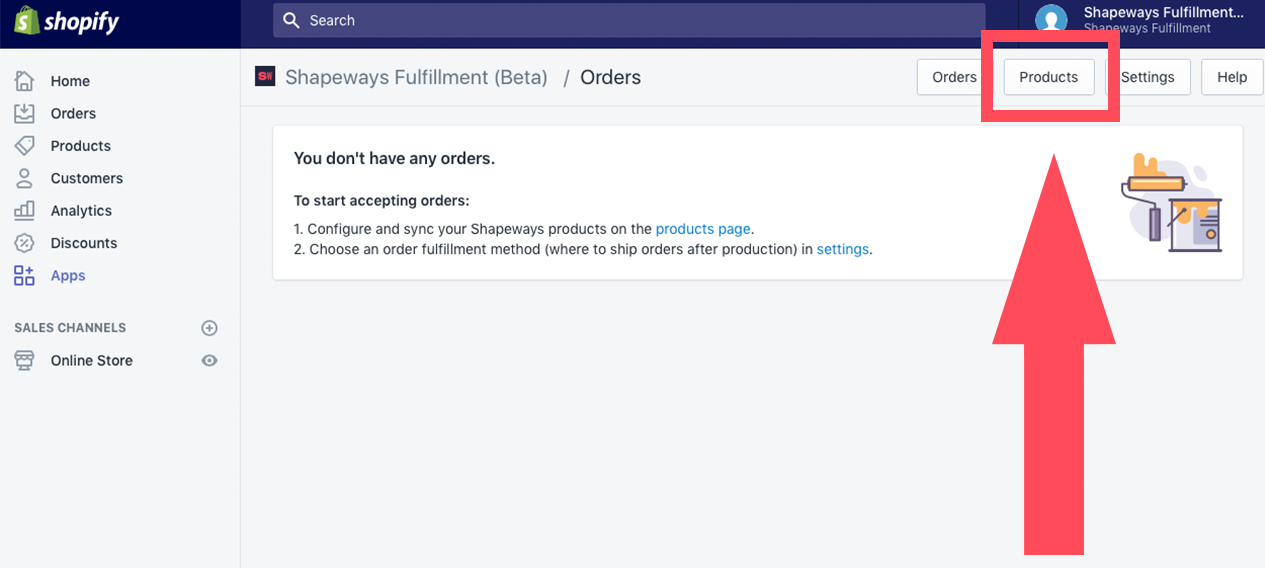
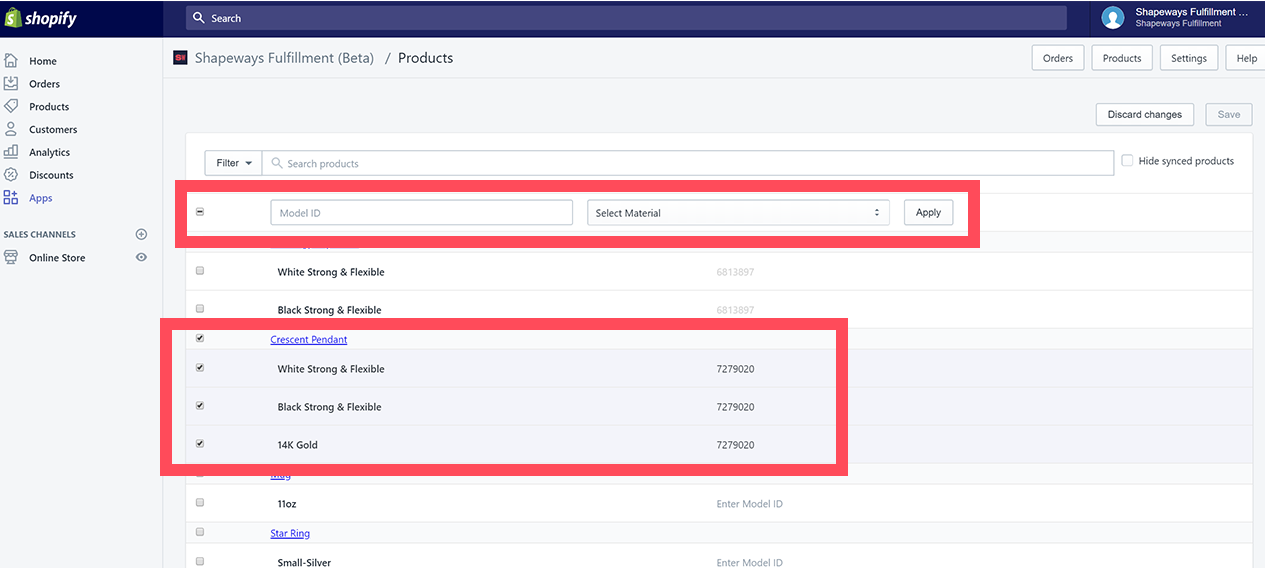
  • Then, you can map your Shopify products to your Shapeways models and materials. Go to the Shapeways Fulfillment app and click on the Products tab.

  • Here, all of your Shopify products and variants will be automatically populated in the first column.

  • For each product-variant, enter the ID of the Shapeways model and select the material you want it to print in.

  • If you select multiple product-variants, the bulk edit tool will appear at the top. You can use this to map several product-variants at once.

  • If you have a product-variant that is not manufactured by Shapeways, simply leave it blank.
  • When you have finished mapping all of your products, click Save.


5. Configuring Settings

You can access your app setting by clicking on the Settings tab.

Decide how you want your Shapeways orders to be created.

  • Place orders manually means that you will need to create each order. This gives you the ability to decide which Shopify orders need to be fulfilled by Shapeways and when the order is placed.
  • Place orders automatically means that for every Shopify order you receive, a corresponding Shapeways order will automatically be created.

Decide how you want your orders to be fulfilled by Shapeways.

  • Ship orders directly to customers means that Shapeways will ship the order to the customer who purchased it on your Shopify site. If this setting is selected, the order will be shipped to the address the customer provided while checking out on Shopify.
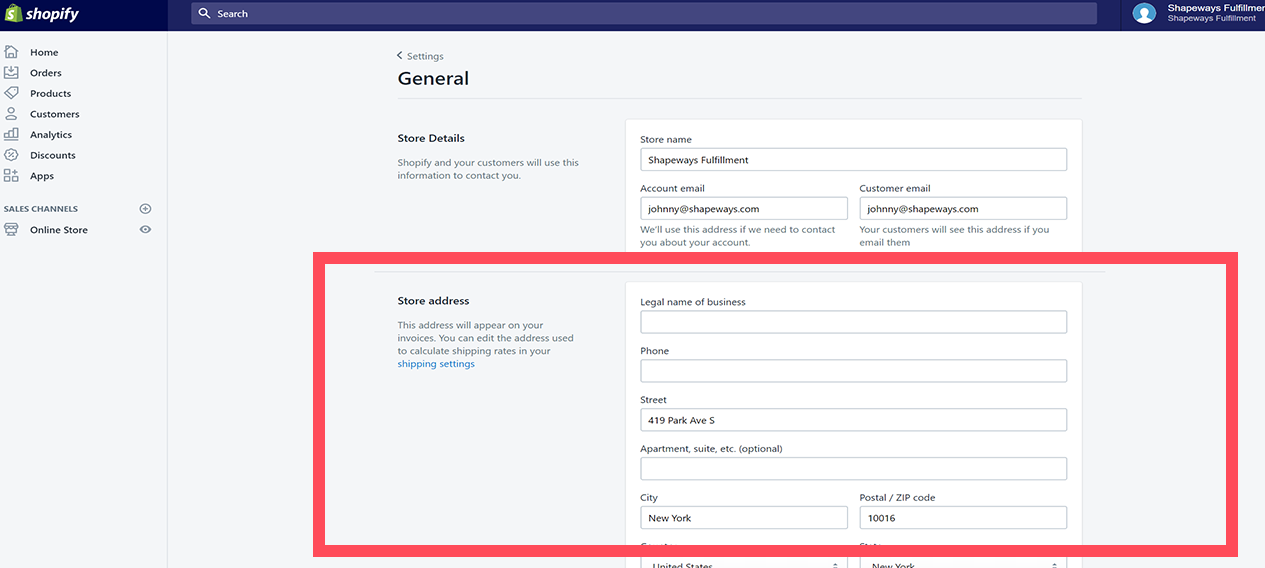
  • Ship orders to me means that Shapeways will send all orders to you first. This will allow you to complete any assembly, finishing, or packaging that is required before sending it to your customer. If this setting is selected, Shapeways will send it to the Store Address in your Shopify settings.

  • To update the Store Address, go to your Shopify Settings and select General.

Decide how you want your orders to be shipped by Shapeways.

  • Choose cheapest shipping option means that every time a Shapeways order is placed, it will default to the cheapest shipping option.
  • Choose fastest shipping option means that every time a Shapeways order is placed, it will default to the shipping option with the shortest delivery time. If several options have the shortest delivery time, it will default to the cheaper option.

  • You can view the shipping rates and delivery times on Shapeways.com. The address used for calculating the shipping rate is determined by the Fulfillment Method setting.

Getting Help from Shapeways

The Shapeways team is here to assist at any stage during the setup. For help, just email storefronts@shapeways.com.


The post How to Set Up the Shapeways Fulfillment App for Shopify appeared first on Shapeways Magazine.

Letter from the CEO – Changes to Shapeways Pricing

Shapeways Community:

This is an exciting time at Shapeways. We are committed to providing the community with the leading platform to design, make and sell with the most innovative technologies. This includes the recent announcement of the Fulfilled by Shapeways Shopify integration and the Stratasys J750 multi-material color 3D printing. And we are in the process of re-launching our entire “Design with Shapeways” platform and re-engaging designers in a better experience to support creators to make their ideas real.

In order to focus on this R&D and invest in developing new technologies and services, Shapeways has also been evaluating parts of our business model that are not profitable, sustainable, or competitive and require change. This includes price.

Below is a detailed explanation of what is changing and when. We also provide some context of how we approached it and why. If you have additional questions, please reach out to service@shapeways.com or your managed account team member. We are here to help.

What have we been doing so far?

Earlier this year we initiated testing of a new pricing algorithm on a subset of new accounts.  We used this opportunity to test, adjust, change the new model without impacting the entire community.  The new pricing algorithm calculates price in an average of 15 seconds vs the historic pricing model which averaged >20 minutes.

What are the variables in the new model?

The variables that are included in the new model are the same parameters that we have used in the past: material volume, machine volume, bounding box measurements, part count… and we are adding an additional variable:  manufacturing speed. The new model also implements “minimum” pricing to cover the cost of the labor on small parts and new pricing on finishes to better reflect the cost structure required to process the finish.

How will this impact price?

Algorithm Change – The intent of the new algorithm is to recreate our existing model, in a more simple way to enable less processing and faster price generation.  With this change, there are some differences. We have worked to minimize the variability between the old and new model, resulting in an average price variance of less than +/- 5% change.

Minimum Pricing – We have added minimum prices per part.  Small parts require similar labor, processing, and handling as large parts and we need to adjust price to offset those costs.  

Finish Pricing – We have evaluated the costs associated with finish services and have adjusted our price accordingly to align with the real cost structure.  

Material Pricing – We have increased pricing on Cast Metals, Steels, and Sandstone to align with the cost increases we have received from our vendors.  These increases vary per material.

Manufacturing Speed –  Historically we have not differentiated prioritization in our manufacturing process, giving every part the same priority of production.  With the new model we are offering varied manufacturing priority… starting with Standard & Economy options… and growing to additional offerings over time.  The Standard offering will prioritize parts and ensure delivery within our current standard manufacturing time, while Economy will not be prioritized and will be manufactured when capacity is available allowing for a low cost option for parts that don’t require a specific delivery time frame.  Please note: we will still be providing ranges for delivery dates. For the new economy option, the maximum time for production may be longer than you have historically experienced. This is because of the new capacity variable.

Shipping – We are also making adjustments to our shipping pricing to align with current cost rates with our vendors.

When will this roll out?

We will implement the new pricing October 22, 2018.

How will this affect the marketplace?

All models that are currently in the marketplace will be grandfathered into their existing pricing until 2019.

Thank you as always for your support, especially through this change.

Greg Kress
CEO of Shapeways

The post Letter from the CEO – Changes to Shapeways Pricing appeared first on Shapeways Magazine.

INTERVIEW: Biologic Models founder Casey Steffen on the Power of the Stratasys J750 Printer

As you may have heard, a few days ago we announced some big news: Shapeways is teaming up with Stratasys, a manufacturer of 3D printers, so every inspired designer and creator will soon be able to access one of the world’s only full-color, multi-material 3D printers, the Stratasys J750. We’re incredibly excited about the partnership and how it’s going to expand our users’ abilities to innovate and turn their most extravagant ideas into reality. In order to help contextualize the power of the Stratasys J750, we spoke to a member of our creator community about what the collaboration means for him.

Casey Steffen is the founder and director of operations at Biologic Models, a company that transforms the invisible beauty of x-ray crystallography data into 3D printed protein models. Millions of times larger than their actual size, Biologic Models explain the nature of health and disease taking place on the molecular landscape, visualizing the unique properties of each molecule and protein interactions.

The Best of Both Worlds

The Stratasys J750 is the best of both manufacturing worlds, full-color 3D printing combined with high-quality transparent plastics. This is exactly what my customers want.

Visualizing protein data derived from an x-ray crystallography dataset as a physical model can be difficult to design. Because of the intrinsic complexity of protein data and the unpredictable overhangs, few 3D printers can handle the job of creating protein models. To complicate the design process even further, sometimes the most important structures are hidden inside the protein, making them inaccessible to the viewer.

For this reason, customers often request that a protein be visualized by its ribbon backbone structure instead of its external surface. This solves the occlusion problem, removing the visual barrier of the exterior surface and revealing the internal protein anatomy. These twisting, folding structures let the customer find hidden residues, but it comes at the cost of structural stability. The ribbon models are very fragile and prone to breaking. Dropping or setting down these delicate models without care could be catastrophic. The best way to visualize delicate internal protein structures is to print them inside of completely transparent plastic, just like the J750 can.

Multi-color Printing

Then there is the need to print in multiple colors. A protein model printed in a single color may be aesthetically beautiful to look at but it has very little value beyond that intrinsic beauty. Making sense of a single-color protein model is like trying to make sense of popcorn — one part looks exactly like another.

Color lets me tag important amino acid residues that drugs might bind or identify where and how a protein is mutating. Color-coded scientific models immediately become more useful tools for communication. When you color-code different parts of a model based on the properties of the molecule, you add an additional layer of information onto the object, using color to describe how one portion of the protein might move or interact with a neighboring protein. With a color-coded model, an educator can easily explain how a certain drug functions, the property of the protein, or how mutation changes protein behavior by pointing directly to a color-coded spot.

Color 3D-printed protein models paint a more vibrant picture of an otherwise invisible molecular universe. Transparency and color coding are necessary features to create high quality, durable models. The J750 tackles these design and manufacturing challenges head on.

The Beginning of Biologic Models

The first 3D print I ever created was of my favorite protein, oxygenated hemoglobin, the protein inside red blood cells that transport oxygen throughout the body. The model was beautiful — you could see every atom of hemoglobin, perfectly round, each sized according to its atomic size. Knowing exactly where to look, I could point out the structural units that bind oxygen molecules but I couldn’t point out the oxygen molecules deep inside the protein. So, as beautiful as the opaque 3D print was, I couldn’t point out the thing that made the model important. It became immediately clear that color coding was going to be necessary to make sense of the model.

That night I posted photos of the hemoglobin on my blog. The next week my first customer put in a bulk order for 50 hemoglobin models. I was through the roof with excitement. That order started a dialog between myself and a colleague who designed action figure toys. We talked through how we could adopt the manufacturing processes used to create action figure toys to lower the hemoglobin’s price point and solve our coloring problem. By casting pieces in multiple transparent colors, we could finally visualize the true sophistication and beauty of hemoglobin. Not long after, Wired wrote a short piece about our collaboration and the creation of the first “molecular action figure toy.”

High-Quality Prints, Shorter Workflow

The entire process took six months of trial and error to segment the model into parts that could then be cast from molds. The result was a scientific model far superior than I could have ever thought possible. The problem was that most customers don’t want 50 models — they only want one or two. While we had solved the problem of manufacturing protein models in bulk with color coding and transparency, the entire process far exceeded the budget of a customer to create a single 3D print.

The only reasonable solution was to begin printing in opaque, full-color sandstone. Full-color sandstone printers create beautiful 3D models, but the rough surface properties take away from their overall aesthetic. The intrinsic reflective and refractive properties of plastic immediately convey a higher sense of material quality than full-color sandstone and increase the model’s value as a work of art. When customers want a beautiful protein model to display in their lobby or museum, the J750 is the only printer I would consider using.

Thanks to the J750, I will be able to print multi-colored transparent scientific models while completely eliminating a costly and time-consuming fabrication and assembly process. It’s a game changer for me and my customers.

The Stratasys J750 printer is available now to select customers, with a full launch expected in 2019. Interested? Join our waiting list. 

The post INTERVIEW: Biologic Models founder Casey Steffen on the Power of the Stratasys J750 Printer appeared first on Shapeways Magazine.

2018 TCT Hall of Fame Inductees and 3D Printing Award Winners Announced

This year’s TCT Show, held in Birmingham as usual, ended earlier this week, and yielded many announcements about new 3D printing materials, software, and of course, 3D printers and their associated hardware. Additionally, the annual TCT Awards was held for the second time during a gala dinner at the Hilton Birmingham Metropole on Wednesday. British actor and presenter Robert Llewellyn hosted the nearly 300 guests at the awards, which celebrates, according to TCT Group owner Rapid News Publications Ltd, “the people, technology and collaborations behind the best in design-to-manufacturing innovation.”

There were 14 competitive award categories, and the TCT Awards recognized the partners in many collaborative projects, in addition to the designers, technology providers, and engineers. Three more 3D printing industry leaders were also inducted into the TCT Hall of Fame in honor of “their contribution to the industry and to the growth in technology adoption.”

“Once again it was a privilege to share an evening with so many truly exceptional people,” said Duncan Wood, Chief Executive of Rapid News. “All of the winners are to be congratulated for their successes, and of course in particular the Hall of Fame inductees need a special mention, their innovation, entrepreneurship and commitment has played a huge part in the development and success of the industry.

“I must also thank our sponsors 3ecruit, as well as our supporting partner, Innovate UK for their endorsement of the event and of course our judges. The TCT Awards night is fast becoming THE night of the year for the industry and we are looking forward to the 2019 edition already!”

The first of the new TCT Hall of Fame inductees is Dr. Carl Deckard, who invented and developed Selective Laser Sintering (SLS) 3D printing technology while based at the University of Texas. Together with his former professor Joe Beaman, Dr. Deckard co-founded DTM Corporation, which was later purchased by 3D Systems, to commercialize SLS 3D printing.

The second 2018 inductee into the TCT Hall of Fame is application specialist and process pioneer Greg Morris. In 1994 he founded Morris Technologies, a specialist AM services provider, which was purchased by GE Aviation in 2012, along with sister company Rapid Quality Manufacturing. His work in developing metal 3D printing applications and processes has increased their adoption in the aerospace and medical sectors, and he distributes his knowledge through his involvement in the speaking circuit.

Professor Emanuel ‘Ely’ Sachs, who invented binder jet printing at MIT in 1989, is this year’s final TCT Hall of Fame Inductee. Professor Sachs, who is on the leadership team of Desktop Metal and still teaches at MIT, actually coined the phrase ‘3D printing’ at that time, and binder jetting technology is a building block for much of the market’s current technology.


As for the rest of the TCT Awards, Project MELT, with its tech lead listed as BEEVERYCREATIVE, won this year’s Aerospace Application Award, while the winner of the Automotive Application Award was the BMW i8 roadster SLM bracket by tech lead SLM Solutions.

Vitamix nozzle at RAPID 2018 [Image: Sarah Saunders for 3DPrint.com]

The Vitamix nozzle by Carbon won the Consumer Product Application Award, while the winner of the Creative Application Award was the Embrace jewelry collection by Cooksongold for Boltenstern. SPEE3D won the Hardware Award – Non Polymers for LightSPEE3D, and the Hardware Award – Polymers went to E3D for its Tool-Changer.

Axial3D won the Healthcare Application Award for the use of its pre-op planning model aids in a world-first surgery at Belfast City Hospital, and Trinckle 3D won the Industrial Product Application Award for its mass customization of copper inductors. The Materials Award – Non Polymer went to SABIC for its EXL AMHI240F 3D printing filament, and NanoSteel took the Materials Award – Polymers for its BLDRmetal L-40 steel 3D printing material.

3D Systems was the winner of the Metrology Award for its Aircraft Damage Assessment for Easyjet, and Steros GPA Innovate S.L. won the Post-Processing Award for its DLyte: Metal DryLyte Electropolishing. Materialise won the Software Award for its e-Stage Metal, and this year’s Rising Star Award was given to HiETA Technologies Ltd.

To learn more about the winning projects and companies, and see the Highly Commended projects, visit the TCT Awards website.

Discuss the TCT Awards and other 3D printing topics at 3DPrintBoard.com or share your thoughts in the comments below.

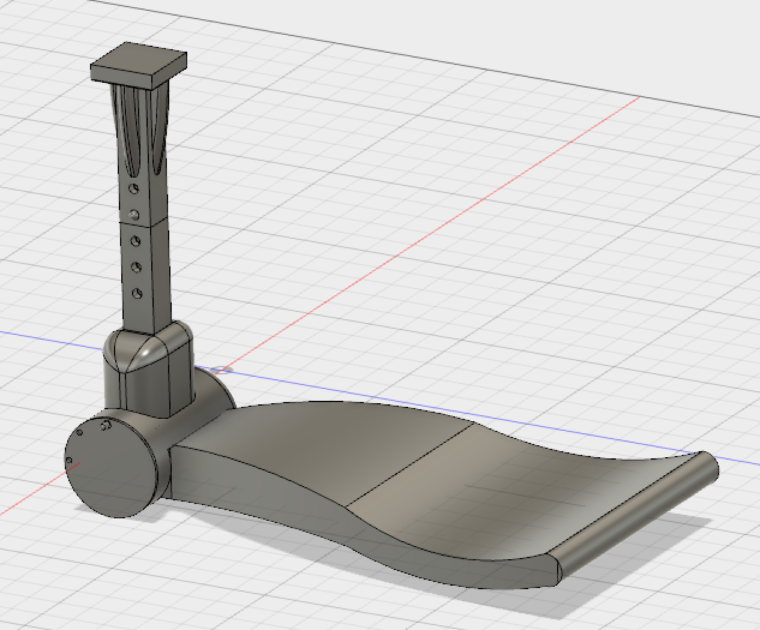
Triton Dynamics: 3D Printed Swimming Flipper for Amputees

Designing a prosthetic of any kind is far from an easy task. But developing one with a pivoting ankle that’s functional enough to use in water? That requires serious research and development. Thankfully, with the help of 3D printing and Shapeways’ EDU program, Shawn Jones, a former design student at Northeastern University, has been able to take that concept and make it into a reality. Jones has plans to bring to market the swimming flipper, named Triton Dynamics, to enable below-the-knee amputees to swim again.

“My first goal was to create an entire prosthetic leg and flipper,” Jones told Shapeways. “This later turned into just developing a pivoting ankle with a mechanism to engage a flipper once in the water. After several years of research, we came to minimizing the swimming flipper due to the ergonomics of both walking and swimming. My team of engineers has concluded that the main pain points were the lack of spring while walking and the limited propulsion of the flipper while in the water.”

With the help of the EDU Grant

With his goals in place, Jones applied for and received an EDU grant from Shapeways. With the assistive funding he received, he was able to develop the first rotational device for the flipper.

“This item was very helpful for when I took it to Northeastern University’s Generate group. They are a student-run organization [that] help out entrepreneurs looking for engineering assistance. They were able to see what I originally designed and saw the actual 3D printed model. This helped them realize the design in a physical space as well as find out the areas of improvement in the design.”

Learning the complexity of 3D design

And although Jones had taken some 3D design courses while at Northeastern University, his experience in the craft was limited, meaning he had a lot to learn when tackling the prototype of Triton Dynamics.

3D rendering of one swimming flipper

3D rendering of the Triton Dynamics swimming flipper

“I did not spend a lot of time working in the 3D printing environment in college. This means I had to teach myself how to use the software and equipment. This took a lot of extra time. I also did not have a mechanical engineering background, so I had to search for a team of engineers who had the same passion for helping others. I luckily found a handful of students who I, today, continue to work on this project with.”

Now, after working with his time tirelessly on Triton Dynamics, he’s hoping to turn his project into a business.

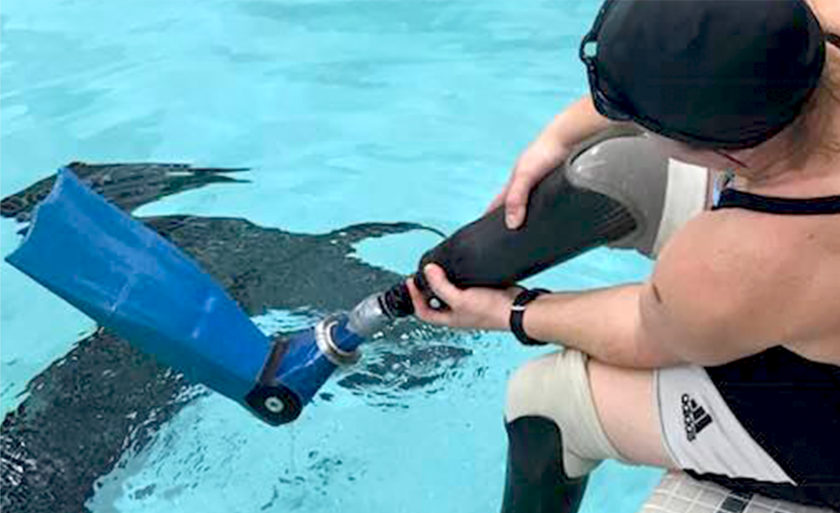
Army veteran Christy Gardner of Lewiston, Maine, trying on the Triton flipper.

Army veteran Christy Gardner of Lewiston, Maine, trying on the Triton flipper.

“I am working on turning the project into a business now. This comes with patenting the prototype as well as making sure everything is FDA approved. This is all quite a new learning experience for me. I am hoping to get a final prototype finished by 2019.” he said.

Solid advice for aspiring designers like himself

In terms of advice for aspiring designers nervous about tackling the world of 3D printing, Jones said, “Don’t give up. It can be very frustrating starting off because every measurement has to be exact. Make sure you measure several times before sending it to the 3D printer. Remember that the material may expand during the process, so make the inverted piece a little smaller than the exact fit. I wish I knew that before I printed an entire project. Be creative, don’t let restraints get in your way. Always look for ways to push the limits of 3D printing.”

Jones added, “My research project showed me that what I was working on could be something worth continuing. I had a lot of positivity within the university and throughout the greater Boston area while working on this project. We want to truly enhance the health and well-being of below-the-knee amputees by giving them the opportunity to explore and continue aquatic activities as a means of physical and mental therapy and the enjoyment of life. Let’s help bring my wounded brothers and sisters back into the water.”

Are you a student or a teacher?

You may be eligible for a 15% discount through our EDU program. Learn more.

The post Triton Dynamics: 3D Printed Swimming Flipper for Amputees appeared first on Shapeways Magazine.

3D Printing Strong and Sturdy Models

Sometimes a digital 3D design looks great in your software, but just can’t make it in reality. Here in the real world, a 3D model can only be so thin or fragile; models with very skinny wires or delicate parts might break after printing, or worse, not be able to 3D print at all. In this post, we’ll examine how auto-checks, human checks, and prototyping can help you design models that print successfully and are sturdy enough to handle repeated use or handling.

Auto-Checks

Shapeways provides guidelines and auto-checks to ensure that your uploaded models are printable in each material. For example, models created at Shapeways in Versatile Plastic are 3D printed in a durable nylon material in large batches using an industrial Selective Laser Sintering (SLS) printer. Versatile plastic has an intense post production process that includes extraction from powder and other models, cleaning and polishing, and even dying in different colors. Thin or narrow models can be easily broken or separated during post production. You can refer to the Design Guidelines for Versatile Plastic to determine how thin you can make the wires in your model. Here’s what those guidelines say about two success parameters, wall thickness and wire thickness:
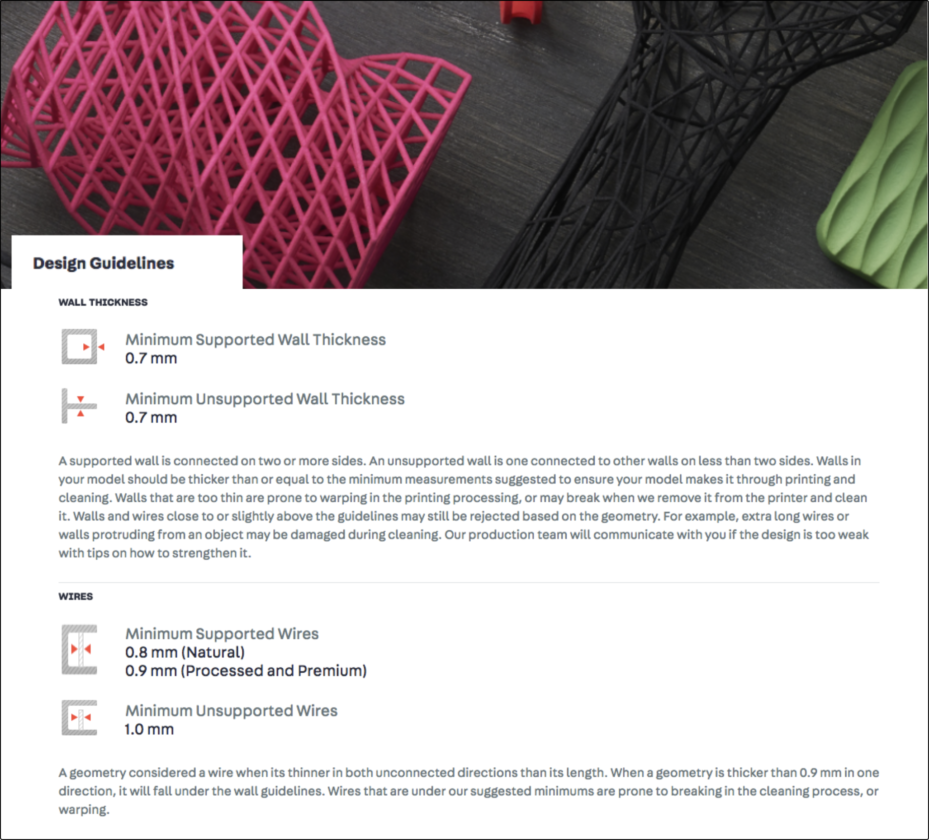
In the guidelines above, “walls” are flat surfaces in your model and “wires” are more like strands. Notice that the recommended minimum for supported wires (those that connect to your model nearby on both ends) is 0.8mm. Processed models are put through a polisher, and Premium models are polished even more, so their minimum is higher: 0.9mm. Finally, the minimum for unsupported wires (which don’t inherit as much stability from the rest of the model) is even larger, at 1.0mm.

After you upload your model, Shapeways will perform a series of auto-checks to measure the thickness of walls and wires, among other things. If you click on “View 3D Tools” (or “View Issues”, if your uploaded model failed any checks) from within any Material view of your model, Shapeways will show you the results of these auto-checks. Here’s what that looked like for an early demo version of our Deltoidal Icositetrahedron model:
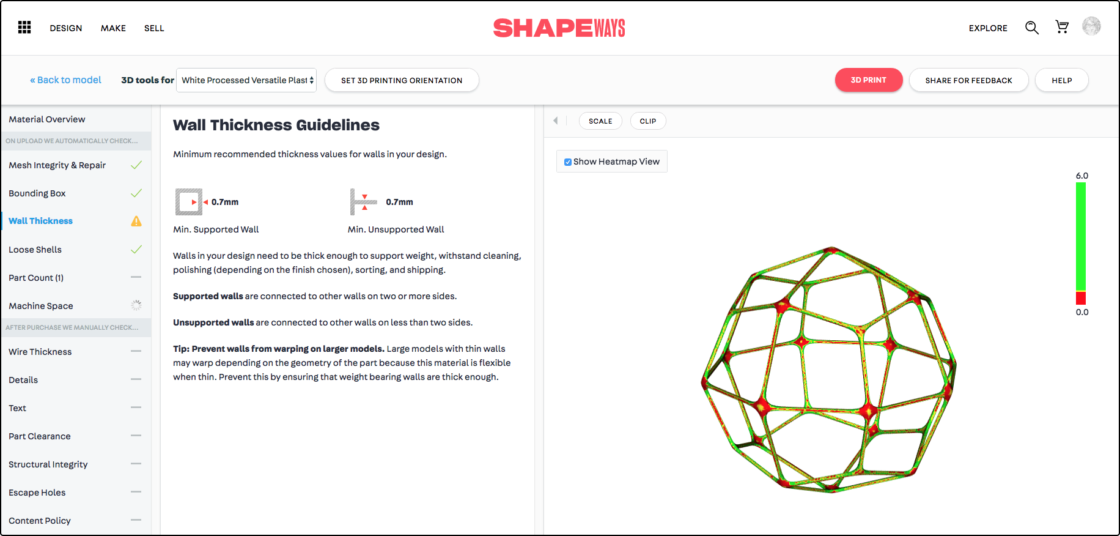
Although this model passed the Wire Thickness check, it fails the Wall Thickness check. The flattened notes at the vertices, and even some of the long wires, are considered “walls” here, and they aren’t thick enough to get over the 0.7mm minimum thickness requirement.

Checking and Fixing Thickness Issues

You can check the thickness of your model in whatever design software you used to create it. Or, another easy way to determine the minimum thicknesses of your design is to import your model to Meshmixer and use the Thickness tool in the Analysis menu. You can then use Meshmixer to make your design thicker, if needed, by selecting the model and then using Edit > Extrude (using the Normal Direction) or Edit > Offset to expand your model outwards or inwards. To thicken only selected parts of your model, you can take the more targeted approach described in our previous article Tutorial Tuesday 50: Using Meshmixer to Make 3D Models Thick Enough to 3D Print.

Prototyping

Even if your model passes printability checks, it’s worth printing a demo model to make sure that everything is okay. Sometimes, weak geometry can’t be determined until a model is actually printed and in your hand. Even if the print comes out successfully, it may be too delicate to hold up to its intended use. After our example model failed printability checks, we redesigned it so that it would just barely pass the checks and print successfully. It was a beautiful model, but it wasn’t long before it broke and warped:
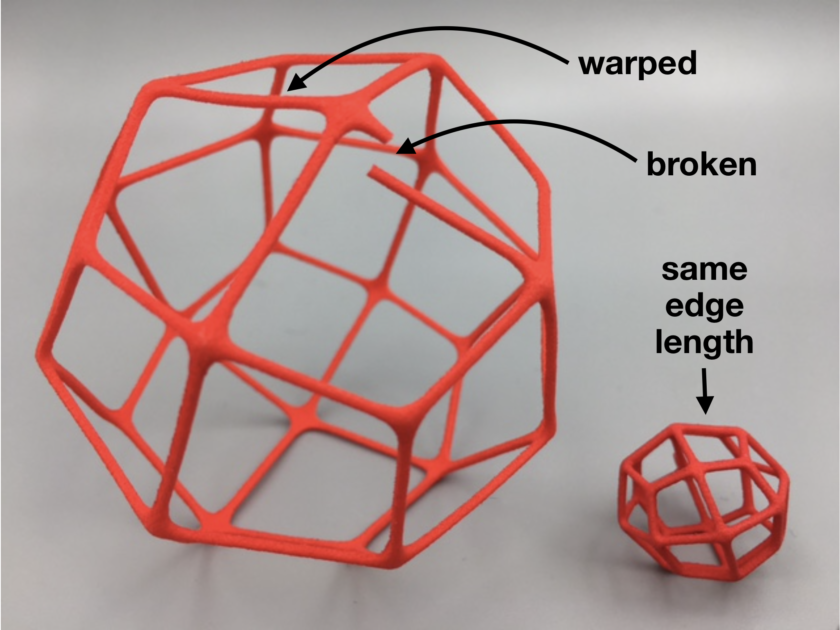
I guess the moral of this story is: For best results, don’t try to just *barely* meet the print requirements; rather, make sure you are safely above them.

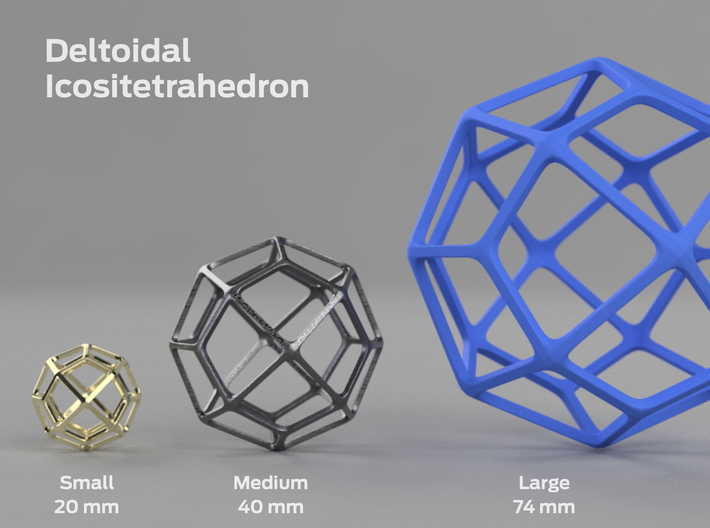
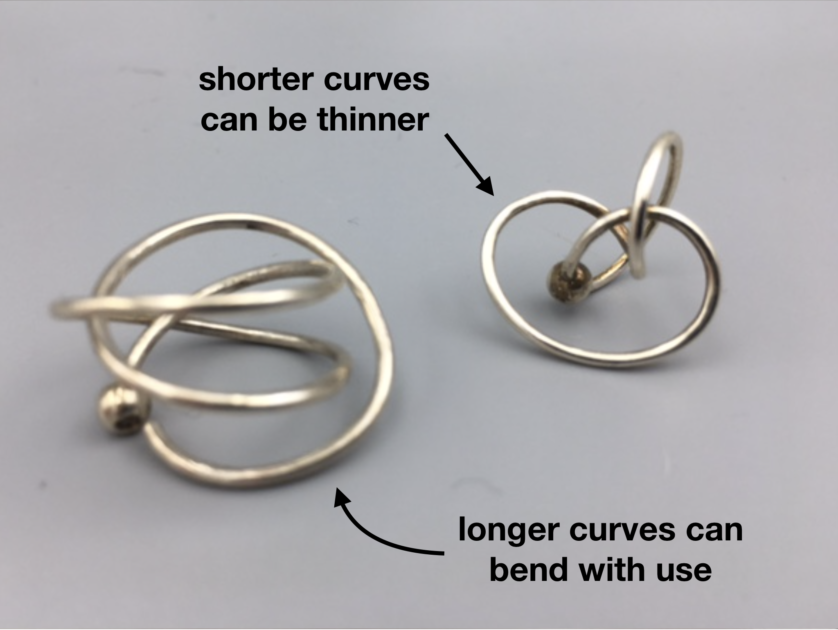
It’s worth pointing out that the size of the model itself matters as much as the thickness; the two go hand-in-hand. In the image above, the smaller model has the same wire thickness but is actually quite sturdy. The larger model is weaker because the wires are longer and have to hold up to greater stress when the model is handled. This means when prototyping, you can’t always get an accurate impression of the strength of your model by shrinking your model down, or designing a smaller version. Think about it this way: a wireframe model the size of your head will need a larger wire thickness than a model the size of your pinky!

In the end, we decided to thicken up our Deltoidal Icositetrahedron model significantly. The final version looks like the blue model on the right in the image below. It’s much stronger, and the cost of printing was only increased by a few dollars.
Human Checks

Sometimes models pass the online checks at Shapeways, but then fail a secondary check when they are actually ordered for printing. That’s because actual human beings at Shapeways check your model manually while they prepare it for 3D printing. They check for things that require a lot more expertise than the automatic computer checks, like how large your model is, how the different pieces of it fit together, and a lot of things that you or I might not think of. If they notice a problem then they will email you, and try to suggest ways that you can modify your model to increase the likelihood that it will print successfully.

Keep in mind that the printing engineers at Shapeways want to make sure that your model can print correctly not just once, but over and over. A model that passes the auto-checks and listed guidelines may have weak areas that may not break on the first print, but are likely to break the second or third time. This means that even if your print comes out well in a “Print it Anyway” situation, it still might not be stable enough to offer as an item in the Marketplace. Variations in print stability can arise from small differences in the printing and finishing process, like how the models are packed or oriented in the machines, or how it interacts with other models in the polisher.

As an example, consider our Hoop Knot Earring:
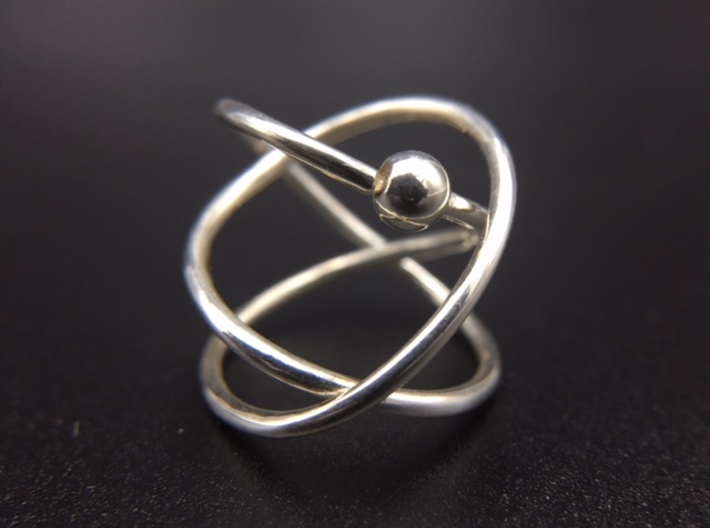
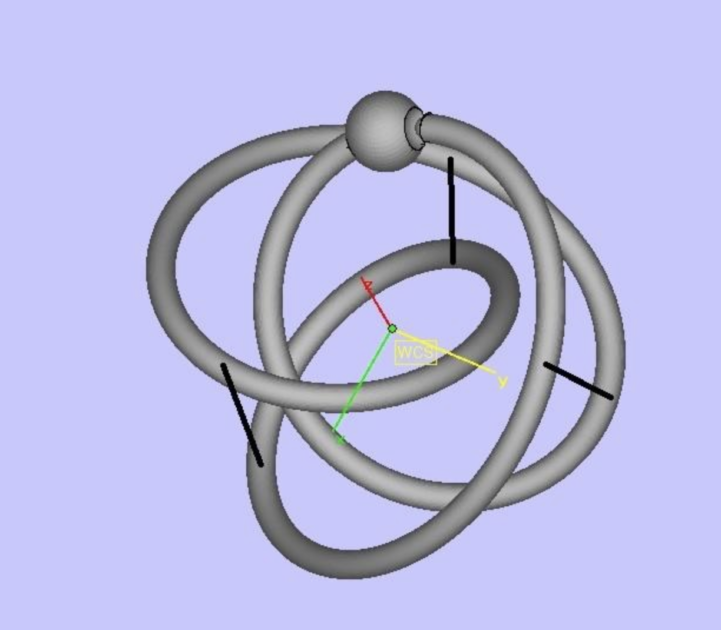
According to the Design Guidelines for Silver, we needed to make the wires at least 1mm in diameter. However, it’s best to exceed that significantly; consider that Silver models from Shapeways are 3D printed in wax, cast in Silver using lost wax casting, and then finished and polished. All of those procedures could damage a model with weak geometry. When we uploaded our Hoop Knot Earring for printing, it passed all of the auto-checks. But when we tried to order a print of it in Silver, the kind and knowledgeable human engineers at Shapeways said that the geometry of our model was too weak. They suggested adding connectors and even emailed me this helpful illustration:
Of course, in this case I couldn’t add connectors since that would have ruined the design; instead I had to make the wires thicker to give the model more stability. That resulted in the print shown below on the right. Later I tried to make a larger version, shown on the left, but an interesting thing happened; since the wires had to travel further, they were more prone to bending and becoming misshapen when I opened and closed the earring. Even though the larger model had thicker wires, in the end it didn’t work as well as a functional item.
In the end, you’ll have to use a combination of your own design analysis, automatic printability checks, manual printability checks, and physical prototyping to successfully print delicate or geometrically complex models. If you’ve got your own tips and tricks that help you through this process, let us know!


The post 3D Printing Strong and Sturdy Models appeared first on Shapeways Magazine.

3D Printed Robots – A Case Study in Democratizing Mechanics

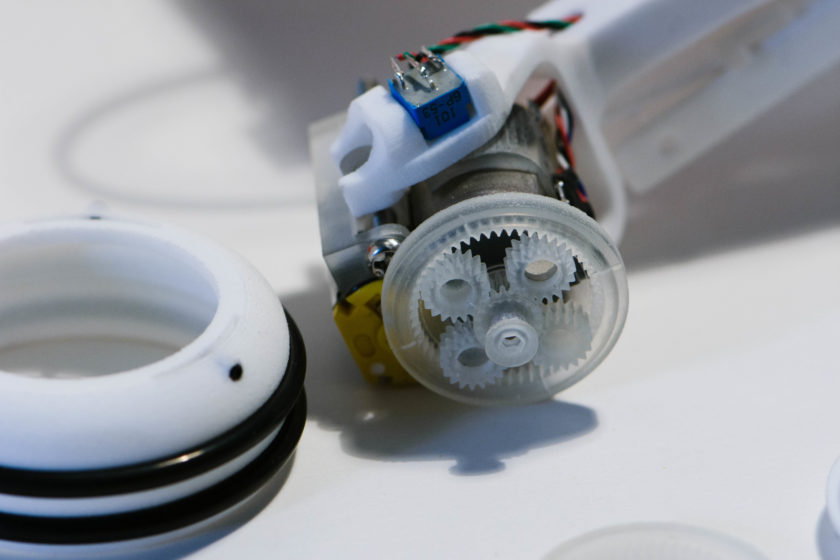
The task: Create an affordable gearbox to assist in robotics, wind turbines and other fields that could deliver a high reduction ratio. The challenge: Making them available via 3D printing in a simplistic way. But despite the inevitable obstacles that stood in their way, Nicolas Besuchet and Sugiyama Hiroyoshi were ready to tackle the project at hand.

“Although we were initially attempting to develop an interesting gearbox design by simply prototyping using 3D printing, we shifted to developing gearbox designs for 3D printing since the printed quality was just so damn good,” they told Shapeways.

The task at hand

Besuchet and Hiroyoshi, students at Waseda University in Tokyo, were not completely foreign to the world of 3D printing before tackling their thesis project, the 3Domnivore Robot. Besuchet had used the method of prototyping before, in fact, and knew it would be a great way to attack the trial-and-error process of their gearboxes.

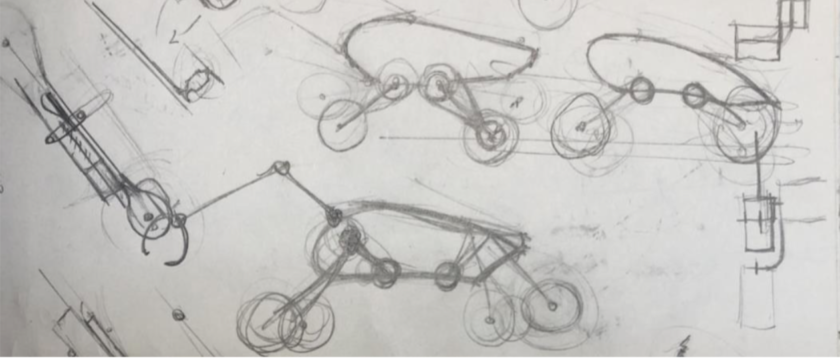
Initial sketches of the 3Domnivore Robot on paper

Initial sketches of the 3Domnivore Robot

“3D printing with inkjet technologies enabled us to drastically reduce the size of our pieces and their costs. We then quickly found out that inkjet printing would give us sufficient resolution for creating miniature gears. Due to the fact that inkjet has a wax support material, this means that the pieces risk less of deforming themselves while being printed. In other words, through SLS nylon we discovered we could reliably print large parts while inkjet allowed us to achieve the same on a much smaller and cheaper scale.”

Setting strong goals in place

Once the Mechanical Engineering majors knew that 3D printing was the way to go, they laid out their main goals for the project. For starters, they wanted anyone to be able to 3D print the gearboxes. On a similar note, they wanted to show the complexities that can be designed through 3D printing. And above all, their main goal was to make a product that was cost-efficient and functional.

“Currently, high reduction gearboxes are in high demand in applications such as robotics, wind-turbines, and many more domains,” they said. “In robotics, for instance, a compact high-reduction gearbox (harmonic drive) can go up to $2000 for just one gearbox. With cheaper gearbox designs, one could envision affordable medical exoskeletons for example. Also, current solar panel farms employ expensive sun-tracking gearboxes which almost doubles the installation costs. This explains why sun-tracking is rarely used in solar farms. Yet with a cheap gearbox design, one could readily leverage sun-tracking to deliver an additional 40% solar energy capture boost.”
The inevitable bumps along the road

With their goals and mechanics in place, and the Shapeways EDU Grant to help fund and assist their project, Besuchet and Hiroyoshi were prepared to create the 3Domnivore Robot. Of course, the process came with its fair share of hiccups.

“This really was three projects nestled within each other. This made it very challenging to manage all that complexity. For instance, problems with our gearbox designs also impacted the completion of the robot. In the same vein, the 10 gearboxes of the robot  [depended on] each gearbox and sensor to work very reliably—something which took us quite some time to achieve!”

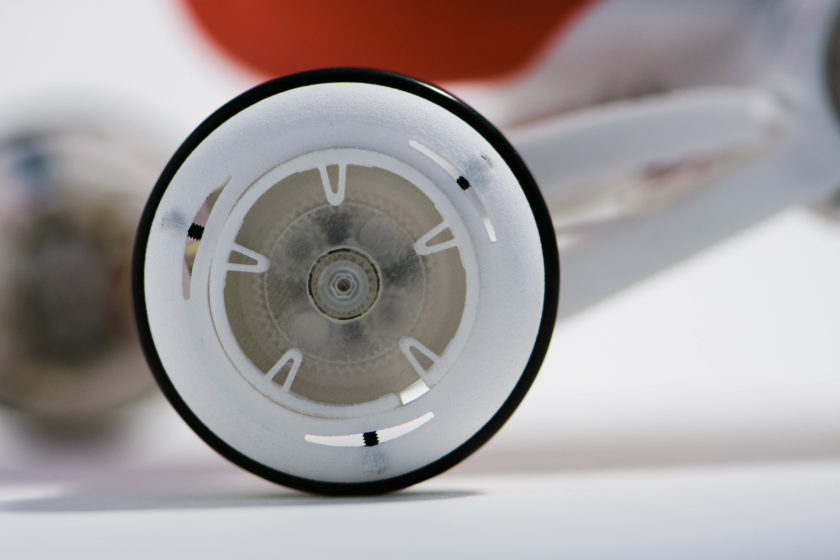
3Domnivore Robot wheel: Front view

3Domnivore Robot wheel: Gearbox

But by pushing through the difficulties, interesting discoveries were made, particularly about the precision of 3D printing and design.

“The most unexpected discovery was how precise 3D printing had become. Just a few years ago, this entire project would have been unfeasible! We started off believing we would just be able to make some quick and dirty 3D printed prototype. We then discovered we could do quite clean and precise prototypes through 3D printing. And now, we’re starting to believe we could do pretty much any mechanism we want, provided that it be small enough to be sufficiently cheap and not impose excessive stresses on the material.”

Their journey with 3D printing has only just begun

In the end, the finished product was nothing short of awe-inspiring, something that both students were incredibly proud of. And although they may not plan to turn their project into a business, they hope their story inspires others, just as they were inspired to continue using 3D printing in the future.

“Back in the lab, we’re currently attempting a medical hip rehabilitation exoskeleton design which hopefully anybody could build with minimum tooling. There, we’re blending laser-cutting and 3D printing while leveraging on craftsmanship to keep the prices low. We’ve just completed the first prototype with promising results and are now preparing that design to be motorized. Again, the idea is to show the potential of 3D printing and laser cutting in democratizing mechanics.”


Are you a student or a teacher?

You may be eligible for a 15% discount through our EDU program. Learn more.

The post 3D Printed Robots – A Case Study in Democratizing Mechanics appeared first on Shapeways Magazine.