Every Thursday is #3dthursday here at Adafruit! The DIY 3D printing community has passion and dedication for making solid objects from digital models. Recently, we have noticed electronics projects integrated with 3D printed enclosures, brackets, and sculptures, so each Thursday we celebrate and highlight these bold pioneers!
Have you considered building a 3D project around an Arduino or other microcontroller? How about printing a bracket to mount your Raspberry Pi to the back of your HD monitor? And don’t forget the countless LED projects that are possible when you are modeling your projects in 3D!
Researchers from Switzerland explain more about how metals dissolved and re-deposited in liquid solvents can further AM processes by promoting fabrication without post-processing. Their findings are outlined in the recently published, ‘Multi-metal electrohydrodynamic redox 3D printing at the submicron scale.’ This new method allows users to create polycrystalline multi-metal 3D structures from a single nozzle with multiple channels.
The authors point out that additive manufacturing on the microscale is very popular, and especially with expanded capabilities in relation to materials. Users want more—and especially on the industrial level; realistically though, challenges still abound:
“…first, common multi-nozzle approaches enforce extensive practical limits to the complexity of the 3D chemical architecture; second, as-deposited properties of inorganic materials, mostly dispensed as nanoparticle inks, are often far from those demanded in microfabrication, and the hence required post-print processing largely complicates many materials combination,” state the researchers.
The ink-free electrohydrodynamic redox printing (EHD-RP) eliminates these issues in metal, with direct printing and combination of materials from one nozzle. The authors say that their new method offers ‘unmatched control of the 3D chemical architecture of printed structures.’ Many different metals can be used in EHD-RP, with both direct and indirect printing possible.
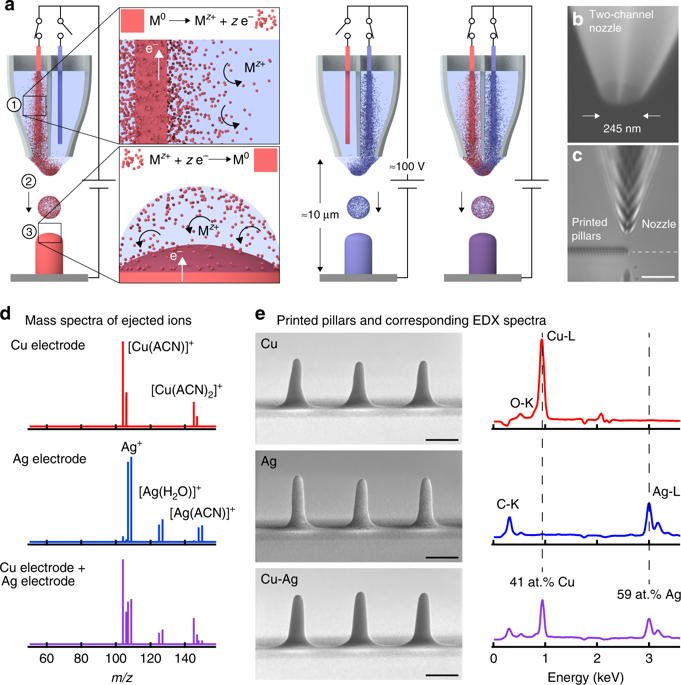
Electrohydrodynamic redox printing (EHD-RP). a Working principle: (1) Solvated metal ions Mz+ are generated within the printing nozzle via electrocorrosion of a metal electrode M0 immersed in a liquid solvent. (2) Ion-loaded solvent droplets are ejected by electrohydrodynamic forces. (3) Upon landing, Mz+ ions are reduced to zero valence metal M0 through electron transfer from the substrate. Switching the oxidative voltage between different electrodes in a multichannel nozzle enables on-the-fly modulation of the printed chemistry (Schematics not drawn to scale: typical dimensions of the electrode wire are 100 μm × 2 cm). b Typical two-channel nozzle. c Optical micrograph of the printing process. Scale bar: 10 μm. d, e Printing Cu, Ag and Cu–Ag from a single, two-channel nozzle. d Mass spectra of ejected ions when biasing the Cu electrode, the Ag electrode, or both electrodes immersed in acetonitrile (ACN). e Printed Cu, Ag and Cu–Ag pillars with corresponding energy-dispersive X-ray (EDX) spectra reflecting the chemical nature of the respective source electrode (background subtracted). The C–K and O–K peaks likely originate from residual solvent and minor oxidation, respectively. The Cu and Ag contents of the Cu–Ag pillars are given in at.% normalised to the total Cu + Ag signal. Scale bars: 500 nm.
The authors mention that while there is very little lateral misalignment during switching, there has been some indication of minor shifting between the two metals. The authors state that this is usually caused because of the nozzle’s asymmetry. Complexity in geometry and fidelity are not as high as the authors would like either, but they state that this is a common issue in EHD-based microprinting techniques.
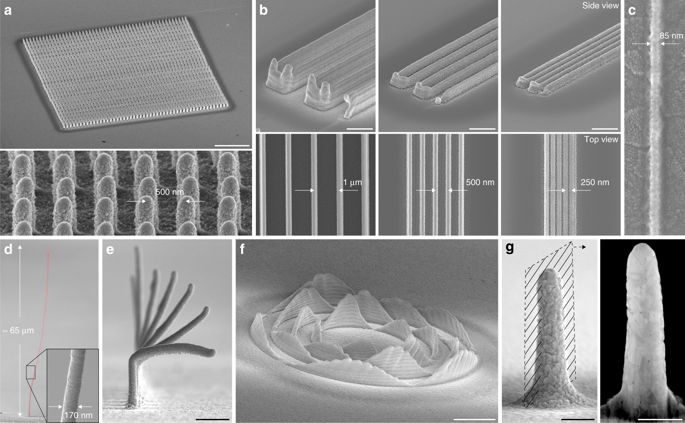
Geometrical performance and as-printed microstructure. a Array of 50 × 50 Cu pillars printed with a point-to-point spacing of 500 nm. Scale bar: 5 μm. b Walls printed at decreasing wall-to-wall spacing, with a minimum spacing of 250 nm. Height: ten layers for the leftmost image, three layers for the others. Scale bars: 1 μm. c Printed Cu line less than 100 nm in width. d Cu wire with an aspect ratio of approximately 400. e Overhangs formed by a lateral translation of the stage balancing the out-of-plane growth rate. The sequence of pillars was printed by increasing the respective in-plane translation speed towards the front pillar, with a maximum speed of 2.1 μm s−1. Scale bar: 1 μm. f Concentric, out-of-plane sine waves printed with a layer-by-layer strategy. Scale bar: 2 μm. g As-printed Cu pillar and corresponding cross-section showing the dense, polycrystalline microstructure. Scale bars: 200 nm
This process also improves mechanical and electrical properties, allowing for potential in applications for manufacturing sensors or actuators, optical metamaterials, and small-scale wire bonding. For this study, the researchers only used three metals, but that number could be increased with the use of nozzles bearing additional channels.
“Thus, EHD-RP holds the potential for unlocking unique routes for the bottom-up fabrication of chemically designed 3D devices and materials with locally tuned properties and a rational use of alloying elements. Such materials could find application in catalysis, active chemical devices, small-scale robotics and architected materials that go beyond single-material cellular designs,” concluded the researchers.
While you may look at a term like electrohydrodynamic redox 3D printing and think things are really getting out there now, the idea behind the process is very simple, but two-fold: to both refine 3D printing and additive manufacturing further—and cutting out the much-dreaded post processing processes still prevalent. Researchers have been working on this issue continually, from creating post-processing hardware, to eliminating post processing from color 3D printing to providing automation for dental printers.
Find out more about electrohydrodynamic redox 3D printing here. What do you think of this news? Let us know your thoughts! Join the discussion of this and other 3D printing topics at 3DPrintBoard.com.
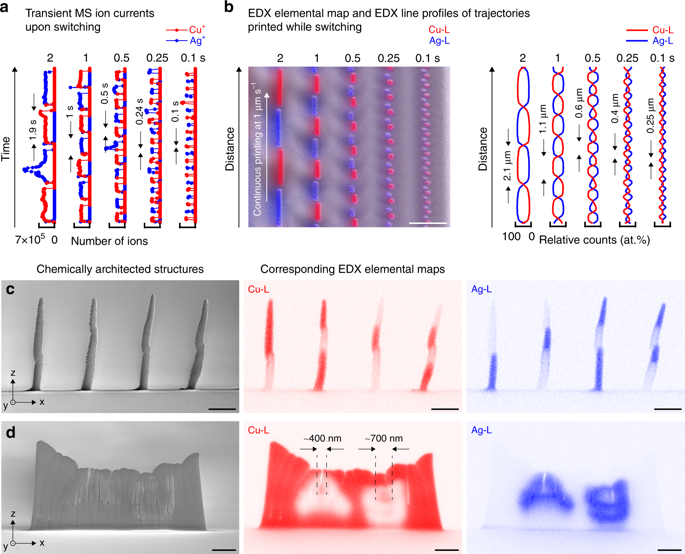
Additive control of the chemical architecture with a single nozzle. a, b Fast switching between two metals printed from a two-channel nozzle. a Summed mass spectrometry (MS) ion currents of Cu+ (red) and Ag+ (blue) cations ejected upon switching the anodic voltage between a Cu and a Ag electrode at different intervals. Switching between two ejected ion species is highly selective. b Overlaid SE micrograph and EDX elemental map of trajectories printed with the same switching profile as in (a) (Cu-L signal, red, and Ag-L signal, blue). The corresponding EDX line profiles show that the switching between Cu and Ag is resolved up to the smallest pulse width. Scale bar: 2 μm. c, d Examples of chemically heterogeneous structures printed using a single nozzle. c Sequence of pillars with different numbers of Cu and Ag modulation periods. Scale bars: 1 μm. d Out-of-plane Cu wall with the letters ‘Ag’ embedded in silver, printed with a continuous layer-by-layer printing mode
While there are numerous calls to action right now for greater quality control programs in 3D printing and additive manufacturing processes, researchers at SUNY Upstate Medical University are more worried about the accuracy of X-ray equipment, and have created 3D printed testing aids. Kent M. Ogden, Kristin E. Morabito, and Paul K. Depew outline their findings in ‘3D printed testing aids for radiographic quality control.’
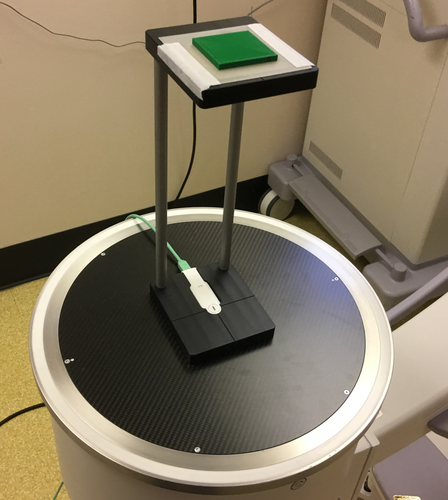
The researchers created testing devices to refine quality control in radiographic and fluoroscopic imaging systems. Objects must be placed accurately, and such aids encourage greater efficiency and repeatability. During this study, they also created a device that can pinpoint the exact position of perpendicular rays. While such testing is important no matter what, especially in the medical field, it is also required and regulated by the state.
Currently, there are five different areas of testing:
Mechanical inspection
Beam geometry tests
Beam quality, tube output, and patient exposure tests
Systems tests
Image quality tests
Testing aids are not always readily available, and sometimes medical professionals must improvise; with 3D printing, however, they can create affordable, custom devices on demand. For this study, the researchers created several different models, using OpenScad for 3D design, and then a MakerBot Replicator 2 or Replicator Z18 printer for fabrication with PLA:
“We have created tools that aid in collimation testing and for general positioning of test articles such as aluminum blocks used for dosimetric measurements and commercial radiographic and fluoroscopic image quality phantoms,” state the researchers in their paper. “Collimation test tools include holders for radiochromic filmstrips that allow for easy positioning on fluoroscopic image receptors, and a newly designed tool to measure the x‐ray perpendicular ray relative to the center of a radiographic image receptor or x‐ray field central ray.”
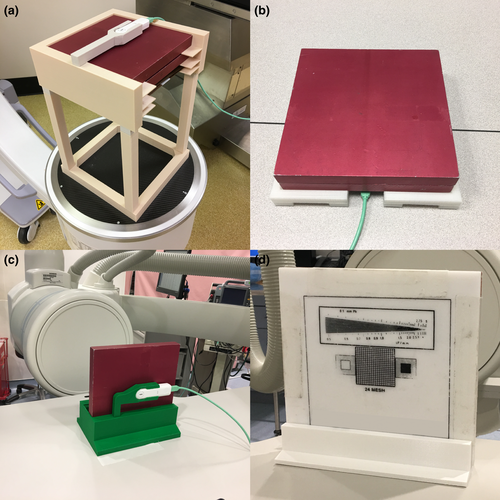
Polylactic acid test article setup for measuring half‐value layer.
PLA, derived from a vegetable base, is an organic compound, and was chosen as the material for 3D printing because of its similarity to tissue. The researchers were intent on preventing the presence of PLA in the X-ray beam as much as possible, but sometimes it was unavoidable; for example, holders for the dosimetry system detector must be in the direct beam during the process. The aids ultimately, however, were found to be lightweight and easy to move from one test site to another, and the authors reported that they have improved testing processes.
“Prior to the development of these tools, we had used improvised positioning aids such as cardboard boxes, blocks of foam, etc. These improvised devices were not very stable, and it was time‐consuming to position test articles and dosimetry sensors at a precise distance from the image receptor and with the dosimetry sensor centered on the phantoms,” said the researchers.
Positioning aids for (a) portable c‐arm fluoroscopes, (b) R/F rooms with under‐table x‐ray tube, (c) interventional c‐arms in the lateral position, and (d) an image quality phantom holder for use in fluoroscopy or radiography.
This project puts all the benefits of 3D printing on full display as the researchers were able to make affordable, customized devices that changed their workflow for the better. The researchers reported one other significant benefit too: the 3D printed test aids are much more hygienic, allowing for the prevention of infection with an easy wipe-down.
“There is no way to disinfect the porous surfaces of cardboard or foam devices to hospital standards,” explained the researchers.
The authors were able to create their models with two spools of PLA (at about $20 per spool). Their designs were also meant to be standard enough so that most users could replicate them if so desired.
“Additive manufacturing is a disruptive technology that has had a large and increasing impact in many domains, including healthcare. Medical Physicists can benefit from this technology in multiple ways, such as the manufacturing of custom QC phantoms, patient specific phantoms for dosimetric purposes, and for prototyping novel equipment‐testing devices,” concluded the researchers.
“We have made these models available for download at https://github.com/Upstate3DLab/3D-Printed-Radiographic-Test-Tools. We have posted the OpenScad code and the generated digital models in. stl format. Users may modify the code to customize the devices to address varying phantom dimensions and to accommodate differences in printer characteristics.”
X-rays and 3D printing have been going hand in hand since the advent of 3D printed models and a variety of different patient-specific devices that can be designed based on CTs and MRIs, from training devices for medical students to using models for reconstructing the eye socket or studying cardiac anomalies. Find out more about how 3D printed aids can be used to test X-ray equipment here.
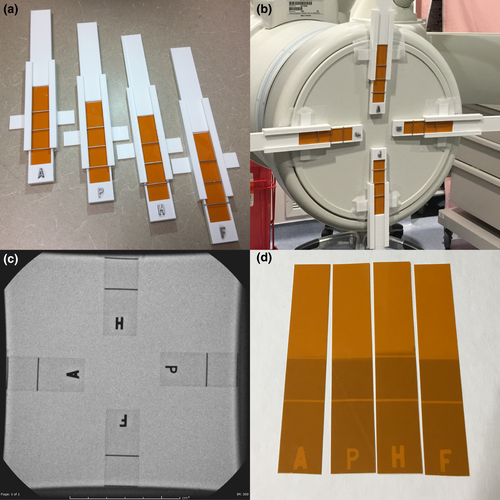
(a) Radiochromic filmstrip holder sets, (b) a typical use case in an interventional room, (c) aligned holders shown fluoroscopically, and (d) the resulting exposed film. Note that the wires in this example were positioned roughly at the edge of the collimator and not at the edge of the image receptor so that they would be visible in the fluoro image.
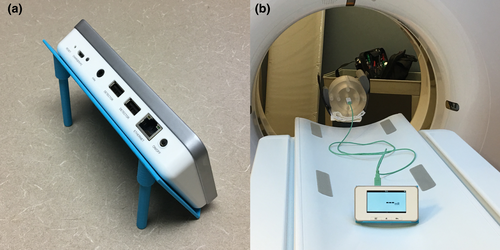
(a) Dosimetry base unit stand, (b) base stand being used in a computed tomography scanner.
This is my second remix of CaseStudyno8’s Anakin Lightsaber. This model is as closely accurate to an actual Graflex flash tube prop that I can get. For all practical purposes, the exterior looks just like the real deal, with the exception of the bunny ears, which I traded perfect accuracy for ease of assembly.
Every Thursday is #3dthursday here at Adafruit! The DIY 3D printing community has passion and dedication for making solid objects from digital models. Recently, we have noticed electronics projects integrated with 3D printed enclosures, brackets, and sculptures, so each Thursday we celebrate and highlight these bold pioneers!
Have you considered building a 3D project around an Arduino or other microcontroller? How about printing a bracket to mount your Raspberry Pi to the back of your HD monitor? And don’t forget the countless LED projects that are possible when you are modeling your projects in 3D!
While porous structures are attractive in many applications today for industries like automotive and aerospace, when created with titanium alloys they ensure strength, corrosion resistance, and the proper amount of density required. Even more importantly, however, lattice structures like Ti6Al4V offer high biocompatibility. Made up of a network of struts that form cells to make lattices, these complex structures are often manufactured with conventional techniques like casting; however, with AM technology, complex geometries can be produced faster and more affordably.
As the researchers point out however, problems can occur in SLM printing when conditions are not properly optimized—resulting in defects due to a ‘mismatch’ between the 3D design and the 3D print. The team set up an experiment for testing parameters and pinpointing a way to improve SLM methods.
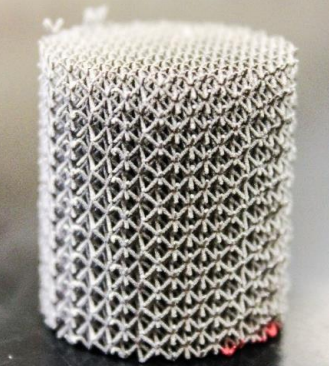
Lattice structure fabricated using SLM
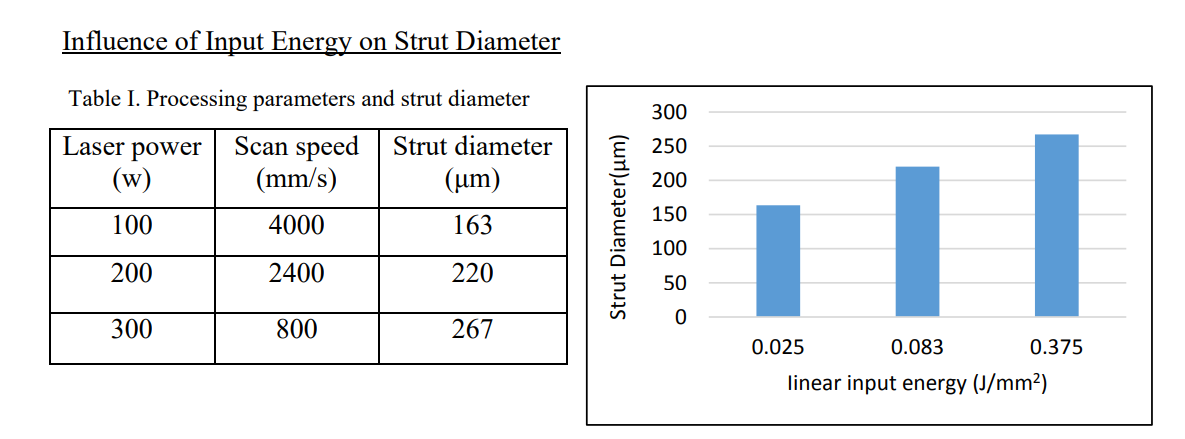
They created a set of structures ranging from 100W to 300W and scan speed ranging 8000 mm/s to 4000 mm/s. Lattices were assessed regarding the effects of input energy on strut diameters, and porosity levels. As they suspected due to compiled data from previous research studies, increased input energy resulted in increased strut diameters:
“This relation is attributed to the fact that inclined struts were built partially on loose powder, which resulted in adhesion of free powder (partially melted powder particles) to the surfaces of the struts. At high input energy condition, the energy transferred to attach powder particles was high enough to result in full melting of the attached powders and hence became part of the fabricated strut.”
Different zones were created based on changes in input energy:
Zone 1 – low input energy was directed here, leading to ‘discontinuity’ in the strut. The researchers noted this was due to lack of diffusion between melt pools, along with a balling effect that typically causes defects in SLM.
Zone 2 – as the zones ascend in energy, this one is a result of intermediate laser power and scan speed. The researchers noted the formation of irregular defects, again, without diffusion between melt pools. They also noted erratic formation in the struts, resulting in ‘waviness.’
Zone 3 – this zone formed with the pairing of higher laser power but low scanning speed, ‘mitigating the previously formed lack of diffusion defects.’
A diagram showing the variation of Strut diameter as a function of increasing linear input energy diameter.
“SLM processing parameters investigated in the current research shows that the input energy density has a significant influence on the strut diameter and porosity morphology within the fabricated struts. Different zones were developed based on changing the input energy,” concluded the researchers. “Additionally, it was observed that strut diameter size for Ti6Al4V lattice structure increased with increasing the input energy density.”
While much about 3D printing can be deceptively simple, additive manufacturing processes are often more complicated in hardware, software, materials required, and technique. Selective laser melting, although it may offer some challenges, continues to be at the forefront of research projects and studies today, from new procedures created for heat accumulation detection to fabricating steel nuclear components or working with metallic glass. Find out more about strut diameter and porosity issues with this method too here. What do you think of this news? Let us know your thoughts! Join the discussion of this and other 3D printing topics at 3DPrintBoard.com.
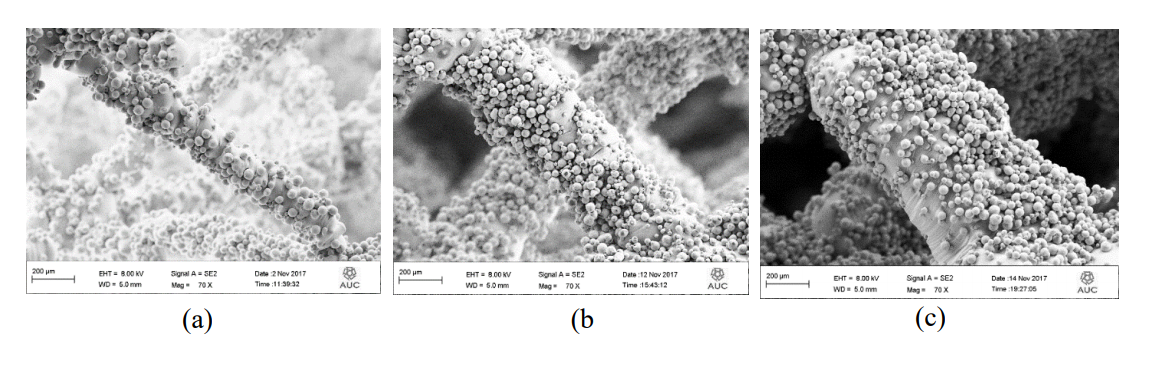
SEM images for struts at different fabrication conditions (a) 100W &4000mm/s (b) 200W & 2400mm/s (c) 300W & 800mm/s
3D printing is moving ever closer to gaining a true home in mainstream commercial applications, thanks to the impact the technology is having on consumer fashion products such as jewelry, footwear, and clothing. While 3D printed fashion was still considered to be more of a novelty a few years ago, efforts have been increasing to make it more common – even in the classroom. Additionally, the technology is helping to usher in a more sustainable and eco-friendly way of manufacturing garments…and designer Julia Daviy is helping to lead the charge.
In addition to designing clothes, Daviy is also an ecologist and clean technology industry manager, and uses 3D printing to make cruelty-free, zero-waste clothing. She believes that the technology will change how the world produces clothing, especially when it comes to some of the more problematic issues of garment manufacturing, such as animal exploitation, chemical pollution, energy consumption, and material waste.
“Our goal was never to demonstrate the viability of 3D printed clothing and leave things at that. We’ll have succeeded when beautiful, comfortable, ethically manufactured and environmentally friendly clothes are the standard,” Daviy stated. “The innovations we’ve made on the production and marketing side of the equation are just as important as the technological breakthroughs that have gotten us this far.”
Concerned with the economically and environmentally irresponsible ways most clothes are made, she created an activewear line made with organic fabrics, and went on to study 3D printing at the University of Illinois in an attempt to find a better, “more complete alternative.” Daviy created her first wearable, 3D printed piece in 2017, and continued working to grow her knowledge base. She experimented with multiple 3D printing techniques, like FDM and SLA, and spent time working with manufacturers on various filament specifications.
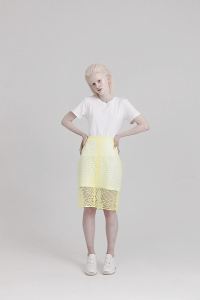
At New York Fashion Week in September, Daviy released the first 3D printed, functional, women’s fashion collection in the US that uses large-format 3D printing. While I wouldn’t have called most of the pieces in that collection appropriate for everyday use, all of them, like the Pure Nature Suit, definitely looked wearable. But now the pioneering designer has come out with something that I would definitely classify as a functional garment: what she’s calling the first digitally customizable, widely available 3D printed skirt.
The skirt is environmentally friendly, made with ethical manufacturing, and can be custom designed and purchased on Daviy’s website so it fits the size and personality of the customer. The 3D printed, digitally customizable skirt meets, according to the website, “your highest sustainable and technological expectations.”
“This is a truly sustainable, zero-waste skirt that was designed and produced in the USA using groundbreaking technology invented and patented by Julia Daviy. This method allows Daviy to 3D print clothing with less than 1% of waste in the clothing production process,” the website reads.
“The skirt is produced by combining innovative 3D printing practices with fabric linings and luxury trimmings that meet the highest environmental and ethical standards.”
Customers can choose almost everything about the skirt, from its color and style down to the waistline. Then, Daviy and her team create a digital model of the skirt using this information, and fabricate it on a large-scale 3D printer, using Daviy’s patented, zero-waste process, out of recyclable TPE material; the organic, stretchable lining is 5% Lycra and 95% silk.
I went to the website to design my own skirt, which is typically delivered in ten days’ time, though you can choose faster delivery options. The only pattern choice is organic, but there are three styles to choose from: mini, A-line, and pencil. You can select a high or short waist wrap, or none at all, and you can also choose to add pockets (yes, pockets! Pause for a moment of celebration!). Color choices are black, blue, white, nude, and yellow, and the lining can be black, white, or nude.
“You are unique,” the website states. “Wear a garment that reflects your identity.”
The skirt is designed for a slightly loose fit, and should be hand washed separately in cold water and dried flat; it should not be ironed.
Based on looks alone, I would wear multiple versions of this cute skirt anywhere. But, as to be expected with customizable products, the more things you add on, the higher the price tag goes. A mini skirt with no waist wrap and no pockets is already breaking the bank for me at $780, and when I designed an A-line skirt with a short waist wrap and pockets, the price shot up to $1,350. But again, customized garments anywhere don’t come cheap, and at least you can sleep tight knowing that Daviy’s zero-waste pieces are more eco-friendly.
“I started to experiment with 3D printing because I believe that in an age of radical change and global challenges, people need absolutely new clothing. The first stage is to simplify digital customization and 3D printing of flexible and wearable clothing. We’ve accomplished that, and I think that consumers will respond,” Daviy said. “Once we’ve brought this technology into the mainstream, we plan to use 3D printing to make smart clothing that integrates technology even further into the design and function of our collection.”
Discuss this story and other 3D printing topics at 3DPrintBoard.com or share your thoughts in the Facebook comments below.
In ‘Process Parameter Optimization for FDM 3D Printer,’ researchers from India discuss varying ways to improve popular fabrication processes, exploring basic parameter settings like density, layer height, and shell thickness—and how they affect mechanical properties like surface roughness, hardness, and tensile strength of 3D printed parts.
Specimen printing parameter variations
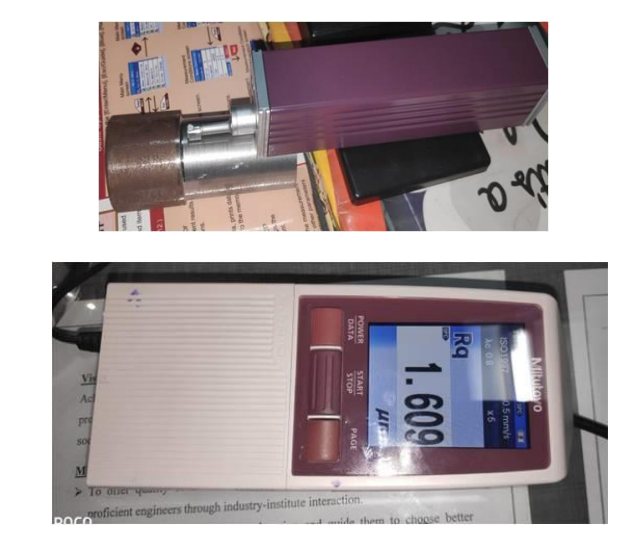
Using 1.75mm PLA as their material of choice, the scientists used an I3D Minds 3D printer for testing, SOLIDWORKS for design, and CURA for slicing. The I3D Minds offers a build volume of 190x190x180 mm and nozzle diameter of 0.4 mm, and automated setup and manufacturing.
Design samples were opened in CURA, and varying parameters were set:
Different layer heights – 0.1mm, 02mm, and 0.3mm
Fill densities – 50%, 75%, 100%
Shell thickness – 0.6mm, 0.8mm, 1.0mm
Sample files were converted into G-Code, and then sent to the 3D printer:
“The nozzle was maintained a temperature of 215 ºC for the extrusion of the PLA material and the build plate was maintained at 60 ºC,” stated the authors. “The printer prints the layer through the nozzle print head onto bed, one layer by layer, from bottom to top, and the same test setup was used for all specimens. The post hardening was observed to investigate the unconditional effect of printing parameters on physical and mechanical properties of the printed specimens.”
Cad modeling
The researchers also touched on common issues such as how to prevent issues due to common errors that may occur at the .stl file stage, often easily averted with ‘repair’ fixes in the original model.
“Generally, STLs that have been produced from a model obtained through 3D scanning often have more of these errors,” said the authors. “This is due to how 3D scanning works—as it is often by point to point acquisition, reconstruction will include errors in most cases.”
Printing a ‘slightly oversized version’ of the object is also suggested for greater precision in parts.
In discussing the Taguchi method, created by Dr. Genichi Taguchi, one of the leaders in parameter design, the researchers suggest using an orthogonal array for balanced results. This balance also means that each part can be evaluated on its own because each one is equal.
“On the basis of varying different parameters in different levels a Design of Experiments was carried out which can be used for preparation of specimens for optimization of 3D printed products for different parameters of 3D printing,” concluded the researchers. “Testing machines are selected for testing mechanical properties such as tensile strength, hardness and surface roughness of 3D printed specimens.”
While many may refer to 3D printing as magical, plenty of brainpower—in labs around the world—still goes into thinking of ways to refine nearly all methods. In FDM printing, researchers explore ways to improve layer adhesion, review how products like sensors are created, and discuss popular types of composites. Find out more about how scientists are improving parameter optimization here. What do you think of this news? Let us know your thoughts! Join the discussion of this and other 3D printing topics at 3DPrintBoard.com.
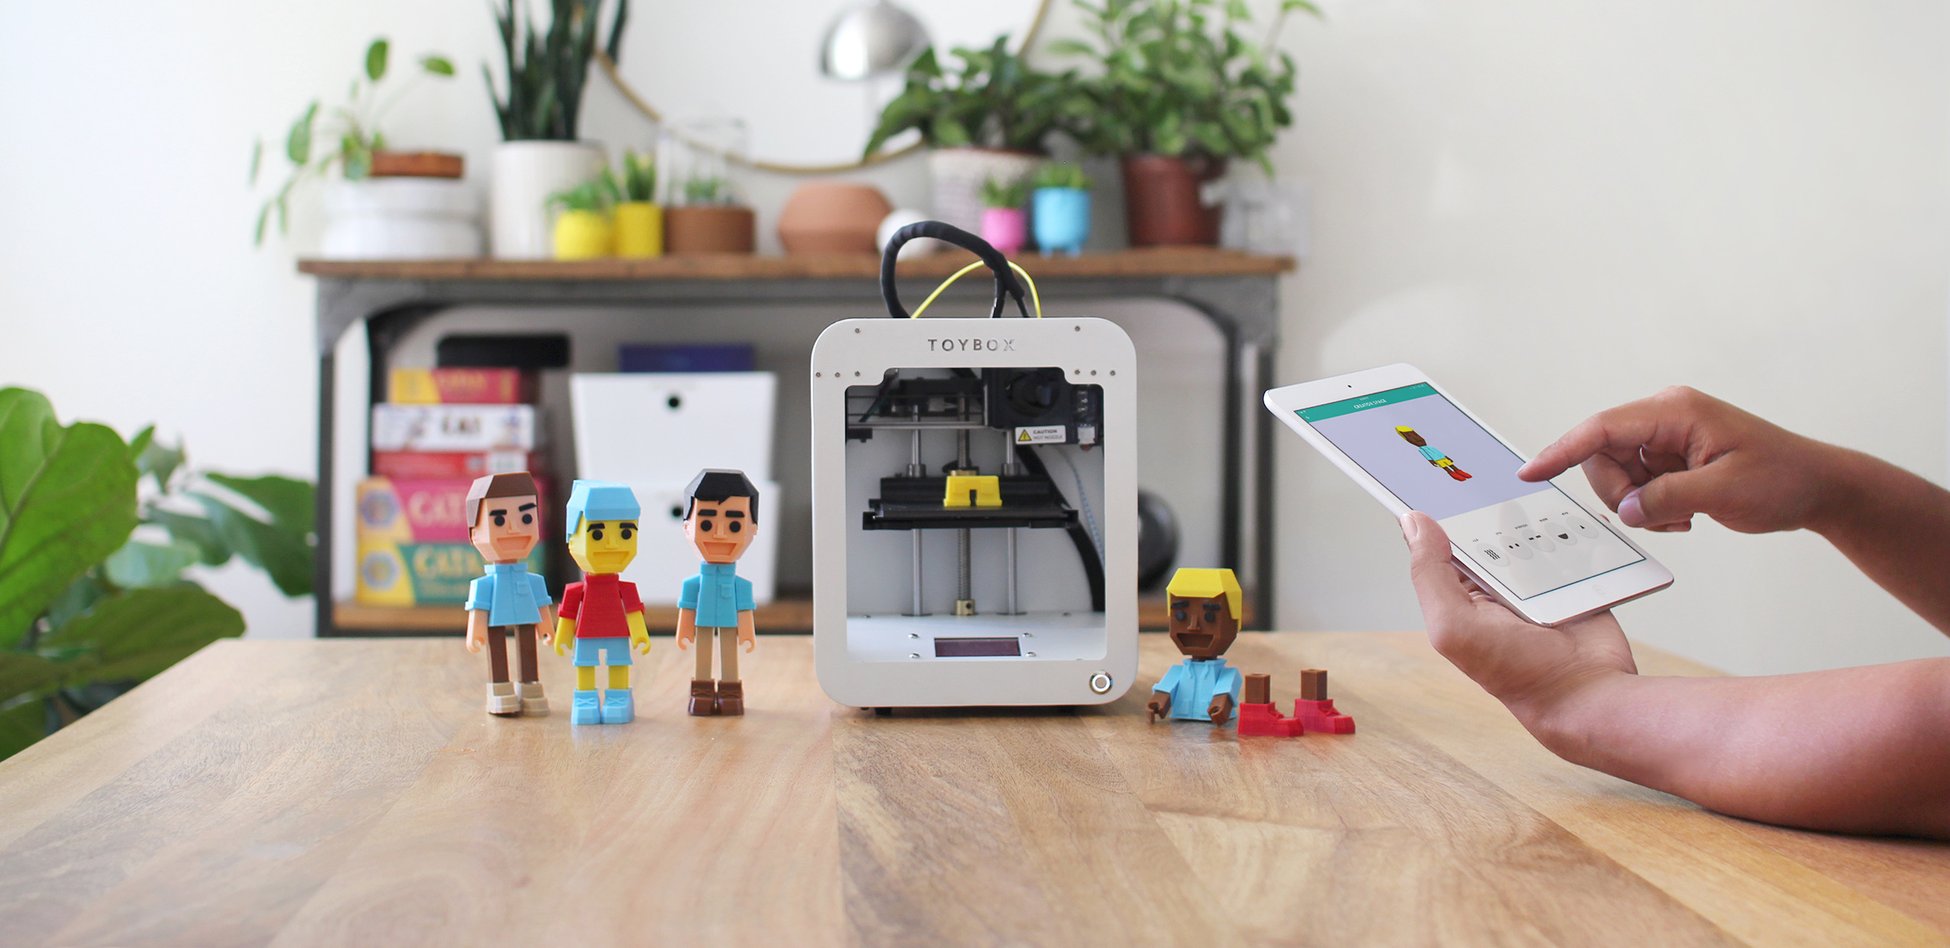
Toybox is a 3D printer that allows you and your kids to print toys. It’s an easy-to-use printer with a user-friendly interface that has a wide variety of toys to choose from. Toybox Labs was created by Ben Baltes and Jenn Chin from Oakland, California. Both founders raised more than $155,000 on Indiegogo, which has helped them to turn their 3D printer prototype into a mass-produced product. Reportedly the Toybox is a Creatbot Super Mini that was altered and made more kid-friendly.
To make Toybox do its magic, you simply have to download the app on AppStore or Google Play, depending on whether you have iOS or Android, and connect your phone and Toybox’s 3D printer to WiFi. Models can also be selected and printed from any computer connected to internet as well from Toybox’s official website.
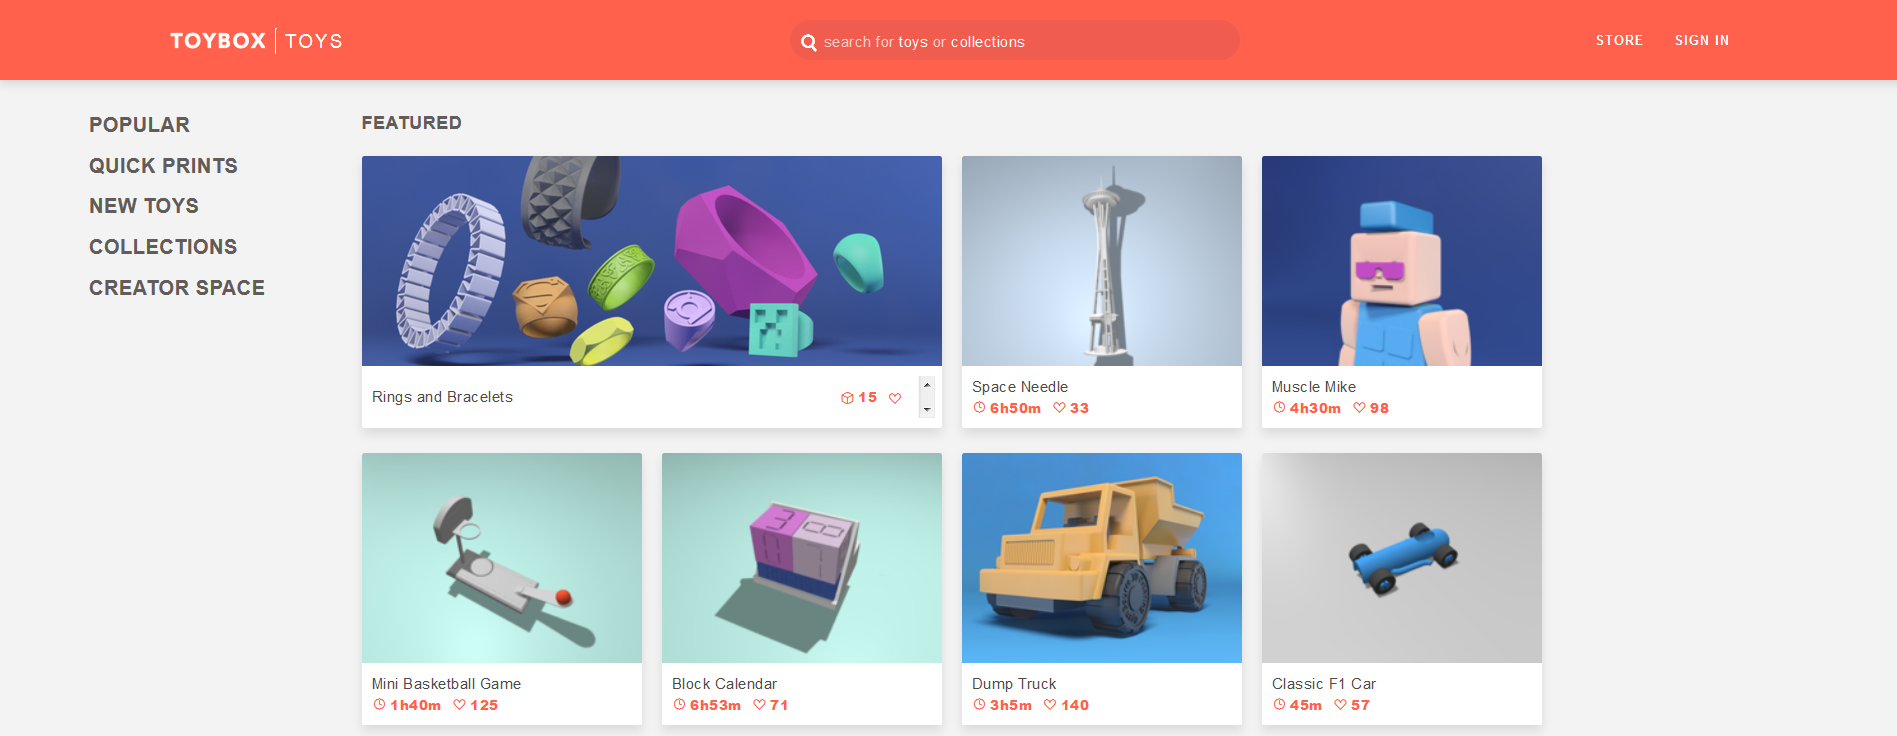
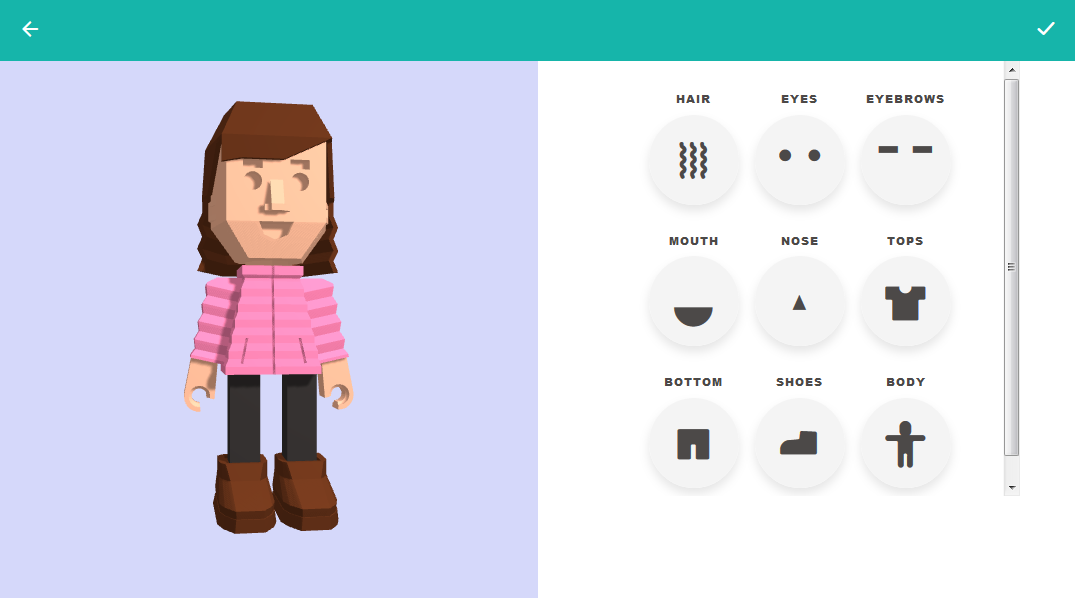
Although there are many other ways to 3D print toys for your kids, such as Toy Maker or Moose Toys, on Toybox’s website, parents and kids can browse a great selection of toys, as well as importing, creating a Block Buddy, or drawing their own. The catalog of toys they offer has different types of swords, cars, animals, character, buildings, creatures, and more. I wanted to test all they offered out so I made my own Block Buddy, a feature developed by Toybox to create your own character, and I was able to select different types of hairstyles, eye shapes, nose shapes, outfits, colors, and more.
I also created my own design. On the Draw option, I tried the text feature out but you can also draw anything you want and add a background to it. There are a few shapes to choose from and to play around with that helps you create the design you are looking for.
Once you’ve finished creating your Block Buddy, drawing or importing a design, you will see the time it will take to print each piece. You can select which piece to print first, and the website or app will ask you to connect with the 3D printer via Wi-Fi.
Toybox’s 3D printer is kid-friendly. It’s easy to teach your kids on how it works and how to use it without worrying about their safety. It’s also an alternate and affordable way of creating toys without leaving creativity behind. Kids can design and modify their creations at any time, and use their imagination fully. The 3D printer is environmentally friendly and produces little to no waste. At only nine inches tall and 6 lbs, the 3D printer doesn’t require too much space, which means it can be easily stored or can fit on your home desk perfectly.
Joel tested the Toybox and you can see that video below. An earlier review from last year by 3D Maker Noob is below that.
The website also includes a Shop section where you can acquire the 3D printer and the “Printer Food”, which is the name Toybox uses to call their filament as to make it more fun for kids. There are fifteen colors to choose from. The shop also includes bed surfaces for the 3D printer, stickers, a pin, and a gift card.
Toybox’s 3D printer costs $349 plus $9.95 shipping, resulting in a total price of $358.95. The 3D printer made it to Shark Tank on March 10, a show where entrepreneurs make their business presentations to a panel of five investors (or “Sharks) who choose whether to invest in their company as business partners. As a final negotiation, one of the Sharks offered to invest $150k for 13% equity and 2% in advisory shares. This is not the first time the idea of 3D printing toys made it to Shark Tank. In 2015, You Kick Ass (now called Hero Builders) presented their 3D printed action figures to the Sharks.
In today’s 3D Printing News Briefs, we’ve got stories on events and business for you, followed by an innovative piece of 3D printed furniture. The fourth Metal Additive Manufacturing Conference will be held in Sweden this November, and Oerlikon AM will soon be hosting the grand opening event for its new Innovation Hub. Link3D is partnering up with Additive Rocket Corporation, and an industrial designer created a 3D printed chair that can fold up flat.
MAMC 2019 Coming to Sweden this November
From November 25-27, 2019, the fourth Metal Additive Manufacturing Conference (MAMC 2019) will take place in Örebro, Sweden. In addition to keynotes and other presentations, there will also be site visits to metal additive manufacturing companies and users AMEXCI, Lasertech LSH, and Siemens Industrial Turbomachinery. Then, directly following the conference, the Austrian Society for Metallurgy and Materials (ASMET) will be holding a two-day metal Design for Additive Manufacturing (DfAM) course in the same city.
The specialized course is for designers and engineers with basic CAD experience, in addition to technical and managerial personnel in industry who are interested in learning more about AM. Hands-on exercises in DfAM will occur during the course, and several experts from around the world, such as Professor Olaf Diefel from the University of Auckland, will be lecturing. The registration fee is €490, and the deadline to register is September 1st, 2019. Please contact Mrs. Yvonne Dworak with ASMET to register.
Grand Opening for Oerlikon AM’s Innovation Hub
On May 29, Oerlikon AM will be hosting an industry event to celebrate the grand opening of its new Innovation Hub & Advanced Component Production facility. The event, which will take place at the company’s new Huntersville, North Carolina facility, will showcase major developments in advanced manufacturing to guests including academics, business leaders, community members, customers, and lawmakers. This is an important step for the Swiss aerospace components manufacturer and will give them the opportunity to enter the US market and serve customers there.
After a brief welcome and breakfast, there will be remarks from 9:45-10:15 on the front lawn of the facility, located at 12012 Vanstory Dr. Then there will be a ribbon cutting, after which attendees can enjoy cake, coffee, and networking opportunities. A tour of the facility will follow, and then Oerlikon will have a BBQ lunch and a children’s program, in addition to several information booths.
Link3D Partnering with Additive Rocket Corporation
At this week’s Aerodef event, AM software company Link3D announced a new partnership with California-based Additive Rocket Corporation (ARC), which makes high-performance 3D printed metal rocket engines. This is ARC’s first step towards adopting Link3D’s digital Additive Manufacturing Execution System (AMES), and will enable standards compliance, in addition to streamlining its 3D printing production for affordable, reliable propulsion solutions. Link3D’s workflow software allows companies like ARC to track and trace data in a secure environment, and adherence to quality assurance and quality control requirements from regulatory standards board will also be embedded in the software.
“Link3D is the perfect compliment to our design process, streamlining our manufacturing operations and building quality into the workflow,” said Kyle Adriany, the Co-Founder & CTO of ARC. “Link3D’s Standards Compliance Program is a built-in solution of its additive manufacturing workflow software that tremendously helps organizations in Aerospace & Defense increase productivity and reliability, improve its market position, reduce costs and advance new technologies.”
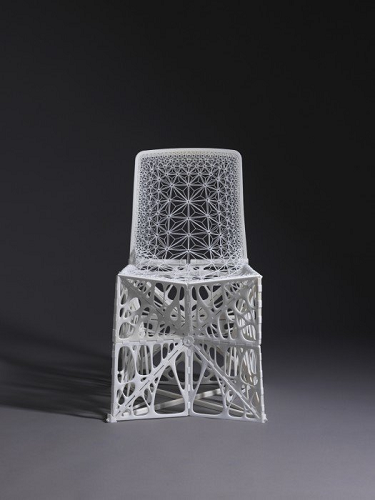
3D Printed Chair Folds Up Flat
Industrial designer Patrick Jouin has long used 3D printing in his work, including his unique One Shot Stool, but his latest prototype really pushes the limits of the technology’s material process. His TAMU chair, developed together with Dassault Systèmes, was launched during the recent Milan Design Week and was inspired by nature and origami. Jouin utilized Dassault’s generative design software to create the chair, which not only helps it look delicate and ornate but also makes it possible to fold it down so it’s almost completely flat. The goal was to use as little material as possible to create the chair, which only weighs a little over five pounds. Jouin’s team in Milan 3D printed 1,643 individual components and assembled the prototype chair by hand, but he hopes to make the chair in one continuous 48-hour print in the future.
“Previously designers were inspired by ‘organic’ as a style, but what is completely new is that designers are now inspired by the organic process itself, and how to emulate it. Manufacturing has fallen into the habit of producing more material than necessary. but with the help of innovative digital technologies, we are now able to create with much more efficiency and less waste, even as early as the design process,” Jouin stated.
Discuss these stories and other 3D printing topics at 3DPrintBoard.com or share your thoughts in the Facebook comments below.