We’ve got so much happening here at Adafruit that it’s not always easy to keep up! Don’t fret, we’ve got you covered. Each week we’ll be posting a handy round-up of what we’ve been up to, ranging from learn guides to blog articles, videos, and more.
adafruit.io, our IoT service for engineers, makers, hackers, and more has 308,729 total users, however! Here are the most recent stats from the last 30 days which is a pretty good picture!
Play with Virtual Puppets! Using the puppet module in the Bluefruit Playground App, you can create the coolest virtual puppet show ever. Learn how to control the puppet, add a green screen, then record your performance.
It was so fun looking back through the Adafruit Youtube videos of the last decade to compile this list! Lets start with the best – check out our top 1-10 youtube videos of the last decade below!
Since the last Guardian Robot project, we’ve gotten a number of requests to add a servo and LED to the head – In this project, we’ll show you how to do that!
Mounted to the eye is a 10mm blue LED. The head itself is attached to a servo horn and mounted to a micro servo. The head can freely rotate while the eye blink randomly. Surrounding the body are 5mm blue LEDs that illuminate the various surface details.
The random motion of the servo and eye blinks give the illusion of the robot “searching”. It’s appears quite organic and live like, adding much more dimension to this replica.
Light up your stride! Mod a pair of high-tops with NeoPixel strip and FLORA, Adafruit’s wearable electronics platform. Becky Stern and Phillip Burgess show you how to use a velostat step sensor in the heel to trigger firey animations as you walk! Build your own: https://learn.adafruit.com/firewalker-led-sneakers/
Here’s a video guide to getting started with our fabulous fingerprint sensor! In addition to the detailed photo/software tutorial, we hope it’ll help you set up your sensor easily!
Adding colorful LEDs to your project used to require a lot of pins on your microcontroller and complex code. With the Adafruit NeoPixels, those problems are a thing of the past. You only need one pin on any microcontroller to run a long string of pixels, and with our open source NeoPixel library, you can get your NeoPixels up and running in seconds.
Not only are NeoPixels easy to use, but they come in a wide variety of designs to fit your project. You can get NeoPixels in sewable form, long waterproof strips, in a ring, on an Arduino shield, on a stick, breadboard friendly and much more! Learn everything there is to know about Adafruit NeoPixels and how easy it is to use them on the Adafruit Learning System.
It’s that time of year again. Colorful leaves and pumpkin-spiced drinks can only mean one thing – the holiday season is just around the corner. To be more specific, we are only 36 days away from Black Friday!
If you plan to or are already selling 3D products, it’s time to prepare your business for holiday shoppers. We highly recommend using our new integration with Shopify, the Shapeways Fulfillment app (see step-by-step setup instructions here). Not sure whether this is something you need? We’re here to help you make that decision.
The Shapeways Fulfillment App
This integration directly connects a Shopify store to Shapeways’ 3D printing manufacturing and fulfillment network, giving your business seamless access to 3D printing technology in over 40 materials and finishes. When your customer makes a purchase from your Shopify store, the order will flow through to Shapeways and can be fulfilled manually or automatically, depending on your business needs.
Who Is It For?
It’s for anyone who wishes to sell 3D models and have the orders fulfilled by Shapeways. The two accounts you need to set up are:
A Shapeways account: you can sell any or all products on your Shapeways shop, if you have one, or you can sell private models uploaded to your Shapeways account.
A Shopify store: there are multiple plans available, but you can always start with a free trial to test it out.
Integration Benefits
Access batch ordering – Eliminate repetitive order entries all together.
Automate customer orders – Orders can be processed immediately and automatically.
Print on demand in over 40 3D printed materials and finishes – No need to stock inventory or worry about products collecting dust on shelves.
Print without your own 3D manufacturing equipment – You will have access to Shapeways’ 3D printing manufacturing and fulfillment network.
Ship directly to you or your customers – Shapeways can package and ship orders straight to your customers. We can also ship them to you for additional processing.
Our early app adopters are enjoying the benefits of keeping customers on their own storefronts, and being able to go on vacation knowing that orders will take care of themselves in reaching the customers. If that sounds appealing to you, give the integration a try. And if you need assistance, we’re here to help you at storefronts@shapeways.com.
Shapeways supports sellers wherever they want to do business. If you would like to sell beyond the Shapeways marketplace and either have a Shopify store or would like to create one, our recent integration with Shopify is a great solution to automating your order processing, production, and shipping by connecting your store with the Shapeways Fulfillment app. No more manual order entry after this integration!
Ready to get started? Follow the steps below to connect your Shopify store to Shapeways.
1. Setting Up Payment
To use the Shapeways Fulfillment app, you must have a credit card on file with Shapeways.
If you have previously placed a Shapeways order with a credit card, your payment method will default to the last credit card you used. If you already have a card on file, skip to Step 2.
If you do not have a credit card on file, you can add one on Shapeways.com.
Click the avatar in the top-right corner and select Settings.
Then select Shipping & Billing.
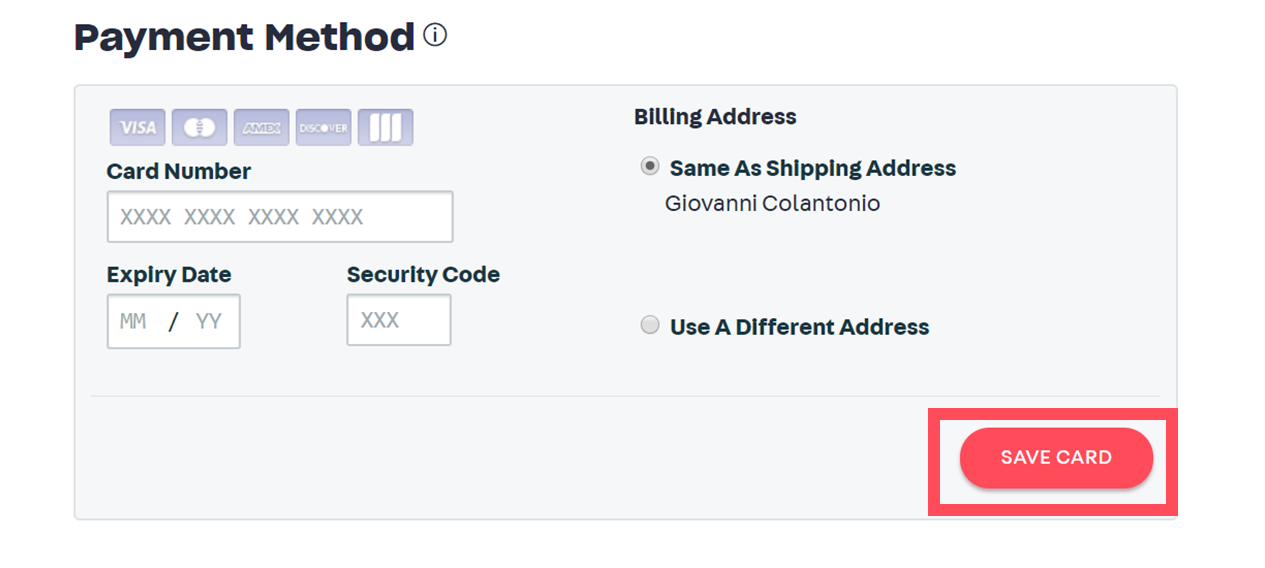
On the Shipping & Billing page, scroll down to Payment Method. Input your credit card information and billing address then click Save Card.
2. Installing the app
Go to the “Shapeways Fulfillment” page on the Shopify App Store here.
Click on the Add App button.
If you are not already logged in to your Shopify account, you will be prompted to login.
You will then be prompted to install the app on your Shopify site.
Next, you will be prompted to sign in to your Shapeways account. Use the same credentials that you use on Shapeways.com.
Review and accept the terms and conditions and click Authorize.
3. Creating Products in Shopify
To start, you’ll need to create your products in Shopify. There are two methods for doing this.
Method 1:
Manually create your products in Shopify. For more information on creating products in Shopify, click here to see their guide.
Method 2:
If you have a Shapeways Store and you’d like to import all of your Shapeways products, the Shapeways team can provide you with a Shopify Product Import CSV file that can be used to import your public products into Shopify. Email storefronts@shapeways.com for details.
4. Mapping Shapeways Products
You can now manually map your Shapeways models to your Shopify products in the Shapeways Fulfillment App. To do this, you’ll need to enter the Shapeways model ID and select a material for each Shopify product variant. There are two ways to locate the information needed.
Method 1:
If you have a Shapeways shop, sign to Shapeways.com and go to your Shop Settings.
Select Pricing CSV Wizard.
Click Download CSV. Your model IDs will be displayed in this file.
Method 2:
If you don’t have a Shapeways Shop: click on the 3D Models tab. Here, you’ll find a list of your uploaded models. Click on a model and copy the number at the end of the browser’s page URL. This is the model ID for your product. (Example: for https://www.shapeways.com/model/upload-and-buy/1234567, copy “1234567”)
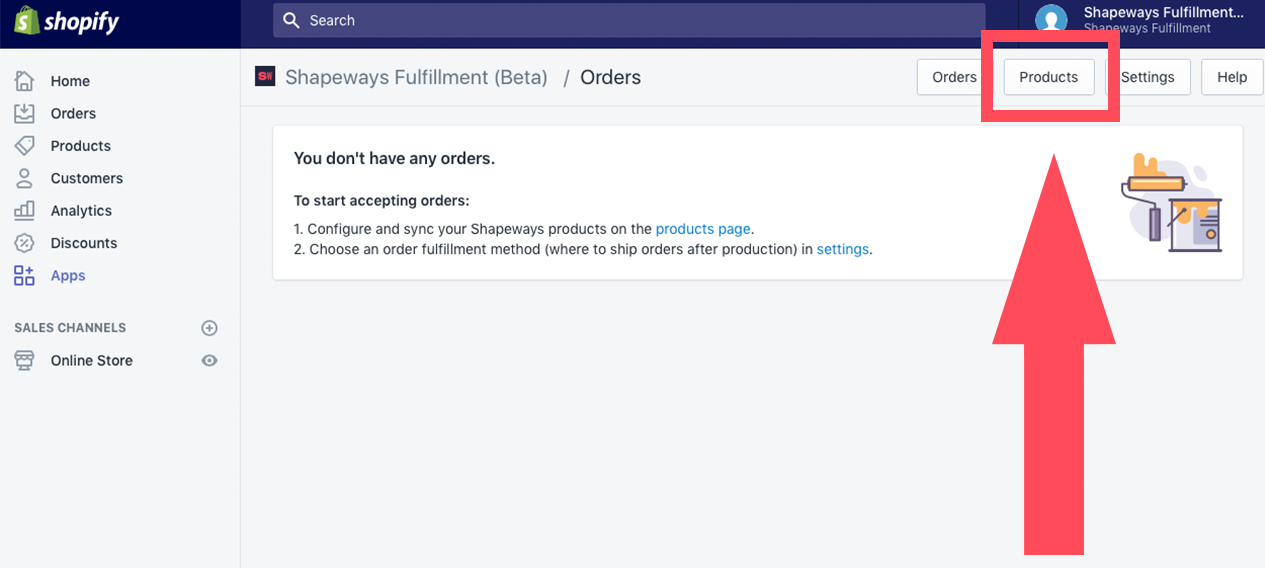
Then, you can map your Shopify products to your Shapeways models and materials. Go to the Shapeways Fulfillment app and click on the Products tab.
Here, all of your Shopify products and variants will be automatically populated in the first column.
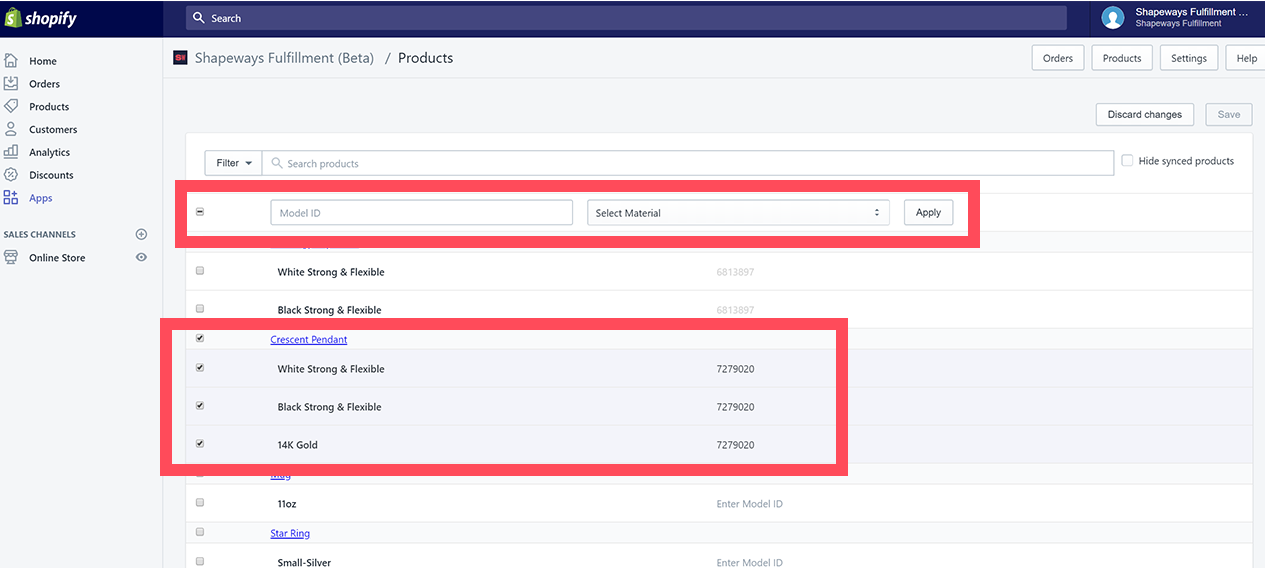
For each product-variant, enter the ID of the Shapeways model and select the material you want it to print in.
If you select multiple product-variants, the bulk edit tool will appear at the top. You can use this to map several product-variants at once.
If you have a product-variant that is not manufactured by Shapeways, simply leave it blank.
When you have finished mapping all of your products, click Save.
5. Configuring Settings
You can access your app setting by clicking on the Settings tab.
Decide how you want your Shapeways orders to be created.
Place orders manually means that you will need to create each order. This gives you the ability to decide which Shopify orders need to be fulfilled by Shapeways and when the order is placed.
Place orders automatically means that for every Shopify order you receive, a corresponding Shapeways order will automatically be created.
Decide how you want your orders to be fulfilled by Shapeways.
Ship orders directly to customers means that Shapeways will ship the order to the customer who purchased it on your Shopify site. If this setting is selected, the order will be shipped to the address the customer provided while checking out on Shopify.
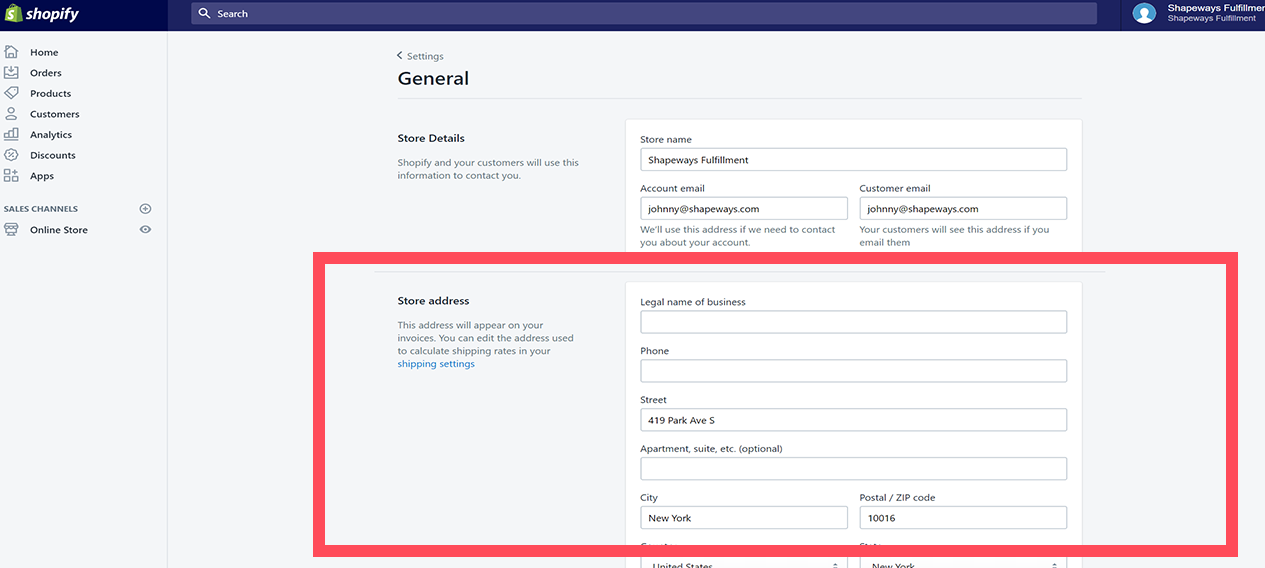
Ship orders to me means that Shapeways will send all orders to you first. This will allow you to complete any assembly, finishing, or packaging that is required before sending it to your customer. If this setting is selected, Shapeways will send it to the Store Address in your Shopify settings.
To update the Store Address, go to your Shopify Settings and select General.
Decide how you want your orders to be shipped by Shapeways.
Choose cheapest shipping option means that every time a Shapeways order is placed, it will default to the cheapest shipping option.
Choose fastest shipping option means that every time a Shapeways order is placed, it will default to the shipping option with the shortest delivery time. If several options have the shortest delivery time, it will default to the cheaper option.
You can view the shipping rates and delivery times on Shapeways.com. The address used for calculating the shipping rate is determined by the Fulfillment Method setting.
Getting Help from Shapeways
The Shapeways team is here to assist at any stage during the setup. For help, just email storefronts@shapeways.com.