3D Printing for the Fourth of July

Today is the Fourth of July, or Independence Day, here in the U.S. This means most people in the United States will get the chance to enjoy a three-day weekend, and that brings with it the chance for barbecues, camping, fireworks, and more summer fun! Obviously, we thought there was no better way to celebrate this exciting occasion than by 3D printing some holiday-related items, so read on and enjoy.
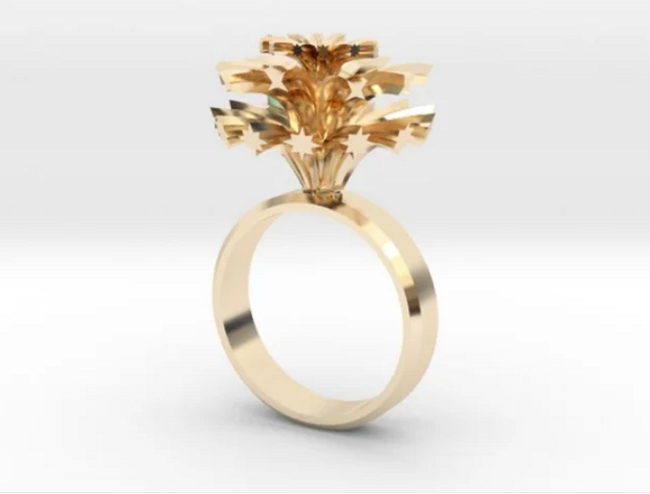
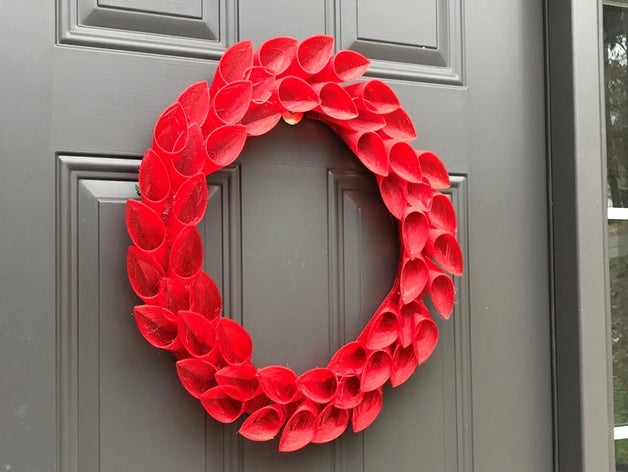
Fireworks ring

If you’re heading out to see a fireworks display (obviously wearing your mask and social distancing from others, of course), you’ll want to look your best. So, why not print out and wear this fireworks ring from Cults3D user Lockheart? She writes that if you really like this piece, you can also order it in metal from Shapeways. However, some cities are canceling their July 4th fireworks displays due to COVID-19, and even if the shows are still happening, many people may not feel comfortable being in a big crowd yet. So, you can always print this Fireworks sculpture and make your house or backyard a little more festive.

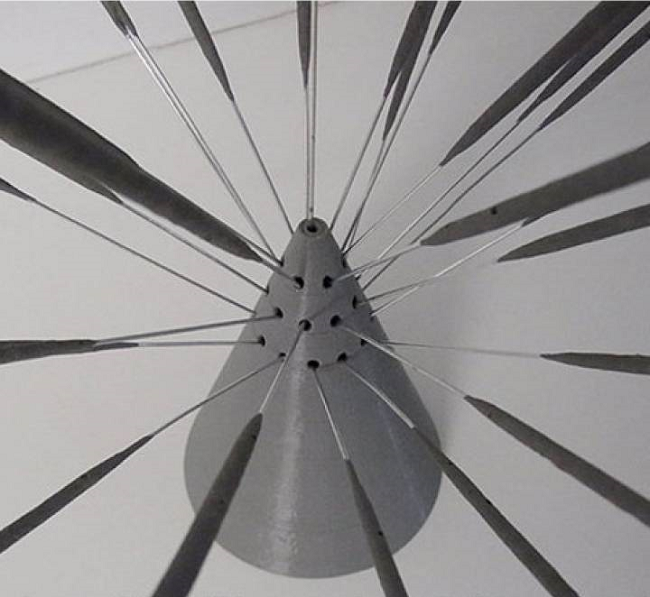
“Put something heavy in the bottom compartment to have it stand better. Scale as wanted,” Thingiverse user Mizcak wrote. “Printed well in ABS at 0.2mm layers and 0.4mm nozzle. No raft or brim.”

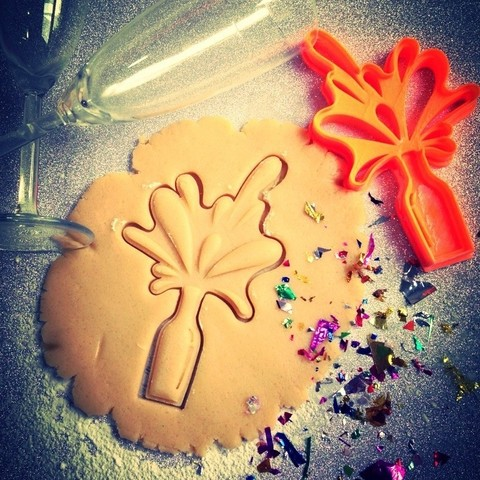
Technically this sculpture was created as a decoration for New Year’s, but I think it works for the Fourth of July just as well.

This 3D Printable Fireworks LED Lamp, posted by MyMiniFactory user Joe Casha, is another great decoration, though it will take more than a 3D printer to make. You’ll need screws, wires, an Arduino Nano, fiber optic cable, and a few other things. Plus, some soldering is required.

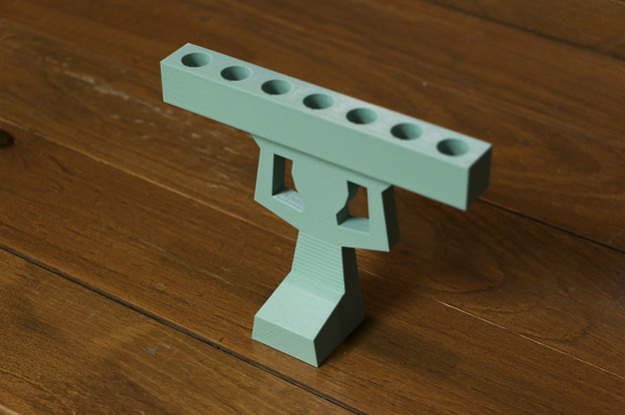
If you want to have some low-key fireworks fun in your own backyard, you can also make this awesome Sparkler Holder by MyMiniFactory user Muzz64. This easy print holds 27 sparklers over three levels, which means you can place a whole package in the holder, and you won’t need a lot of filament to make it, either.

3D Printable Sparkler Holder

“The design features an internal retainer to locate the Sparklers so they stay at a similar angle as others on the same level as well as keeping the hot / burning part well clear of the holder itself so it won’t melt or burn.”

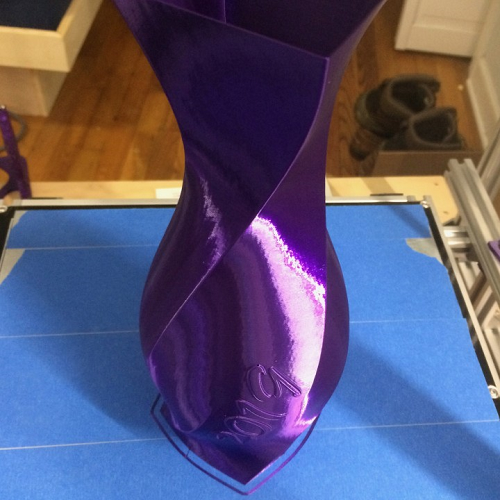
Speaking of fun in the backyard, it’s always fun for kids when the sprinkler gets hooked up for the summer – make their day with this Basic Water Sprinkler by Thingiverse user ICEPICKTONY. While they’re all running around, you can keep cool yourself with this nine-sided Glacier Wine Cooler from MyMiniFactory user 3DRegan.

“This neat wine cooler uses the infill settings in 3D Printing to trap a cold layer of air between the two walls and keep your wine bottle chilled!”

Glacier Wine Cooler

It takes about 16 hours to print this model out of PLA, with 20% infill, no supports, and layer height of 0.3 mm. You can also print it in separate colors if you so choose.

But if you prefer beer over wine, then you’ll definitely need this Bottle Opener and Cap GUN! by Thingiverse user 3Deddy. It’s an easy print, with just a few supports, and you’ll need a set of M3 bolts and an elastic rubber band to get the fun started. The speed at which it shoots is described as “gentle,” though obviously you won’t be shooting it at people…maybe just stand way back and see how close you can get to the grill!

Bottle Opener and Cap GUN!

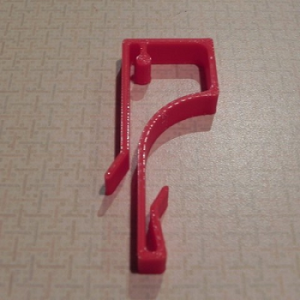
If your grill doesn’t have quite as much space as you’d like for the necessary tools of the trade, you can print this handy BBQ tool holder peg multiplier by MyMiniFactory user Kazys Domkus. It fits on a 200 x 200 mm print bed, and should be scaled by 25.4. If the tool doesn’t fit your particular grill, Inventor files have been included for this print. You could also try this BBQ CLIP-ON HOOK/HANGAR print from Cults 3D user Dantu, who printed this out of PETG material.

Once your grill is set up the way you want, you can get down to the serious business of cooking the meat…and why not have some by customizing your burgers with this Burger Stamp by MyMiniFactory user Jeff Green? He says it only “takes about 10 seconds to change it/create it in Tinkercad,” and another 20 minutes to print out of food-safe PLA.

Burger Stamp

If you’ve decided to take advantage of the long holiday weekend and go camping, 3D printing can help with this activity as well. You can make this 1L Camping Bottle from Cults 3D user wavelog, or a helpful Folding Tripod Camping Stool Part by Cults 3D user to make your chair away from home more stable.

You can turn a mini flashlight into an ambient light with this Cults 3D Camplamp model by user 3DPrintNovesia. It’s designed with a 12 mm hole, so you’ll just need to scale it to your own flashlight, and print it with a low infill out of transparent filament. But my favorite is this Camp Caddy by fittingly named Cults 3D user TeamOutdoor, because it’s attractive and multifunctional.
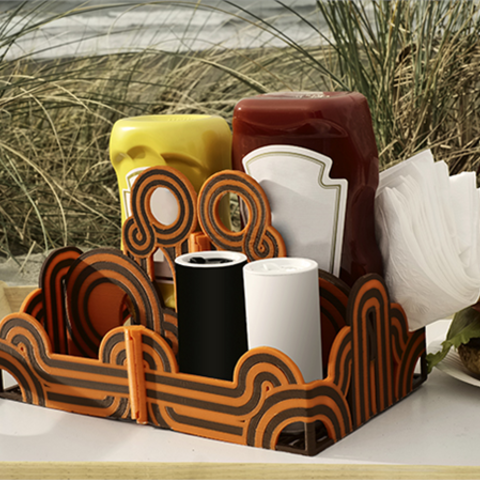
Camping Caddy

“Condiment Holders don’t get any more far out than this. Everybody who BBQs in the outdoors or cooks on a campfire needs this. For one thing, condiments are unwieldy little suckers, and best passed and carried around all at once. And this one is a 3D printed work of art. Also holds a six pack—because of course—and your shower stuff, because why not?”

You can’t argue with that reasoning! It should take about 32 hours to print each half of this caddy out of PLA, and then you simply press the two together “until all of the vertical edges snap together.”

Happy Fourth, and happy 3D printing!

The post 3D Printing for the Fourth of July appeared first on 3DPrint.com | The Voice of 3D Printing / Additive Manufacturing.

Holiday Fun During COVID-19: 3D Printed Easter Eggs, Seder Plates, and Ramadan Lanterns

Because of the COVID-19 epidemic, this spring is going to be really difficult for a lot of people. On top of cancelled classes, closed restaurants, and people panic-buying at grocery stores, Passover began earlier this week, Easter is this Sunday, and Ramadan starts in two weeks. Many people like to spend time with their loved during holidays like these, and with countries all over the world in various stages of lock down and quarantine, that’s likely not going to happen. The ongoing coronavirus crisis has upended life for a lot of people, and additive manufacturing companies and makers at home have been rushing in to help, to the best of their abilities, by 3D printing things like face shields and masks, nasal swabs, ventilators, field respirators, and even hands-free door openers.

A face shield made with a 3D printed adapter and a standard hard hat. (Image: GE Additive)

However, while this call to arms is admirable, we need to remember that regulations and certifications for 3D printed medical devices are put in place for a reason. Even the best intentions can lead to some harmful consequences, and we must make sure we’re not causing additional harm by 3D printing items that don’t need to be 3D printed. My suggestion is that maybe, we use 3D printing to take care of our mental health, which is just as important during these strange times. So I refer back to my opening statement – it will be hard not spending the holidays with your family and friends.

So, if you’re stuck at home with a 3D printer, why not make the best of things and create some holiday-themed prints? For instance, just because you’re not expecting a passel of guests doesn’t mean you can’t still decorate with this Easter Egg-shaped holder for electric candles, published by MyMiniFactory user 3dprintinggeek, or this ‘Happy Passover‘ print on Thingiverse, which user jrembrandt created with the Customizer feature.

Ramadan Moon

This Ramadan Moon decoration by Thingiverse user YehiaJammoul can be 3D printed in different sizes, so long as the bed is “perfectly leveled.” I also like this Ramadan lantern print by the same user, who designed it in SOLIDWORKS and printed it on a Creality CR-10S.

Easter Cookie Cutters

A lot of people are getting through these difficult times by stress-eating. So long as you use food-safe filament, help feed your craving with the help of these cute Easter Cookie Cutters by MyMiniFactory user Benjamin_Lau, or this one from aptly named Cults3D user Cookiemonster. Thingiverse user ianwarelec turned to Fusion 360 to design this Ramadan Kareem Cookie Cutter, shaped like a crescent to represent the lunar month of Ramadan. Also on Thingiverse, I found this Matzo Slicer by Shoogon and a Matzo holder by itaysp.

You can celebrate the holidays by dressing up if you want, and these Easter Bunny Earrings by MyMiniFactory user Idea Lab, or this adorable Bunny Ears Head Band, will surely land you on the Easter Bunny’s best-dressed list…if he makes one.

Bunny Ears Head Band

“Don’t forget to cut off the tabs, they are present to act as a strategic brim to help bed adhesion and prevent curling,” Cults3D user bLiTzJoN writes about the head band.

I found this really lovely Vertical Seder Plate on Thingiverse – user stevemedwin’s wife is a rabbi, and challenged him to make the vertical plate.

Vertical Seder Plate

” I ended up designing a seven piece assembly that holds the traditional seder plate liners. OpenSCAD came to the rescue as the tolerances on the pieces was critical for it to be stable,” he wrote.

“The arms can be rotated independently in order to fit the items as needed.”

He 3D printed the plate on his MakerBot Replicator 2, with no raft or supports, at 10% infill and a layer height of 0.200.

Of course, it wouldn’t be Easter without 3D printed eggs, like these Floral Easter Eggs and Woven Easter Eggs by MyMiniFactory user TechDave204, and I also really like this Resin Easter Egg Collection on MyMiniFactory from user ChrisBobo, “made with Fusion 360 and Meshmixer and printed on an Anycubic Photon.”

If you’re interested in an indoor hunt for your 3D printed Easter eggs, you can hide them in this 3D Printable Grass by Cults3D user Superbeasti, which can be cut to length and should be printed with a raft for better adhesion.

3D Printable Grass

“As with any “hairy” print, these are printed sideways, and then one of the plates is cut free. The parts should be oriented so, that each strand starts printing from the top of the grass and ends on the root (Cura changes this when you rotate the block 180 degrees on the Z axis).This way you get a nice effect, where the grass is thinner on the top, and adheres better to the bottom plate. You can choose, if you want to have a thick bottom plate or the thin one, by simply orienting the parts accordingly and cutting the opposite plate off,” he wrote.

Bringing things full circle, Thingiverse user menzach created this Coronavirus Easter egg, which needs a raft and supports and will require an extra step of gluing the red S-proteins to the rest of the egg. Once you’ve collected all of your 3D printed eggs, you can place them in this Easter Eggs Basket by Cults3D user SE_2018. But maybe leave the coronavirus egg where you found it…we’ve had enough of that, I think.

Happy holiday 3D printing and stay healthy!

Did you create any holiday 3D prints? Let us know at 3DPrintBoard.com or share your thoughts in the Facebook comments below. 

The post Holiday Fun During COVID-19: 3D Printed Easter Eggs, Seder Plates, and Ramadan Lanterns appeared first on 3DPrint.com | The Voice of 3D Printing / Additive Manufacturing.

Robotic Christmas Teapot

via gzumwalt on instructables

“Robotic Christmas Teapot” (my wife calls it Robotic Christmas “Treepot”) is a motorized, animated Christmas themed teapot.

The animated mechanism features three axis of rotation; pitch (the spout), yaw (the handle) and roll (the body), plus a “wobbling” circular travel path, and is powered by a 3.7VDC 100MA LIPO battery driving an N20 6VDC 100RPM gear motor. The model draws around 8MA during operation.

Read more.

It’s the Most Wonderful Time of the Year…for 3D Printing

Hanukkah, Christmas, Kwanzaa, New Year’s Eve, St. Nicholas’ Day, the Winter Solstice, Festivus…December is filled with holidays for us all to celebrate. And what better way to do so than with 3D printing? But whether you’re hosting a holiday gathering this year, or trying to get ready and leave the house so you can attend one (or five…), we know you’re busy and don’t need another thing to add to your already full plate. So we’ve taken the liberty of gathering up some fun holiday-themed 3D print ideas for you in this article. Obviously, you’ll still need to factor in time to actually print these, but sacrifices must be made somewhere, right? Maybe only bake five batches of cookies instead of ten this year.

Speaking of cookies, here are some adorable 3D printable Christmas cookie cutters from Oogime on Cults3D – they come in a variety of festive shapes, such as candy canes, stockings, bells, reindeer, mistletoe, snowmen, Christmas trees, and Santa Claus himself.

“For the baking enthusiast and home cooking aficionado, OogiMe is what you have been looking for. OogiMe digital designs have been tested to fit the requirements necessary for 3D home printing technology.

“We designed unique Cookie Cutters to print that incorporate the holiday spirit, especially for you and your family.”

A couple of the Oogime cookie cutter prints state that with a standard resolution and layer height of 0.3 mm, they shouldn’t take more than an hour to print.

Some people prefer making gingerbread houses to cookie baking, and we found a really awesome holiday 3D printing idea from MyMiniFactory user 3Demon – these are still cookie cutters, but for making a 3D printer out of gingerbread, instead of a house!

“Here’s how you can make a special kind of gingerbread house celebrating one of the best hobbies ever!” the 3Demon group wrote on Instructables.

“I would recommend actually reading the text and not just looking at the pictures so you can avoid some of my mistakes.”

I’ll let you read the rest of the instructions yourself if interested, though I will note that all together, the cookie cutters “should fit on 4 print beds and take about 10 hours of print time” if 3D printed at a layer height of 0.3 mm.

To make your home look merry and bright, you’ll need some good holiday decorations. Thingiverse user amytheengineer suggests this lovely front door wreath, which was 3D printed in four pieces on a JGAurora system. Even though the supports will be “a hassle to remove,” they are necessary for this print.

Thingiverse user deadspool posted this eye-catching Christmas Tree design, which can be 3D printed either as a solid or in vase mode, while Cults3D user Raeunn3D created this cute Snowman, which does not need any supports to print, and Tony Gonzalez on MyMiniFactory designed a 3D printable Spinning Stars Snowflake Ornament, which can be printed in place with no supports.

abbymath on Thingiverse used Mathematica to generate designs for 100 Snowflakes with random parameters, so they are all truly unique. No raft, supports, or infill are required, and the snowflakes were 3D printed at 0.2 mm layer height.

“My code creates all 100 designs, checks each for connectedness, and generates all the STL files in about 13 minutes,” abbymath wrote.

“Included among the individual STL files are five that each contain 20 of the snowflakes arranged to fit on a 200 x 200 mm print bed for quicker setup. Each snowflake has a diameter approximately 40 mm (plus or minus about 5 mm) and a thickness of 0.8 mm.”

Those who celebrate Hanukkah and are in need of a menorah fast, check out this Vase Mode Menorah by Jacob Surovsky on MyMiniFactory. It takes no more than an hour to print in vase mode, or with Surface Mode set to “Surface” rather than “Normal,” and is also a great mold for a cement craft. But, if you’d rather have a more permanent menorah, you can fill the interior with cement, and once it’s cooled, melt off the thin layer of plastic, which will leave behind a “beautiful and colorful organic texture.”

“Sometimes Fusion exports the units strangely,” Surovsky wrote. “If the menorah is really small in your slicer, make sure the units are set to inches or scale up by 2540%. Also, make sure to orient the menorah as displayed in the photos.”

I found some other 3D printable menorahs as well – Thingiverse user DavidPhillipOser designed a Customizable Simple Menorah that holds metal cups rather than candles, and Cults3D user hirez posted a lovely design with the Star of David as the base, held up by a pair of hands and adorned with olive leaves, “a symbol of peace that will grow only if we are all chosen to focus on light than in the dark.”

Moving on, it is now time for the Airing of Grievances, or at least it is for the people who choose to celebrate the secular December 23rd holiday of Festivus. Thingiverse user goodBEan posted this design for a Mini Festivus pole, which can fit “a 1/2 inch standard electrical conduit that is cheap, readily available, and made of aluminum so it has a very high strength to weight ratio.” You should use “as many shells as possible” for this print so the top stays intact, and it’s noted that some sanding may be required if the fit is a bit tight.

Finally, if you’re just not feeling that much holiday spirit this year, or you know someone else who isn’t, might I suggest this adorable Baaaa Humbug! design by Thingiverse user keithirma?

We hope you have a joyful holiday season, and that 3D printing makes it even better!

Have you 3D printed anything for the holidays? Let us know at 3DPrintBoard.com or in the Facebook commentsbelow.

The post It’s the Most Wonderful Time of the Year…for 3D Printing appeared first on 3DPrint.com | The Voice of 3D Printing / Additive Manufacturing.

Make the Perfect 3D Printed Accessory for Your New Year’s Eve Party

I’ve said it before and I’ll say it again now – I’m a sucker for a good New Year’s Eve party. I’ve been to fancy themed parties, parties where everyone was in jeans and t-shirts, and even a pajama party. Today, I’m focusing on everyone’s favorite New Year’s Eve party accessories: the 3D printed variety, of course. Rather than giving you a summary of great 3D printed NYE decorations, we’re talking mostly about apparel, along with a few other items, that will make you look like the most tech-savvy Belle (or Bill) of the ball.

2019 Happy New Year Fun Glasses


Starting things off right with everyone’s favorite New Year’s Eve accessory – those silly glasses in the shape of the year we’re about to begin. Thingiverse designer Auggie is back with the 2019 version, which features two arms with rugged hinges and glasses that are easy on the skin of both your nose and your ears.

“I printed the arms with black PLA at 220 degrees and 45 degrees bed,” Auggie wrote. “The Glasses themselves I printed them with white PETG at 345 degrees and 100 degrees bed. Fill is 10% and no need for supports because they are already in the uploaded STL file. Don’t forget to cut them off before inserting the arms.”

Auggie writes that Gorilla Glue will help to secure the arms of the glasses in place. In addition, if you’re interested in painting the numbers on the glasses in different colors, you’ll want to ensure a good color base by 3D printing them in a white material. To really go all out for the new year, add some glitter to your glasses!

For another option, check out this New Years 2019 Glasses version by Cults3D user A_Skewed_View_3D.

Earrings 2019

Another oldie but goodie is this pair of earrings by Thingiverse user catf that have been updated for the year 2019. If you’re in need of a quick accessory for your party tonight, these are perfect, as it only takes 15 minutes to 3D print the set. The length is 6.2 cm, with a width of 1.3 cm and a thickness of 2 mm. The 3D printing parameters for these cute 2019 earrings are listed as the following:

  • 20% print speed not too fast for better rendering
  • 100% filling rate sufficient for jewelry
  • 215 ° PLA printing temperature
  • 60 ° plateau temperature
  • 0.1 layer thickness
  • 0.8 shell thickness

Headband New Year 2019

MyMiniFactory user Zeljan Ban created this cute 3D printable headband, which shows the transition from 2018 to 2019. This is another quick print, as it only takes 45 minutes from start to finish, and the headband and the number 8 were 3D printed in whit Anet A8 material, with a 0.2 mm layer height and a print speed of 50. The numbers 2, 0, 1, and 9 were 3D printed in red for a nice contrast, and even feature some holiday sparkles.

Fancy Bow Tie Version One

Cults3D user BonGarcon wants to make sure you look your best for your New Year’s Eve party (or parties) with this dapper bow tie, which can be 3D printed in a variety of colors to match your festive outfit…puttin’ on the Ritz, indeed.

New Years Vase – 2019

If you’re in need of a thoughtful gift to give your hostess tonight, look no further than this lovely, simple 2019 vase, designed in Fusion 360 and 3D printed in deep purple by MyMiniFactory user thom lamourine. You won’t need any supports to print this vase, though you will need to utilize a spiral/vase mode.

Bubbly Champagne Cookie Cutter

You could also be the guest that impresses by bringing a batch of cookies you made from scratch (or a boxed mix, no judgement here) shaped like exploding champagne bottles, courtesy of this cute print from Cults3D user oogime. Just make sure you use a food-safe filament.

Happy New Year Keychain 2019

Cults3D user LaurentRiviere created this adorable 2019 key ring “to remember the new year!” You’ll need to pause the print job at the 11th layer to change the color from black to white for the full effect, and remember – if you’ve had too much to drink or are too tired to drive home at the end of the night, make sure the keys attached to this key ring go in your pocket, not your ignition, and call an Uber instead.

3DPrint.com wishes everyone a safe and happy New Year’s Eve!

Will you try making any of these 3D prints? Discuss this and other 3D printing topics at 3DPrintBoard.com or share your thoughts below.

Making the Holiday Season Merry and Bright with 3D Printing

Floating State Ornaments with Heart Cutout

While the official first day of winter isn’t actually until next Friday, December 21st, it’s certainly felt like winter here in southwest Ohio recently. For me, this means drinking hot chocolate, sleeping in flannel pajamas, donning mittens and a scarf every time I walk outside, scraping the frost off my windshield when I need to go somewhere, and asking my husband to spread pet-safe salt on the back porch steps so our elderly dog can get down to the yard to go to the bathroom without slipping and breaking his furry neck. But it also means hauling all of my Christmas decorations up from the basement and setting them out, as well as braving the crazy crowds at the mall to find the perfect Christmas gifts for everyone on my list.

Luckily, these last two – decorations and gifts – can be helped along through the use of 3D printing. If you have your own 3D printer at home, the best part of 3D printing during the holidays is not having to leave your house to take care of the essentials. Here at 3DPrint.com, we’re saving you the heavy lifting and compiling a list of holiday 3D prints to make from the comfort of your own home.

If you’re looking for the perfect festive decorations, there are many great 3D printable Christmas tree options out there, like this one from Cults3D user tanyaakinora or this version by Thingiverse user Tony_D, which prints without any supports. It also definitely wouldn’t be Christmas without some 3D printed ornaments; my favorites include this Christmas Ball by Cults3D user Luci, these Floating State Ornaments with Heart Cutout on Thingiverse by PenolopyBulnick, and this quick and simple 3D printable snowflake_04 found on MyMiniFactory.

“Printed in white PLA on highest quality setting using in Simplify3D, 10% infill,” wrote Rich Williams, who goes by Akronovation, about this last snowflake. “No supports required.”

Nativity scenes are also popular 3D printable decorations – check out this traditional set by MyMiniFactory user Stephen Bailey, or this more modern version, found on Thingiverse by user T-Maz and 3D printed at 70% infill.

Nativity Scene Modern

Advent calendars come in all shapes and sizes, and 3D printing makes it even easier to customize them. Case in point: this awesome Deathly Hallows Advent Calendar by Thingiverse user LoisG, who 3D printed the calendar on a Flashforge Creator Pro out of PLA Wood material.

“Due to the size I had to make the sides in 6 pieces and glue together,” LoisG wrote. “I used Gorilla Glue as the surface wasn’t flat enough to use Superglue.”

Deathly Hallows Advent Calendar

3D printing also helps when it comes to the more utilitarian aspects of the holiday season, like this Holiday Light Holder by Cults3D user BOLROD, these Christmas Tree Feet for a mini tree by Thingiverse user Almantle, and an ingenious Christmas Light Wreath Clip found on MyMiniFactory, created by user James DeRuvo.

“Had a few of the light clips on our Christmas wreath break this year,” DeRuvo wrote. “No idea where to buy them, so I whipped out my mobile phone, took a picture of the white one, converted it to a 3d model using Selva3d and Tinkercad, and five minutes later, I’m printing replacements! That’s what I what I love about 3D printing!”

It’s not Christmas without cookies, and what better way to make your dessert festive than by making some 3D printed cookie cutters?


MyMiniFactory user airin danielle shared this nice cookie snow flex cutter design, and TeamOlivia posted an variety of 3D printable designs in this Christmas Cookie Cutter Set, which includes Santa, a reindeer, a Christmas tree, and a present with a bow on top.

“All of them were designed so that they could be decorated very easily (if that is your preference) or have room for something more detailed,” TeamOlivia wrote.

Of course, it’s a big world out there, and not everyone celebrates Christmas. On Thingiverse, I found a Multi-Color Dreidel on MyMiniFactory by Mosaic Manufacturing and this Kinara – Kwanzaa Candle Holder by user Fargo3DPrinting.

“This is currently prone to tipping backwards, so some adjustments will be made in the future,” Fargo3DPrinting wrote about the holder. “It was designed to be printed flat on its “back.” Full size will fit 1/2″ tapered candles. Can be scaled to fit bigger or smaller candles.”

Kinara – Kwanzaa Candle Holder

Happy holidays, and as always, happy 3D printing!

Will you try making any of these holiday-themed 3D prints? Let us know! Discuss this and other 3D printing topics at 3DPrintBoard.com or share your thoughts below.

Just in Time: Last-Minute Holiday Gifts

Need a last-minute gift for a special person on your holiday list?  You can create a unique, custom 3D-printed clock with just a little bit of design knowledge and an inexpensive battery-powered clock kit like this $8 Youngtown Silent Clock Mechanism with Small Hands:

You’ve got from now to the second week of December to get a 3D design together, if you want to order a 3D print before the Shapeways Material Cut-Off Dates for the holidays. In this post we’ll show you how you can create a custom 3D-printable clock face with three different software programs. Don’t have time for that? Skip to the end to see how you can customize a retro clock very quickly with our Sunburst Clock Maker.

Beginner: Tinkercad

Even if you’ve never created a 3D design before, it’s easy to get started with Tinkercad, a free in-browser 3D design tool with a simple drag-and-drop interface. To get started, sign up for a free account and check out the All3DP video Getting Started in Tinkercad: A Tutorial for Complete Beginners. Once you know a few Tinkercad tricks, you can create complex designs from very simple combinations of shapes; throughout this post we’ll link to helpful YouTube videos to show you exactly what you need to know.

To make a simple clock in Tinkercad, we’ll start with a cylinder for the center face, and then create a couple of stretched-out rings with Rotated “Round Roof” shapes and Holes:

By using the “Control-D” duplication tool we can copy and rotate those rings in a pattern around the cylinder. After modifying the heights of each shape with the Ruler, we get a simple retro clock face design:

If you want to pick apart our Tinkercad design and see how it works, just open this Quick Clock link and tinker for yourself! Add some Text for numbers, if you like, or design something new from scratch. When you’re ready to download your design for 3D printing, click the “Export” button and then choose “Export as STL”.

Intermediate: Fusion 360

To make a fancier custom clock, try Autodesk’s Fusion 360 3D software, which is free for students, educators, and hobbyists. There’s a steeper learning curve to get started in Fusion 360 than there is with Tinkercad, but there are plenty of video tutorials online to help you learn. Some of the best are the Fusion 360 tutorials by Maker’s Muse. We’ll link to relevant video tutorials throughout this section so that you can learn just what you need. Fusion 360 is a very powerful program with a lot of features and tools, but you only need to know how to use a few of those tools to make a simple clock!

For example, if you know how to create a Sketch, add Constraints, and use a Circular Pattern, then you have all the tools you need to create a 2D shape for a clock face design in Fusion 360. To create the example below we started a Sketch, added a Circle at the origin, then formed spoke shapes with Lines. We kept the shapes symmetric by using Constraints, and rotated them in a Pattern around the origin. In the screenshot below we are in the process of duplicating and rotating the thinnest spoke to create twelve copies of it around the center circle:

Most models in Fusion 360 start from a two-dimensional Sketch like the one above. Once you’re done with your Sketch you can Extrude to give it some three-dimensional depth, and then Fillet the edges to make them rounded and professional-looking:

To download your model for 3D printing, right-click on the gray name of your model in the Browser menu (if you haven’t saved your Fusion 360 design yet, then the name of the model will be “(Untitled)”, as it is in the screenshot above). Select “Save as STL”, click “OK” in the new window that pops up, and save the STL file to your computer.

Advanced: Make ALL THE CLOCKS

Feeling more ambitious? With some parametric design you can write OpenSCAD code to generate billions of clocks, each from a random seed. For example, consider the many types of retro-styled “Sunburst” or “Starburst” clocks shown in this Google Image search:

Clocks like these were inspired by the modernist-style work of industrial designer George Nelson, who made many variations of such clocks in the 1950s. There are some common design features that are shared by most of these clocks: geometrically-shaped spokes, a star/sunburst pattern, a circular inside for the hands… Here’s what our first notes looked like when we started thinking about the typical parts and designs for Sunburst Clocks, and some of our early test prints:

OpenSCAD is a free code-based design software that works on any platform. With just a little bit of coding knowledge you can write simple code to describe a library of geometric spoke shapes, and then options for rotating those shapes around a central circle. There are literally billions of configurations; here are just a few:

If you want to learn more about OpenSCAD, check out our beginner’s video tutorial PolyBowls – A simple OpenSCAD code walkthrough and intro document Hello OpenSCAD. The “Hello” document has a link to sample code you can inspect and modify; if you want to play around with the code that made the clocks in the rotating image above, you can download it from our Thingiverse page.

The Easy Way Out: Customize a Sunburst Clock

But… you may be thinking… there is NO TIME FOR THIS!! The holidays are coming fast, and you don’t have time to learn how to write parametric OpenSCAD code right now? No problem, just use our Customzier to design your own retro clock! We’ve made our design free on Thingiverse so you can create unique and interesting Sunburst Clocks in just a few seconds. Just go to the design on Thingiverse and click the “Open in Customizer” button to get started (you’ll have to sign up for a free Thingiverse/MakerBot account to open the design in Customizer):

The Customizer version of the Sunburst Clock design lets you create new clocks just by clicking in the Random Seed slider and selecting design options from drop-down menus. You can also set the overall shape and size of your clock, and control the center hole and backing to match your clock kit:

Once you have the clock you want, click the “Create Thing” button and download the STL file from your list of Things within Thingiverse. Here is a design we made with the Customizer and had printed at Shapeways in White Versatile Plastic for less than $30 (it’s the “Cordelia” design), together with the clock mechanism we’ll use to assemble the final clock:

After assembly, the clock looks like this:

And here’s an “action” shot on the wall:

Light Speed: Order an Existing Design

If you’re really down to the wire and don’t have time to create or customize your own design, then quickly head over to the Shapeways Marketplace for a huge selection of unique 3D printed gifts that you can order right away. If it’s before the December 13 cutoff date for medium-sized White Versatile Plastic at Shapeways, then you still have time to order, with next-day shipping and priority manufacturing, one of our best twelve pre-made retro clock designs from the geekhaus shop, like the Velma:

Happy making, and happy holidays!

The post Just in Time: Last-Minute Holiday Gifts appeared first on Shapeways Magazine.

Holiday Planning Tips: #5 Promote Your Products In Tactful Ways

You may not be a marketing specialist, but that doesn’t mean you can’t use some marketing tips to help promote your products this holiday season. These simple, easy-to-follow tips will not only help generate more interest in your products over the next few weeks but also lead to more long-term business success.

Dive Deep Into Your Google Analytics Account

One of the best ways to fully understand your customers is by using Google Analytics. Reviewing your traffic data will give you a good indication of what your customers are most interested in and which products they view the most. If you haven’t set up your Google Analytics account, it is easy to do — and free! — just follow our tutorial here.

Once you’re all set up, make it a habit to check it regularly. Know how many visitors your shop receives on a weekly and monthly basis, the demographics of your visitors, how they’re finding your shop, and what your most popular products are.

Utilize Social Media

If you see through Google Analytics that your shop is receiving decent referrals from social media, it’s worth allocating some time to further develop your social channels. Whatever your preferred  channel is, these tips could help:

  1. Comments are worth more than likes: Not only from an engagement scoring perspective, but meaningful conversations can help you understand your customers’ needs and wants much more than likes.
  2. Know what time zones your audience is in and when they are most active. Use this insight to plan your posts at times when there is more engagement.
  3. Aim to only share high quality photos, meaning that none of them should be blurry or hard to see. Additionally, candid photos work well on social because they feel more personal, and behind-the-scenes photos shot on cell phones can be just as effective.
  4. Build relationships online and offline: Ultimately, you want people to message, contact, and purchase from you. Don’t lose sight of your end goal, which is to generate revenue, not to reach x number of followers or likes.

Don’t Underestimate Word of Mouth

As useful as digital marketing is, word of mouth is still extremely important. If customers are happy with the products you make for them, chances are they’re going to tell their friends and family. Don’t be shy about letting your social circles know about your 3D products. You are your own best advocate, so give out your products as gifts, bring them to holiday parties, wear them, display them, use them at home, at work and when you travel, so that when people think of your product category, they think of you.

Ask For Customer Testimonials

Getting customer testimonials is also useful. Remember that customers are humans, and behind each purchase is somebody looking to make their lives happier or more productive with your product. Ask your customers for feedback and use the feedback to improve your shop, and to let the world know why people have chosen to purchase from you.

So you’ve reviewed our material cutoff dates, refreshed your products, added in the best images possible, and now you’re marketing your products to your target audience. We hope these tips have been helpful and wish you a great holiday season of selling.

The post Holiday Planning Tips: #5 Promote Your Products In Tactful Ways appeared first on Shapeways Magazine.

Holiday Planning Tips: #4 Position Your Products Well to Optimize Sales

The goal of this holiday season for our business owners is simple: to sell as much as possible and to deliver quality products that satisfy customers. A helpful part in doing that — in addition to planning for material cutoff dates and refreshing products and images — is marketing. But we have one more tip to share before we get to that, which is to recognize how your products are positioned in the Shapeways marketplace, or wherever else your products are sold.

Consider the Theory of Long Tail

Traditionally in the commercial world, a company’s sales work like this: About 20% of their products make up 80% of the sales, which is known as the 80/20 rule. The other 80% of the products, while still manufactured, draw in much less revenue. At Shapeways, however, our marketplace sales embrace the theory of Long Tail.

3D printing is moving the consumer world more towards personalized and customized products, and the products our shop owners sell on the Shapeways marketplace is an example of a diverse long tail of products. Our shoppers purchase from this long tail of products instead of from a small pool of selections (meaning the 80% rather than the 20%).

Categories, Subcategories and Popular Product Placements

At Shapeways, we split our marketplace into 8 main categories: Tech, Accessories, Jewelry, Art, For Your Home, Games, Miniatures and Other. Within those 8 categories, we have 43 sub-categories. During the holiday season, while we don’t have popular products in the same way that major chain stores do, some categories are slightly more popular for shoppers. These include: Tech, Jewelry (pendants) and Games (tabletop & wargaming).

Where you choose to place your product in the marketplace is completely up to you, but it’s definitely a decision you should take some time to think about. You can reconsider your categories to help more shoppers discover your shop, or you can count on a less crowded space to help your products stand out. Whatever you choose, know that each route can lead to much success with the right strategy.

The post Holiday Planning Tips: #4 Position Your Products Well to Optimize Sales appeared first on Shapeways Magazine.

Holiday Planning Tips: #3 Attach the Best Images to Your Products

So you’ve taken the time to review your products and our material cutoff dates. Great! But there’s one more aspect you’ll want to consider when polishing up your shop: photography.

Look at your product images: Do they reflect your 3D printing capabilities well? Are the pictures appealing to potential clients? Do they show customers an accurate representation of what they’re ordering? Stellar photography can make or break a sale. It’s simple: People love photos and Shapeways’ audience is no exception. Follow these tips to ensure your images are effectively helping you promote your designs.

Which Images Should You Use?

  1. Use photos of printed products. “Default renders” of unrealized products don’t give shoppers the confidence to make the purchase because they can’t visualize what the actual products will look like.
  2. Use images that show the material options so customers know exactly what to expect when they order the 3D model in a specific material and finish. For example, do you offer your products in both gold and bronze? Have photos that show the difference in the two options.
  3. Use images that are focused and can capture details on your 3D products. If you need help with this, we’ve created a simple tutorial just for you.

Photo Quality and Quantity

  1. In your images, show the actual size of your products. In the past, we’ve heard from confused shoppers who thought that the miniature chair they purchased is one they can actually sit on! Including dimensions in your images will help avoid similar problems.
  2. It’s best to show three types of images: close up, scale, and in-use (for a wearable object, show it on the body; for a toy, show it next to related items). In addition, you may also want to use photos to show how your products can be the perfect gift idea. For instance, if you’re selling jewelry for women, consider having photos of women modeling the products.
  3. Summer is long gone, so go ahead and update the background of your photos to fit the holiday theme. Change that photo you took in the park in the spring to one with snowflakes in the back.
  4. Be consistent with having great photos. If you have great photographs next to bad ones it erodes the overall integrity of the look of your shop.


In addition, adding a video alongside your images can help tremendously. Most of the top selling 3D products here at Shapeways include videos, so it’s clear that going the extra mile certainly pays off in the long run.

The post Holiday Planning Tips: #3 Attach the Best Images to Your Products appeared first on Shapeways Magazine.