New Guide: Build a NeoPixel Crystal Chandelier with Speed & Brightness Control

DIY crystal chandelier

Take a look at the latest guide from Erin St. Blaine: build a three tiered chandelier with hanging DIY paper-craft crystals that light up with pixels inside. Easily add your own custom animations using CircuitPython and the LED Animations Library. This guide takes animated lights a step further, adding a rotary encoder knob that controls the brightness or the animation speed of the pixels, and also acts as an on/off switch. From the guide:

Floating crystals and glowing lights are a match made in heaven. This project combines a wide variety of skills and tools into one lovely project. Make a gorgeous hanging lamp with sparkly beads, glowing crystals, live edge wood and of course, lots of NeoPixels.

My chandelier is unique, and designed to show my personal style. Since you, dear reader, have your very own unique style, this tutorial will focus on giving you the tools to design and create your own one-of-a-kind bespoke hanging lamp. This tutorial will provide source files and ideas, and give guidance on how the electronics fit together.

This tutorial will also get you started with customizing your own software animations. The sample code uses CircuitPython and the delightfully easy to use LED Animations Library by Kattni Rembor. This code gives you a framework that allows speed and brightness control using a rotary encoder knob, so you can adjust the lighting to suit any environment or mood.

See the full build tutorial here: https://learn.adafruit.com/neopixel-crystal-chandelier-with-circuitpython-animations-and-speed-control/overview

crystal chandelier

We can’t wait to see the creative lamp you build with NeoPixels and Circuit Python!

Reinvented Magazine Presents their Latest Maker Themed Issue!

Caeley Looney from Reinvented Magazine reached out to let us know all about their latest issue which features Erin St. Blaine, Adafruit tutorials and more!

Reinvented Magazine is proud to present its latest issue, and guess what? It’s maker themed! Issue No. 5, their most recent publication, features a wide variety of makers, innovators, and electronics aficionados. Here is a more in-depth look at the content you’ll find in this season’s magazine:

  • An exclusive interview with Svetlana from Kamui Cosplay, showing off her extraordinary maker-centric cosplay designs just in time for some Halloween inspiration;
  • A story highlighting the Maker Movement, including an exclusive interview with the founder of Maker Faire, Sherry Huss;
  • Their ‘Meet the Makers’ series featuring interviews with Julielynn Wong, MD; Maker and Nonprofit Founder, Xyla Foxlin; Ashley Awalt; Erin St. Blaine; and Lorraine Underwood;
    An interview with the Host of Mythbusters Jr., Allie Weber;
  • Articles providing an introduction to electronics, 3D printing, and hackathons;
    Do it yourself (DIY) article featuring one of Adafruit’s tutorials;

You can find all of this (and much more) in their latest issue, which is officially in stock on their website!

Order your digital or physical copy now at https://www.reinventedmagazine.com/shop-1!

Reinvented Magazine is a 501(c)(3) nonprofit organization that works to empower and inspire the next generation of young girls to pursue their passions in science, technology, engineering, and mathematics (STEM). Through their One-for-One Program, for every magazine bought, they donate up to one magazine to a girl in a low-income or rural area without access to STEM education resources.

The Diamond Project

The Diamond Project

The Diamond Project is a business idea from Valerio Semeraro. He is an Italian born in Martina Franca, Puglia, Italy. He is a passionate, technical, and highly enthusiastic 3D printing artist. Martina 3D Printing is an Instagram page he started, and it lead to this particular project we are showcasing today. I think it is an interesting concept that with some assistance could scale.

The “Diamond” Project is trying to create a diamond capable of projecting holograms suspended in the air. 

We like to create objects that are unique in the world and different from anything we’ve seen before.We aspire to revolutionize the display of holograms with devices thanks to an application of 3D printing.

Diamond Project Prototype

Their Diamond wants to replace typical logos on the front bonnets of future cars. It will have a function similar to the Rolls-Royce statue and will highlight innovation, design, and technology. This design will give a futuristic look to cars as it will display a hologram on the hood. The technology they are using can also be readily applied to different mediums such as car headlights, audio speakers, gadgets for televisions, gadgets for telephones, lamps, advertising, and much more. It is a cool technology that is leveraging AR

Here is my opinion on the project. I think that the project is truly in its infancy and needs more guidance from seasoned business professionals. The concept is good and definitely a doable one technology-wise. I do not believe they have the bandwidth or business experience to grow this fully. I am helping them in the sense that I want to highlight them for this though: dogged persistence. I will say that Valerio and his team have been emailing me for months sending me different media as well as updates on their project. It shows that as an organization they will put in the work necessary to grow. They just need the right business counsel to grow exponentially.  

Valerio Semeraro

They are looking for some assistance in terms of company direction. Their intent is to create functional and futuristic prototypes starting from the holographic logos on the bonnets of cars. They are looking for someone to give them a hand to build their project. Their ideals of inventiveness came trough their Fablab origins. This idea won the Italian Microsoft award “SognatoriDigitali”. If this intrigues you and you want to help this project more contact them through email at diamond.project.hologram@gmail.com

The post The Diamond Project appeared first on 3DPrint.com | The Voice of 3D Printing / Additive Manufacturing.

Make All the Things Part 2: Ring Creation and Casting a Wax Ring, Part 2

This is the final installation of the wax ring project I have been working on. It has been such a great learning experience, and it has invigorated the maker within me. I highly suggest everyone to start making projects for fun. There is such a cathartic feeling attached with having an idea and bringing it to completion. It really pushes oneself to get things done. The creativity and new skill sets associated with building projects is so rewarding. Before this project I had zero skills in jewelry making and prototyping. After this project, I will not be at the level of a professional jeweler, but I have a newfound confidence to experiment and make new jewelry projects in my spare time. I also see what areas I need to improve to be a better designer. I will definitely be working and crafting my 3D design skills if I want to make very intricate designs for the future.

Before Cleaning Up

The end of this project required a good amount of clean up of our rings. Buffing, cutting, as well as sanding was necessary to complete the project. The ring was still attached to our sprue structure that was discussed in our previous articles. In order to remove this,  we first needed large bolt cutters to clip the base material of the structure. This requires one to place the structure on the floor and then use force to cut the base. I had to put on a mask for facial safety in case of debri flying from the ground towards my eyes. After this has been cut, the tree like structure can then be cut further with different tools. The main tools used for this include a jeweler’s blade as well as pliers. The pliers were used to remove the stems of sprues within the structure.  It takes a bit of dexterity as well as patience to make sure that the structure is properly handled. 

Rotary Dentist Tool

The biggest issue from this is making sure that the cuts and blade movement are precise. A jeweler’s blade is very thin. This can lead to the blade breaking easily during a cut if one is not precise in their movement. One does not want to have chunks of material still hanging off their piece also. This will make the next step of the process way more difficult than we would want. I learned this through firsthand experience. The next step in the process was focusing on grinding the extra chunks of material within the ring. The pliers did an okay job of removing the stems within our sprue structure, but nubs of the material were still present. I then used a handy set of dentist tools to grind the inside of my rings. Before this project, I had no idea how the dentistry industry and the jewelry industry used similar tools. With the rotary grinder tool available to me, I then smoothed out the inside of the ring as best as I could. Honestly, my precision and detail were only okay. It is definitely a great start in the journey of refinement and detail. I would say that I miss out on details at times, and I believe keeping up with this hobby of jewelry will really develop my attention to detail.

Jeweler’s Blade

Once these nubs of material were ground out with the dentistry tools, I focused on finishing the product in terms of refinement. This is where sanding precision came into play. I took an 80 grit piece of sandpaper and applied it to the perimeter of the rings. This helped to bring out the true shine of silver in the designs. This part of the process was simple, but the most difficult part was to come. I had to sand done the face of the lion without degrading the actual design of the ring. This requires using the rotary dentist tool again. It took some precision, but the lion head was buffed and the silver shine of the material came through all around the ring. 

Finished Product

With this done, I finally had a cool lion ring made. The overall cost of the project itself in terms of silver was $200. With a bit more refinement, I will be able to sell this product at a high price point. Some follow ups of this project would include building a mold of the ring. This would then cut down the time associated with creating this product. Thank you all for watching this project evolved, but be prepared for new projects that I have ready for the future.

The post Make All the Things Part 2: Ring Creation and Casting a Wax Ring, Part 2 appeared first on 3DPrint.com | The Voice of 3D Printing / Additive Manufacturing.

Interview with Ganit Goldstein on Craft, Technology, Fashion & 3D Printing

Ganit Goldstein

Ganit Goldstein is a Designer whose interest lies in the intersection between Craft and Technology. Ganit studied Jewelry and Fashion. She received the Excellence Award from Bezalel Academy of Arts and Design, Jerusalem, Israel. Her work is focusing on new methods of incorporating 3D Printing into the world of Textiles, Shoes and Fashion. In her Collection ‘Between The Layers’, she created garments and shoes, inspired by her study of ‘IKAT’ weaving in Tokyo, Japan. Her collection received great interest and immediate press recognition, and was presented at Exhibitions and Museums around the world including Milan Design week, New York Textile Month, Asian Art Musuem – San Francisco, Holon Design Museum, ‘TALENTE’ exhibition in Munich and more. Ganit Goldstein believes in an interdisciplinary approach to design- mixing Tradition with Futuristic techniques – 3D printing & 3D body scanning.

Give us some background on your experiences so far.

I studied at Bezalel Academy of Arts in Design and majored in the department of Fashion and Jewelry. Since my first year of study, I was fascinated by using 3D design software, especially because of the design-freedom it allowed me. During my studies, I have often incorporated tools from other disciplines into my work, whether it is CNC, laser cutting, 3D scanning and 3D printing. The use of different tools and mindsets helped me discover my own desig language.

During my third year of study, I was expected to participate in an exchange student program. My decision was to apply for the opposite direction of what I was used to. Meaning, the opposite of the cutting-edge technology field. I found my way to the Craft Department ’Textile Art’ program at Tokyo University of the Arts – GEIDAI. During this time, every single process of my designs was made using traditional handmade techniques. Meaning, I turned completely low-tech, changing my entire thinking structures and patterns. That was very significant for me in terms of expanding my horizons and changing my view on design. Talk about stepping out of your comfort zone! When I finished my studies in Tokyo, I went back to Jerusalem to finish my final project. That’s when I decided to combine the traditional methods I recently learned, with the latest technology I was working on before. This was translating both worlds of the past and future into one design language.

Since my graduation, I was lucky to participate as a finalist in four international competitions, presented my projects in New York Textile Month, Hong Kong Fashion Week, Asian Art Museum- San Francisco and ‘Talente’ exhibition in Munich. These competitions helped me a lot to reach my goals, discover possibilities, and meet great people that influence my work until this day.

Craft and Technology Outfit

When did you first get excited about fashion and design?

I was excited to mix the borders between art and fashion, back in high school, when my project consisted of dresses made from broken glass and metal wires. I was looking at garments as a platform to make art pieces, that aren’t necessarily meant to be worn, but rather a manifestation of aesthetics, culture, language, and design. 

One exhibition that is very powerful in my memory is a solo exhibition (2014) of Iris Van  Herpen at the Design Museum Holon. The exhibition was very special and it featured beautiful outfits, that crossed borders between art, fashion, and futuristic techniques. It was influential for me because it dealt, or perhaps answered the question of whether fashion can be presented at museums as art pieces.  

When you did your first 3D printing project with fashion?

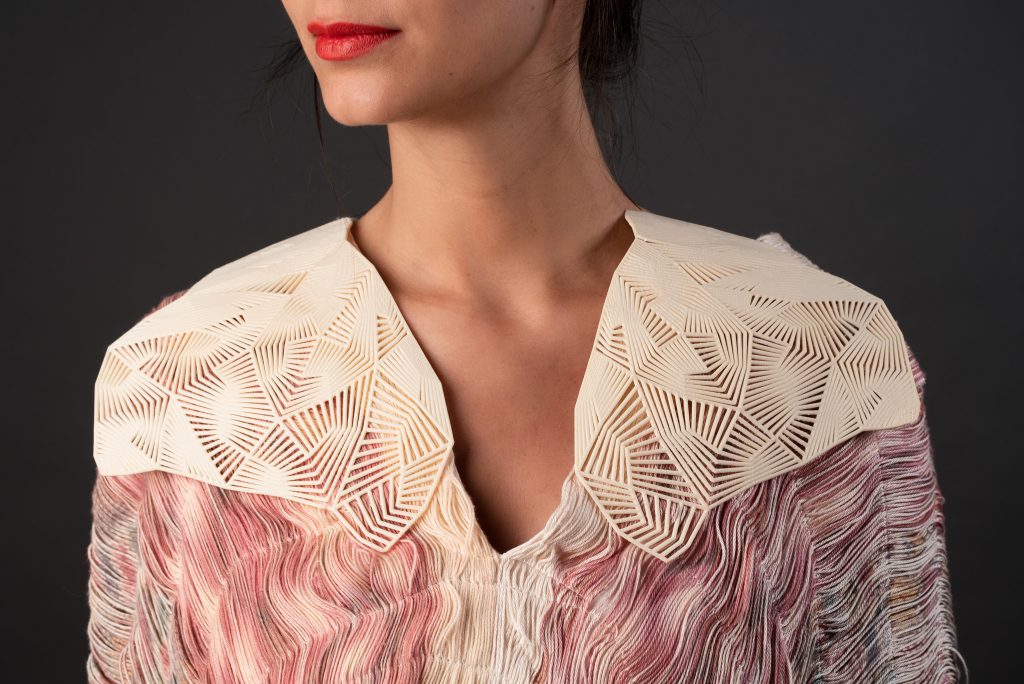
As part of my second-year curriculum study, we were asked to reconstruct costumes from the 18th- 19th centuries. I was asked to build an entire costume, made up of 7 different layers, just as it was made back in the history of fashion. The dress I was assigned to reconstruct is held by The Metropolitan Museum of Art (Costume Institute collections) – from the year 1870. This decade was a “golden decade” for lace dresses.  In the next semester, we were asked to think about the outfit in a modern perspective, and I was focusing on the lace. I decided to design and create a 3D lace of our times, based on algorithms printed with hard material, combining flexible properties inside the printed part. This was the first time I used 3D printing as an integral working method in my designs, and that’s when I discovered the huge potential in using algorithms, software and parametric design in the process of my work.

During my studies, and especially due to this project, I began working closely with the Institute of Chemistry – Casali Center at the Hebrew University, for innovative research in 3D printing. The research group, led by Prof. S. Magdassi, focuses on materials science, nanotechnology and their applications in a variety of fields such as 3D and functional printing.

This collaboration gave me the opportunity to work with great researchers, and thus better understand the different approach for material research studies, working on innovations in the field of 3D printing.

How important is the differentiation of fully created 3D printed items vs hybridized fashion products from textiles and 3D printed material?

The harmony of putting together two different worlds makes the innovation approach, and bring forward a new way of thinking about design. I believe in taking the essence of the traditional techniques from our past and translate those methods to the new technology- a different point of view from the traditional technique inside the process of the newest technology.

I feel it is important to make the hybrid of textiles and 3D printing together because it has the power to bring 3D printing to a much more wearable level. I also understand that fully 3D printed fashion is still in a building stage, and the combination of traditional textile methods helps this method is growing quicker. Hybridized craft methods in 3D printing are important in my opinion because we should not lose sight of the traditional processes. Technology will always move forward, but craft methods can disappear easily. I believe it is important for the designers also to remember the traditional working processes, not to lose the history of crafts. Bridging the craft methods and technology to move forward with the latest technology.

Craft and Technology Shoe

What are some of your favorite projects that you have worked on in 3D printing?

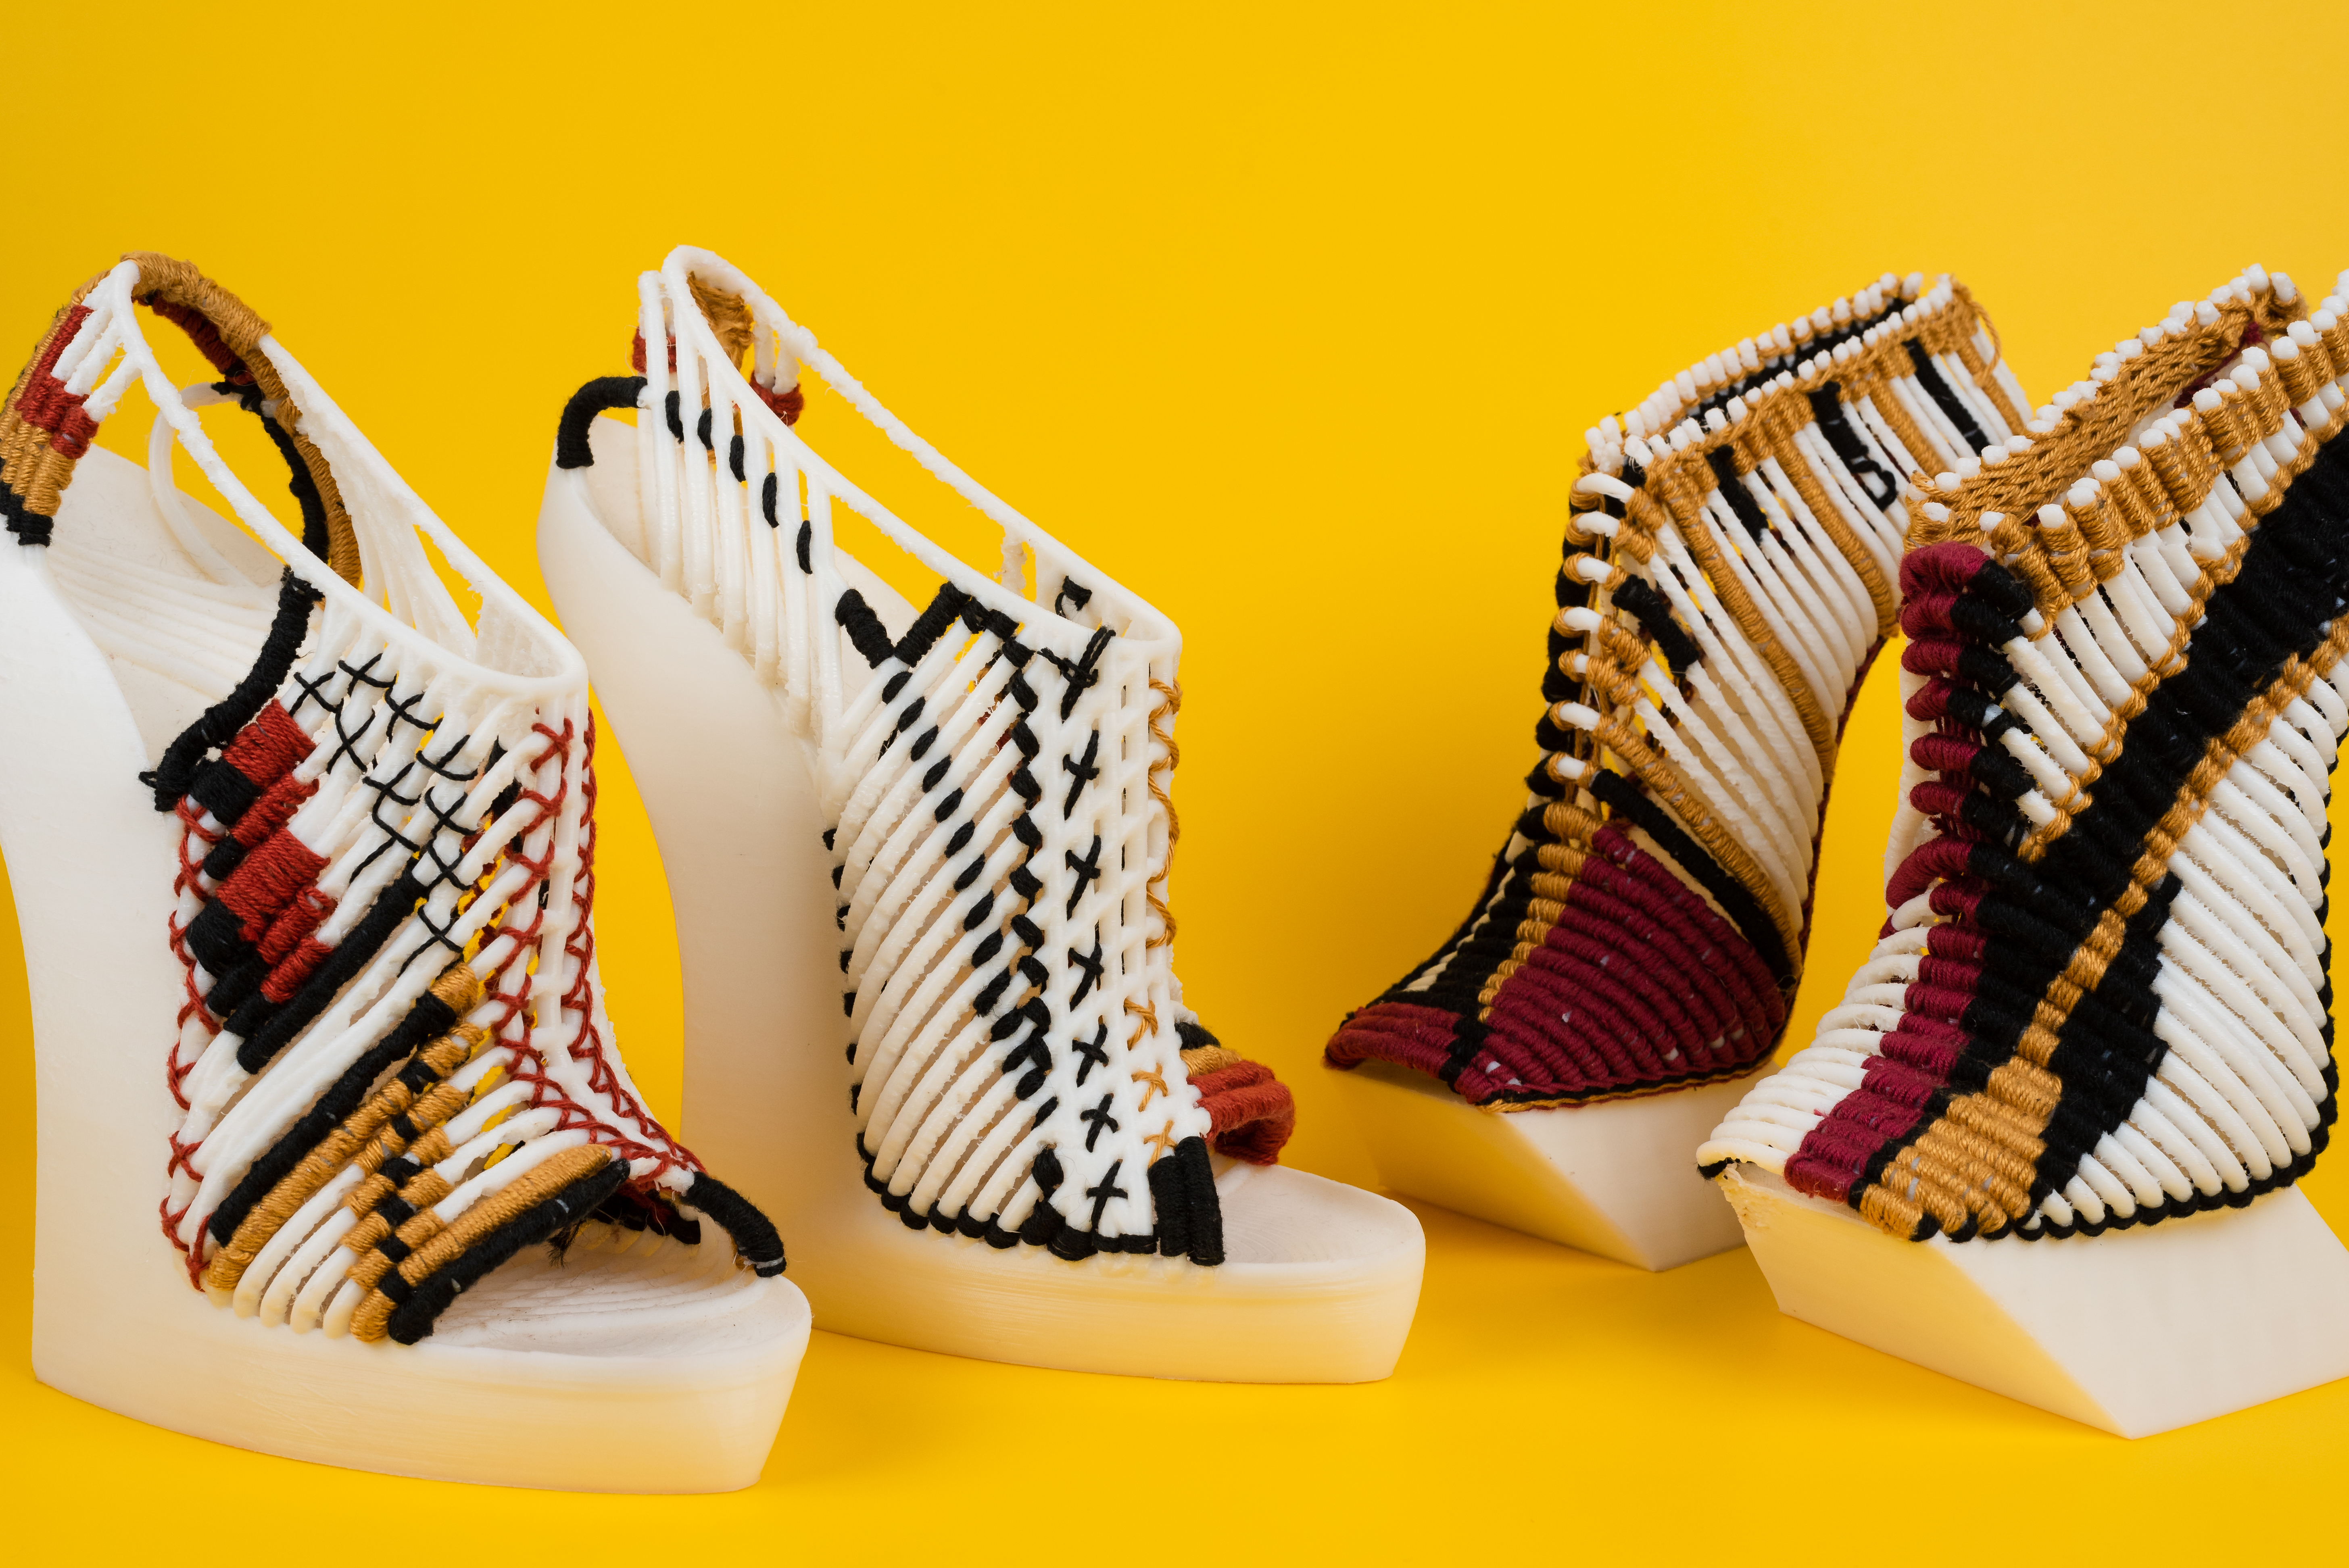
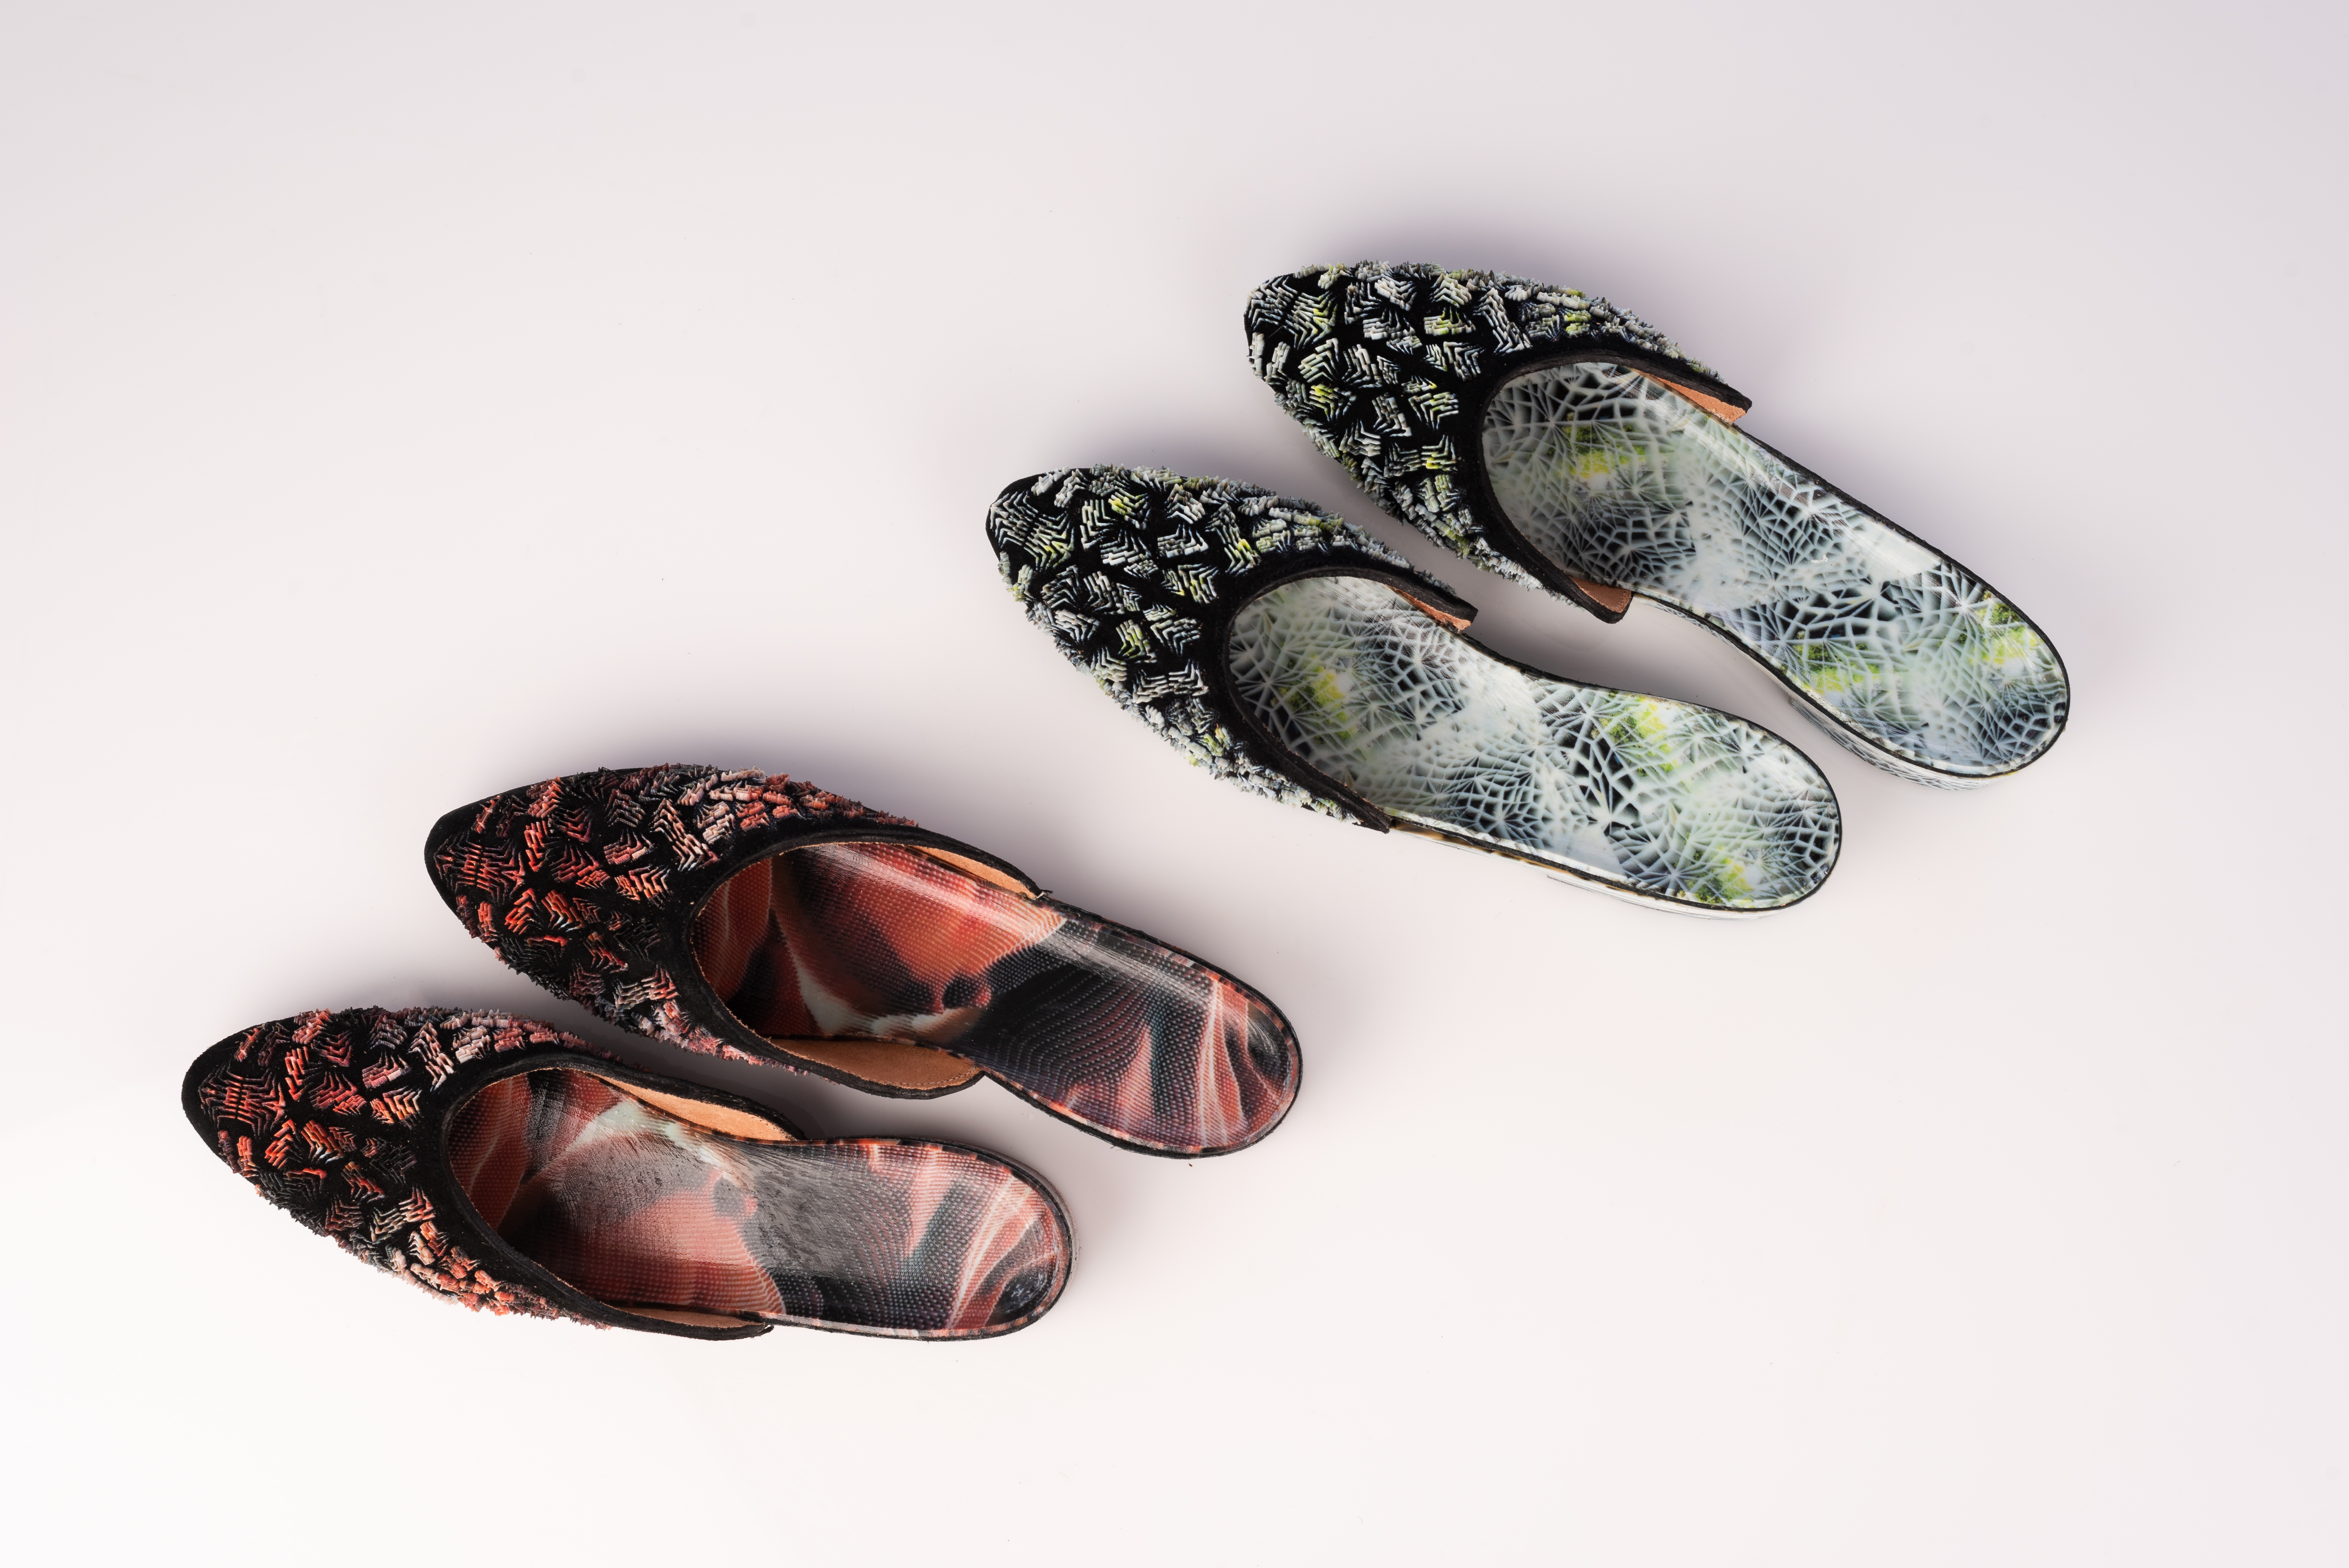
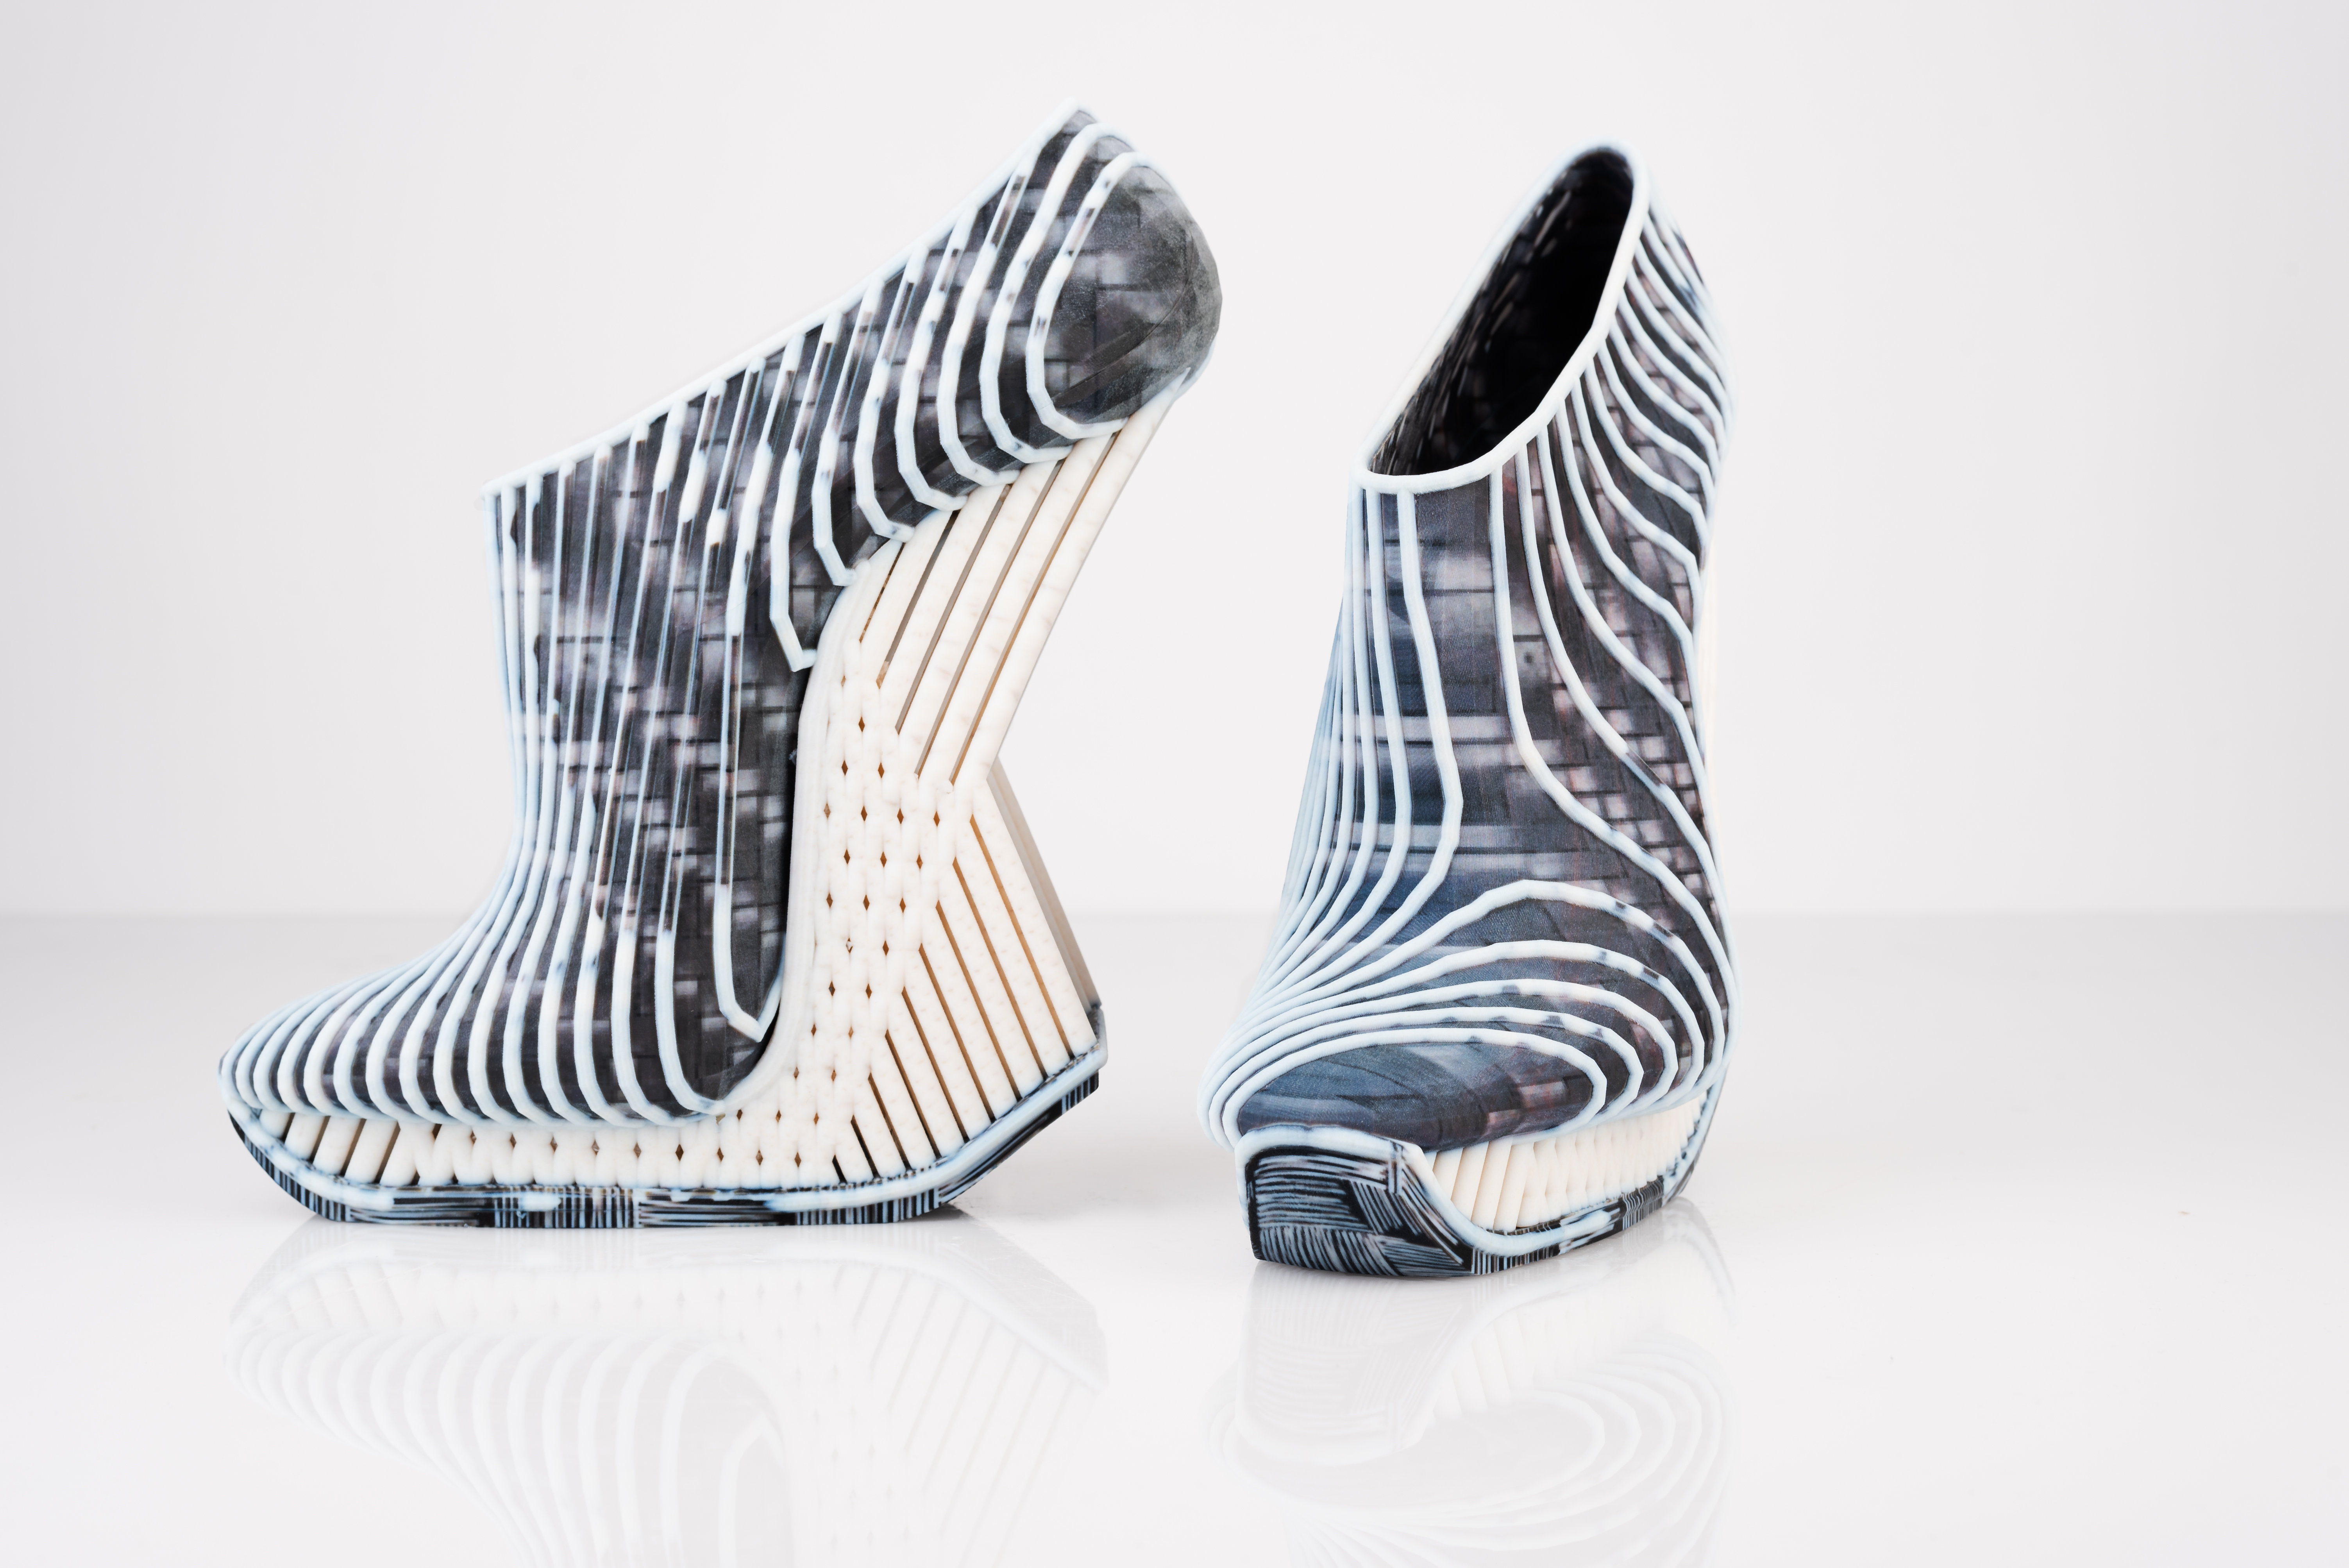
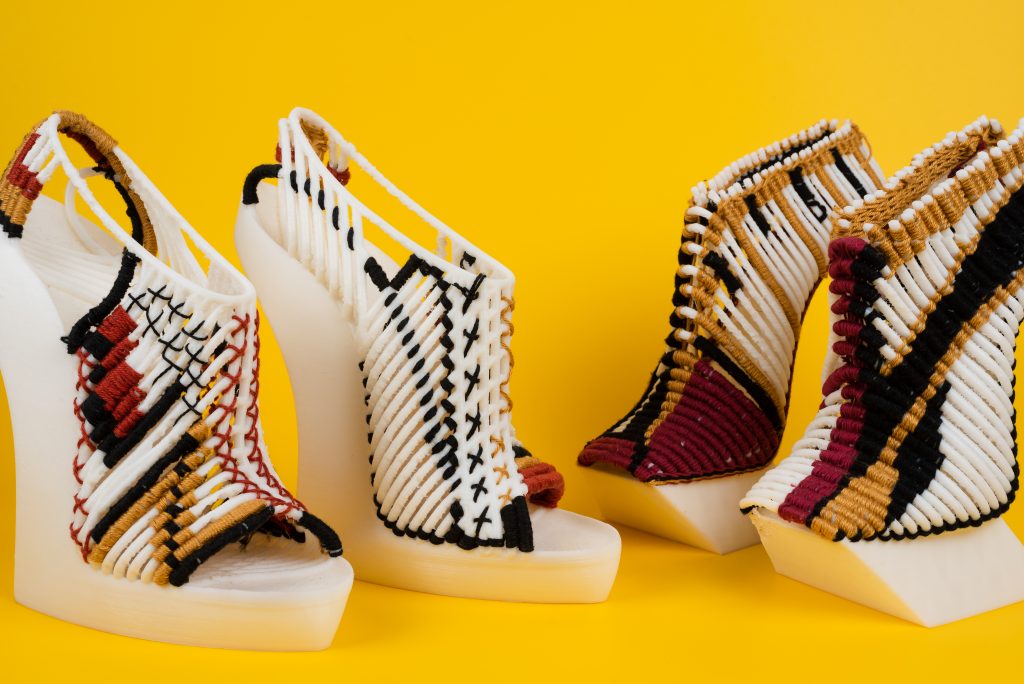
Seeing the first 3D printed multi-color shoes that were made in collaboration with Stratasys was an extremely exciting moment. In these shoes, my aim was to create a fabric-like texture inside the printing process. I couldn’t hope for better results. Since my graduation presentation, the shoes were presented in exhibitions worldwide (the last exhibition was in Milan Design Week 2019). Most of the people I have met during the exhibitions were sure the shoes are made from fabric and not from 3D printing. The shoes are now part of the Holon Design Museum permanent collection, they were the first pair I made together with Stratasys. We made a few more designs, but nothing compares to the success and joy that was brought by my first pair.

One of the most exciting projects that has had a huge impact on my projects so far, was working in collaboration with Intel ‘RealSense’ studio in Jerusalem. We incorporated their technology into the design process by 3D scanning an entire body thus allowing to create customized fashion and accessories, designed for a specific person. We also launched together an AR App (made together with Yoav from RealSense Studio) that demonstrates the 3D printing process using a hologram featured on the reality).

Another very exciting collection will be soon launched together in collaboration with Prusa Research company for FDM processes of wearable shoes. I worked closely with their maker-lab, and we made huge progress, the shoes are 100% wearable with multi-color and flexible materials!

Stratasys and Goldstein Collaboration

What is currently being worked on for you within the 3D printing world?

I am a great believer in collaboration and partnership with great people and open-minded companies. I want to continuously break boundaries, that is my core value, and I understand that in order to do that, I must turn to other disciplines and utilize what they have to offer. The ability to combine both worlds of past and future technique has a big impact on both my past and current projects. This is my take on the future of the 3D printing world.

Harnessing the power of the new technology and utilizing traditional techniques helped me create my own design language. I think that the ability to be open minded in the design process enables me to achieve my goals. I am a great believer of trying new methods, and not putting limits. This works because the design process has ups and downs, and from some failures and material tryout, you can reach better-designed results.

How was it to partner with Stratasys so early on in your journey?

My 3D printing journey started in a small room in my parent’s house, which I filled with 2 desktop printers. That room became my very own printing lab, where I got to experience, try-out materials and utilize the good old “trial and error” method.

I was fortunate enough to gain that experience, because I believe that is what enabled me to work with a “tip of the spear” company such as Stratasys.

The collaboration with Stratasys established after I had many “flight hours”, examples and tryouts. We partnered up during my last year studies. As my vision was to integrate colors inside my printed projects, They allow me to carry out my vision and turn it into reality. I’ve been incredibly lucky, and honored, especially knowing it came at such an early stage of my career. And it also makes me very proud.

I worked closely with the R&D team, and therefore, we shared the same vision of pushing the boundaries of the technology through design research. During the making process, we made some very interesting tryouts with the ability to control any voxel (3D pixel). At the same time, our research was growing, I made it into the final stage of numerous worldwide competitions and exhibitions (‘Talente’ & Milan Design Week), so we were continuing our collaboration for specific events that lead to new developments and exciting processes in each of the projects.

Woven 3D Print Shoes

Do you wish to branch out of just 3D printing? 

I wish to further develop in the field of augmented/virtual reality.

3D printing is already well integrated into our lives and in many industries. From medicine to automobiles, furniture, military equipment, housing, fashion, etc.

I believe in the future of 3D printing and its applications. I also believe that 3D printing is directly linked to 3D scanning and ARVR applications and that this technology will completely alter the user experience in public sites and will be adding new features to the digital medium.

The adoption of the technology by museums to reach new levels of audience experience- multi sensational- rather than just viewing. I believe AR will soon be in every museum, using the newest technology for public use, and even controlling our experiences in different senses- not just by looking at an art piece.

I’m also very interested in the smart- textile field, adding new reactions for textile by using programming software. I find especially the 4D printing process very interesting topic to work on, creating 3D objects that change their shape over time.

What are some key skills needed to be a designer within the 3D printing world?

I believe that the main key is determination. Not to be afraid of failure. 3D printing can be very attractive on the one hand, but on the other hand, it is a relatively new technology, there are some limits and tons of failures in the making process. It takes time unti you figure out the path to the final project, it takes time and extra effort.

Being a Maker- For me, to be a designer in the 3D printing world means to be a ‘maker’, I believe in hard work from the beginning. You need to be experimental with many technology techniques. Building your own printer and so on are examples of how I describe a ‘maker’.

Professionalism and expertise- 3D designing and printing is just like programming. You must “study the language”. You must learn the 3D software skills, be an expert in your field. Luckily, in our times, this information is approachable by everybody via the internet. It is possible to study everything you set your mind to, every single feature is fully covered.

Independence and self-confidence – I believe to fully be in control of your designs, anyone that wishes to be a designer in the 3D printing world, should do the work on his own, and not rely on others people’s skills. The making process changes the way the final object will appear, and for me, this is the main freedom space, that you have the ability to bring your design from your imagination into reality and constantly improve it upon your request.

Who are organizations you want to partner or collaborate with in the future?

I want to continue my work with the partners that supported me and have been fantastic in our collaboration: Stratasys, Prusa Research and Swarovski.

I believe the future of my work also lays in collaborating with companies that have new technological developments and have design potential that can become a platform for combining my design visions.  I would love to work with researchers of innovation in material research such as Neri Oxman and designers working in the field such as Iris Van Herpen. I’d like to extend the collaboration for shoe design with companies that develop 3D printed shoes such as Adidas.

Designers are not fully on the 3D printing wave just yet, how does it feel to be an early adopter?

It’s extremely exciting to be a part of a relatively small group that consists of designers and makers, who are investigating into how design can be developed in a sustainable and innovative way, using 3D printing technology.

This era is the most stirring time for pushing the boundaries of this technology, and I’m looking forward to working on new projects that will inspire me to think about “re-inventing” our future.

I feel that there is so much space for designers to grow in this field, working together with researchers and scientists all while keeping an open mind for new opportunities.

I feel blessed and extremely lucky to have become an early adopter in this field. It is a magical time filled with opportunities to seize and enjoy and to continue being excited from any new features, ideas, and projects.

I think 3D printing has great potential in so many fields, and design is one of the most exciting uses for this technology, clearing the way for further development of Art and Design (and maybe the concept of fashion and design as art), presenting each artist’s point of view the production process, from imagination to reality.  

Where do you see the field of 3D printing and fashion in 5 years?

I see 3D body scan as a key process that will be an integral part of any fashion development department. I believe that 5 years from now, personalization will receive a different meaning and will bring a drastic change in the fashion industry, moving from mass production to one of a kind customizable piece.

In my opinion, another upcoming major change that will take fashion design forward is the ability to design your own clothing- the customer will be his own designer by, ‘pushing buttons’ (by simplifying the design and programming software) for producing his favorite design.

I’ve also found the development of flexible material as a very important process for 3D printed fashion, and the development of new material will be a major step for 3D printed textile to make 3D printing – wearable.

Where do you see yourself in 5 years?

With 3D printing and 3D scanning, we can utilize the new technology to develop tailored pieces and fit to measure clothing for individuals. I want to take this a step further and produce customized clothes, based on body scans, ready-to-wear fashion and I hope to have designers and partners in the future, bringing innovative approach into daily production methods of fashion.

In the next two years, I will be studying at the Royal College of Arts in London, in the master’s program for smart textile developments called ‘Soft Systems’.

I believe this upcoming period will greatly influence and affect my career, and I hope that 5 years from today I will be able to continue developing my design language, and open my own brand, start-up, lab and continue researching and developing the wearable technology field. I hope to continue being thrilled and excited from any new project, any new printing method and constantly breaking the boundaries of the latest technology 

Mechanical Engineer Makes 95% 3D Printed Autonomous Robotic Lawn Mower

While I do know how to mow my lawn, that’s a job my husband normally takes care of. We like to divide and conquer when it comes to household chores – I do the laundry, he mows the lawn, I vacuum and he mops, et cetera, et cetera. Maybe I would enjoy mowing the lawn if ours was bigger and I could use a mower of the ride-on variety…I don’t know for sure, but I always imagined this would be something like a way slower go-kart (if this is untrue, don’t tell me). But German mechanical engineer and maker Philip Read recently completed a project, using Arduino and 3D printing, that makes me want to get out there and get mowing, no matter the size of my yard.

“It’s a fully autonomous Robot Lawn Mower which can be 95% 3D printed,” Read told 3DPrint.com, noting that a few small connectors will have to be made for the wheels and mower disc.

“I see you have covered this type of project in the past, but I believe this is a real upgrade in terms of design and “makeability” due to the ability to 3D print almost everything.”

Read, a self-professed RC fanatic and scratch builder who goes by ReP_AL online, is not wrong – over the years, we have definitely written stories about 3D printed parts for lawn mowers, fully 3D printed lawn mowers, and even another 3D printed robotic lawn mower.

“Its been a long project and took a lot of my time to complete,” Read wrote on Thingiverse.

“I have had many requests for parts and code etc.. and decided to relocated the build instructions and code management to my new website.”

You can find all of the build instructions and details for the little robotic lawn mower, including code, videos, and a webshop, on his website, where he explains why he is passionate about building his own robots and other machines, such as his own 3D printer.


“I like to understand the mechanics, the programming and what the electrical components do. I would like to share this passion with you, so you can build the projects too and learn about robotics,” Read wrote.

“This site will guide you through the build process of these projects so you can enjoy making them yourself..  With detailed instructions and links to the components I used, my goal is to make it possible for anyone to complete a complex robotics project and enjoy the results.”

On his website, Read rates the difficulty of his 3D printed autonomous lawn mower robot as a 7 out of 10, noting that the required skills to make the machine include soldering and 3D printing.

“The mower navigates within the boundary wire which is positioned (pinned) around the perimeter of the garden,” Read explained. “Once the mower senses the perimeter wire, it stops reverses and moves off in a new direction. The mower also has 3 sonar sensors to detect objects in the mowers path. Once the mowers battery is exhausted, the mower uses the boundary wire to navigate itself back to the charging station. All this can be customised in the Arduino software or completely re-written to your personal preferences.”

Rear control panel

According to Read, a commercial lawn mower with these kinds of specifications would cost at least €600, if not more.

The equipment required to make Read’s robotic lawn mower includes PLA material, a 3D printer with a 330 x 330 x 400 mm bed, wire strippers, and various screwdrivers and Allen wrenches. He 3D printed the lawn mower parts at 50% infill, with a 0.4 mm resolution, and notes on Thingiverse that most parts can be printed without any supports.

He also added the STL files for his lawn mower, and its optional charging station, to Thingiverse.

Will you try and make your own 3D printed robotic lawnmower? Discuss this project and other 3D printing topics at 3DPrintBoard.com or share your thoughts in the Facebook comments below.

SALE EXTENDED: Take 15% off Sitewide Today AND Tuesday

Sale Extended By Popular Demand!


Our Cyber Monday offer has been extended until the end of Tuesday! Take an extra day to browse and shop on Shapeways.com for 15% off sitewide* with code HAPPYMONDAY.

This is truly our best offer of the year so don’t miss out. Set yourself a reminder to order before November 28 at 3AM EST.

Happy Holiday shopping!

*15% off discount applies to a designer’s own uploads and models in the Marketplace. Promo code HAPPYMONDAY must be entered at checkout. Code is valid for 4 uses per customer with a maximum discount of $250 USD per order before taxes and VAT. If you order a design during the promotion period that cannot be printed, we cannot apply discounts to future orders (even if these designs are repaired) that occur after this promotion has expired. Code cannot be combined with other discounts or offer codes, or applied to orders already placed. Discount does not apply to shipping. No cash value.  Eligible with economy or priority manufacturing. Code is active starting November 26, 2018 at 12:01am Eastern Standard Time and expires November 28, 2018 at 3:00am Eastern Standard Time.

The post SALE EXTENDED: Take 15% off Sitewide Today AND Tuesday appeared first on Shapeways Magazine.

Our Cyber Monday Gift to You: 15% off EVERYTHING

Happy Cyber Monday From Shapeways


Enjoy 15% off sitewide* on Shapeways.com with code HAPPYMONDAY.
Go ahead and fill your basket with unique holiday gifts for everyone. Order now to get them in time for the holidays!


*15% off discount applies to a designer’s own uploads and models in the Marketplace. Promo code HAPPYMONDAY must be entered at checkout. Code is valid for 4 uses per customer with a maximum discount of $250 USD per order before taxes and VAT. If you order a design during the promotion period that cannot be printed, we cannot apply discounts to future orders (even if these designs are repaired) that occur after this promotion has expired. Code cannot be combined with other discounts or offer codes, or applied to orders already placed. Discount does not apply to shipping. No cash value.  Eligible with economy or priority manufacturing. Code is active starting November 26, 2018 at 12:01am Eastern Standard Time and expires November 27, 2018 at 3:00am Eastern Standard Time.

The post Our Cyber Monday Gift to You: 15% off EVERYTHING appeared first on Shapeways Magazine.

Black Friday Sale Is Here!

Black Friday starts now at Shapeways! Today through November 26, save 15% off your own model* with code MADE4HOLIDAYS.

3 Ways to Save

  1. Upload your own model to shapeways.com
  2. Create your own model using one of our Creator Apps
  3. Design the perfect jewelry piece through Spring & Wonder

Design with Shapeways is Also On Sale

Need help with your design idea? Take 25% off your initial price† for Design with Shapeways services.

Happy Holidays from Shapeways!


*Promo code MADE4HOLIDAYS is good for 15% off models uploaded by the user that are unavailable in the marketplace. Code is valid for a maximum discount of $250 per order, 4 orders maximum per customer. Order must be placed during the offer period. If you order a design during the promotion period that cannot be printed or is rejected for any reason, we cannot apply discounts to future orders (even if the original designs are repaired and reordered). Code cannot be combined with other discounts or offer codes. No cash value. Discount does not apply to shipping. Eligible with economy or priority manufacturing. Code is active starting November 22, 2018 at 3:00am Eastern Standard Time and expires November 27, 2018 at 3:00am Eastern Standard Time.
‡Spring & Wonder 15% off discount applies to all products and materials on Spring & Wonder. Use promo code MADE4HOLIDAYS and discount applied before taxes, VAT and shipping. Limit one code use per customer. Discount cannot be combined with other discounts or offer codes, or applied to orders already placed. Discount does not apply to shipping. No cash value. Code is active starting November 22, 2018 at 12:01am Eastern Standard Time and expires November 27, 2018 at 3:00am Eastern Standard Time.
The Design with Shapeways 2018 Holiday Promotion is good for 25% off the initial price for Design with Shapeways services. The discount will not apply to any additional charges required after the design request has been evaluated by the Design with Shapeways team or to the printing of any designed models. The initial design request must be placed during the promotion period to take advantage of the discount. The Design with Shapeways 2018 Holiday Promotion has no cash value. The promotion period begins at 12:00pm Eastern Standard Time on November 21, 2018 and ends at 3:00am Eastern Standard Time on November 27, 2018.

The post Black Friday Sale Is Here! appeared first on Shapeways Magazine.