The Maker Movement Unmade? Part 2: The Roots of the Maker Movement

With the shaky ground that Maker Media (now Make: Community) stands on, this author was prematurely ready to signal the end of the maker movement. However, we have already received feedback from a number of people in the world of open source hardware who suggest that, while the Make: brand may have run into issues, the larger movement it still thriving. We will provide those comments in a follow-up article as a means of diagnosing the current state of the maker community.

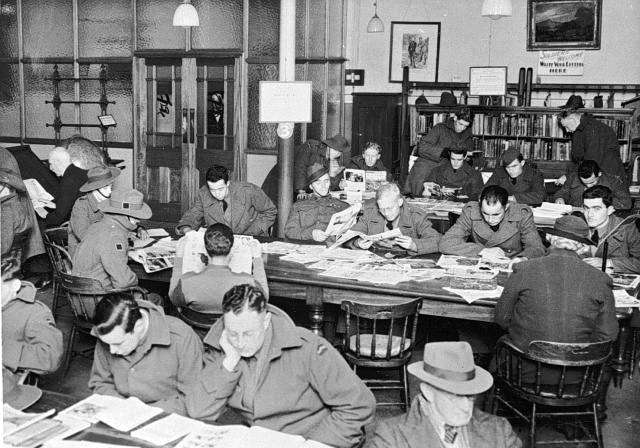
American and Australian soldiers in the reading room of the Ballarat Mechanics Institute in 1942.

Before we get into the future, however, it’s worth looking at the history of the hacking mentality and makerspaces. Depending on how far back you want to go, we could back to the 19th century and Mechanics’ Institutes, which joined libraries, labs and lecture halls. Funded by industrialists, these facilities were meant to provide the working class with a place to gain skills that would aid them in the workplace.

This sort of acceptable form of tinkering, however, seems to be part of a lineage distinct from the sort of unauthorized hacking that would play an important role in the creation of makerspaces much later. As broken down by author “Maxigas” in the Journal of Peer Production, we can distinguish between more-or-less sanctioned makerspaces (or “hackerspaces,” as they were earlier called) and unsanctioned hacklabs (the terms used by the author only to keep the two traditions separate).

Hacklabs blended different movements that developed from the 1970s. In Europe, this included the leftist autonomous movement, which developed with the idea that the working class could create its own power structures separate in response to the State and capital. Communists and anarchists within this fight appropriated physical spaces and real estate to challenge the establishment, a practice known as squatting.

Also in the 70s, the miniaturization of electronics enabled budding tech enthusiasts to computers from kits, like the Altair 8800. Inspired by phone phreaks who experimented with public telephone networks a decade before them, hackers worked individually or often in clubs to program their own software with a philosophy dedicated to the freedom of information and sharing of knowledge.

With the development of technology, another activist tradition developed nestled in the roots of squatting, but dedicated to intervening in cultural spaces. The practice of culture jamming emerged as a form of media activism characterized by pirate radio stations, then video broadcasts and eventually internet-based works.

Maxigas describes the emerging ideology in this way: “Many media activists adhered to some version of Gramsci’s theory of cultural hegemony, taking the stand that cultural and educational work is as important as directly challenging property relations. Indeed, this work was seen as in continuation with overturning those property relations in the area of media, culture and technology.”

Forte Prenestino. Image courtesy of Spotted by Locals.

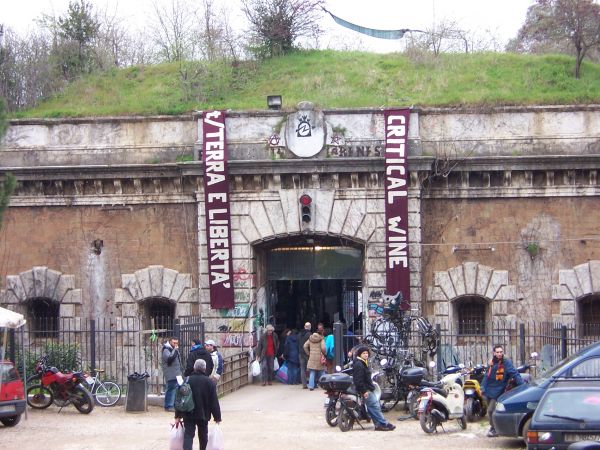
In turn, squatting and media activism blended, as squats served as urban hubs for internet access as well as locations to orchestrate culture jamming. These became hacklabs, which emerged roughly between 1995-2005. An interesting example is Italy’s Ultralab, established at the occupied fortress of Forte Prenestino in Rome.

Whereas these sites were dedicated to a countercultural mode of living and challenging society, Maxigas describes hackerspaces (later also called “makerspaces”) as less subversive than hacklabs, as the concept of hacking became institutionalized (like the creation of the Electronic Frontier Foundation) and more integrated into mainstream society. An example of an early second wave hackerspace, would be C-base, founded in 1995 in Berlin as a community center for free internet access.

By the late 2000s, hackerspaces had proliferated extensively, with lectures around the world, as well as established media, inspiring this proliferation. In 2007, Cologne’s C4 hackerspace gave a talk called “Building a Hackerspace,” which inspired “Building Hacker Spaces Everywhere: Your Excuses are Invalid” the next year in the U.S. Hackerspaces.org was founded in 2008, with 72 hackerspaces listed.

Maxigas summarizes the formation of hackerspaces by saying: “the emergence of hackerspaces is in line with a larger trajectory in the hacker movement, which gradually has gained more institutional structures. The turn towards the physical (mainly through utilising micro-controlers) marked the point when hackerspaces became widespread since development and collaboration on such projects is greatly facilitated by having a shared space. While most discourse and innovation in the community was focused on the organisational form rather than the political content of hackerspaces, such less defined and more liberal-leaning political content allowed the movement to spread and forge connections in multiple directions without losing its own thrust: from companies through civil society to a general audience.”

At the same time, the philosophies of hacklabs and hackerspaces/makerspaces are quite different. Hacklabs were born out of a tradition of leftist activism and, at least according to Maxigas, see inclusion of women, sexual minorities and the disabled almost as inherent to the creation of the space. Whereas hackerspaces/makerspaces have tended to be made up of male, well-educated, white and more affluent members with a more narrow philosophy focused on freedom of information and innovation, rather than challenging the status quo. At the same time, due to their integration into society at large, hackerspaces have proliferated more widely than the more societally challenging hacklabs.

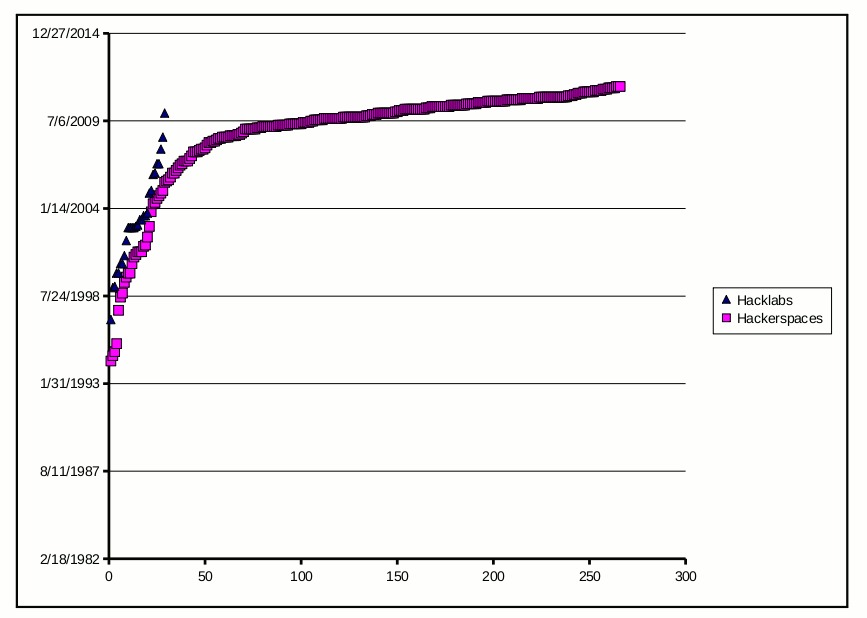
The growth of hacklabs vs. hackerspaces, based on data taken from hacklabs.org and hackerspaces.org. Image courtesy of Maxigas.

The creation of MAKE: Magazine in 2005 seems to lay at the intersection between second- and third-wave hackerspaces. Perhaps it represents the conclusion of the second and beginning of the third wave, which included the introduction of the term “maker”, the launch of Maker Faires, and the media frenzy that coincided with the introduction of 3D printers, microcontrollers, consumer drones and more.

So, we might refer to this third wave, in which hackerspaces were commercialized and branded, as the “maker movement.” We will look at the commercialization of the maker revolution more in the next part of this series and explore the extent to which that commercialization may have played a role in the unmaking of certain portions of the maker movement.

The post The Maker Movement Unmade? Part 2: The Roots of the Maker Movement appeared first on 3DPrint.com | The Voice of 3D Printing / Additive Manufacturing.

Issue 26 – HackSpace magazine: 3D Printers #3D Printing @HackSpaceMag

Issue 26 – HackSpace magazine: What 3D Printer?

What’s the best 3D printer? We asked real users about their experiences with their own printers, and here are the results. Find your perfect 3D printer with our guide.

  • Create your own clothes with a sewing machine
  • Discover a USB power supply
  • Add OctoPrint to your 3D printer
  • Build a video baby monitor

Read moredownload PDFbuy nowsubscribe.

And see additional blog posts today and in coming days on Adafruit-related content in this issue.

X-Carve Demo with Inventables

Thanks to the guys at Inventables, we were able to test out the X-Carve in their office in Chicago. The X-Carve is a cool piece of machinery in different ways. I had the pleasure of conducting an interview with the CEO of Inventables, Zach Kaplan, a while ago. It was a fun conversation overall and it got me thinking more in terms of the entrepreneurial economy. Kaplan then extended an offer for me to test out the X-Carve machine in their office at a later date. I then gladly set up a time to do so, and I learned a lot about the machine itself.

I have various experience with technology and machines. I work out of a Makerspace in Chicago called Pumping Station One, so new technology and machinery does not necessarily intimidate me. It does take a little bit of time to learn the nuances of any machine though. Before I was able to come in and test the X-Carve, I had to learn how to use the software associated with it to upload images that were to be carved out later. I chose a project that would require a little more complexity than a simple, quick carve on the machine. I try to do difficult projects early on when I am working with technology or new mediums. It allows for a rapid learning curve, and one starts to see the benefits and limitations of a device.

Image result for x-carve

X-Carve

In order to carve an image into specific material on the X-Carve, it is necessary to operate the accompanying software it uses, which is called Easel. For anyone new to manufacturing, it is simpler to navigate than some of the software packages I have used for similar CNC operations with different devices. The biggest benefit of this software is that is web-enabled. This allowed me to work from anywhere on a design that could be carved on a machine. This design can be carved when it is linked through Easel to any X-Carve device via WiFi. The interface is nice and maneuverable. The biggest issue with it would be the learning curve still involved with bit sizes used for various carving. For a new person using the platform, it would be intimidating to learn the specific drill bits required to do carves at a precise level. Fortunately, I had the assistance of people at X-Carve to learn, as well as previous experience with CNC machines.  For someone completely new to this type of work, it would take a bit of time to learn all of these things. I’d estimate a full week would be enough to get someone up to speed on the various materials and bits associated with them based on the thickness of material. From there it would just be an ongoing learning process.

Branding Material

The project that I wanted to carve was a marketing piece. I wanted to carve a two-colored acrylic circle that had a logo for an online clothing store I created. It also would have a QR code attached on one side of it. Ideally, the QR code would then take someone to our Instagram page. The concept was a bit difficult to pull off. It required a strategy called flip milling. We had to specifically create a jig that would allow the piece to be flipped and rotated in place for carving done in the same position of the material. This is a little bit more complex than some materials, such as a laser cutter that may cut the material first and then one may be able to manually flip the object. The flip milling allowed us to have a very accurate carving done on the front side and back side of our object. I was able to learn how to do this project specifically through the help of the Inventables team themselves. This means that a good amount of the learning curve was reduced, but I am not sure how that may work for a person who is not able to have the same type of advantage.

The project did not take long to create as it was a small circular disk that had about a  2 cm radius. The overall carving took around 30 minutes. This includes the various setup that we needed to do for flip milling and general maintenance of the X-Carve. Like any other machine, there are certain intricacies that we must understand about our device. This is where having the X-Carve team to help with the project was great, but I would suggest for anyone using the X-Carve should consult various YouTube videos for different projects and future self-driven learning. There are a lot of possibilities that can be made with this device that I am not even aware of. Overall it was a great experience to get all of these tips and a completed project with the Inventables team. Unfortunately, the QR Code didn’t work. But I will work on this project more and see how we can get a QR Code scanning circular image.

The post X-Carve Demo with Inventables appeared first on 3DPrint.com | The Voice of 3D Printing / Additive Manufacturing.

Make All the Things Part 2: Ring Creation and Casting a Wax Ring, Part 1

A curious mind and a makerspace results in interesting potential. Previously I had explained my intention to create a ring with the materials in my local MakerSpace of Pumping Station One. The last month was dedicated to a bunch of preparation and learning the process. It has been an immense experience that is still continuing, but I will inform everyone about the first developments of this project and follow ups as needed. 

Original Ring Design

Firstly, I was curious and wandering around Pumping Station One and learned about the Small Metals Area. I just saw the material there and realized what I could do almost instantaneously. I am a firm component of being able to create items for oneself. It is a very empowering mindset to realize that we can do things for ourselves. Coming up with an idea and driving it to completion is a great feeling and experience. Honestly, it is one of the best feelings I get within this world. But let’s stop my geeking out, and let’s get into the details.

I wanted a lion ring. I then put in substantial effort towards this goal. To create this ring I utilized carver’s wax initially for the body of the piece. Then I found a 3D printed lionhead online that I thought was stylish. This then was used for the front facing design of the model. I attached this onto the ring body with sticky wax in a uniform manner. This then created my prototypical design for a ring. The majority of the work done in this stage was dedicated to sanding, as well as molding the ring, to the specific weight I wanted to use. This work took a couple of days of crafting, but now that I understand the process more, it will take even less time than the next time I want to do this. 

Kiln

The next part of this project was filled with lots of hot wax and continuous failure. Sprues of hot wax are needed in terms of attaching a model. This model is plastic and wax, which means that it will be burned within a kiln for metal creation purposes. Chemistry is a fun thing, but I digress.

The sprues must be attached in almost a tree-like structure in order for an item to be cast from plastic or wax into a metal such as silver. This tree structure is placed in a container. In order to cast this, we utilize silicon powder. The silicon powder is weighed in terms of a conversion sheet that a jeweler would use. Then it is mixed with water in order to create a gel. This gel is placed into the aforementioned container and it is left there until it hardens. Once it hardens the container is prepped for placement within the kiln. Mind you, a kiln temperature is around 1500 degrees Fahrenheit. So it is indeed a dangerous process if one is not careful.

Ring After

Once the container is taken out of the kiln, it is now important to understand the conversion of plastic or wax into metal. The tree like structure built is now flipped upside down. A metal of a choice is also melted at a very high temperature. Again, high temperatures are dangerous. Fortunately, I had the help of people at Pumping Station One. This metal is then poured into the container that was taken out of the kiln. The molten metal travels down the tree-like system and it effectively burns the plastic and wax. The silicon powder essentially holds the piece in place and creates a barrier so that the material does not dissipate and lose form. When the molten metal cools down, the container then may be taken to a water bath for cooling. This then concludes the first part of the process. What is needed after this is post-processing, and I will tackle that in a new article.

The post Make All the Things Part 2: Ring Creation and Casting a Wax Ring, Part 1 appeared first on 3DPrint.com | The Voice of 3D Printing / Additive Manufacturing.