How does PLA Color Influence Mechanical Properties in FDM 3D Printing?

All kinds of research has been conducted regarding the mechanical properties of 3D printing materials, such as how they are effected by things like infill density, build orientation, temperature, and porosity. Researchers Adi Pandžić and Damir Hodzic from the University of Sarajevo and Aleksa Milovanović with the University of Belgrade were curious how much the color of PLA would effect material tensile properties in FDM 3D printing, and published a paper on their work, titled “Influence of Material Colour on Mechanical Properties of PLA Material in FDM Technology.” Different colors need different extrusion temperatures in 3D printing. The additives that make your PLA a different color also have influence on how your part prints and what properties it has. This much was already known, but to which extent do the different color formulations influence your mechanical properties?

The abstract reads, “Topic of this article is to investigate whether colour of PLA material effect on material tensile properties and in what amount. It will be tested more than 10 different colours of PLA material, and for every colour it will be tested 3 specimens. Specimens are prepared according to ISO 527-2, and all printed with same 3D printing parameters and with 100% infill. Also, all used materials are of same company and for every colour specimen will be 3D printed from same filament spool. All this is done to avoid other parameters to effect on material properties. The results of this study will be useful for colour selection of the PLA material without compromising the material tensile properties of 3D printed product.”

Many parameters are taken into account when it comes to the quality of FDM printed products, including things like infill pattern, layer height, nozzle diameter, and material characteristics. Polylactic acid, or the popular PLA we all know and love, is a polymer with a melting point between 150°-160° C, and is still the reigning material on the desktop.

“By reviewing the literature it can be noticed that the greatest accent is given to the influence of parameters on mechanical properties of material. Another characteristic barely evaluated is the influence of different material pigmentations,” the researchers explained. “Today, there are many different colours of PLA material of the same manufacturer, and in most cases it is assumed to have the same mechanical properties regardless of colour. This is one of the reasons why we chose to examine whether and how much the colour of the PLA material influences the mechanical properties of the finished product.”

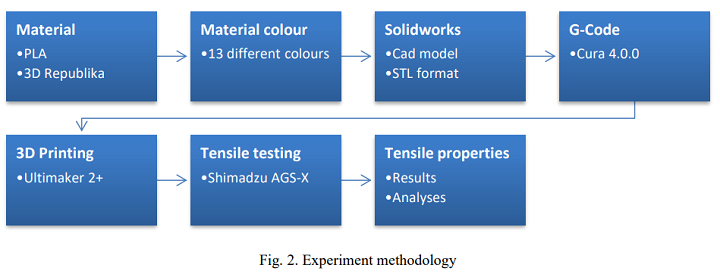
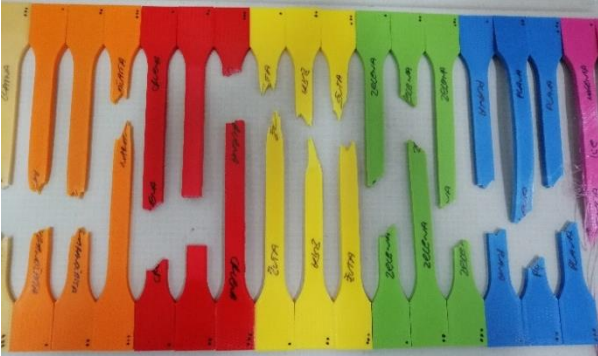
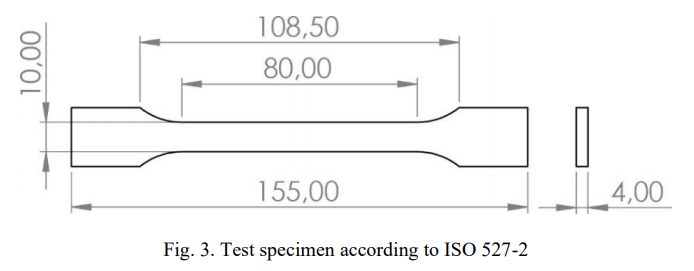
The team ordered 14 different colors of PLA from 3D Republika, with the same properties and characteristics, in order to investigate their potential influence on the mechanical properties of specimens made with the material. They used SOLIDWORKS to design samples according to ISO 527-2, and printed three different specimens for each color on an Ultimaker 2+, under the same conditions with 100% infill, and the “normal” profile from Cura 4.0.0 slicing software was used to prepare the G-code for the samples.

“Specimens are printed with “flat” printing orientation and 45˚ raster angle,” the researchers wrote. “Also brim around specimen is used for better adhesion with print bed and to reduce wrapping of material, after 3D printing it is removed from specimen.”

A Shimadzu AGS-X tensile machine was then used to perform tensile testing on the 42 3D printed PLA specimens. Properties like elastic modulus, strain, toughness, ultimate tensile strength (UTS), and yield strength were tested.

The team learned some interesting things, such as the fact that the red PLA had the highest elastic modulus, yield strength, and ultimate tensile strength, while pink had the lowest numbers for these. But, pink had the highest toughness and influence on strain, while blue had the lowest.

Once the testing was complete, the researchers determined the following:

• Color of PLA had an influence on elastic modulus, and varies up to 18% (from 2719MPa to 3217MPa) depending on color
• Color of PLA had an influence on yield strength, and varies up to 36% (from 30MPa to 41MPa) depending on color
• Color of PLA had an influence on ultimate tensile strength, and varies up to 31% (from 35MPa to 46MPa) depending on color
• Color of PLA had an influence on toughness, and varies over 300% (from 10J to 48J) depending on color
• Color of PLA had an influence on strain, and varies over 400% (from 7% to 108%) depending on color

“In future research, the influence of material colour on other mechanical properties (bending, hardness, pressure, etc.) should be examined, and also influence of colour on mechanical properties of other materials (ABS, PET, etc.),” they concluded.

Discuss this research and other 3D printing topics at 3DPrintBoard.com or share your thoughts in the Facebook comments below. 

The post How does PLA Color Influence Mechanical Properties in FDM 3D Printing? appeared first on 3DPrint.com | The Voice of 3D Printing / Additive Manufacturing.

Open Source DIY Telescope Prime Features Raspberry Pi and 3D Printed Parts

PiKon telescope

While the majority of us are not astronauts, there is a tool that can be used in your home to make you feel like you’re just a little bit closer to the stars – the telescope. Five years ago, a group of UK researchers from the University of Sheffield, including physicist Mark Wrigley, were inspired by NASA’s Juno spacecraft to create their own DIY telescope, the PiKon, using 3D printing and a Raspberry Pi. Now, a pair of Polish scientists have followed in their footsteps with their own parametric, open source, DIY telescope with 3D printed parts.

Aleksy Chwedczuk and Jakub Bochiński wanted to help popularize astronomy by making their own semi-professional, yet affordable, telescope model for at-home use, for which people can then download the files and create on their own. Chwedczuk and Bochiński call their creation the Telescope Prime, and created the first prototype in just eight hours. The initial prototype was then used to take pictures of the moon, and the final version was finished in less than three months.

The look from the inside of the Telescope Prime

Polish 3D printing company Sygnis New Technologies offered to help the scientists create their DIY telescope by sharing their equipment.

“As Sygnis New Technologies, we are proud to say that we have participated in the Telescope Prime project by adjusting 3D models of parts of the telescope and printing them for the science duo,” Marek Kamiński, the Head of Social Media for Sygnis New Technologies, told 3DPrint.com.

Telescopes have been helping people observe outer space since the 17th century, though at that time it was reserved only for the elite citizens who could purchase the equipment. But even though there is much more variety available today, it’s still not something that is widely available – the device has many complex, interacting elements. That’s why Chwedczuk and Bochiński wanted to use 3D printing to help create a more affordable, open source version.

In a piece by Sygnis, the two scientists said, “We wanted to initiate the development of an open-project telescope that could be easily modified and expanded…

“At the same time, it should be a digital telescope – adapted to our 21st century online lifestyle, where the habit of sharing one’s experiences on the Internet is the new norm.”


The telescope model, which all together costs less than $400 to put together, is made of three main parts: the 20 cm diameter parabolic mirror (with a recommended focal length of 1 m), a Raspberry Pi microcomputer with a camera and touch display, and 3D printed parts that are used to fix the camera and the mirror. To help keep costs down, “readily available materials,” like wood, screws, and a paper tube, are used to build the Telescope Prime.

Aleksy Chwedczuk with the first prototype of the telescope

In a further effort to keep the telescope fabrication as inexpensive as possible, it does not have lenses. Light is focused in a single spot, and stops on the mirror. A boarding tube makes up the body of the device, and plywood parts are then added. The telescope can use its build-in camera to take images of the night sky, and transmit them online in real-time using the touchscreen of a computer, projector, or tablet. Additionally, you can easily increase and reduce the size of the telescope – just enter the mirror’s size into the program, and all of its dimensions will be automatically converted.

“The creators had to take into account the realities of the 21st century, modern issues of the popularization of astronomy, also among the youngest amateurs of the starry sky, as well as the availability of materials for the construction of the telescope,” Sygnis wrote. “Telescope Prime is an innovative idea that reflects the needs and possibilities of an astronomer enthusiast of the second decade of the 21st century.”

The open source models for the telescope parts, which are available for download on the Telescope Prime website, were prepared in advance for 3D printing, so they didn’t need any corrections later. These elements were 3D printed on FlashForge 3D printers out of Orbi-Tech PLA material, and it took a total of 156 hours of printing to create the 17 telescope parts.

The final version of the Telescope Prime

Kamiński told 3DPrint.com that the two scientists are currently “promoting the project on Polish universities, schools and science institutes.” This makes sense, as the Telescope Prime website explains that the project was “initiated and fully carried out” on the grounds of the Akademeia High School in Warsaw.

Discuss this story and other 3D printing topics at 3DPrintBoard.com or share your thoughts in the Facebook comments below.

[Source/Images: Sygnis New Technologies]

The post Open Source DIY Telescope Prime Features Raspberry Pi and 3D Printed Parts appeared first on 3DPrint.com | The Voice of 3D Printing / Additive Manufacturing.

French Researchers Develop Algorithm to Generate Interior Ribbed Support Vaults for 3D Printed Hollow Objects

Hollowed Bunny printed with our method, using only 2.2% of material inside (compared to a filled model). The supports use 316 mm of filament over a total of 1,622 mm for the print).

In 3D printing, every layer of material must be supported by the layer below it in order to form a solid object; when it comes to FFF 3D printing, material can only be deposited at points that are already receiving support from below. French researchers Thibault Tricard, Frédéric Claux, and Sylvain Lefebvre, from the Université de Limoges (UNILIM) and the Université de Lorraine, wanted to look at 3D printing hollow objects, and proposed a new method for hollowing in their paper “Ribbed support vaults for 3D printing of hollowed objects.”

The abstract reads, “To reduce print time and material usage, especially in the context of prototyping, it is often desirable to fabricate hollow objects. This exacerbates the requirement of support between consecutive layers: standard hollowing produces surfaces in overhang that cannot be directly fabricated anymore. Therefore, these surfaces require internal support structures. These are similar to external supports for overhangs, with the key difference that internal supports remain invisible within the object after fabrication. A fundamental challenge is to generate structures that provide a dense support while using little material. In this paper, we propose a novel type of support inspired by rib structures. Our approach guarantees that any point in a layer is supported by a point below, within a given threshold distance. Despite providing strong guarantees for printability, our supports remain lightweight and reliable to print. We propose a greedy support generation algorithm that creates compact hierarchies of rib-like walls. The walls are progressively eroded away and straightened, eventually merging with the interior object walls.”

Figure 2: A Stanford bunny model is hollowed using a standard offsetting approach. The resulting cavity (R) will not print properly due to local minima (red) and overhanging areas (orange).

While most people think of 3D printing supports as external ones that support overhanging parts of an object, the interior of an object may also need support structures.

“Hollowing a part is not trivial with technologies such as FFF,” the researchers explained. “In particular, the inner cavity resulting from a standard hollowing operator will not be printable: it will contain regions in overhang (with a low slope, see Figure 2) as well as local minima: pointed features facing downwards. There is therefore a need for support structures that can operate inside a part.”

Inner supports should occupy a small amount of space with the print cavity, and the impact on overall print time should be slight. Other researchers have contributed a variety of ideas in terms of support structures with 3D printed hollowed objects, including:

  • sparse infills
  • self-supported cavities
  • external supports as internal structures

“We propose an algorithm to generate internal support structures that guarantee that deposited material is supported everywhere from below, are reliable to print, and require little extra material,” the researchers wrote. “This is achieved by generating hierarchical rib-like wall structures, that quickly erode away into the internal walls of the object.

“Our algorithm produces structures offering a very high support density, while using little extra material. In addition, our supports print reliably as they are composed of continuous, wall-like structures that suffer less from stability issues.”

Hollow kitten model printed with our method and split
in half vertically.

The researchers explained how to support a 3D object by “sweeping through its slices from top to bottom” and searching for any unsupported parts, then adding necessary material below them in the next slice; this material doesn’t need to cover the entire unsupported area, and can take any shape.

“The amount of material added can also be larger than the area needing support. Depositing more material than necessary comes at the price of longer printing times, but can be interesting to significantly improve printability,” the researchers explained. “Large, simple support structures often are faster to print than complex, smaller structures. Indeed, when multiple disconnected locations need to be supported, it is in many cases more effective to print a single, large structure. It encompasses and conservatively supports many small locations. This is more effective than supporting isolated spots, which individual support size may be very small and therefore difficult to print, and which will inevitably increase the amount of travel and therefore print time (taking nozzle acceleration and deceleration into account).”

The team then explained their algorithm for ribbed support vault structures. The idea is to use three main operations to produce supports: propagating and reducing supports from the above slice, detecting areas that appear to be unsupported in the current slice, and adding the supports needed for it.

“Our inspiration comes from architecture, where supports are generally designed in an arch (and vault) like manner. In particular, vaults tend to join walls in any interior space, with only a few straight pillars directed towards the floor. Similarly, many vault structures present hierarchical aspects. Such hierarchies afford for dense supports while quickly reducing to only a few elements – much like trees,” they wrote.

“Within each slice we favor supports having a rectilinear aspect: they provide support all around them while eroding quickly from their ends. Thus, within a given slice, we seek to produce rectilinear features covering the areas to be supported.

“We propose to rely on 2D trees joining the object inner boundaries. Through the propagation-reduction operator, the trees are quickly eroded away (from their branches). Taken together across slices, the trees produce self-supported walls that soon join and merge with the object inner contours, much like the ribs of ribbed vaults.”

The team 3D printed a variety of PLA models with the same perimeters on different systems. Orange models were fabricated on an Ultimaker 3, while the yellow Moai was printed on an Ultimaker 2 and the octopus on a CR-10. A Prima P120 was used to make white models, the blue Buddha was printed on an eMotion Tech MicroDelta Rework, and a dual-color fawn was made on a Flashforge Creator Pro.

Demon dog printed using our method for external support.

The quality of these prints matches models with a dense infill, thanks to the full support property offered, and the algorithm generates multiple small segments that require individual printing, which led to many “retract/prime operations surrounding travels.”

“Depending on the printer model used, the quality of the extrusion mechanics, the user-adjustable pressure of the dented extrusion wheel on the filament, as well as the brand of the filament itself, a small amount of under-extrusion may happen,” the team explained.

“To compensate for this, we perform a 5% prime surplus at the beginning of each support segment: if the filament was retracted by 3 mm before travel, we push it back by 3.15 mm after travel. Because the extra prime may create a bulge, we avoid doing it when located too close to perimeters, so as to not impact surface quality.”

The team also evaluated how much material their method needed, and compared this with materials used for iterative carving and support-free hollowing methods. They also noted how layer thickness impacted support size, and recorded processing times.

Comparison with Support-Free Hollowing and Iterative Carving. The input volume represents the volume (in mm3) and height (in mm) of the model.

“While producing supports of small length, our algorithm is clearly not optimal. This is revealed for instance on low-angle overhangs,” the team wrote. “The inefficiency is due to the local choice of connecting support walls to the closest internal surface, ignoring the material quantity that will have to appear in slices below. While a more global scheme could be devised, it could quickly become prohibitively expensive to compute.”

The researchers concluded that their algorithm ensures complete support of deposited material, which can be helpful for extruding viscous or heavy materials like concrete and clay. They believe that their method for 3D printing hollowed objects through generating ribbed internal support structures could one day lead to novel external support structures as well.

Discuss this and other 3D printing topics at 3DPrintBoard.com or share your thoughts below.

Mimaki USA and Sindoh Introduce New 3DFF-222 Desktop 3D Printer

In 2015, Mimaki USA, an operating entity of Japanese company Mimaki Engineering, announced that it would begin development of its own full color 3D printer, which was then previewed two years later. The company installed its first photorealistic, UV-cure inkjet 3DUJ-553 3D printer in the Americas last winter at print technology company Pictographics in Las Vegas, and is now venturing into the world of desktop 3D printing with its latest product launch.

Mimaki is one of the top manufacturers of wide-format inkjet printers and cutters, along with 3D modeling machines, software, hardware, and associated consumables, like cutting blades and ink. Now it’s adding the new 3DFF-222 desktop 3D printer to the mix, which is co-branded with South Korean 3D printer manufacturer Sindoh.

“The new desktop 3D printer is designed to fit the needs of modern print production environments and it is suitable for a broad range of uses. This latest product introduction demonstrates Mimaki’s commitment to driving innovation and providing our customers with profit-enhancing solutions,” said Michael Maxwell, a senior manager at Mimaki USA.

The FFF 3D printing solution by Mimaki and Sindoh, which was developed to be used as an in-house design and production tool, obviously doesn’t have the more than 10 million color combinations offered by the full-color 3DUJ-553 printer, but it’s perfect for fabricating parts, like jigs, that are used in direct-to-object printing. The desktop 3DFF-222 can also be used to manufacture tools for producing 3D signage, as well as molds for vacuum forming.

The compact 3DFF-222 makes it possible for users to cut back on costs as they work to expand into more profitable markets, and was designed to reduce noise levels during operation, making it a good system for use in an office setting. The 3D printer’s fully covered design, which helps gets rid of any disruption of contaminants that might adhere to a model during 3D printing, and its installed HEPA filter also contribute to this.

The new desktop 3D printer by Mimaki USA and Sindoh, the latter of which also created a 3D printer in partnership with Stanley Black & Decker a few years ago, prints parts up to 8.27″ x 7.87″ x 7.67″ in easily loadable PLA filament cartridges, and also provides remote monitoring of each print through a built-in camera and included app.

“Flexibility and ease-of-use are key features of the new desktop 3D printer,” Maxwell stated. “This printer also complements our industrial printers seamlessly. The 3DFF-222 is capable of inexpensively producing customized print jigs, which can be used to stabilize print quality when printing on UV-LED flatbed printers from our UJF Series. Additionally, customers can create objects for decoration as well as a variety of signage.”

Additional features of the new desktop 3DFF-222 3D printer include a heated flexible bed, which has a built-in thermostatic function for easy model removal and stable formation during 3D printing, and semi-automatic leveling, which measures the table’s horizontal error and tells the color monitor how to maintain a level position.

A 5″ full-color touch panel provides illustrated instructions to make the system easy to operate, and the filament is automatically loaded and supplied to the 0.4 mm 3D printer nozzle after installation, with no manual feeding required. The 3D printer weighs 16 kg and comes with a built-in LED lamp and dedicated 3DWOX Desktop slicing software.

The 3DFF-222, which is the latest addition to Mimaki’s 3D printer portfolio after its full-color 3DUJ-553, is now available for order.

Discuss this story and other 3D printing topics at 3DPrintBoard.com or share your thoughts in the Facebook comments below.

[Images: Mimaki]

Researchers Compare Human Cadavers and 3D Printed Anatomical Models to Determine Print Accuracy

3D pelvis model in Meshlab.

Surgeons often turn to innovative technology, like 3D printed anatomical models, to get a closer, more detailed look inside a patient’s body ahead of complex procedures. In particular, these models can help trauma surgeons determine the best approach to fixing complex fractures. But just how accurate are these 3D printed models when it comes to matching the look of human bone?

Accuracy is very important when it comes to the fitting of surgical guides and plates, as it’s difficult to characterize and analyze these fractures ahead of time, even with the help of CT scans. But a collaborative group of researchers from the Netherlands just completed a validation study to test the accuracy of 3D printed anatomical models for surgical planning purposes.

Their results were published in a paper, titled “Validation study of 3D-printed anatomical models using 2 PLA printers for preoperative planning in trauma surgery, a human cadaver study,” in the European Journal of Trauma and Emergency Surgery; co-authors are Lars Brouwers from Elisabeth-Tweesteden Hospital, Arno Teutelink with Bernhoven Hospital, and Fiek A. J. B. van Tilborg, Mariska A. C. de Jongh, Koen W. W. Lansink, and Mike Bemelman from Elisabeth-Tweesteden Hospital.

“Surgeons generally need years of practice to transform a two-dimensional (2D) image into a three-dimensional (3D) image in their mind in order to get a proper understanding of the fracture patterns. CT software however easily enables volume rendering of 2DCT into a 3D reconstruction,” the study’s introduction reads.

“3D printing has become increasingly utilized in the preoperative planning of clinical orthopaedics, trauma orthopaedics and other disciplines over the past decade [2]. 3D-printed models are readily accessible due to the wide availability of 3D printing techniques and 3D printers. 3D printing contributes to a better understanding of the surgical approach, reduction and fixation of fractures, especially in complex fractures such as acetabular fractures.

“However, it is unclear how a 3D-printed model relates to a human bone. To our knowledge, there is no literature that validates the accuracy of 3D-printed models in a preoperative planning strategy when applied to real human bones.”


The team dissected nine human cadavers to acquire three specimens each of a pelvis, hand, and foot, and inserted Titanium Kirschner (K-) wires in them to mark important anatomical landmarks. In order to convert CT scans in the DICOM file format to STL, the team used a Siemens Somatom Definition AS 64-slice CT to scan the specimens at a slice thickness of 0.6 mm, before moving on to the next stage of image post-processing.

3D model of a pelvis after CT scanning with all measurements between the five marker points performed on the Philips Intellispace Portal.

Phillips Intellispace Portal software was used to render the the DICOM data into 3D reconstructions, and then the data was digitally cleaned and saved as STL files, the landmarks of which were measured by two independent reviewers using open source Meshlab. The files were then imported and the G-code generated, and then the models were 3D printed, in a ratio of 1:1, on both an Ultimaker 3 and a Makerbot Replicator Z18 using PLA material.

Then, the independent observers measured the distances between the K-wires on the 3D printed models and the human cadaver specimens, in addition to Meshlab, 2DCT, and the 3D reconstructions. These distances were measured a second time one month later, with the exception of the specimens, as these had to be disposed of quickly. In addition to analyzing the observers’ data, the team also completed some calculations to provide an overview of the print process settings.

According to the study, “The least decrease in average distance in millimetres was seen in “the 3D printed pelvis 1”, − 0.3 and − 0.8% on respectively the Ultimaker and Makerbot when compared with cadaver Pelvis (1) The 3D model of “Hand 2” showed the most decrease, − 2.5 and − 3.2% on the Ultimaker and Makerbot when compared with cadaver hand (2) Most significant differences in measurements were found in the conversion from 3D file into a 3D print and between the cadaver and 3D-printed model from the Makerbot.”

Cadaver hand with titanium K-wire marker points next to its 3D printed model. The K-wires are visible on the 3D printed model.

The team concluded that 3D printing can be used to create accurate medical models that are “suitable” for pre-op planning; they also determined that the Ultimaker 3 was just a little more accurate than the Replicator Z18. The researchers recommend that any medical professionals who use 3D printed models for surgical planning first test out the accuracy of their own 3D printing processes.

Discuss this and other medical 3D printing topics at 3DPrintBoard.com, or share your thoughts below.

[Images: Brouwers et. al.]