Mimaki USA Releases New Large-Scale 3DGD-1800 3D Printing System

Wide-format inkjet printer and cutter manufacturer Mimaki USA, an operating entity of Mimaki Engineering in Japan, is expanding its existing 3D printer offering with the new large-scale Mimaki 3DGD-1800 system, which complements the company’s full-color UV-cure inkjet 3DUJ-553 3D printer and 3DFF-222 desktop system. Due to its size, the new 3DGD-1800 is a great choice for 3D printing dimensional displays for multiple applications.

Mimaki USA develops and builds a full line of digital printers and cutters, and provides a total workflow solution for applications in the industrial 3D printing, art, sign graphics, and textile and apparel markets. Its new 3DGD-1800 3D printer, which offers a processing speed that’s three times faster than what conventional FFF and other extrusion-based systems can provide, creates large-scale prints using Gel Dispensing Printing technology, which sounds similar to Massivit 3D’s proprietary GDP method that combines FDM and SLA techniques.

Mimaki’s newest 3D printer offering, weighing in at 2,500 kg, is able to create a figure that’s 70.8″ high in only seven hours, with a maximum build weight of 150 kg and dimensions of 57” x 43.7” x 70.8”. The 3DGD-1800 has an assembly-based design, which allows users to print massive objects that, as Mimaki USA puts it, far exceed “the size of the formation area.” Additionally, because the system does not need to use support materials for internal structures, it can print objects with hollow interiors at a higher rate of speed than conventional 3D printers, “which can later accommodate infill material or be left open.”

Mimaki 3DGD-1800 3D printer

The Mimaki 3DGD-1800 features a dual-printhead configuration, which helps decrease production time as it can provide output for two different structures simultaneously. Its MG-100W material, which is a white UV-curable resin, is a good choice for applications that are lit internally with LED modules. The printer is a complete solution for fabricating large-scale 3D objects, and includes easy to use 3DGD slicer software.

Example application

The printer’s surface be decorated with output from Mimaki’s inkjet printers, and specialty graphics producers can add a desktop 3DFF-222 or full-color 3DUJ-553 as supplementary systems if they’re also interested in printing smaller 3D figures and models with fine details. The new Mimaki 3DGD-1800 is a great system for manufacturing large, colorful items, including channel letters and logos, event decorations and product mock-ups, movie props and sets, interior design elements and entertainment promotions, vacuum molds, interior-illuminated signage, museum/POP/window displays, and more.

Additional specs for the new Mimaki 3DGD-1800 include:

  • Ethernet
  • 1.8 / 2.6 mm diameter nozzle
  • Supports standard STL, OBJ, 3DS, ply, blend file formats

The new large-scale 3DGD-1800 3D printer is now available for purchase through Mimaki USA. With this new addition, Mimaki now offers more 2D and 3D printing solutions than any global wide-format digital printing company.

Discuss this story and other 3D printing topics at 3DPrintBoard.com or share your thoughts in the Facebook comments below. 

(Images: Mimaki USA)

The post Mimaki USA Releases New Large-Scale 3DGD-1800 3D Printing System appeared first on 3DPrint.com | The Voice of 3D Printing / Additive Manufacturing.

Reducing 3D Printing Collisions with Toolpath Optimization Methodology

While many industries are using 3D printing to manufacture products, the technology has not been largely adopted in large-scale production. According to researchers from the University of Arkansas Department of Industrial Engineering, this is mainly due to cycle time. However, while it’s possible to print different parts of one object at the same time thanks to multiple collaborating printheads, this isn’t yet widely supported by research. Hieu Bui, Harry A. Pierson, Sarah G. Nurre, and Kelly M. Sullivan published a paper, titled “Tool Path Planning Optimization for Multi-Tool Additive Manufacturing,” that lays out their proposed toolpath optimization methodology.

The abstract states, “The objectives are to create a collision-free infill toolpath for each printhead while maintaining the mechanical performance and geometric accuracy of the printed object. The methodology utilizes the combination of tabu search and novel collision detection and resolution algorithms, TS-CCR. The performance of the TS-CCR is analyzed and compared with the current industry standard.”

The FFF 3D printing process is limited by how fast the printhead is able to move, melt, and dispense filament. The parallel processing method, which lets multiple toolheads work together at the same time to fabricate different parts of the same object, is used by the Autodesk Netfabb software function for Project Escher 3D printers. This can obviously speed up printing time, but also increases the chance for collisions.

Netfabb uses an algorithm to make sure that all the printheads are synchronized, so they can’t collide with each other.

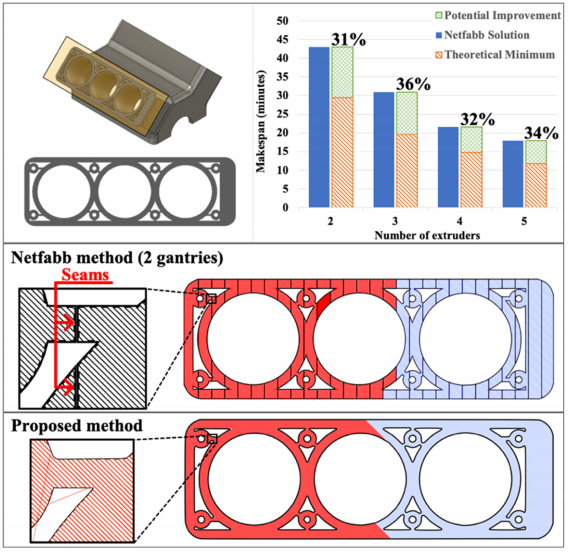
Summary of the result from the case study of Netfabb’s performance and toolpath illustrations (30% infill) of the Netfabb method and proposed method.

 The goal of this methodology is to consider collision constraints for 2-gantry 3D printers, while also minimizing the single layer makespan (printing time). 

The shortcomings of current methods, the lack of published research on concurrent FFF, and the need for an alternative path-planning method for multi-gantry FFF 3D printers inspired the development of a new method,” the researchers explained. “Although the multi-gantry system is one of several kinematic configurations of concurrent FFF 3D printing, increased understanding it can provide insights into the development of generalized multi-tool path planning problems for AM processes.”

A Tabu Search (TS) heuristic (practical method of problem solving), which uses a memory mechanism to store information to help guide future searches, was used to optimize the single layer makespan in the methodology by adjusting the toolpath for the infill. The TS incorporates three main operators:

  1. The local swap operator swaps two raster segments printed by the same printhead to reduce the rapid movement distance
  2. The global swap operator exchanges two raster segments that have been printed from different printheads
  3. The rebalancing operator allocates one raster segment from the printhead with a higher makespan to the other printhead

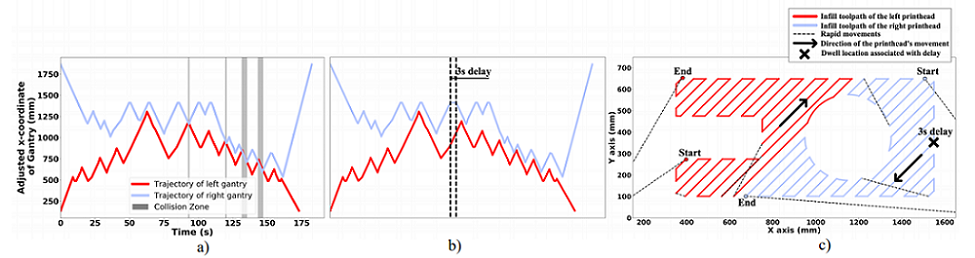
a) trajectory plot produced by the collision checking algorithm (tested layer A with 1% infill) showing 4 possible collisions (i.e. vertical gray bars); b) trajectory plot after adding 3 seconds’ delay to resolve the first collision (note that it also resolves the following collisions); c) toolpath representations of solution in 2b. The arrows indicate the two gantries are moving in the opposite directions toward each other when printing the associated raster segments. By adding 3 seconds delay at the dwell location, the two gantries synchronized and avoided the potential collision.

“At the beginning of the algorithm, with a randomized initial solution list, the global swap operator is favored. Due to the high degree of randomization of the sequence and the high number of collisions, adding delays might not be able to resolve the collisions, in which case the two gantries will work in sequential order. The goal is to segment the appropriate raster segments into two groups, one group for each printhead. The number of collisions begins to decrease as a result. Later on, the local swap slowly becomes more attractive.”

Two complementary algorithms work with the TS: a collision checking algorithm, which detects any potential collisions, and a collision response algorithm, which finds points in the toolpaths where a collision can be avoided by adding a delay.

The researchers explained, “An efficient collision checking algorithm should be able to quickly detect the collisions for a large number of raster segments and identify the corresponding movements that caused them. By utilizing a unique characteristic of the multi-gantry FFF machine, the process of identifying the collisions can be simplified. In such configuration, the collisions happen every time the gantries collide in the x-direction. In other words, a collision happens when the two gantries share the same workspace at any moment in time. A safety distance between two gantries was added when constructing the trajectory plot as a way to keep the gantries away from each other even though the collision is detected.”

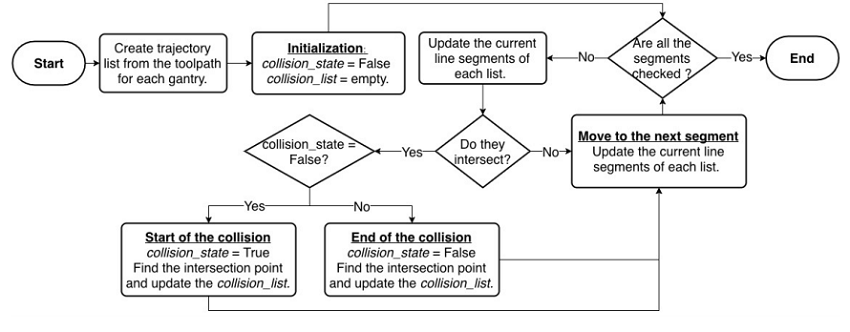
Flowchart of collision checking algorithm

“The motivation of the collision response algorithm is to identify an opportunity for resolving the collision by adding a delay. It is worth mentioning that each vertex on the trajectory plot represents a potential place to insert the delay.”

This algorithm has 4 steps, the first being to identify a set of line segments that are associated with the first collision, and then figuring out whether a delay could fix the collision. Third, the delay is inserted and all future trajectory segments are adjusted, and finally, you move up in time to find the next collision; then, lather, rinse, repeat until the collisions are gone.

The team’s methodology for avoiding 3D printing collisions was thus named Tabu Search with collision checking and response, or TS-CCR.

“The TS-CCR outputs a solution represented as a combined list of sequences of raster segments that must be printed for each printhead,” the researchers wrote. “To get the infill makespan of the solution, an infill toolpath for each printhead is constructed from the aforementioned solution. The collision-checking algorithm then searches for any potential collisions and passes the information to the collision-response algorithm, which introduces delays in order to prevent potential collisions.”

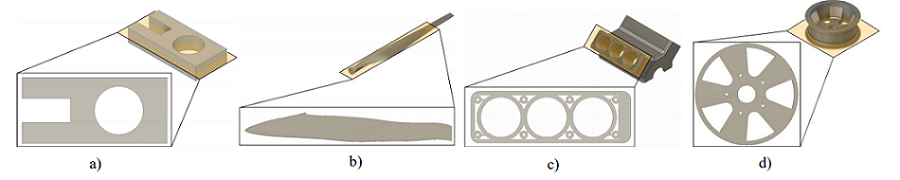
a) tested layer A; b) turbine blade layer; c) engine block layer; d) wheel rim layer. The wheel rim layer is considered a special case since Netfabb did not produce a solution.

To test the TS-CCR’s performance, the team chose four objects, then sliced a selected layer of 0.3 mm from each and computed the results from the theoretical minimum makespan, slicing the layer with the Netfabb Multi-Gantry FFF Engine and the 2018.1.0 Escher plugin, and the TS-CCR.

They collected information, such as build volume and print speed, about the multi gantry 3D printer from the Titan Cronus profile in Netfabb.

For the TS heuristic, the value for the size of the candidate list and tabu tenure were chosen as 10 and 4, respectively. The algorithm terminates if it has been running for 2 minutes since the last improvement,” the researchers explained.

Then, they compared the makespan for three solutions – the theoretical minimum, proposed methodology, and Netfabb for 2 printheads – in a trajectory plot, which shows how the algorithms performed. 55 seconds of delays were added at different points, but because most of these were introduced in the printhead with a shorter makespan, only three total seconds were added to the overall makespan. This plot also shows how important the rebalancing operator is in TS – the gantries completed their work at almost the same time.

Trajectory plot of the result obtained from the TS-CCR (engine block layer with 30% infill). The printing time of the two gantries are 1272 and 1269 seconds, respectively.

“The performance of the methodology varies depending on the complexity of the layer. It can reduce the makespan of the “tested layer A” by 14.48% as compared to Netfabb, while the improvement reduces to 10.18% for the “engine block” layer. Since only one printhead is utilized to print the perimeter shells, the time spent on printing the shells likely offsets the improvement of the proposed methodology for any complex layer. Since this work focuses on only optimizing the infill, the method of allowing multiple printheads to print the perimeter shell at the same time can be implemented to reduce the makespan further,” the researchers wrote.

While there are only about 11 minutes of makespan reduction for the tested layer over the single printhead, this kind of improvement can accumulate across all layers and reduce the overall time.

a) makespan comparison for 3 layers (tested layer A, engine block, turbine blade) at 30% infill, where the proposed method can yield a solution with a shorter makespan than the solution obtained from Netfabb; b) makespan comparison for the “wheel rim” layer, where Netfabb did not produce a solution. The result from the methodology is compared to the makespan if the same layer is printed by the single printhead and the theoretical minimum.

The team’s proposed TS-CCR methodology can solve major issues of using multi-gantry FFF 3D printing, such as carefully planning to avoid mutual collisions while also not compromising the strength of the final print.

Discuss this and other 3D printing topics at 3DPrintBoard.com or share your thoughts below. 

The post Reducing 3D Printing Collisions with Toolpath Optimization Methodology appeared first on 3DPrint.com | The Voice of 3D Printing / Additive Manufacturing.

Thesis Focuses on Using Cooperative 3D Printing with Robots to Improve the Technology’s Scalability

Illustration of the slicing strategy for cooperative 3D printing.

Obviously, the size of your 3D print is limited to the size of your 3D printer…you wouldn’t try and 3D print a building, no matter how small, using a desktop system, right? Jace J. McPherson from the University of Arkansas put it more exactly in the honor’s thesis he wrote and submitted for his Bachelor’s degree in Computer Science and Computer Engineering:

“More specifically, an object cannot be printed if it is wider than the full horizontal movement range of an extrusion nozzle or if it is taller than the maximum height of the extrusion nozzle above the printing surface (i.e., the “print bed”).”

Chunker results with a cylinder and a car model.

According to McPherson’s thesis, titled “A Scalable, Chunk-based Slicer for Cooperative 3D Printing,” print jobs’ size limitations can hinder the technology’s goal of being “fully dynamic.” In the thesis, he focused on the issue of 3D printer scalability – limited by print bed size and use of a single printhead – and lack of manufacturing automation, and the idea of cooperative 3D printing, and a new slicing strategy for this technology, as a combined solution.

The abstract states, “Cooperative 3D printing is an emerging technology that aims to increase the 3D printing speed and to overcome the size limit of the printable object by having multiple mobile 3D printers (printhead-carrying mobile robots) work together on a single print job on a factory floor. It differs from traditional layer-by-layer 3D printing due to requiring multiple mobile printers to work simultaneously without interfering with each other. Therefore, a new approach for slicing a digital model and generating commands for the mobile printers is needed, which has not been discussed in literature before. We propose a chunk-by-chunk based slicer that divides an object into chunks so that different mobile printers can print different chunks simultaneously without interfering with each other. In this paper, we first developed a slicer for cooperative 3D printing with two mobile fused deposition modeling (FDM) printers. To enable many more mobile printers working together, we then developed a framework for scaling to many mobile printers with high parallel efficiency. To validate our slicer for the cooperative 3D printing process, we have also developed a simulator environment, which can be a valuable tool in visualizing and optimizing a cooperative 3D printing strategy. This simulation environment was also developed to export the visualization in a generic format for use elsewhere.”

Large-scale cooperative 3D printing. Many robots cooperate to produce a single object that does not require assembly upon completion. The final product in this figure is a topographical map of the state of Arkansas.

Cooperative 3D printing is made up of multiple independent, free-roaming robot 3D printers that receive instructions on how to print one part, or chunk, of a whole object. The mechanism makes it possible to autonomously complete large print jobs, with no interruptions, in a single piece, without human interaction. The parts are actually 3D printed on top of each other so they’re joined during the process and not after.

(a) Illustration of the chunk’s dimensions and printing limitations on the slope, and (b)a comparison of chunk width with robot width.

“Cooperative 3D printing solves physical scalability with the premise that multiple independent 3D printers can be used to produce a single object. These printers need to “cooperate” to produce objects that would normally exceed the size limitation of a traditional 3D printer. They must have the freedom to navigate a large area, such that their print range is limited only by the size of the print surface, as opposed to a fixed range imposed by the extrusion nozzle’s mechanism. To summarize, assuming the print surface is easy to scale, the potential print size will also be highly scalable,” McPherson wrote.

“This new mechanism also solves time scalability assuming new 3D printers that enter the fray can decrease the overall print time. Given that the number of printers is dynamic, we can quantify the time scalability as a function of the parallel efficiency from using any number of robots.”

The chunker design subdivides 3D models into chunks, which are then split up between the robots for 3D printing. The slicer converts these chunks into print commands for the robots, and the simulator creates a visual, using the slicer commands, that shows how real robots would complete their tasks. It’s important for the simulator to be properly designed, as it’s used to validate the chunker and slicer algorithms – if the simulator is not accurate, the rest of the process isn’t either.

In the rest of his thesis, McPherson describes how the slicer makes it possible to subdivide models so that chunks can be 3D printed in parallel, as well as demonstrating how to scale the slicer for more than two robots for additional degrees of spatial freedom.

“Results show that the developed slicer and simulator are working effectively,” McPherson wrote.

McPherson hopes that this project can help “lay the foundation for scalable Cooperative 3D printing,” which could open up a whole new direction of research for scaling 3D printing, and potentially even “revolutionize the way manufacturing processes are structured.”

“This thesis has presented, in detail, a feasible process for managing ?? 3D printing robots operating in parallel on a single print job, taking into account the geometric constraints, the communication requirements between robots, and the necessary pre-processing needed to properly subdivide a model for chunk-based printing,” McPherson concluded.

Discuss this research and other 3D printing topics at 3DPrintBoard.com or share your thoughts below.

ECCO Steps Forward with 3D Printed Custom Silicone Midsoles

German company ViscoTec, which manufactures systems required for conveying, dosing, applying, filling, and emptying medium to high-viscosity fluids for multiple industries, including automotive, medical, and aerospace, is well-known in the 3D printing world for its two-component print head for viscous materials like silicone. The Bavaria-based company, which began working with 3D printing four years ago, employs about 200 people worldwide, and is now putting its print head to the test through a collaboration with Danish heritage footwear brand and manufacturer ECCO.

ECCO, a family-owned business founded in 1963 with factories and subsidiaries in China, Indonesia, Portugal, Slovakia, Thailand, and Vietnam, has a vision of becoming the top premium brand for leather goods and shoes. The latest innovation to be introduced by the Innovation Lab of ECCO is called QUANT-U, an experimental footwear customization project.

QUANT-U relies on three core technologies: real-time analysis, data-driven design, and in-store 3D printing. The project combines these technologies to create custom, personalized midsoles, in just two hours, out of a heat cured two-component silicone.

Most everyone likes personalized products such as shoes, but due to the necessary cost, production time, and expertise involved in making custom footwear, they’re typically not available to everyone. But thanks to ECCO’s partnership with ViscoTec, this is going to change.

3D printing of silicone midsoles with ViscoTec printhead.

In order to specifically coordinate the material properties and the process, ECCO had to rethink its approach to customization, and now plans to utilize ViscoTec’s print head technology and two-component silicone to 3D print customer-specific midsoles for its customers, so each person can enjoy their own tailored fit and comfort.

According to the Innovation Lab ECCO website for QUANT-U, “A midsole is the functional heart of the shoe. It plays a key role in the performance and comfort of your footwear. Two years of research has proven that replacing the standard PU midsoles with 3D printed silicone can tune its inherent properties; viscoelasticity, durability and temperature stability.”

The QUANT-U process has three steps, starting with using scanners and wearable sensors to measure the customer’s feet and build a unique digital footprint. This biomechanical data is then evaluated and interpreted using a sophisticated algorithm, and a unique configuration is generated through structural simulations and machine learning.

This augmented pattern is optimized for each person’s respective feet and activity level by making adjustments to its densities, patterns, and structures, and the final 3D printed midsoles are personalized according to the customer’s own orthopedic parameters for a far more comfortable fit than you’d get with typical store-bought midsoles. Within just a few hours, you’re able to take home your custom 3D printed midsoles, along with your chosen pair of ECCO shoes.

Thermal cross-linking of the individual silicone layers.

By 3D printing the two-component silicone, ECCO is able to optimally counteract the high mechanical stresses we often deal with in everyday life; this is thanks to the midsole’s algorithmic designs combining with the silicone’s unique properties. By utilizing 3D printing, ECCO will be able to fabricate large quantities of personalized midsoles.

Using ViscoTec’s print heads gives ECCO several unique advantages, such as the usage of heat cured two-component silicone and precise 3D printing results, in addition to making sure that the silicone is uniformly mixed in the static mixing tube.

The footwear industry, which often utilizes 3D printing, has been growing fast over the last few years, with its global market expected to reach $371.8 billion by 2020. We often see 3D printed insoles and midsoles available for purchase now, and ECCO’s collaboration with ViscoTec and its unique 3D print head will certainly help keep it in the game.

Discuss this story and other 3D printing topics at 3DPrintBoard.com or share your thoughts in the Facebook comments below. 

[Images provided by ViscoTec]