What is Metrology Part 2: CMM

Image result for cmm

CMM

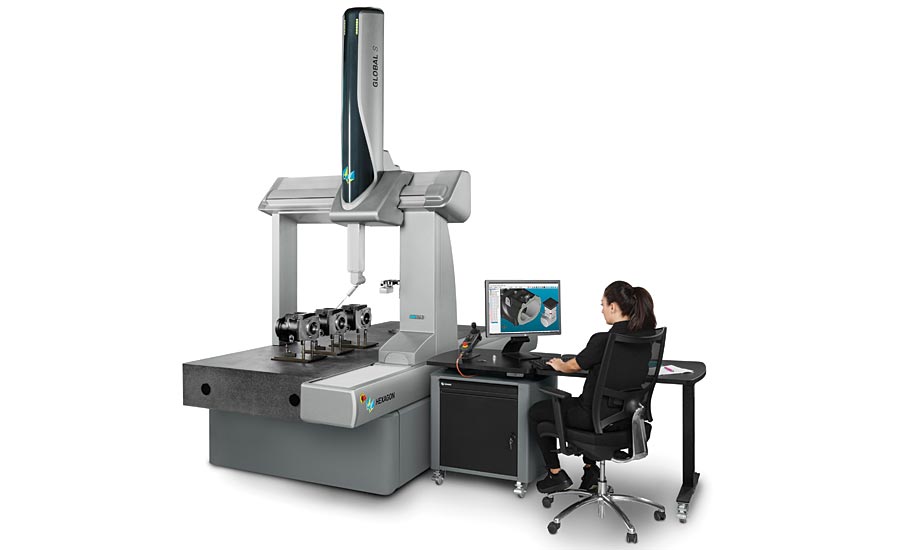
A CMM is a widely used machine used to measure objects. A CMM is a coordinate measuring machine. This refers to any machine that measures the geometry of physical objects by sensing discrete points on the surface of the object with a probe. This is the essence of many a metrology system. The precision of a CMM is vital for determining the geometry of objects. This then leads to more precision in the manufacturing and replication of objects. 

Probes are the engine of a CMM. They sense objects through their surfaces. There are various types of probes as well.  The types of probes used in CMMs include mechanical, optical, laser, and white light. Mechanical probes typically have a ball and rod looking setup attached to them, or have a nozzle setup. These physically touch the surface of a material that is in need of measuring. Optical probes typically refer to spectral analysis and measuring through these means. One can think of a fiber optic probe in particular. These type of probes are usually used in Raman spectroscopy, and diffuse reflection applications. Raman spectroscopy is a spectroscopic technique based on inelastic scattering of monochromatic light, usually from a laser source. Inelastic scattering means that the frequency of photons in monochromatic light changes upon interaction with a sample. The scattering of the photons within a monochromatic light source allows for a device to detect if an object is within the path of monochromatic light. This thus leads to measuring capabilities that are important in terms of a CMM as well. Diffuse reflection is similar to Raman Spectroscopy aside from the optical source is typically infrared. When an IR beam passes through a physical object, it can be reflected off the surface of a particle or be transmitted through a particle. The IR energy reflecting off the surface is typically lost. This transmission‐reflectance event can occur many times in the object, which increases the pathlength. This pathlength is vital for measuring. Finally, the scattered IR energy is collected by a spherical mirror that is focused onto the detector. The detected IR light is partially absorbed by particles of the object, collating the object information.

Image result for raman spectroscopy

Typical Raman Spectroscopy Setup

A CMM is heavily reliant on a built-in coordinate system of, typically, three axes. This is similar to the coordinate systems we are aware of within a 3D build environment. This is a Cartesian Coordinate system. The main structure of which includes three axes of motion. The material used to construct the moving frame has varied over the years. Granite and steel were used in the early CMM ‘s. Today the major CMM manufacturers tend to build frames from aluminium alloy or some derivative and also use ceramic to increase the stiffness of the Z axis for scanning applications. CMM axises need to be stiff because there should be minimal outside inference with forces that may misalign the device during measurement. Any misalignment will cause higher error ranges for measurement. 

Image result for cartesian coordinate system

Cartesian Coordinate System

Scanning techniques are becoming more reliant on data collection and compilation. These methods use either laser beams or white light that are projected against the surface of a part. Thousands of points can then be taken and used not only to check size and position but also to create a 3D image of the part also. This “point-cloud data” can then be transferred to CAD software to create a working 3D model of the part. The ability to hold various point cloud data from these methods is essential for the future development of the field. Big data is something of interest most definitely for this field. 

CMM’s are very interesting and are the basis of most metrology methods. It is important to understand how in-depth and fascinating this field is. It is a very vital one as well for the future in terms of 3D printing and manufacturing. Stay tuned for the next installment where we take a look into different subfields within Metrology as well.

The post What is Metrology Part 2: CMM appeared first on 3DPrint.com | The Voice of 3D Printing / Additive Manufacturing.

Monitoring the Laser Powder Bed Fusion 3D Printing Process with Spectroscopy to Detect Defects

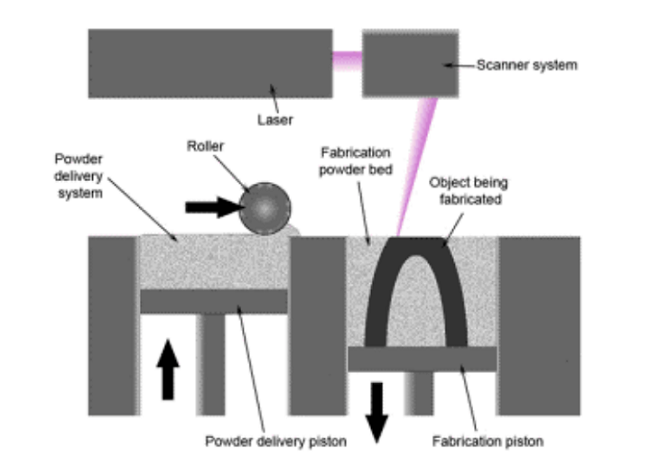
Diagram of laser powder bed fusion system.

Laser powder bed fusion 3D printing, one of the most well-established processes for producing metal parts, uses a powder bed of material to build a part layer by layer. The part is formed when energy is put into the powder to fuse it together, which can achieve parts with high resolution at high productivity.

Unfortunately, a lot of things can go wrong and cause defects in metal parts made with powder fed fusion 3D printing, such as cracking, root concavity, residual stress, porosity, balling, delamination, microstructural impurities, and surface defects. 3D printed metal parts with defects can cause safety issues and compromised functionality, and while some issues can be detected and fixed during post-processing, others can’t, which results in part failure. In order to detect and correct defects before it’s too late, we need to keep studying the source of these defects.

Andrew Drieling from Wright State University in Ohio recently published a paper, titled “In Situ Defect Detection Using Three Color Spectroscopy in Laser Powder Bed Additive Manufacturing,” about using spectroscopy to monitor 3D printing for defects.

The abstract reads, “Additive Manufacturing (AM) provides a way to create parts that would be extremely difficult or impossible with conventional manufacturing processes. However, AM also introduces defects, which are detrimental to the mechanical performance. These defects are potentially unknown until post-processing inspection and testing, wasting time and resources on an unusable part or initiating unexpected failure. Historically, spectroscopy has successfully been used for in situ monitoring of laser welding, using changing parameters in the generated plume to predict defects. In situ monitoring using a visible spectrometer for fabrication of Alloy 718 on a test bed laser powder bed fusion system is performed. AM defects, such as keyhole porosity and unfused powder, are detected in the sensor output and a physics-based modeling approach is used to predict defect occurrence. Spectroscopy can provide near real-time monitoring, allowing defects to be predicted, and potentially corrected before the completion of the part, saving time and resources.”

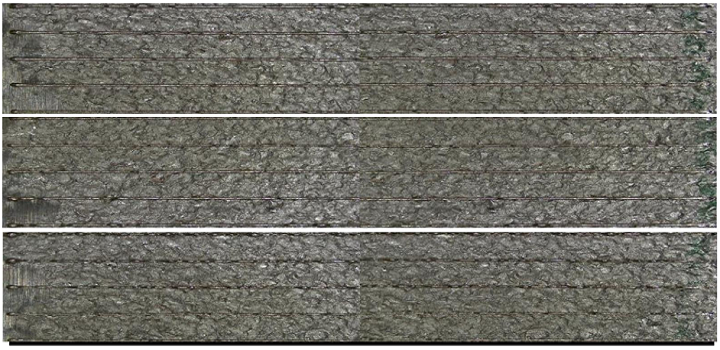
Effects of varying processing parameters on bead quality.

In his paper, Drieling explained that spectroscopy is the study of matter’s absorption and emission of light and other radiation as it relates “to the dependence of these processes on the wavelength of the radiation.” It actually measures the interaction between matter and photons.

There has been previous research completed regarding the use of spectroscopy for defect detection and closed loop control of laser welding processes –  it can be used to provide real-time monitoring of the 3D printing process, which can save time, money, and resources by making it possible to detect any defects early enough to correct them.

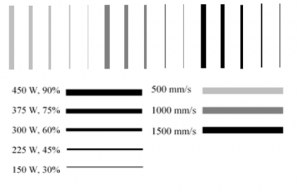
Processing parameters and beam layout.

“If defect detection is important in laser welding, where it is only a single pass and the surface of the entire weld can be seen, then it is even more important in laser powder bed fusion where most of the welds are hidden by the top surface,” Drieling wrote. “The defects found in laser powder bed fusion are determinately to part performance and current methods to detect defects cannot be employed until fabrication of the part is complete, even then, not all defects can found by nondestructive methods. With current methods, the part must be completely fabricated, then if unacceptable defects are detected, all the time and resources put into that part have been wasted. If the defects go undetected, then they can initiate unexpected failure, leading to potentially dangerous situations.”

Drieling used a custom built laser powder bed fusion 3D printer from Universal Technology Corporation for his research and recorded data with a spectrometer, a high-speed camera, a profilometer, and visible and thermal cameras as well. He ran 15 individual tests, while varying the power and speed parameters, to see if this had any effect on the spectroscopy data.

“Once the experiment was complete, the beads were examined under a microscope and accessed for quality,” Drieling wrote. “The top set of five were run at 500 mm/s, the middle at 1000 mm/s and the bottom at 1500 mm/s. Within each group, the top bead was run at 450 watts, running down through the power levels to 150 watts for the bottom bead.”

Intensity plot for all three beads of interest.

Three features were looked at for possible future experiments while the beads were being examined: keyholing, balling, and highest quality of bead.

“Keyholing was most prominent in the 500 mm/s, 450 watt “High Power” bead,” explained Drieling. “The 1500 mm/s, 375 watt “Low Power” bead was chosen for balling features. It should be noted that the 1500 mm/s, 430 watt bead exhibited worse balling behavior, however it wasn’t able to maintain a continuous bead, therefore it wasn’t chosen. The 1000 mm/s, 225 watt “Nominal” bead was chosen for having the highest observable quality in terms of bead width and consistency. These three beads were further examined using the spectroscopy data.”

By varying the processing parameters, Drieling saw a range of defects in the produced beads; after analyzing the spectroscopy data, he saw that the intensity values varied for the defects and that the intensity data is not only affected by the energy input, “as two beads studied had similar energy inputs and different intensity readings.”

“All these results show that closed loop control of laser powder bed fusion is possible with spectroscopy,” Drieling concluded.

In the future, Drieling plans to expand the build to larger geometries, like cubes.

Discuss this research and other 3D printing topics at 3DPrintBoard.com or share your thoughts below.