BCN3D Testes Chemical Resistance of Eight Common 3D Printing Materials

A material’s ability to resist degradation, erosion, or impregnation from contact with liquids, solids, or vapors of a different nature, like chemical solvents, acids, and bases, is known as chemical resistance, and it’s pretty important to achieving successful parts. When you’re choosing the materials you want to use for 3D printed end-use applications, especially for industrial purposes, you should know each element’s chemical resistance. Some 3D printing materials can swell when exposed to the liquids or vapors of solvents, like alcohols, esters, ketones, fuel, brake fluid, motor oil, and various mixtures of mineral and synthetic hydrocarbons, which changes the end part’s mechanical properties and shape. Industrial parts need to be able to hold up well under contact with these kinds of corrosive products, so filaments should be chosen wisely.

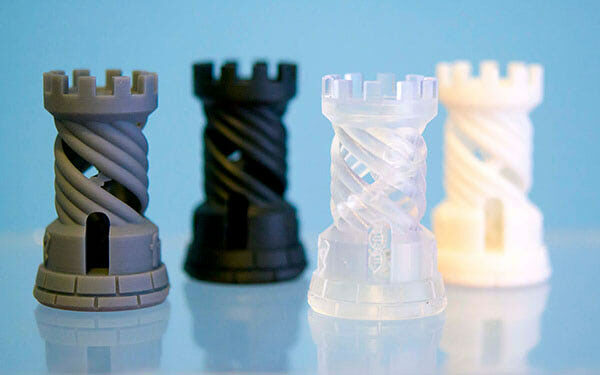
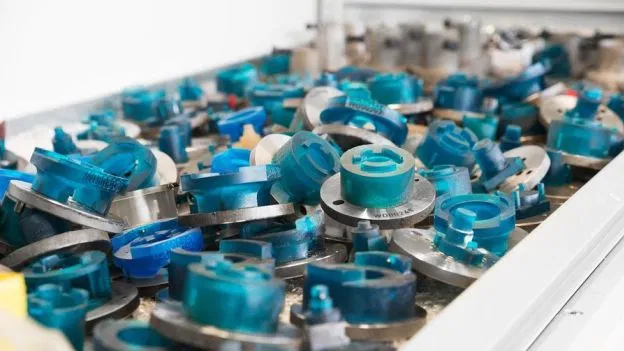
Barcelona-based desktop 3D printer manufacturer BCN3D Technologies wanted to investigate the behavior of its main filaments when they came in contact with corrosive products, in order to better inform customers on which materials should be used for specific applications. So the company put eight of its materials to the test by pitting them against an organic solvent’s chemical attack.

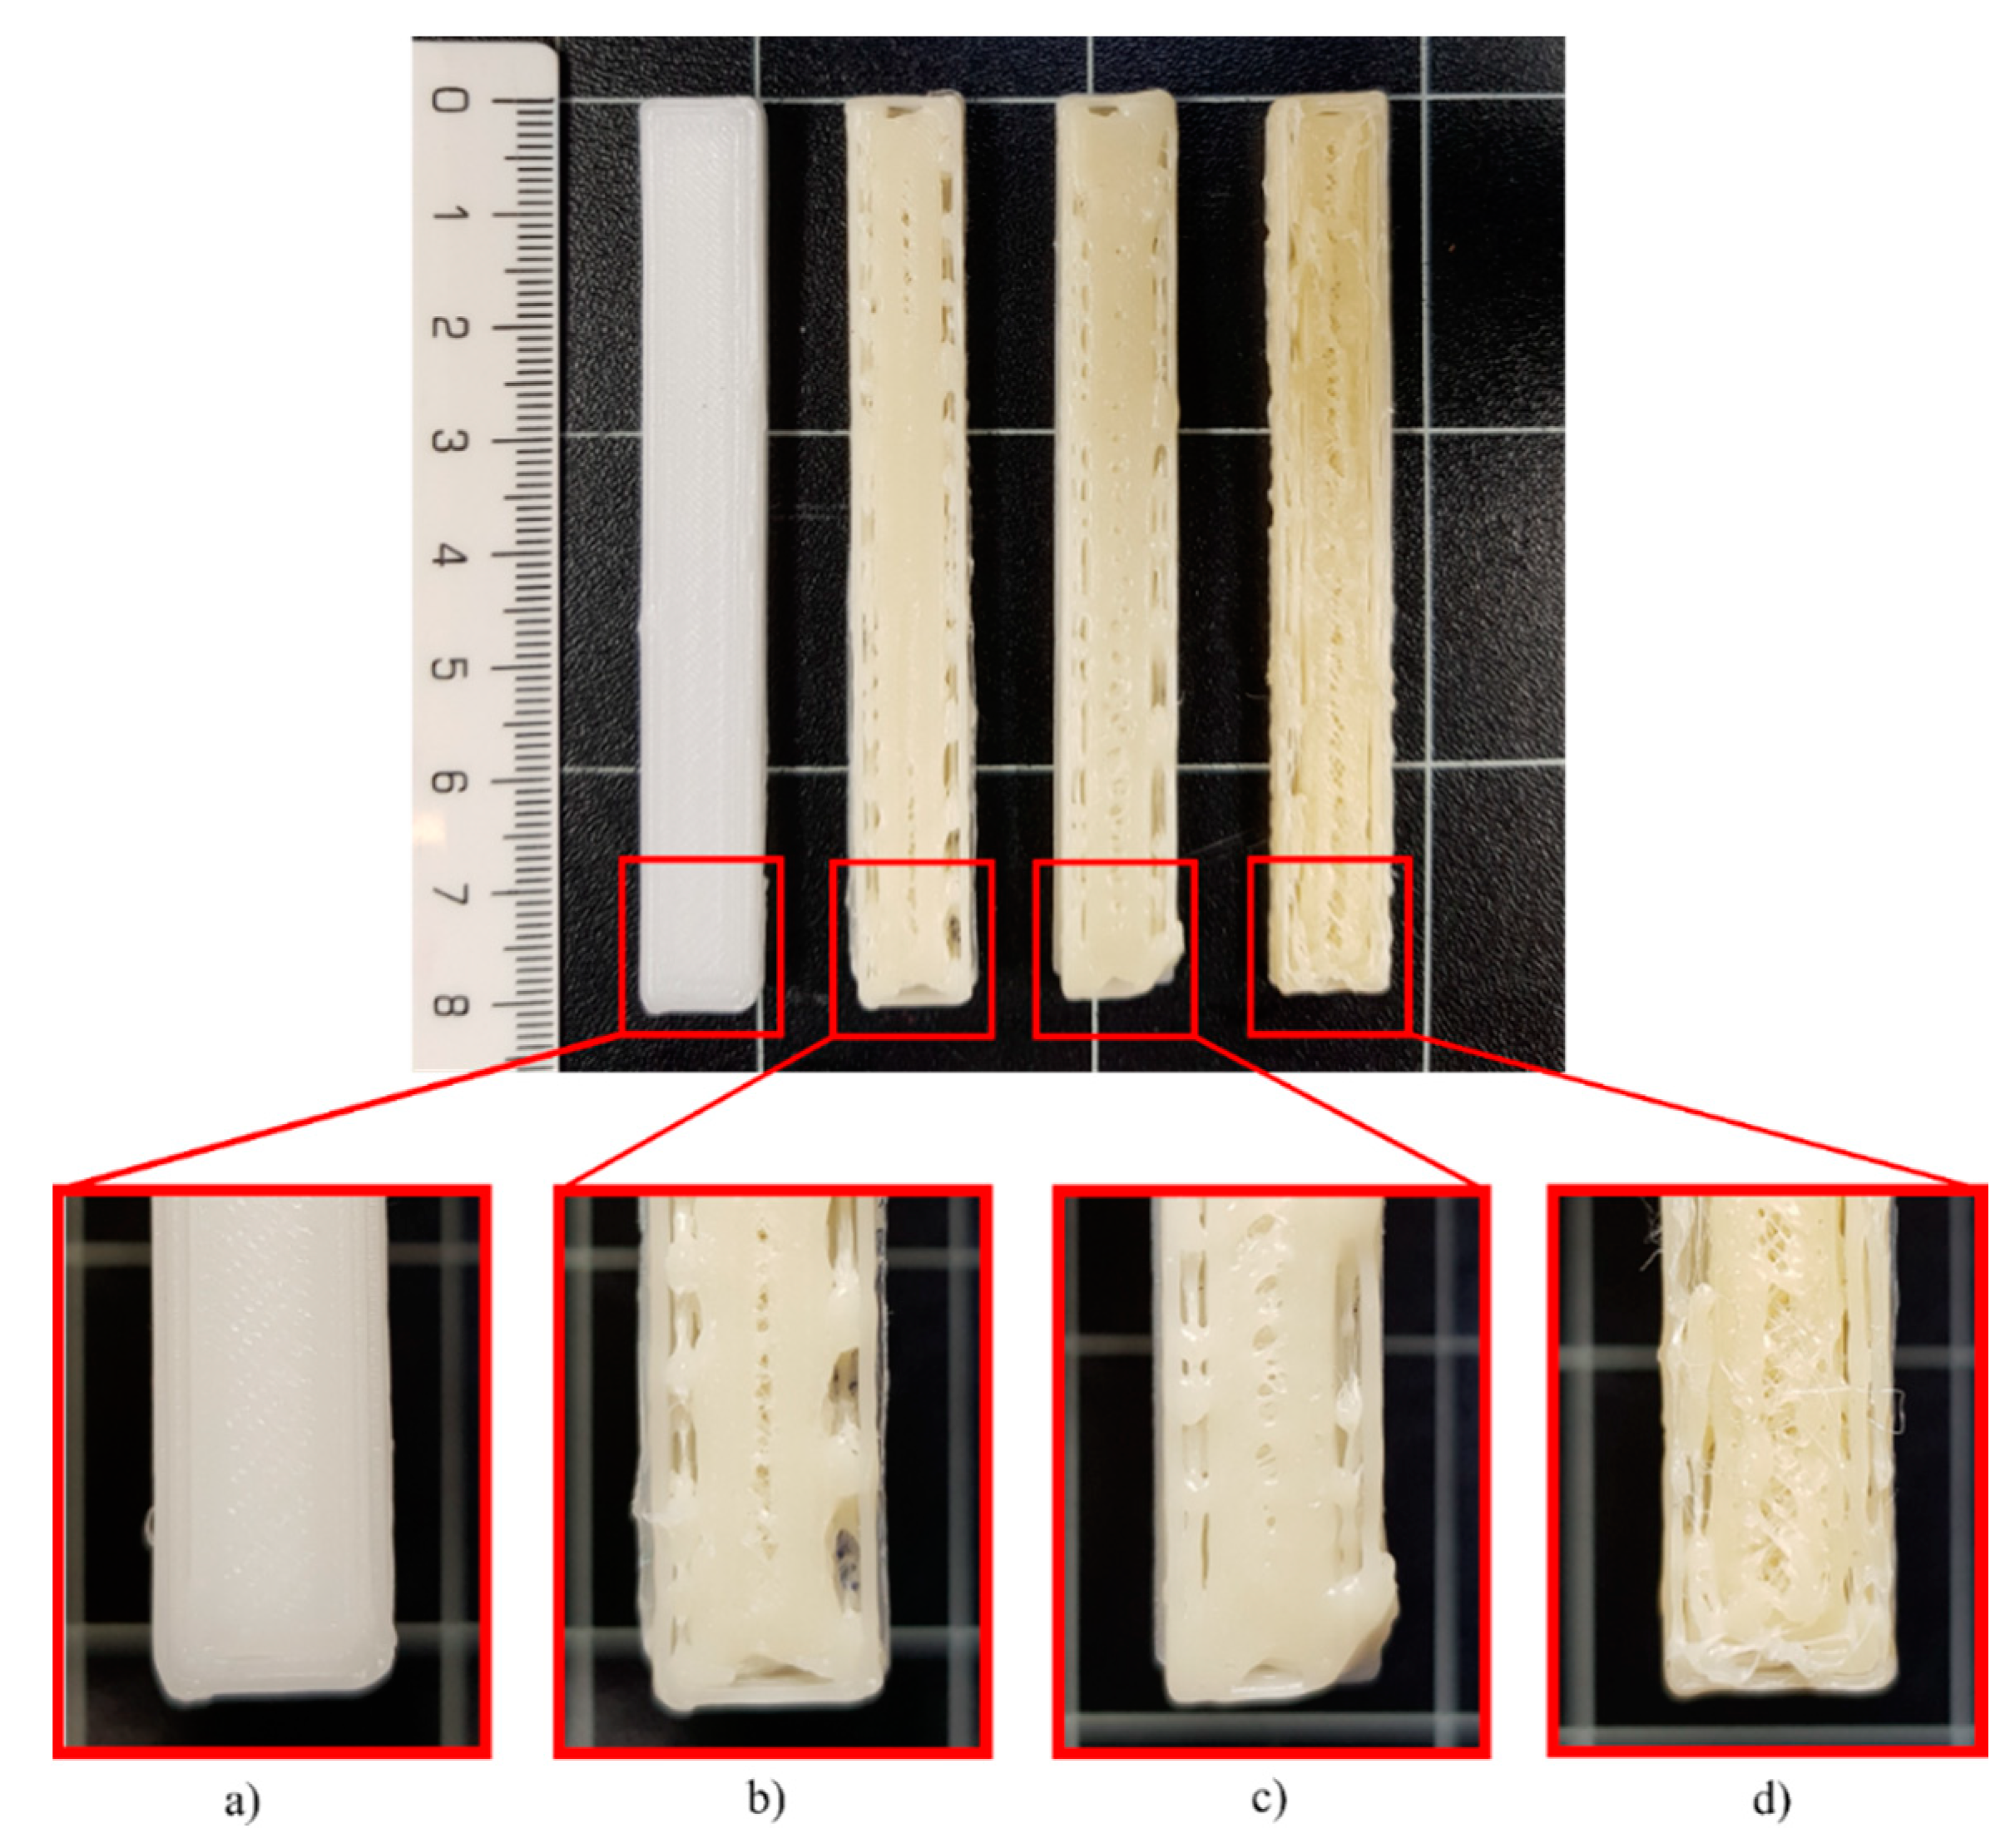
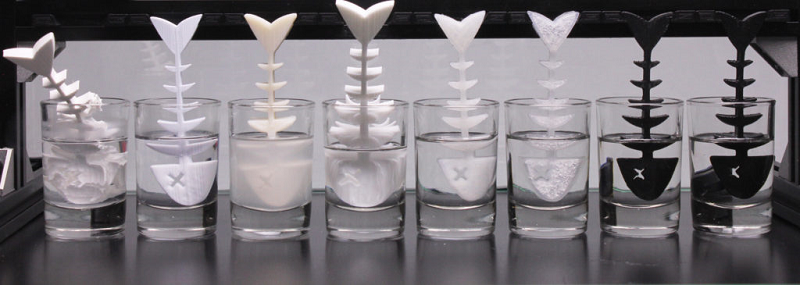
“This experiment was carried out by partially immersing these 3D printed parts in a small volume of organic solvent,” BCN3D wrote. “The corrosive agent chosen was Nitro-P, which is used to dilute paints and is very aggressive. To maximize the damage, the 3D printed parts were immersed in the solvent for a period of 24 hours, and their change in shape and properties was monitored by a timelapse camera followed by a visual and physical evaluation.”

The team wanted to simulate the effect caused on a 3D printed object when a solvent is accidentally splashed on it – quite a common occurrence in workshop and factory environments. The goal was to show users how important it is to choose the right filament for the end application, and risk of chemical exposure, so that the final product is safe and durable. The same print settings were used to fabricate parts with a shape that was designed to “favor the material degradation” out of the following filaments:

  • Polylactic acid (PLA)
  • Polyethylene terephthalate – glycol (PET-G)
  • Acrylonitrile butadiene styrene (ABS)
  • Thermoplastic polyurethane (TPU)
  • Polyamide (PA)
  • Polypropylene (PP)
  • High Temperature Polyamide carbon fiber reinforced (PAHT CF15)
  • Polypropylene glass fiber reinforced (PP GF30)

BCN3D hypothesized that the parts 3D printed out of PP would come out fully intact, while the PLA and ABS parts would be most affected by the solvent and hygroscopic materials (absorbing moisture from the air), like TPU and PA, would likely increase in volume.

So, what ended up happening?

They were right about the PLA and the ABS – the geometry of the 3D printed PLA part was totally, and quickly, changed by the solvent. The layers were separated, which broke the part, and the surface finish dimmed from bright to matte. Additionally, its thickness increased by 60%. The thickness of the ABS was only reduced by 15%, but the layers still separated, making the part viscous where it was submerged. Degradation was constant, causing the ABS to dissolve, and it was the only sample that changed above the level of the liquid: the evaporated solvent caused it to become brighter.
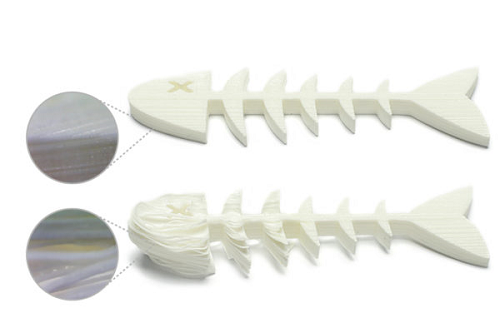
TPU sample

The TPU sample absorbed the solvent quickly, which caused its thickness to increase by a whopping 150%. BCN3D explained that the absorption generated “delaminations in the submerged part of the model as a result of the increase in volume due to the polarity of the solvent and the absorption capacity of TPU,” but once the absorbed solvent evaporated, the part “recovered its original properties,” which led the team to believe the results were “a phenomenon of physical adsorption without dissolution of the polymer.”

The thickness of the PA sample increased by 10%, and the effects of the solvent also caused it to gain flexibility. The PAHT CF15 also increased its flexibility and thickness in the solvent, but there was no dissolution of the material in the solution. This one swelled a little, but held on to its resistance and original shape.

The surface finish of the PET-G sample lost its brightness, though the solvent smoothed and softened its surface. The layers were slightly concealed due to the superficial polishing caused by the solvent, and the thickness and flexibility both increased. But while it lost most of its rigidity and resistance, the part did remain in its general shape.

Neither the PP nor the PP GF30 were terribly affected by the solvent during the test, showing no change in mechanical behavior or variations of either an aesthetic or dimensional sort. The PA did swell a bit, but managed to keep most of its original resistance and shape. The experiment shows that these two materials are ideal for 3D printed industrial applications where parts need to hold up under contact with other corrosive substances.

Discuss this story and other 3D printing topics at 3DPrintBoard.com or share your thoughts below.

The post BCN3D Testes Chemical Resistance of Eight Common 3D Printing Materials appeared first on 3DPrint.com | The Voice of 3D Printing / Additive Manufacturing.

3D Systems Figure 4 Powers Nokia’s Factory in a Box

figure 4 nokia mini factory featuredThe level of productivity that can be unlocked with a 3D printer is limited only by the user’s imagination. 3D printers are incredibly flexible when compared to most manufacturing machines, which is probably why Nokia made the 3D Systems Figure 4 3D printer the heart of their Factory in a Box. Our ideas, our vision […]

New Developments in Light Curing 3D Printing Processes

New Developments in Light CuringDifferent applications require different materials. Dymax works on creating model formulas for rigid, tough, and flexible 3D printing resins that can assist users in all kinds of applications. Specific mechanical properties must be determined in order to mimic those of thermoplastic materials in multiple categories. It is important to determine physical requirements for the specific […]

New Guide: Frozen-Inspired Temperature-Sensing Pendant

Elsa with her Gizmo

The latest tutorial from Erin St. Blaine will teach you how to make a Frozen II inspired pendant for your young maker friend (or for you and your own sweet style) featuring elemental images that change based on the temperature of the air. The TFT Gizmo inside the pendant will display a snowflake when it’s cold, a spinning leaf image when it’s warm, and a lovely purple flame when it’s hot. From the guide:

Discover your inner Snow Queen with this temperature sensing pendant. Invoke the elements of snow, air, and fire using your breath or body heat (or your Ice Queen Superpowers). The pendant will display a snowflake, a spinning leaf, or a lovely purple flame animation depending on the warmth of the air.

Inspired by the elemental spirits in Disney’s Frozen II movie, this pendant will be sure to inspire and excite any Queen Elsa fans, and add an element of magic to your cosplay or halloween costume.

This project uses Adafruit’s TFT Gizmo, a Circuit Playground Bluefruit, and a 3d printed case. There’s no soldering or coding involved — just a few screws to tighten, and a couple files to upload — so it’s a wonderful beginner project if you’re just starting out in the world of electronic cosplay, or if you have a young helper who’s getting interested in making stuff.

Check out the full tutorial on the Adafruit Learning System here: Frozen-Inspired Animated Temperature Sensing Pendant Guide

3D Factory Incubator Successfully Promoting 3D Printing Adoption in First Year

Last year, 3D Factory Incubator, the first high tech business incubator specializing in 3D printing in Europe, celebrated its inauguration in Barcelona. After reporting on a successful first 100 days this summer, we’re happy to say that the initiative has had an excellent first year in operation.

The project, which is led and promoted by technological institute Fundación LEITAT and public self-funded company El Consorci de Zona Franca de Barcelona (CZFB), with financial support from the ERDF via Spain’s Fundación INCYDE, promotes 3D printing adoption by creating a space to incubate related startups, SMEs, and micro-enterprises. The initiative is part of a growing AM hub in Barcelona, and offers marketing services, co-working spaces, and access to a 3D printing lab.

3D Factory Incubator has a target of hosting the 100 best 3D printing-based business ideas in five years, and has been working hard to make this a reality over the last twelve months by encouraging the business take-off of incubated initiatives, by providing multiple services such as business consulting, parts testing, general incubation services, advice on internationalization and marketing, and 3D production technology services.

Its over 600 m2 of space features private offices, meeting rooms, a co-working and training area, and a comprehensive laboratory with eight 3D production units and a post-processing and metrology area. The lab features six different industrial and small-format 3D printing technologies, in addition to multiple design and post-processing equipment, such as a polisher, sandblaster, and systems for metrology and quality control of parts.

Over the past year, the 3DFactory has been encouraging its incubated initiatives to get going in the business world, by offering its more than 500 consulting and training services, marketing activities, parts certification, and post-processing production technologies. In 2019, the incubator hosted over 30 sessions on 3D printing-related topics for each aspect of the AM value chain, in addition to networking sessions, business development, financing and training for startups. 3D Factory Incubator also participated in multiple conferences and seminars that helped provide visibility to the initiative and its incubated projects, like the 4YFN and INDUSTRY From Needs to Solutions conferences.

As mentioned previously, the goal was to reach 100 incubated companies in five years, with 25 in the first year. In just this one year, 3D Factory Incubator has reached over 30, including 3D printing service provider Layertolayer; 3DBide, which provides 3D printing solutions and advice for equipment, development, training, implementation, and investment decision-making regarding new products related to 3D printing; and E4-3D Engineering for Additive Manufacturing, which offers spare parts for multiple vehicle brands.

According to Leitat’s Executive Vice President, Joan Parra, the incubator owes its success this first year to “…finding a need in the sector and being able to offer this emerging talent, through the 3D Factory Incubator, the support needed to boost your business, not only through access to spaces and professional advice, but also through access to the latest technology in 3D printing and post-processing on the market.”

It looks like things aren’t slowing down anytime soon: the production lab for incubated projects recently expanded by acquiring a DLP 3D printer for biocompatible and CE-certified materials. Soon, 3DFactory will likely incorporate a second processing station from HP for work with flexible TPU, in addition to several post-processing systems, such as an air-blasting parts cleaning system, a graffiti machine, and a dyeing machine.

“The forecast was that, in the first year, 20 companies would be installed and the reality is that we already have more than 30. This is a five-year project, but it has a second derivative which is the Dfactory 4.0, an industrial project that we are already building on the industrial estate; by June 2020 it will be a reality,” said Pere Navarro, Special State Delegate from the Consorci de la Zona Franca de Barcelona. He continued, noting that the DFactory 4.0 “will be a 21st century factory, where there will be 3D printing, robotics, the Internet of Things, artificial intelligence and blockchain; that is to say it will welcome the new economy via companies that have already shown interest in occupying these spaces, with the ambition of making Barcelona the European capital of Economy and Industry 4.0.”

Thanks to project promoters Leitat and CZFB spreading the word about the initiative’s success so far, of the over 80 applications received to 3D Factory Incubator, 79% have national headquarters and 21% are international. The organizations are both pleased with the success of 3DFactory’s first year, and many even take the model to other countries, like Colombia.

You can visit the website to see the current call to submit 3D printing-related projects to the initiative.

Discuss this story and other 3D printing topics at 3DPrintBoard.com or share your thoughts in the Facebook comments below.

The post 3D Factory Incubator Successfully Promoting 3D Printing Adoption in First Year appeared first on 3DPrint.com | The Voice of 3D Printing / Additive Manufacturing.

3D Printer review: 100 hours with the Creality CR-10 V2

Creality CR 10 V2

Along with competitors Anet and XYZPrinting, Creality form a trio of manufacturers that dominate the low-cost 3D printing segment. Only a few years ago 3D printers under $500 were rare, but these firms have made them accessible and have sold hundreds of thousands of them.

In this segment, there are often a lot of issues with print quality and printer reliability. The Creality CR 10 v2 is the upgraded version of the very popular CR 10 and retails for around $500. Creality in the past has also had quality issues and even some safety issues with some components and models. The CR 10 was known to in some cases catch fire. Subsequent safety improvements have made Crealitys safer. We would not recommend running these types of machines unattended, however. Whereas Creality machines tend to work well out of the box, low-cost components do mean that after a few months you will need to replace components.

After testing it for over 100 hours of print time, we can conclude that CR-10 V2 is a value-engineered machine with a large build volume that works surprisingly well.

Unboxing and Set Up

Unboxing is easy and there is some assembly required. This process is simple if you follow instructions. You can find a video showing you how this is done. Most people should be able to do the assembly and set up of the printer.

The printer has a separate console for controls. For some this may mean that your printer takes up more space on your desk but it could also make it more accessible because you could place the console closer to you. Physically separating the main electronics and controls from the motors and frame could make the machine safer though, so that’s a positive. The filament is placed on top of this console, this seems a bit weird initially but works ok. When running the printer for a long time this does mean that you can prevent tangling by placing your filament spool at the correct angle. You can also place the spool closer to you so you can easily see if there is tangling or problems with unspooling.

Controls

Controls work through a wheeled button. It is easy to navigate through the menu screens. Do not confuse easy with intuitive, however. Menu structure and operations are far from perfect and can be time-consuming and confusing.

Structure

A nice design element is that it has an extra set of diagonal arms that gives the printer more Z-axis consistency. These arms also make the printer more stable overall and seem to have a handle in improving print quality generally. These arms also help when moving it to a new location. The arms make it much more steady overall and makes it is easy to grasp, move and re-position. Build quality on parts looks better than previous models as does overall attention to details such as cable placement. Machined parts also look like they’re better quality than before.

Operation

The ultra-quiet TMC2208 motherboard does not make the printer that quiet. It is actually annoying if you work in the same place that you print. The printer sounds like an old PC and is much too loud. This is an important point for me and actually made me use the printer less often than I would have liked to.

It has a dual-port hot end cooling fans. This is a refinement over some other clones and seems to improve the surface quality of prints. The printer warms up fast enough. Both the nozzle and the bed preheat quickly enough.

Bed leveling is still a semi-automated process. I did it manually with a piece of paper, but I only had to do it 2 times for a 100 hours of printing.

The resume printing function works extremely well. Several simulated stops and starts worked well and I was able to resume prints without incident. During normal operation, I ran out of filament and was able to replace it easily while print was automatically paused. I also really like doing gradients in colors so I like this feature a lot. It helped me play with gradient colors and gave me more confidence in the machne.

Specs

  • Build Volume 300 X 300 X 400mm
  • Weight11.5 K
  • Movement speed ≤180mm/s, normal 30-60mm/s
  • Positioning Accuracy ±0.1mm
  • Layer thickness 0.1-0.4mm
  • Heated bed temperature  ≤100℃
  • SD slot
  • File format STLOBJAMF
  • Slicing software: CuraRepetier-HostSimplify
  • OS: Mac, Linux, WindowsXPVista7810
  • Power supply AC Input 115V/230V
  • Output: 24V Power rating 350W
  • Auto leveling Optional Extra
  • Filaments: PLA/ABS/PETG/TPU (Would only recommend TPU with the optional Titan Direct Drive unit added).
  • Filament diameter1.75mm

Overall it’s well equipped for the price and especially the build volume is comparatively good.

Results


Test 1 and 2: Not bad! Some light stringing. Cura: Layer hight: 0.2 – Print speed: 60mm/s – No Supports

Test 3: This shape is not possible to get right a 100% because the tube has a 1cm diameter and is very sensitive to vibrations, but I use it as a test for the Z axis. Cura: Layer hight: 0.2 – Print speed: 60mm/s – No infill

Verdict 

Pretty good at details. Cura: Layer hight: 0.2 – Print speed: 40mm/s – No Supports

Higher than initial Creality price points of around $200 or $300, this is still a good value machine at around $500. Build and parts quality is not stellar so I will expect to have to replace parts in the long run. Machined parts and build quality does seem superior to previous models, however. Day to day this printer is adequate for an entry-level user. Operation is not super intuitive but you will get the hang of this machine. It is easy to unbox, set up and organize. An issue that I have with it is that it is surprisingly noisy, also when compared to other similarly priced machines I have. The CR-10 V2 is a value-engineered low-cost machine with a large build volume that works surprisingly well. I was happy with the print results overall and the printer let me customize enough through settings that I could dial in new materials, new colors and optimize prints. The print detail is actually quite good. If you’re willing to take the time to understand the process and variables this could be a good first printer for you.

The post 3D Printer review: 100 hours with the Creality CR-10 V2 appeared first on 3DPrint.com | The Voice of 3D Printing / Additive Manufacturing.

INTERVIEW: AMFG CEO Keyvan Karimi on the importance of connectivity in the AM workflow

Headquartered in London, AMFG provides software that will help move industrial 3D printing to production. Specifically, the company has developed a Manufacturing Execution System (MES) and workflow automation software for additive manufacturing. Keyvan Karimi, CEO and Founder, launched the company in 2014 with the vision of helping manufacturers scale up their additive manufacturing operations.  Speaking […]

TRANSFORM-CE: MMU €9.6 million plans to give plastic ‘a new lease of life’ with 3D printing

Manchester Metropolitan University (MMU) has undertaken a €9.6 million project to transform single-use plastic waste into feedstock for additive manufacturing, as well as intrusion molding – a combination of extrusion and injection molding. Aiming to provide the waste ‘a sustainable lease of life’ and create a drive for recycled plastic materials, the project will use […]

Improving Polymers: 3D Printing Polycaprolactone with Gum Rosin and Beeswax Additives

Researchers from Spain and Ecuador are focused on nature-driven materials for digital fabrication, outlining their findings in the recently published ‘New Materials for 3D-Printing Based on Polycaprolactone with Gum Rosin and Beeswax as Additives.’

Nature is often the inspiration for scientific findings and innovations, and the world of 3D printing is no exception, from the intense study of fish to seashell material to the ever-changing color of the chameleon’s skin, and more. In this study, the researchers experiment with the potential of gum rosin and beeswax as additives, analyzing mechanical, thermal, and structural properties.

Reminding us that polymers are indeed useful in manufacturing and many applications, some do present a hazard to the environment regarding the build-up of waste on the planet. With no desire to add to that problem, the authors sought alternative materials such as biopolymers.

While there are many benefits to avoiding the use of conventional plastics, affordability has typically been an issue, along with finding materials that have suitable mechanical properties. Blends, fillers, and composites are often the key, however, for scientists and innovators when it comes to materials like polycaprolactone (PCL) that require some refining—despite offering benefits such as biocompatibility, biodegradability, and non-toxicity.

The researchers intended to find out whether gum rosin, beeswax, and PCL would offer the ‘synergistic’ effect expounded on by other scientists as it is expected that the mixture not only will support initial benefits of all the materials but also ‘enhance the antimicrobial properties.’ Beeswax has also been known to complement polymers being used in biomedical applications like drug delivery systems. Both GR and BW are known to offer improvements to other materials in terms of adhesion (often an issue in 3D printing), toughness, and behavior of plastic overall.

The researchers used a BCN3D 3D printer with a 0.6 mm diameter nozzle to print samples that could then be compared to standard test specimens. A bed temperature of 40 °C was set for the printing of all materials, but nozzle temperatures varied among the samples, from 90 °C and 150 °C, ‘depending on the easiness of traction of the materials in the printer.’

“These differences aim to achieve and adequate printability,” explained the researchers, noting that just an ‘increment’ in the nozzle temperature could offer increased mechanical strength.

Temperatures of 110 °C for PCL-GR and 150 °C for PCL-BW were chosen as the printing temperatures.

Standard test specimens (STS)surface obtained in the printing test at 80 °C for (a) PCL, (b) PCL-GR, (c) PCL-GR-BW and (d) PCL-BW.


Three-dimensional (3D)-printing parameters and tensile mechanical properties of filaments of neat polycaprolactone (PCL) and the formulations with gum rosin (GR) and beeswax (BW).

Thermal characterization showed ‘good miscibility’ in the PCL matrix, upon examination of GR and BW, with the added note that GR did increase the thermal stability of PCL.

Thermal properties of neat PCL and its formulations with GR and BW.

(a) DSC second heating curve and (b) DSC cooling curve of neat PCL and the formulations with GR and BW.

(a) TGA curves and (b) DTG curves with an expanded area for temperatures between 395 °C and 430 °C for the neat PCL and the formulations with GR and BW.

With GR being used as an additive, the authors noted that the material was then limited to just one phase—while with BW, two phases existed, causing low miscibility and lowered mechanical properties.

“Color measurements showed that the intrinsic coloration of natural additives has a significant effect on the color of the final materials. With respect to wettability, the addition of GR and BW increased the hydrophobic behavior of neat PCL,” said the researchers.

“Finally, it was concluded that the PCL-GR-BW formulation is the most suitable material for a 3D-printing process as it behaves better in the traction mechanism of the printer. Further, it exhibits the thermal and mechanical properties closer to neat PCL.”

What do you think of this news? Let us know your thoughts; join the discussion of this and other 3D printing topics at 3DPrintBoard.com.

Scanning electron microscopy (SEM) images of (a) PCL, (b) PCL-GR, (c) PCL-GR-BW, and (d) PCL-BW, red arrows show holes and discontinuities in the material surface.

[Source / Images: ‘New Materials for 3D-Printing Based on Polycaprolactone with Gum Rosin and Beeswax as Additives’]

The post Improving Polymers: 3D Printing Polycaprolactone with Gum Rosin and Beeswax Additives appeared first on 3DPrint.com | The Voice of 3D Printing / Additive Manufacturing.

The 3 Reasons Your 3D Printed Parts are so Expensive

It’s 2020, and additive manufacturing has finally emerged as a mature technology for production in a growing number of sectors. In the last decade, it made a full run of the technological Hype Cycle but has finally arrived at the Plateau of Productivity.

Pankl Racing Systems showcases a replicable custom fixturing system with Formlabs technology

Despite recent technical progress, many industrial 3D printing programs are still not making the financial returns that business owners expect. Often one of the biggest reasons is under-utilization: groups simply not using additive capital equipment often enough to justify the expense. Under-utilization can be caused by a lack of applications or technological inadequacy, but usually it’s the symptom of a much deeper problem that leaders need to address: a severe lack of design for additive manufacturing (DFAM) skills within their engineering organization. When designers and engineers don’t know how or when to design for additive, they create bad, expensive parts or just avoid using it altogether.

Here are three ways that bad DFAM is holding up the profitability of many additive manufacturing programs:

1. Additive processes are still misunderstood.

While 3D printing OEMs race to make the fastest, most efficient industrial additive equipment, the excitement for advancement is not reciprocated by most engineering groups. 3D printing technology can keep getting better and better, but if users don’t familiarize themselves with the basics of additive processes, part designs will never be truly optimized for 3D printing.

All the CAD skills in the world can’t substitute for understanding additive constraints and benefits.

For example, both DLP and FDM 3D printing gets faster and better materials ever year. But neither technology will ever overcome the need for support material. By redesigning this military vehicle equipment bin (below) with the goal of eliminating support material, Blueprint engineers produced it for 33% of the cost of the original design. The design is no better or worse in performance, but it is much faster to produce due to some simple knowledge of DFAM.

Designing with knowledge of self-supporting structures is just one of the ways that build time and material consumption can be reduced on many technologies including DLP, FDM, DMLS, stereolithography, etc.

What should you do? How do you know if your group needs upskilling? You’ll start to see low machine ROIs, frequent failed prints, and difficulty removing support material or excess powder. It’s also to hear frequent complaints of the inadequacy of the technology, which while sometimes valid can also point to a limit of users’ knowledge or skills. These symptoms are demoralizing and are bad for business… but fortunately they’re caused by a very solvable problem. There are good guidebooks and DFAM courses that teach the technical side of additive manufacturing. But nothing can replace trial and error with the equipment and proactively developing your internal additive language.

2. Additive design software is lacking in usability.

The birthplace of organic, geometrically complex designs was the world of digital art: concept design, video game design, and illustrations. The software used to make these designs have absolutely nothing in common with the engineering CAD packages engineers use to make parts manufacturable. Additive manufacturing introduces a new paradigm of design, one that introduces manufacturability to optimal, organic designs that break the mold of traditional manufacturing design processes.

A new generation design software is needed to make value-optimized designs, like this topology-optimized brake caliper by Bugatti.

To fill this gap, a host of software companies have risen to the challenge of designing geometrically organic manufacturable parts. Below are a couple examples of these offerings and some of their current limitations.

  • Autodesk Generative Design is a simple tool that generates geometry connect anchor features in an organic way. Today it still doesn’t yield a 100% manufacturable design, and the outputs require either tweaking or a full redesign based on the generated result.
  • Materialise 3-Matic offers a variety of DFAM modules from part lightweighting to digital texturing. Procedures can be convoluted and because it outputs mesh files manufacturability and file integrity are still concerns.
  • nTop by nTopology is a promising new software that combines the organic shapes of generative design with well-understood geometric patterns. It’s a fairly new software that has yet to pass through the test of widespread adoption.

What should you do? Additive users are between a rock and a hard place. They’re forced to choose between spending expensive engineering time on powerful, yet new software and under-designed parts that are material-intensive or prone to failure. The bottom line? Expensive. But user organizations must embrace the fact that no design software is perfect yet and focus their energy on discerning the type and depth of software needed to create value. Future-ready engineering organizations should engage subject matter experts to assess whether investment in additive-specific design tools is on the critical path to success.

3. Additive is too often an afterthought

Unless additive is brought in at the very beginnings of a product’s lifecycle, it will simply not yield much value. An organization must do more than try to implement additive at a few stages in product development. Its people must “think additively”, considering and applying this new manufacturing methodology across the organization. Without embedding additive thinking from the beginning of a project with the support of all departments, the necessary CAD data, requirements analysis, or design resources won’t be available, resulting in failure and wasted effort.

What should you do? Start to Think Additively by considering additive before every step in the product development process.

Think Additively for Prototyping – In all stages of product development, designers should embrace the “agile” nature of additive manufacturing, assuming every part will need to be printed twice – once for testing and once for use. Additive manufacturing is the right technology for the old innovation adage: “Fail fast, and fail often”

Think Additively for Fixturing and Tooling – When it comes to fixturing and tooling, additive manufacturing is often disregarded as too expensive or too weak. Adding bushings to for strength or reducing material around the cradle geometry are ways to improve the design for performance and economics.

Think Additively for Production – There are two things that must drive design for production AM parts: the firm requirements (including surface quality, mechanical loads, and economics) and the goal (reduce weight, reduce cost, improve function). Designers should throw out the traditional manufacturing assumptions and start from the ground up with these two considerations.

3D printing requires a new thought process and the cooperation of multiple departments

Overcoming these three barriers to good design are crucial to creating an efficient, profitable additive operation.

Why? Because while traditional methods of manufacturing tie designers’ hands with manufacturability constraints, the flexibility of additive manufacturing frees the designer in an unprecedented way. And while 3D printing shifts control from the manufacturing process to the engineer, it also puts inadequate designs painfully on display through waste, whether it’s wasted time, material, or iterations. Waste and expense ultimately eclipse the expected business benefit of this disruptive technology.

This is why DFAM skills are so important to realizing intended business benefits.

David Busacker is a Senior Engineering Consultant for Blueprint. He is an experienced additive manufacturing designer and has developed multiple additive manufacturing design courses.

Blueprint is an additive manufacturing consultancy, bringing together more than 16 years of knowledge and experience across the industry. As the world’s leading additive manufacturing consultancy, Blueprint regularly assists future-ready companies achieve additive success. Based in Eden Prairie, Minn., and Milford, U.K, the firm offers a unique, technology-agnostic perspective on all things additive, from strategic advice to design optimization services. More information is available online at www.additiveblueprint.com.

The post The 3 Reasons Your 3D Printed Parts are so Expensive appeared first on 3DPrint.com | The Voice of 3D Printing / Additive Manufacturing.