I’m a huge proponent of clustered manufacturing. I believe that for many manufacturing parts clusters of FDM printers are the most economical solution for tough durable parts. Especially for parts larger than around five centimeters, FDM is the option that would work best. If a wide variety of materials is needed then FDM would also be at a distinct advantage. Large FDM systems would also be an alternative if reliability is your main concern and material variety was less important. Open systems don’t lock you into a vendor and let you have the lowest cost and widest choice of materials also. But there is still a wide gap to bridge between the current generation desktop printers and manufacturing millions of parts at scale. Surprisingly little work has been done on automating prints in 3D print clusters. Generally, there hasn’t also been much truly innovative work done lately. 3DQue does have a new approach to automating 3D printing clusters. The Canadian startup 3D prints sideways and sells software and clusters that aim to lower costs and automate manufacturing. We interviewed CEO Stephanie Sharp to learn more about the company.
What is 3DQue?
3DQue is a technology company producing automated digital manufacturing systems for in-house, on-demand mass production of plastic parts. Traditional 3D printing is high-touch, limiting its scalability. Whenever a person gets directly involved in the print process — part removal, printer reset, job scheduling, and batch layout — lead times increase and unit costs skyrocket. This limits the application of in-house 3D printing to very low volume applications such as prototyping and emergency parts. Alternatives such as outsourcing to regions with low labour costs increase lead times, reduce cost savings, and increase complexity associated with outsourcing, global shipping, and bulk inventory handling and storage.
We build technology that addresses the frequently overlooked cost-traps of 3D printing. Our QPoD is a multi-printer unit that runs autonomously, eliminating the need for scheduling, batch layout, part removal, and printer reset.
3DQue technology allows companies to take control of production.

How did you get started?
Mateo was an avid 3D printer hobbyist running his own print lab for himself and some friends. Word quickly spread and he was overwhelmed with so many orders, he could not keep up. The manual tasks (removing parts, loading files, etc) were too time consuming and there was a lot of downtime as printers sat idle between prints waiting for Mateo to be at home and have the time to remove parts and restart the next print. He was determined to remove the manual tasks so that he could manage the printing remotely and print continuously without having to be physically present.
After extensive research and trial and error, he came up with the technology (a combination of hardware and software) where he was able to vary the adhesion of the print bed, allowing for high adhesion during printing and automatic release of the print without any need for scraping or preparing the print surface. He then flipped the printer on its side, so that the part would fall off cleanly, allowing the printer to start the next job right away.
After using the technology himself for a few years and conducting extensive research to refine the technology, Mateo decided to offer his technology to the marketplace and enlisted the help of his mentor (and later co-founder), Steph, to lead the business operations and sales.
Why should I work with you?
For print lab operators:
-
Reduce manual tasks by 60% – eliminate need for batch layout, scheduling, part removal, and printer reset. Focus time on increasing quality of parts.
-
Have ability to produce hundreds of functional prototypes without disrupting R&D production.
-
Have ability to produce emergency parts without sacrificing a batch – simply allocate production of emergency part to a printer.
For production engineers
-
Take control of production of jigs & fixtures by printing in-house.
-
Reduce lead time by producing jigs & fixtures on-demand.
-
Reduce lead time by eliminating lengthy process of creating tooling for injection moulding.
-
Reduce inventory from tens of thousands of dollars to a few hundred with just-in-time inventory at same unit cost as injection molding.
There are a number of advantages:
Scalability
Each QPoD comes with a built-in 9-printer network driven by QSuite software. This frees operators from batch production and offers users the ability to scale production by adding additional QPoDs. With 3DQue’s unique MaaS (manufacturing as a service model), users only pay for the hours that they use the printer and are able to buy “bundles” of hours (like cell phones) at a reduced rate, offering cost scalability.
Digital Manufacturing
With networked 3D Printers, there is no incremental cost to switching production from one part to another.
Essentially, any printer on the network can produce any part at any time, enabling just-in-time manufacturing for many parts in parallel, eliminating the cost, complexity and handling associated with batch production.
This in turn eliminates the need for overstock, reducing surplus inventory, and simplifying inventory management, as parts are only produced as needed.
Space Savings
By eliminating the need for tooling and having production capabilities handled by a limited number of machines, QPoD is able to produce thousands of unique parts in a very compact space (100,000 small parts/yr in 12 sqft).
Shorten the Supply Chain
Orders for any plastic part can be produced on demand on-site, essentially moving the entire supply chain into the warehouse, reducing complicated logistics, bulk shipping and inventory management.
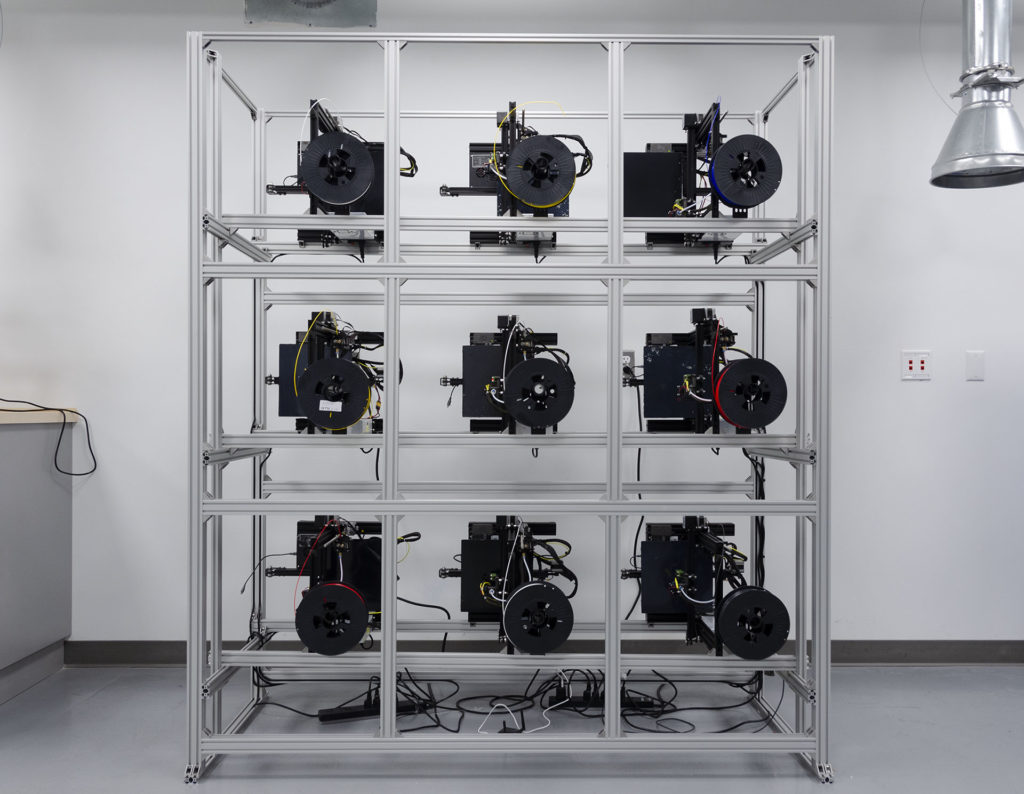
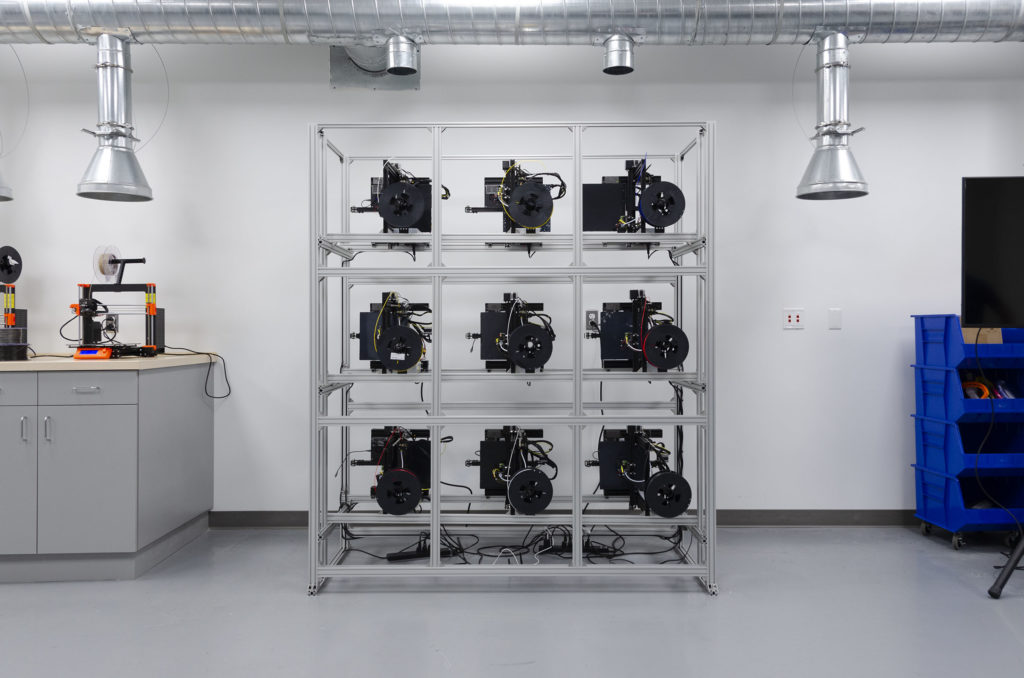
How does it work?
The core tech rests on our VAAPR + Lock System (Variable Adhesion, Automated Part Release + Lock). This technology, driven by QSuite software, varies part adhesion so that prints stay in place during printing and are automatically released once the part is complete.
One of the first things many notice with 3DQue printers is that they are positioned sideways; prints are built outwards from a vertical the print bed rather than the traditional bottom-up approach. Once parts are done, the VAAPR + Lock is released, and gravity takes over causing the parts to drop out of the print area into a bin, conveyor, or dissolvable support tank and the printer is clear to start the next print. The VAAPR lock technology works without consumables such as tapes, glues, or other adhesives, eliminating the need to clear the print bed between prints.
QSuite is the software that runs the printer network. It serves as a central point for interacting with the printers and handles things such as printer monitoring, job delegation, job scheduling, and remote control. Users are able to submit their print jobs to a central queue in QSuite, and jobs will automatically be dispatched to available printers with the necessary configuration, connected to the network.
What kind of customers are you looking for?
We are looking for manufacturers interested in reducing lead times and inventory of plastic parts by having the ability to mass produce plastic parts on-demand and in-house:
-
COO – automation of 3D printing is the future of plastics manufacturing. It reduces inventory up to 90%, reduces lead times from months to hours, increases sustainability scores by moving manufacturing in-house and on-demand, and produces parts at a unit cost that is comparable to your current costs for mid-volume injection molded parts.
-
Production engineers – reduce cost and lead times for production of jigs and fixtures.
-
Mechanical engineers & print lab operators looking to:
-
scale their current network of 3D printer;
-
eliminate lead times from days to hours;
-
increase throughput capacity (9 separate print surfaces in a single unit);
-
reduce costs 40-60% for rapid prototyping;
-
have the capacity to easily produce hundreds or thousands of functional prototypes; and
-
spend more time on high value tasks such as print optimization by eliminating tedious manual tasks (e.g. scheduling printers, designing batch layouts, part removal, and printer reset).
-
Manufacturers who want to reduce lead time, inventory, and costs associated with plastic parts. For example, companies requiring electronics enclosures for sensors and other components, for example alarms, monitoring systems, etc.
-
Filament manufacturers looking for hardware optimized to handle high volumes of their proprietary materials and automated part production to simplify the collection of hundreds or thousands of data points for developing new material formulations.
Do you save me money?
Yes. Field testing with a variety of end-users indicates that QPoD produces 3D prints at 30 – 50% less than traditional 3D printing and resulting in costs that are competitive with injection moulding in quantities ranging from 10,000-100,000 parts/yr.
|
QPoD
|
Traditional 3D Printer
|
|
Hardware + Labour
|
$1.12/APH*
|
$2.25 – 4.70/print-hour
|
|
Manual scheduling
|
none
|
yes
|
|
Batch layout
|
none
|
yes
|
*APH = Autonomous Print Hours ($0.79 with pre-purchase of APH)
Why sideways? And like everything works still then?
By printing sideways, the VAAPR + Lock mechanism takes advantage of gravity to clear parts from the print area. This means that we don’t have to introduce any additional moving parts eliminating potential points of failure.
The adhesion provided by VAAPR Lock is strong enough to support parts that fill the entire print surface area. The prints themselves are largely unaffected by printing sideways; for the vast majority of parts, the difference is impossible to tell. In some cases it can even be helpful as overhangs and bridges are no longer competing against gravity.
Whats a QPoD? What can it make? At what cost and yield? And how much does one cost?
QPod is a network of 9 printers that can make the same plastic parts as any other FDM-style 3D printer – plastic jigs, fixtures, electronic enclosures, etc.
Yield: 100,000 small parts/ year
Installation Cost: $45,000 ($0.12/APH over 5 years)
Production Cost: $1.12/APH (or $0.79 with pre-purchase of APH bundles)
With what materials does it work?
Everything we have tested to date works with the VAAPR + Lock System: PLA, ABS, TPU, PETG, Nylon, PVA and testing for more materials is on-going.
How has it been designed?
QSuite and VAAPR Lock have been designed been designed with agility in mind. The manufacturing industry is entering a period of unprecedented change and the ability to quickly adapt will become a key competitive advantage.
As 3D printing moves production from batch to continuous production, inventory from bulk to just-in-time, and supply chains from outsourcing to inhouse. In 2019 the range of functional materials available for 3D printing more than doubled. The most competitive organizations will be the ones with the agility to take advantage of this rapid change. Recognizing this, we have designed the system for maximum flexibility ensuring that our clients will be able to quickly and easily adapt to market changes.
QPoD’s open architecture allows it to be easily customized to suit customer needs. Configuration options include dry boxes, dual extrusion, larger filament reels, etc.
Is it made in house?
Yes, the printers are all built at our facility in Vancouver, Canada.
Using the best components to meet the client’s needs, we assemble and test each printing unit and frame prior to shipping. Our product team then installs, calibrates and tests the equipment onsite to ensure it is functioning up to client expectations.
And do I need the QSuite?
Yes. QSuite runs the VAAPR Lock System and provides the operator-free functionality. It drives the fundamental job scheduling and delegation for printers on the network.
Can I use one without the other?
If you are a printer OEM, you can license the QSuite system and build it into your hardware.
What do you hope to achieve?
We want to see the world move towards a more sustainable, efficient and innovative form of manufacturing.
Imagine how much CO2 is created by shipping billions of tons of plastic parts around the world and then having to store them in bulk warehouses, handling the product multiple times, consuming energy for vehicles and forklifts, light, heat, humidity, and air conditioning. Imagine how much waste is produced by ordering thousands of parts to get a low unit cost and throwing out half due to obsolescence or simply lack of demand.
Now imagine in addition to reducing your environmental footprint, how much money, time and materials you would save by producing just the parts you need, where you need them (in your warehouse or production facility), when you need them.
Finally, imagine much you could reduce lead time and accelerate innovation by eliminating the following steps:
-
Design for Manufacturing (DfM – the process of redesigning parts to make them suitable for manufacturing)
-
Mould design and production
-
Tooling setup and clean up
-
Bulk shipping, handling, and warehousing
These steps can add 6, 12 or even 18 months to the part production process. By the time parts are made, the world has changed and the order is obsolete, sending companies back to the drawing board. With QPoD, part design can literally be changed during production – from one part to the next.
For what customers are you making this? What applications?
Mitsubishi Chemical Performance Polymers (MCPP) is using it in their R&D lab for new materials development.
The University of Illinois, Gies College of Business for their print lab. They are the only business school in the world to offer their students hands-on experience with this new production method.
We are also working with a global plastic parts supplier to create a smart factory to transfer mid-volume injection molding operations to an on-demand 3D printing process.
Because of the open architecture type of design for our QPoD, it is easily customizable and able to be used in a variety of applications from materials testing, to mass production of parts. This is great for materials testing as it accelerates the testing process by removing the need for batch processing and reducing downtime as the printers no longer sit idle waiting for operators to be available for part removal and printer reset. This can be applied to a variety of industries.
The post Stephanie Sharp of 3DQue on Automated Manufacturing With FDM Clusters appeared first on 3DPrint.com | The Voice of 3D Printing / Additive Manufacturing.