Early Bird Deadline For Trends & Innovations in Dentistry Is Tomorrow, September 1

There’s still time to save on Trends & Innovations in Dentistry, our three-day online event starting September 25. If you sign up by tomorrow, September 1, you’ll receive 23 percent savings.


Sign up for Trends & Innovations in Dentistry with an early bird discount through tomorrow, September 1


Learn the latest dentistry innovations in this conference-style online event with live guest speaker sessions, product demos and audience Q&A sessions, plus ongoing discussions broken out into various industry categories.

Speakers include industry thought leaders, like Samuel Wainwright, Dental Product Manager at Formlabs.

Samuel Wainwright, Dental Product Manager at Formlabs and class speaker

Check out the full speaker roster here.

All sessions are recorded and archived so you can watch any time. When you sign up at our early bird rate, you’ll also get immediate access to archival video recordings from related courses so you can start learning right away!

Want to learn about how 3D printing is making an impact across industries? You can also sign up for our other fall classes, 3D Printing in Metal and 3D Printing with Polymers, starting September 18 and October 16, respectively.

Researchers Improve SLA Printing With Cross-Linking Method

SLA prints are oftentimes quite weak in comparison to various other additive manufacturing methods. This perception of weakness has often help them back from having applications in industrial environments. The mechanical properties of SLA prints can, however, be improved with certain methods, as a new study proves. Researchers at China’s Zhejiang University have shown that cross-linking can […]

The post Researchers Improve SLA Printing With Cross-Linking Method appeared first on 3D Printing.

BEEVERYCREATIVE to launch B2X300 3D printer kit – technical specifications and pricing

Portuguese desktop 3D printer provider BEEVERYCREATIVE is to launch a new B2X300 DIY kit at the 2018 TCT Show in the UK. This new FFF/FDM 3D printer kit has been designed based on quantitative and qualitative feedback from customers of the helloBEEprusa kit, released 2015, and studies conducted by the BEEVERYCREATIVE team over the past 3 years. A […]

An Endurance 10 & 10 watt laser+ attachment for 3D printers and CNC machines

SPONSORED BY ENDURANCE LASERS I am sure that many of you have never ever thought that you can use your 3D printer as a laser cutter as powerful as a CO2 engraving machine and as efficient as a fiber laser machine. The thing is that powerful diode lasers appeared on the market not long ago. […]

Ultimate YouTube Live Camera from the Adafruit Learning System #piday #raspberrypi @Raspberry_Pi

NewImage

Use a Raspberry Pi to stream directly to Youtube Live with the touch of a button! From the Adafruit Learning System:

As a YouTuber, I’m always looking for ways to streamline different tasks. Live streaming is definitely something that has the opportunity to be a LOT simpler. It would be nice if you just had a camera that you can take with you, turn on, and live stream. So that will be the primary goal of this project: to make a dedicated camera for live streaming to YouTube.

My idea is to make a video camera using a Raspberry Pi 3, 2.8″ LCD Touchscreen, and the Pi Camera as the basic platform. We’ll also need a small USB microphone to record audio, and some type of rechargeable battery to power it all. Then I’m going to 3D print a custom case shaped like the YouTube logo to power it all.

More of a visual learner? Then feel free to watch my four part video series on making this project from start to finish! View the successes and pitfalls as I go step by step through the entire project.

Check out the full guide!


3055 06Each Friday is PiDay here at Adafruit! Be sure to check out our posts, tutorials and new Raspberry Pi related products. Adafruit has the largest and best selection of Raspberry Pi accessories and all the code & tutorials to get you up and running in no time!

Researchers Use Cross-Linking Strategy to Improve SLA 3D Printing, Focus on Polyurethane-Acrylate

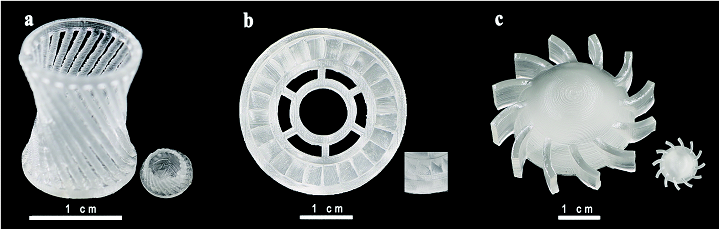
Optical images of SLA 3D printed complex-shaped parts. (a) Hollow glass; (b) gear wheel and (c) the spiral piece.

Stereolithography, also referred to as SLA and SL, was the first 3D printing method invented, and while for a long time it was only considered to be a prototyping solution, we’re long past those days. This versatile technology can produce accurate, high-resolution parts with smooth surfaces, diverse build sizes, consistent properties throughout, and can also access a wide range of material properties. All of these features explain why SLA is so often used now for applications in tooling and patterns, such as injection molding, investment casting, and thermoforming.

A group of researchers from Zhejiang University in China recently published a paper, titled “A cross-linking strategy with moderated pre-polymerization of resin for stereolithography,” with the Royal Society of Chemistry. The study explains how the team worked to improve stereolithography, by providing parts, 3D printed with SLA technology, with better mechanical properties.

The abstract reads, “Here, we demonstrate a cross-linking strategy used in the coating field to attain long chains for resin pre-polymerization to obtain final resin parts which can expand the application of SLA. Isophorone diisocyanate (IPDI), 2-hydroxyethyl methacrylate (HEMA) and polyethylene glycol (PEG)-based prepolymer have long chains, making it easier for them to form dense structures. However, the prepolymer has high viscosity and can solidify in the absence of a laser. Thus, three kinds of adjuvants were added to dilute the prepolymer to make the slurry suitable for 3D-printing. Slurries were cured with different laser powers and scanning speeds. Diluents are found to affect the curing properties differently. With the diluent 2-hydroxyethyl acrylate added into the prepolymer, shrinkage of printed parts is lower than 1.3%. With the diluent ethylene glycol monophenyl ether, the density range of printed parts is between 1.187 g cm−3 and 1.195 g cm−3, which is higher than that of commercial PVC and PET. The three resins vary in density and hardness within a small range when the scanning speeds change. A relatively flat surface, high density and hardness can be obtained when the laser power is at 195.5–350 mW. Resin with this cross-linking strategy can expand the underutilized stereolithography’s application from prototyping to actual parts by producing more functional components with excellent performance.”

The slurry synthesis and stereolithography process of the whole process.

The researchers explained that SLA is not often used for final parts production, which is why there’s “a need to continuously improve existing processes and materials.” They aimed to do so with a cross-linking strategy popular in coating technology.

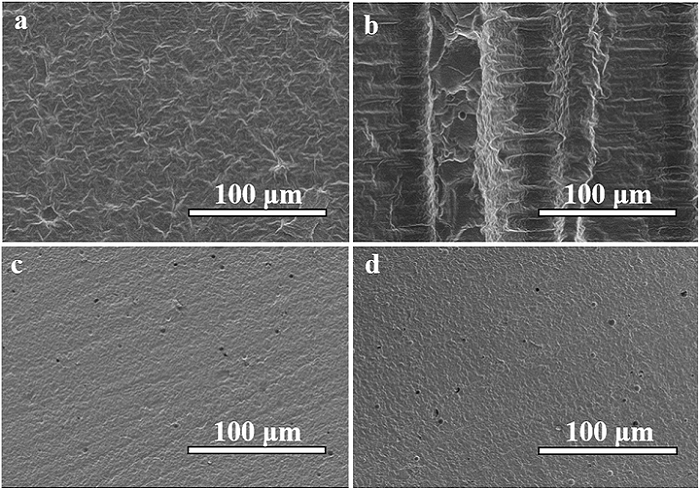
SEM images of an unpolished resin sample (type 3, 1000 mW, 100 mm s−1). (a) The front surface of the resin sample; (b) and (c) the side surface of the resin sample.

“In the fabrication of polymer coating, one of the strategies is to allow isocyanates to react with hydroxyl compounds to get radiation curable coating slurries,” the researchers explained. “The polyurethane resin, made of, e.g., IPDI, has excellent higher surface energy, photo-stability and chemical resistance and it is commonly used in paints, coatings, printing stamps and adhesion agents. HEMA is one of poly-acrylate derivates among acrylate-based resin, and acrylate-based monomers are used widely because of their low cytotoxicity and high heat resistance, while acrylate-based resin is prone to have a slower curing rate. Multifunctional monomers are applied to introduce more crosslinking sites, accelerate the curing rate and enhance the mechanical properties of the cured resin.”

They used HEMA, IDPI, and PEG to make the pre-polymer, and added diluents agents to modify the resin’s viscosity, because the pre-polymerization slurry was too sticky to use for SLA.

The researchers explained, “Viscosity is an important parameter to ensure good quality of SLA-printed parts. When the scarper forms a new layer, it is necessary to wait until the resin surface becomes completely flat in order to have accurate thickness control. Low-viscosity slurries are usually preferred as they allow better resin flow to replenish each layer during printing and also make handling easy (refilling and cleaning the resin tank more convenient).”

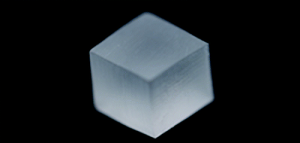
Photograph of a cubic resin sample with a size of 10 mm × 10 mm × 10 mm

After adjusting the software to match the slurries’ viscosity, the team 3D printed several 10 x 10 x 10 mm sample squares. After adjusting the laser power and scanner speed as well, they discovered that the three kinds of slurry had different typing ranges.

The researchers were able to show that that the crosslinking strategy of polyurethane-acrylate polymer could be applied for pre-polymerization in the resin slurry’s 3D printing synthesis. They also demonstrated that resin characteristics can be tailored for use in different applications by using variations of diluents.

“With 2-hydroxyethyl acrylate as diluents, the slurry can be used in high precision manufacturing, and the shrinkage of final parts is smaller than 1.3%. With ethylene glycol monophenyl ether as diluents, the density of final parts is larger than that of PVC and PET, which is comparable to the density of PC. The individual samples are uniform in the interior, and the front and side after polishing have similar surface quality and hardness. The laser scans with low power and high speed resulting in incomplete curing, while low speed and high power may cause over-polymerization,” the researchers concluded. “Together, our results provide important technique information for exploring polymer-based stereolithography in manufacturing of more complex functional parts.”

Co-authors of the paper include Rongping NiBin QianChang LiuXiaofeng Liu, and Jianrong Qiu.

Discuss this research and other 3D printing topics at 3DPrintBoard.com or share your thoughts below. 

Consolidation in medical 3D printing market, K2M acquired by Stryker in $1.4 billion deal

Virginia medical device manufacturer K2M is to be acquired by Michigan headquartered FORTUNE 500 medical technology firm Stryker (NYSE:SYK). Both companies apply 3D printing technology to the production of spinal implants. In the terms of the acquisition, K2M is to become a wholly owned subsidiary of Stryker at the aquisition price of $27.50 per share, generating a […]

Sphere holder #3DPrinting #3DThursday

5d6b74b674e643f522ed68ef83053a1f preview featured

larkinj shared this project on Thingiverse!

Holder for spheres. Basic design is for a sphere 110 mm in diameter, but easily scaled to other sizes. In the photos the clear sphere is with an unmodified 110mm version. The crystal sphere is 70 mm in diameter.
Seems to print fine without any support.

See more!


649-1
Every Thursday is #3dthursday here at Adafruit! The DIY 3D printing community has passion and dedication for making solid objects from digital models. Recently, we have noticed electronics projects integrated with 3D printed enclosures, brackets, and sculptures, so each Thursday we celebrate and highlight these bold pioneers!

Have you considered building a 3D project around an Arduino or other microcontroller? How about printing a bracket to mount your Raspberry Pi to the back of your HD monitor? And don’t forget the countless LED projects that are possible when you are modeling your projects in 3D!

9V Battery Pack #3DThursday #3DPrinting

1378b9a97d18c8ad5958925aa412f203 preview featured

Shared by andrewytiger on Thingiverse:

This a simple 9V battery pack/connector that allows you to power other projects or devices. It is particularly useful for powering Arduino’s or small circuits which require a 9V DC current. This print requires no glue to assemble. Just press the male ends of two jumper wires into their slots and slide in a battery, Then slide on the clip as shown in the pictures. Never buy a 9V connector again.

Features

  • Holds the battery securely against the leads for a reliable connection.
  • To disconnect the battery from the circuit, simply slide the battery up. This disengages it from the leads, while still keeping it in place.
  • No glue required for assembly.

Note: Toleranced for a finely tuned Anet A8. If tolerances are too tight or too loose, try scaling the model by 0.5 – 1%.

Download the files and learn more


649-1
Every Thursday is #3dthursday here at Adafruit! The DIY 3D printing community has passion and dedication for making solid objects from digital models. Recently, we have noticed electronics projects integrated with 3D printed enclosures, brackets, and sculptures, so each Thursday we celebrate and highlight these bold pioneers!

Have you considered building a 3D project around an Arduino or other microcontroller? How about printing a bracket to mount your Raspberry Pi to the back of your HD monitor? And don’t forget the countless LED projects that are possible when you are modeling your projects in 3D!

The Adafruit Learning System has dozens of great tools to get you well on your way to creating incredible works of engineering, interactive art, and design with your 3D printer! If you’ve made a cool project that combines 3D printing and electronics, be sure to let us know, and we’ll feature it here!

Giraffe Toy #3DThursday #3DPrinting

3030e92c4179ec51c55ab83c1612964a preview featured

Shared by makerboz on Thingiverse:

Remixed from the wonderful Alpaca to make for more zoo type animals.

Download the files and learn more


649-1
Every Thursday is #3dthursday here at Adafruit! The DIY 3D printing community has passion and dedication for making solid objects from digital models. Recently, we have noticed electronics projects integrated with 3D printed enclosures, brackets, and sculptures, so each Thursday we celebrate and highlight these bold pioneers!

Have you considered building a 3D project around an Arduino or other microcontroller? How about printing a bracket to mount your Raspberry Pi to the back of your HD monitor? And don’t forget the countless LED projects that are possible when you are modeling your projects in 3D!

The Adafruit Learning System has dozens of great tools to get you well on your way to creating incredible works of engineering, interactive art, and design with your 3D printer! If you’ve made a cool project that combines 3D printing and electronics, be sure to let us know, and we’ll feature it here!