Mount all the things with this system from HeyVey on Thingiverse:
The modules can be used with GoPro compatible equipment. The bolts and nuts included in the design are standard M5. It’s hightly recommended to use metal bolts and nuts for the arm. There is also a printable version if anyone is interested to try out.
Articulated camera arm fastens down to a 2×4, and allows you to position your camera in “infinite” positions. Nominally cut with a laser cutter and 3D-printed. Could also be made manually, or with just a laser cutter or 3D printer by itself… Though using a printer would take a looonng time.
I love this simple 3D printed mirror adapter that clips onto your laptop and feeds the image of a document placed beneath it into your camera. Perfect timing for remote back-to-school teaching.
We #celebratephotography here at Adafruit every Saturday. From photographers of all levels to projects you have made or those that inspire you to make, we’re on it! Got a tip? Well, send it in!
If you’re interested in making your own project and need some gear, we’ve got you covered. Be sure to check out our Raspberry Pi accessories and our DIY cameras.
They say a picture is worth a thousand words, and as someone who takes a lot of photos (on my phone), I definitely agree. But that doesn’t mean your camera needs to cost $1,000, right? Enter Dora Goodman, who makes beautiful handcrafted, open source 3D printed cameras.
“Only you know exactly how you like your own camera, that peculiar way you hold it, or the shape that fits best into your hands,” the website states. “On top of our unique, hand-crafted camera straps that we revamped to be more durable than ever before, we offer something revolutionary: a free, open-source file that you can customize to your heart’s content, and 3D print your own camera.”
Together with Goodman Lab, a community of innovative design and photography enthusiasts, Goodman is part of a movement that is dedicated to making high quality, 3D printable open source projects…like film cameras. The Goodman Lab projects are available through the website to any interested person with access to a 3D printer and a creative spirit. Even better, the 3D printed cameras don’t seem terribly expensive.
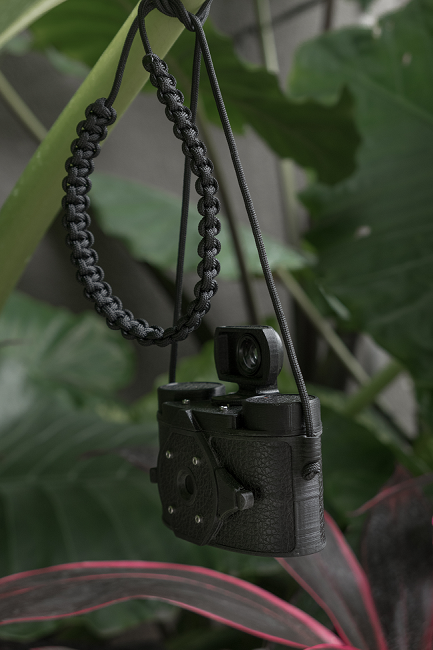
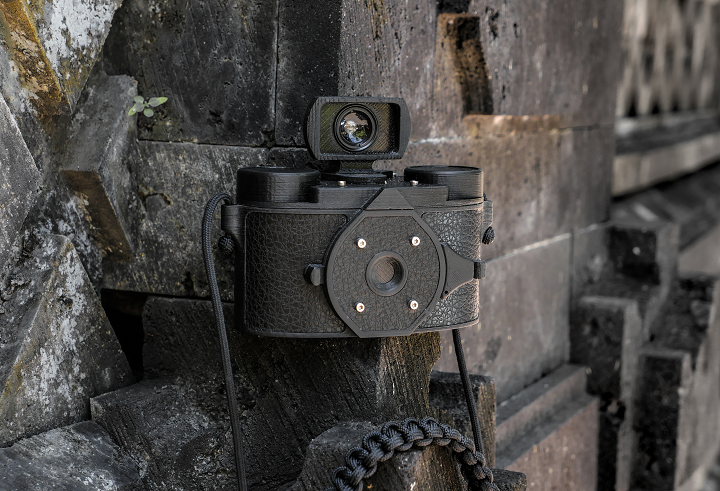
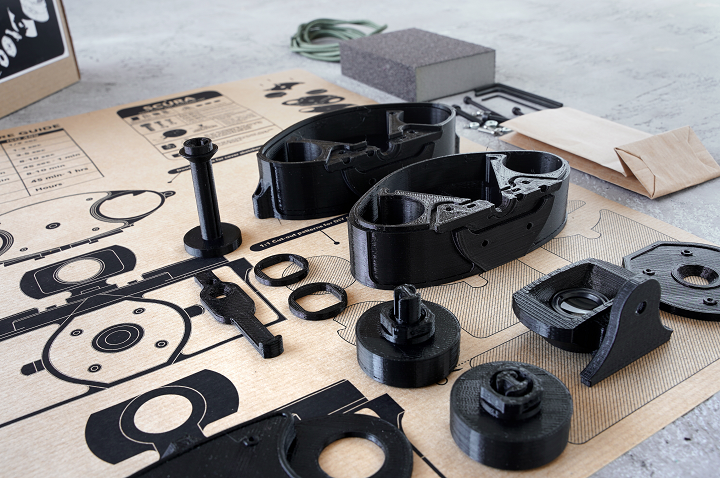
Now, Goodman is introducing her newest exciting 3D printable masterpiece. SCURA, which she tells us is a “love project” of hers, is a 35 mm panoramic pinhole camera that shoots 60 x 25 images.
SCURA
“The system is the same as always, we offer the files free of charge for anyone, all of them are open source,” Goodman told 3DPrint.com.
With most pinhole cameras, 3D printed or otherwise, the film lies completely flat inside, which gives the photographs a distorted edge. But the SCURA isn’t most pinhole cameras – it features a special curved design, which allows light to reach all of the film evenly for distortion-free images. The framing was also increased to give the camera a panoramic field of view. Additionally, the most important part of a pinhole camera is the hole, and Goodman “put a lot of effort into finding the technology for the perfect, precisely drilled hole.”
“When working on this camera, we have focused on combining the design and functionality of 3D printing, resulting in a minimalist approach to pinhole photography,” the website states. “Along the laser-drilled pinhole and the curved design, we have managed to achieve a distortion-free, yet amazing picture quality.”
Goodman offers users precise but smooth exposure control with a magnetic shutter, and the SCURA is convenient, as pinhole cameras have only a few simple moving parts. It’s also easy to use, which makes it a good choice for beginner and professional photographers, and because it’s an open source design, the camera is available for anyone to make.
The SCURA is customizable with a self-adhesive stock skin, which comes with the kit, or you can use Goodman’s cut-out sheets and tutorial videos to personalize the camera with your own ideas.
“I always encourage everyone to print their own pinhole camera, to challenge themselves and share their results with us, all our projects are inspired by the different approaches of our community,” Goodman writes.
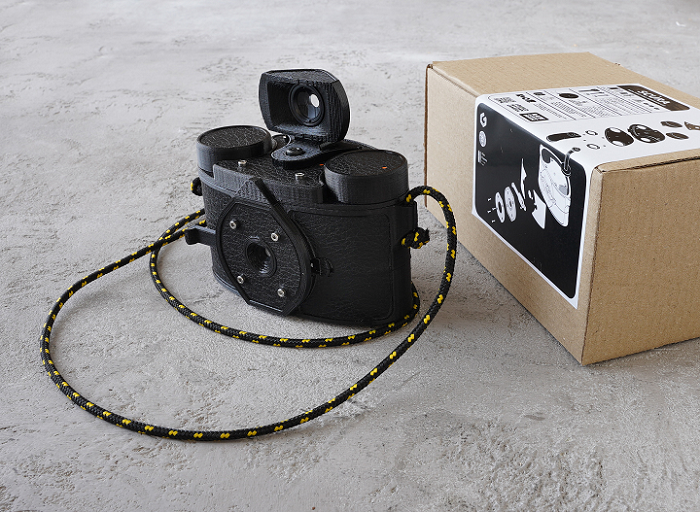
There are two options to get your own SCURA, and the first is to 3D print your own by signing in on the website to gain free access to all of the camera plans and design files. The accessible open source package includes all of the documentation you need to build the SCURA from scratch, which Goodman notes is a “fun and easy” project. But, while the available online guides make assembly fairly straightforward, the process was “designed to be an intriguing journey on the way.”
If you are 3D printing the SCURA yourself, but need the drilled 0.3 mm pinhole plate, shutter magnets, and the screws and key sets for assembly, you can purchase a hardware kit for just $38, which includes an Allen key set, socket head Allen screws, and a male female thread adapter.
But, if you don’t have easy access to a 3D printer, you can also purchase the DIY kit for the SCURA, which includes all of the elements, equipment, and tools you’ll need without having to purchase additional parts. Every part of the pinhole camera in the kit is pre-printed, and you also get the tools, screws, and hardware to assemble and post-process the camera.
The basic kit also includes:
1 laser drilled pinhole plate
1 set of faux-leather decor foil
1 sanding sponge
1 strap cord
zero waste wrapping paper with cut-out samples
There are some additional add-ons you can purchase with the basic $78 DIY kit, such as a viewfinder for $23, a $35 pre-cut wood inlay, and a pro flash mount with bubble level and smartphone holder, also for $35. You can see the exposure information, dimensions, and additional specs for the SCURA on the website, and check out the tutorial video for help building this lightweight yet powerful camera.
Even with all of the optional extras, the SCURA kit costs less than $200, which is a pretty good deal for this attractive, customizable panoramic pinhole camera.
Discuss this story and other 3D printing topics at 3DPrintBoard.com or share your thoughts in the Facebook comments below.
We #celebratephotography here at Adafruit every Saturday. From photographers of all levels to projects you have made or those that inspire you to make, we’re on it! Got a tip? Well, send it in!
If you’re interested in making your own project and need some gear, we’ve got you covered. Be sure to check out our Raspberry Pi accessories and our DIY cameras.
The snout is a loose fit around the 5× widefield microscope eyepiece, with the difference made up in a wrap of black tape; it’s much easier to adjust the fit upward than to bore out the snout. An overwrap of tape secures the snout to the eyepiece, which I’ve dedicated to the cause; the scope normally rocks 10× widefield glass.
The tapered hole exposes the phone’s fingerprint reader to simplify unlocking, should it shut down while I’m fiddling with something else.
The microscope doesn’t fully illuminate the camera’s entrance pupil at minimum zoom, with 4.5× filling the screen and (mostly) eliminating the vignette. The corner blocks have oversize holes to allow aligning the camera lens axis over the microscope optical axis. The solid model incorporates Lessons Learned from the version you see here, because you (well, I) can’t measure the camera axis with respect to the outside dimensions accurately enough.
Great project (and fantastically perfect/unnerving build inspiration) from Little_french_kev on Hackster.io:
The camera moves using two servos driven by an Arduino Uno. The camera is plugged to a computer where a software tries to find faces in the images received from the camera.
We #celebratephotography here at Adafruit every Saturday. From photographers of all levels to projects you have made or those that inspire you to make, we’re on it! Got a tip? Well, send it in!
If you’re interested in making your own project and need some gear, we’ve got you covered. Be sure to check out our Raspberry Pi accessories and our DIY cameras.
My Dear Makers,
I embarked on an ambitious project last month: the creation of a homemade hand-cranked motion picture camera from scratch. I also endeavored to develop the film myself using household chemicals and further to reverse the film negative so that it could be projected and viewed!
We #celebratephotography here at Adafruit every Saturday. From photographers of all levels to projects you have made or those that inspire you to make, we’re on it! Got a tip? Well, send it in!
If you’re interested in making your own project and need some gear, we’ve got you covered. Be sure to check out our Raspberry Pi accessories and our DIY cameras.
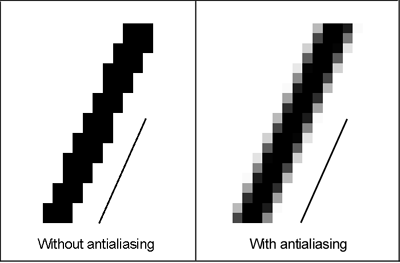
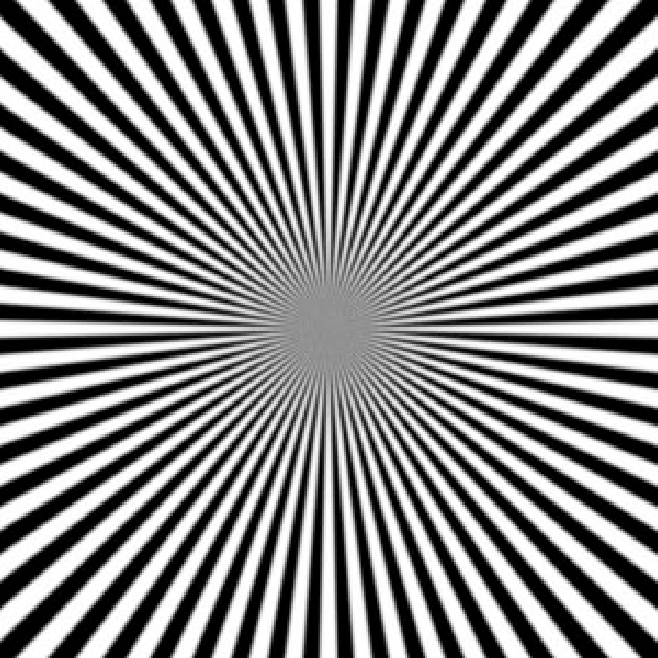
We have done a good amount of learning within this series. With each new project and research oriented article, more knowledge is unraveled. We will be taking a look at antialiasing today as it was something that caught my attention in a previous article. It affects the accuracy of images as a whole, and we know the importance of precision in metrology.
Antialiasing is a technique used to add greater realism to a digital image by smoothing jagged edges on curved lines and diagonals. This is a computer graphics technique that allows for sharper resolutions for a photo based on precise geometry. Some of the “imperfections” of an image may be distorted or destroyed due to this. I am certain that in order to do processing such as photogrammetry and image stitching, a computer would need exact geometries that can be added together to form a 3D image. This causes the 3D image to have less precision overall in terms of actual dimensions.
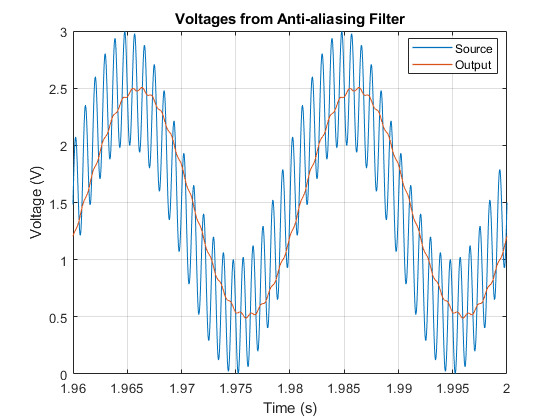
An antialias filter refers to any filter that is used before a signal output, which in this case is our digital image. This filter is able to restrict the bandwidth of a signal. If we recall, we have talked about limiting signals before within this series in terms of filters (thresholding). We have defined this similarly as a low pass filter. A low pass filter does not allow for an image to pass through a specific energy level. This is what allows for filtering or cleaning of an image.
The goal of antialiasing is to correct images. When certain defects are present, information cannot be correctly read by a device. Antialiasing is particularly useful when a picture is rasterized and has jagged appearance due to rasterization. Converting from an analog signal or image in the real world to a digital image causes distortion. This distortion needs to be filtered out, and antialiasing is one method that does such.
There are more forms of antialiasing as well. The main forms include the following:
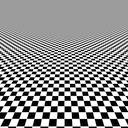
In digital signal processing, spatial antialiasing is a technique for minimizing the distortion artifacts known as aliasing when representing a high-resolution image at a lower resolution. Why would we want to do this? When thinking in terms of the 3D world, spatial antialiasing is vital. Most of our images taken in the real world if done properly will be high resolution. In order to stitch together high resolution, one needs a large amount of storage for the data that would be stitched. In order to do this in a more effective way, it is better to convert the image data into lower resolution images and then stitch them. This requires less intensive data and storage. We can then convert the lower resolution image stitch later into higher resolution 3D models after spatial antialiasing methods are used.
Temporal Sample Anti-aliasing (TSAA) seeks to reduce or remove the effects of temporal aliasing. Temporal aliasing is caused by the sampling rate (i.e. number of frames per second) of a scene being too low compared to the transformation speed of objects inside of the scene; this causes objects to appear to jump or appear at a location instead of giving the impression of smoothly moving towards them. To avoid aliasing artifacts altogether, the sampling rate of a scene must be at least twice as high as the fastest moving object. The shutter behavior of the sampling system (typically a camera) strongly influences aliasing, as the overall shape of the exposure over time determines the band-limiting of the system before sampling, an important factor in aliasing. A temporal anti-aliasing filter can be applied to a camera to achieve better band-limiting. A common example of this can be seen when seeing a car wheel move backwards while we see it in video
There is still more to unpack knowledge wise. The rabbit hole continues to open up. There are different forms of antialiasing methods within the two sections provided today as well. I will be addressing some of these things within the next article. Hopefully I will show these things off too with code.